はじめに
本記事では、C#アプリケーション内でPythonスクリプトを実行できるIronPython3の開発事例をご紹介します。スクリプティングAPIの実装やダイアログAPIの実装など、実践的なノウハウを共有いたします。
IronPython3はシンプルな構成であるため、特に難しい点はないと考え、導入を進めました。しかし、実際に使用してみると、見慣れない例外が発生する という問題に直面しました。本記事では、その解決方法を共有いたします。
さらに、付録としてAvaloniaを用いたGUIフレームワークの実装例 もご紹介します(本サンプルGUIはAvaloniaによって実現しています)。特に、WPFからAvaloniaへ移行する際、多くの方が疑問に思う「Triggerがない場合、どのように対応すればよいのか?」についても解説いたします。
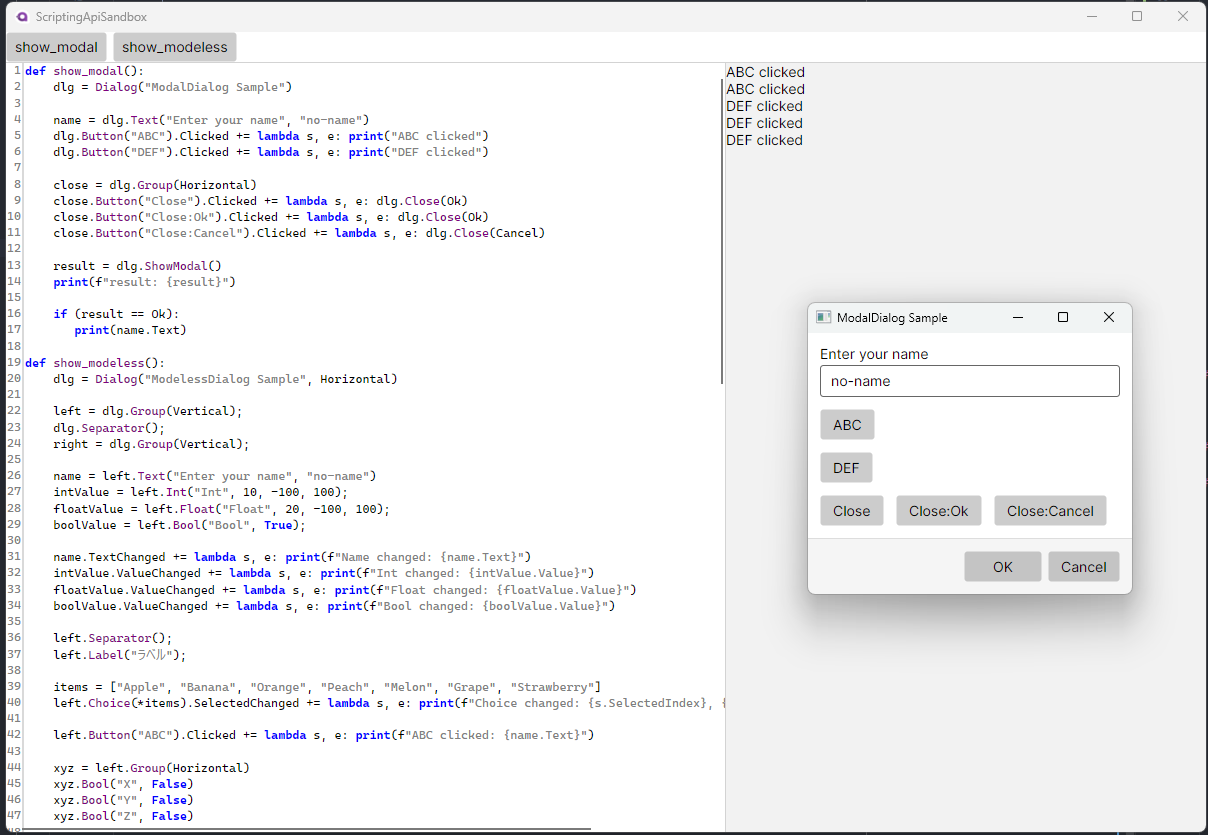
実際に動作する成果はこちらです。
YoshihiroIto/ScriptingApiSandbox

>git clone https://github.com/YoshihiroIto/ScriptingApiSandbox.git
>cd ScriptingApiSandbox
>dotnet run --project=ScriptingApiSandbox
Error calling function: unknown encoding: codepage___0
IronPython3を組み込んだコンソールアプリケーション(CUI)を作成し、動作確認を行ったところ、特に問題なく実行できました。しかし、これをGUIに組み込んで実行すると、次のエラーが発生しました。
Error calling function: unknown encoding: codepage___0
CUIでは問題がなく、GUIでは発生するという状況から、標準入出力の扱いが原因であると仮説を立てました。そこで、公式ドキュメントを調査しました。
📄 IronPython 3の公式ドキュメント
ドキュメントには「IronPython 2から標準出力の扱いが変更された」と記載されていたため、指示に従い修正を試みましたが、問題は解決しませんでした。
解決策
GUIアプリでは、標準出力に出力された内容を手元で保持し、適切な形で表示するのが望ましいです。そこで、C#側で標準出力をトラップする ことでそもそもの問題を回避する方法を採用しました。
具体的には、以下のような対策を行いました。
- C#側で出力を処理する関数を用意する
- スクリプトの初期化時に、IronPythonの標準出力をこの関数に置き換える
この方法により、エラーを回避しつつ、スクリプトの出力をGUIアプリ内で適切に扱うことができるようになりました。
public void InvokeStandardOutput(string output)
{
    StandardOutput?.Invoke(this, new StandardOutputEventArgs(output));
}

private ScriptScope CreateScope()
{
    var scope = _pythonEngine.CreateScope();
    scope.SetVariable("__custom_print__", new Action<string>(InvokeStandardOutput));

    try
    {
        _pythonEngine.Execute("""
                              import sys

                              class CustomOutput:
                                  def write(self, text):
                                      if text and text.strip():
                                          __custom_print__(text)
                                  def flush(self):
                                      pass

                              sys.stdout = CustomOutput()
                              sys.stderr = CustomOutput()
                              """,
            scope);
    }
    catch (Exception ex)
    {
        Console.WriteLine($"初期化エラー: {ex.Message}");
    }

    return scope;
}
[付録]ダイアログAPIの設計
GUIフレームワークで実現可能なイメージを持ちつつ、まずは仮のスクリプトを書きました。
スクリプトを書く人は、おそらく以下のような形で記述したいはずです。
当然、この時点ではスクリプトを実行するC#プログラムは存在しません。
スクリプトの記述を先に行い、その後、スクリプトの実行環境をC#で実装していきます。
今回ぐらいであれば、これで十分です。
ダイアログでうっとりUIを作れる感じは出す必要なしです。
def show_modal():
    dlg = Dialog("ModalDialog Sample")

    name = dlg.Text("Enter your name", "no-name")
    dlg.Button("ABC").Clicked += lambda s, e: print("ABC clicked")
    dlg.Button("DEF").Clicked += lambda s, e: print("DEF clicked")

    close = dlg.Group(Horizontal)
    close.Button("Close").Clicked += lambda s, e: dlg.Close(DialogResult.Ok)
    close.Button("Close:Ok").Clicked += lambda s, e: dlg.Close(DialogResult.Ok)
    close.Button("Close:Cancel").Clicked += lambda s, e: dlg.Close(DialogResult.Cancel)

    result = dlg.ShowModal()
    print(f"result: {result}")

    if (result == Ok):
       print(name.Text)
[付録][Avalonia]DataContextの値で切り替える方法
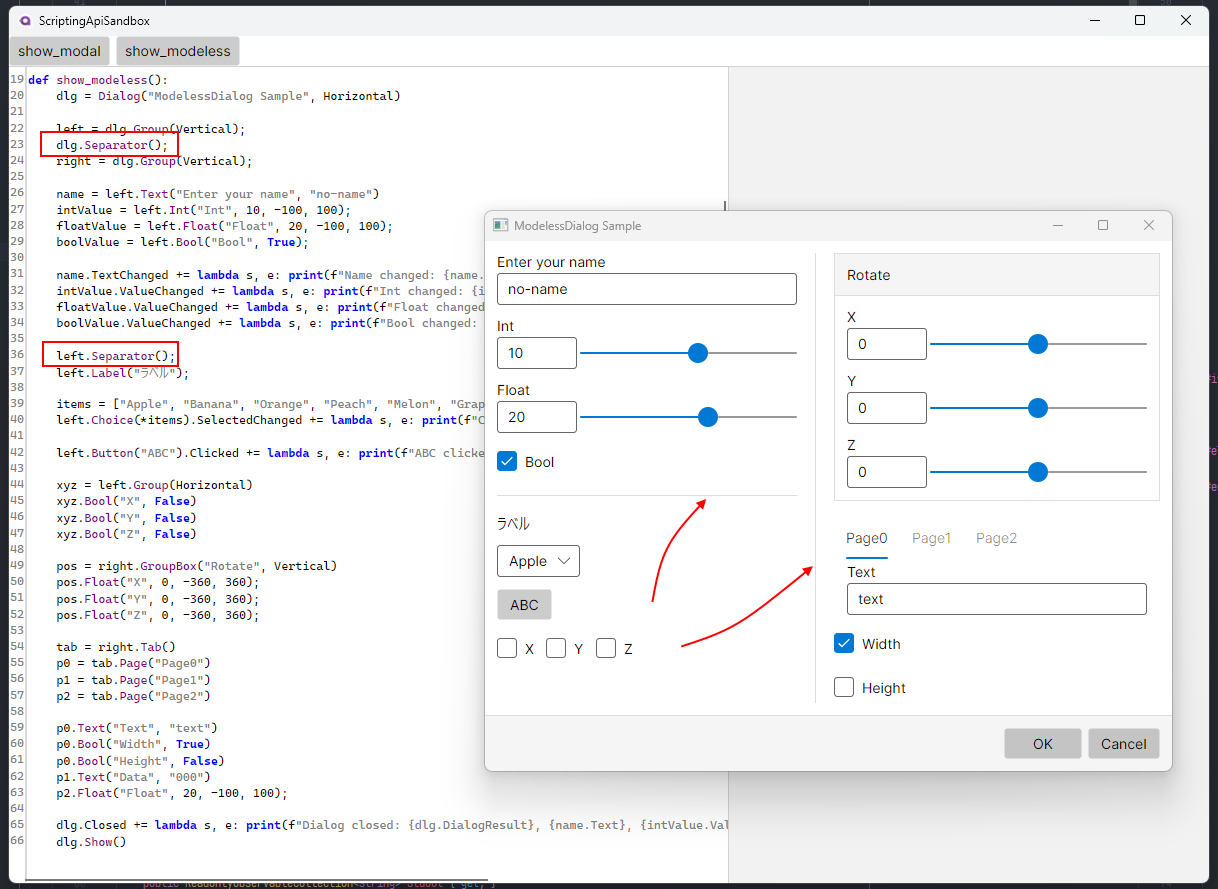
サンプルの show_modeless関数には2つのSeparator関数が呼ばれています。
実行すると、方向を明示していないにも関わらず、縦線と横線が正しく描画されています。
この動作を XAMLで宣言的に解決 します。
WPFに少し知見があれば、Style.Trigger に DataTrigger を指定し、 親のコントロールから向きを判断して適切なプロパティを設定する方法を考えるでしょう。
しかしAvaloniaにはTriggerが存在しません。
どうしましょう。
実装方法
Avaloniaには強力なStyle選択の仕組みが備わっています。
Style Selector Syntax - Avalonia
プロパティーによる選択をStyle.Selectorで指定します。
<DataTemplate DataType="element:DialogSeparatorImpl">
    <Rectangle Fill="#DDD"
               IsEnabled="{Binding IsEnabled}"
               Tag="{Binding Orientation}">
        <Rectangle.Styles>
            <Style Selector="Rectangle[Tag=Vertical]">
                <Setter Property="Height" Value="1" />
                <Setter Property="HorizontalAlignment" Value="Stretch" />
                <Setter Property="Margin" Value="0,6" />
            </Style>

            <Style Selector="Rectangle[Tag=Horizontal]">
                <Setter Property="Width" Value="1" />
                <Setter Property="VerticalAlignment" Value="Stretch" />
                <Setter Property="Margin" Value="6,0" />
            </Style>
        </Rectangle.Styles>
    </Rectangle>
</DataTemplate>
