NetApp Trident 24.06で AWS BottlerocketでNFS volumeの利用がサポートされました。
AWS Bottlerocket はコンテナに最適化された安全なワーカーノードとして利用でき、必要なパッケージのみを導入することでセキュリティ向上や、リソース使用率を改善して管理オーバーヘッドを削減するなどのメリットがあるかと思います。
そのBottlerocketをワーカーノードとして利用するEKSの環境下でのストレージプラットフォームとしてFSx for NetApp ONTAPを利用できるようになったとのことなので、とりあえず実際に試してみました。せっかくなのでその手順を紹介したいと思います。
前提
以下の環境で試しています。
- Amazon EKS 1.30
- eksctl 0.194.0
- Trident 24.06
やってみること
Bottlerocketをワーカーノードとして利用するEKSクラスターとFSx for NetApp ONTAPを展開して、PodからNFS volumeを利用できることを確認してみる。
- Bottlerocketをワーカーノードとして利用するEKSクラスターを展開
- FSx for NetApp ONTAPを展開
- VPC Peering 設定
- Tridentを導入・構成
- PVC/PV(NFS)を作成してPodから利用してみる
- 環境削除
※ AWSCLIは導入・設定済みの前提としています
1. Bottlerocketをワーカーノードとして利用するEKSクラスターを展開
最初にeksctlを利用してEKSクラスターを展開します。
1-1 eksctl導入
eksctlを導入します。
eksctlのInstallationページを参考にしています。
$ # eksctlを導入
$ ARCH=amd64
$ PLATFORM=$(uname -s)_$ARCH
$ curl -sLO "https://github.com/eksctl-io/eksctl/releases/latest/download/eksctl_$PLATFORM.tar.gz"
$ curl -sL "https://github.com/eksctl-io/eksctl/releases/latest/download/eksctl_checksums.txt" | grep $PLATFORM | sha256sum --check
eksctl_Linux_amd64.tar.gz: OK
$ tar -xzf eksctl_$PLATFORM.tar.gz -C /tmp && rm eksctl_$PLATFORM.tar.gz
rm: remove regular file 'eksctl_Linux_amd64.tar.gz'? yes
$ sudo mv /tmp/eksctl /usr/local/bin
$ eksctl version
0.194.0
$
1-2 EKSクラスター展開
Bottlerocketをワーカーノードとして利用するEKSクラスターを展開します。
こちらのページを参考にしています。
$ # EKSクラスター展開用のYAMLファイル作成
$ cat >bottlerocket.yaml <<EOF
---
apiVersion: eksctl.io/v1alpha5
kind: ClusterConfig

metadata:
  name: my-cluster
  region: ap-northeast-1
  version: '1.30'

iam:
  withOIDC: true

nodeGroups:
  - name: ng-bottlerocket
    instanceType: m5.large
    desiredCapacity: 3
    amiFamily: Bottlerocket
    ami: auto-ssm
    iam:
       attachPolicyARNs:
          - arn:aws:iam::aws:policy/AmazonEKSWorkerNodePolicy
          - arn:aws:iam::aws:policy/AmazonEC2ContainerRegistryReadOnly
          - arn:aws:iam::aws:policy/AmazonSSMManagedInstanceCore
          - arn:aws:iam::aws:policy/AmazonEKS_CNI_Policy
EOF
$ # EKSクラスターを導入
$ eksctl create cluster --config-file ./bottlerocket.yaml
2024-10-24 22:03:34 [?]  eksctl version 0.194.0
2024-10-24 22:03:34 [?]  using region ap-northeast-1
2024-10-24 22:03:34 [?]  setting availability zones to [ap-northeast-1a ap-northeast-1c ap-northeast-1d]
2024-10-24 22:03:34 [?]  subnets for ap-northeast-1a - public:192.168.0.0/19 private:192.168.96.0/19
2024-10-24 22:03:34 [?]  subnets for ap-northeast-1c - public:192.168.32.0/19 private:192.168.128.0/19
2024-10-24 22:03:34 [?]  subnets for ap-northeast-1d - public:192.168.64.0/19 private:192.168.160.0/19
2024-10-24 22:03:34 [?]  nodegroup "ng-bottlerocket" will use "ami-053ad0a202a494dda" [Bottlerocket/1.30]
2024-10-24 22:03:34 [?]  using Kubernetes version 1.30
2024-10-24 22:03:34 [?]  creating EKS cluster "my-cluster" in "ap-northeast-1" region with un-managed nodes

~~~ 省略 ~~~

2024-10-24 22:19:13 [?]  waiting for at least 3 node(s) to become ready in "ng-bottlerocket"
2024-10-24 22:19:13 [?]  nodegroup "ng-bottlerocket" has 3 node(s)
2024-10-24 22:19:13 [?]  node "ip-192-168-10-32.ap-northeast-1.compute.internal" is ready
2024-10-24 22:19:13 [?]  node "ip-192-168-41-107.ap-northeast-1.compute.internal" is ready
2024-10-24 22:19:13 [?]  node "ip-192-168-73-90.ap-northeast-1.compute.internal" is ready
2024-10-24 22:19:13 [?]  created 1 nodegroup(s) in cluster "my-cluster"
2024-10-24 22:19:13 [?]  created 0 managed nodegroup(s) in cluster "my-cluster"
2024-10-24 22:19:14 [?]  kubectl command should work with "/root/.kube/config", try 'kubectl get nodes'
2024-10-24 22:19:14 [?]  EKS cluster "my-cluster" in "ap-northeast-1" region is ready
[root@k8sdev40-master1 work]#
$
EKSクラスターが展開されました。
Nodegruopの定義で、"amiFamily: Bottlerocket"を指定しています。
また、Nodeには"192.168.x.x/xx"のレンジが各Subnetに割り振られています。
こちらのページを見ると、eksctlはデフォルトのCIDRが"192.168.0.0/16" のようです。この情報は、ルートテーブルの設定時に利用します。
1-3 EKSクラスターへの接続
展開したEKSクラスターに接続してみます。
こちらの内容を参考にしています。
$ # EKSクラスターに接続
$ aws eks update-kubeconfig --region ap-northeast-1 --name my-cluster
Updated context arn:aws:eks:ap-northeast-1:xxxxxxxxxxx:cluster/my-cluster in /root/.kube/config
$ kubectl get node -o wide
NAME                                                STATUS   ROLES    AGE     VERSION               INTERNAL-IP      EXTERNAL-IP      OS-IMAGE                                KERNEL-VERSION   CONTAINER-RUNTIME
ip-192-168-10-32.ap-northeast-1.compute.internal    Ready    <none>   3m14s   v1.30.1-eks-e564799   192.168.10.32    13.112.111.189   Bottlerocket OS 1.25.0 (aws-k8s-1.30)   6.1.109          containerd://1.7.22+bottlerocket
ip-192-168-41-107.ap-northeast-1.compute.internal   Ready    <none>   3m16s   v1.30.1-eks-e564799   192.168.41.107   18.183.197.207   Bottlerocket OS 1.25.0 (aws-k8s-1.30)   6.1.109          containerd://1.7.22+bottlerocket
ip-192-168-73-90.ap-northeast-1.compute.internal    Ready    <none>   3m15s   v1.30.1-eks-e564799   192.168.73.90    18.180.193.51    Bottlerocket OS 1.25.0 (aws-k8s-1.30)   6.1.109          containerd://1.7.22+bottlerocket$
eksクラスターに接続できました。
Node情報をkubectlコマンドで見てみると、EKSクラスター展開時の出力メッセージにあったNode名やIPアドレスのノードが確認できます。
なお、kubectlが古い場合は、こちらを参考に新しいバージョンを導入します。
1-4 ワーカーノード用 EC2インスタンスを確認
AWSコンソールにログインしてEKSクラスターのワーカーノード用EC2インスタンスの情報を確認してみます。
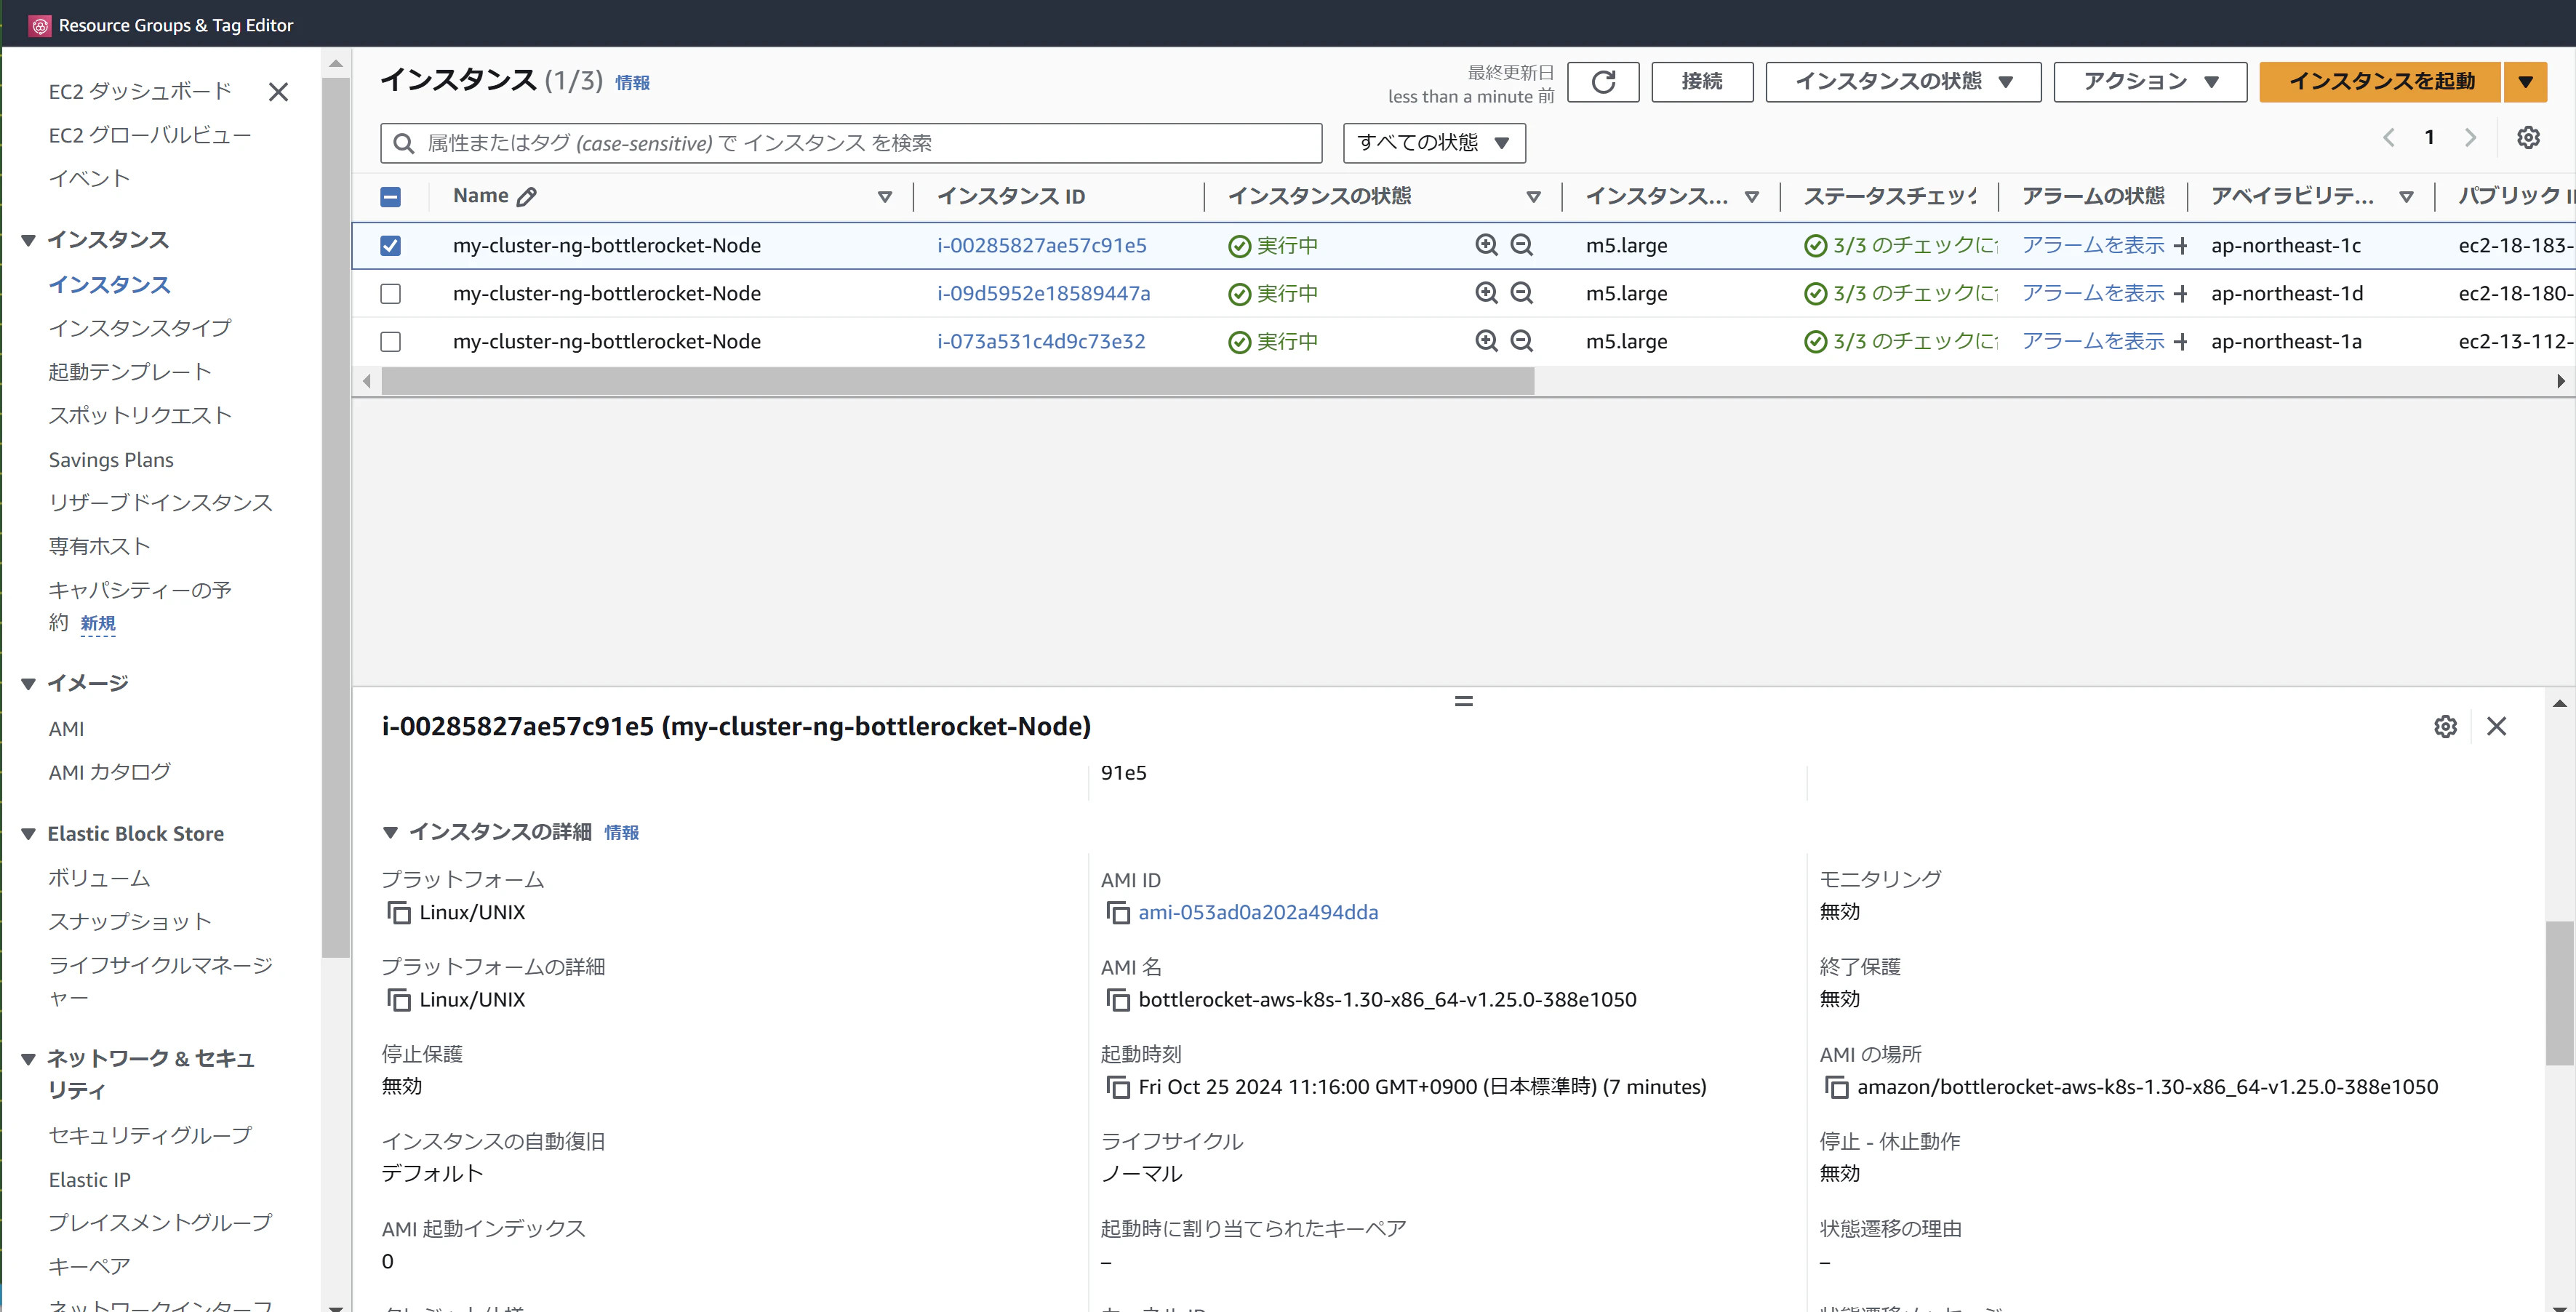
eksctl展開時のメッセージに出力されていたAMI "ami-053ad0a202a494dda"が利用されていることが見て取れます。
EKSクラスター側の画面で確認しても、OSイメージが "Bottlerocket OS 1.25.0 (aws-k8s-1.30)"となっています。
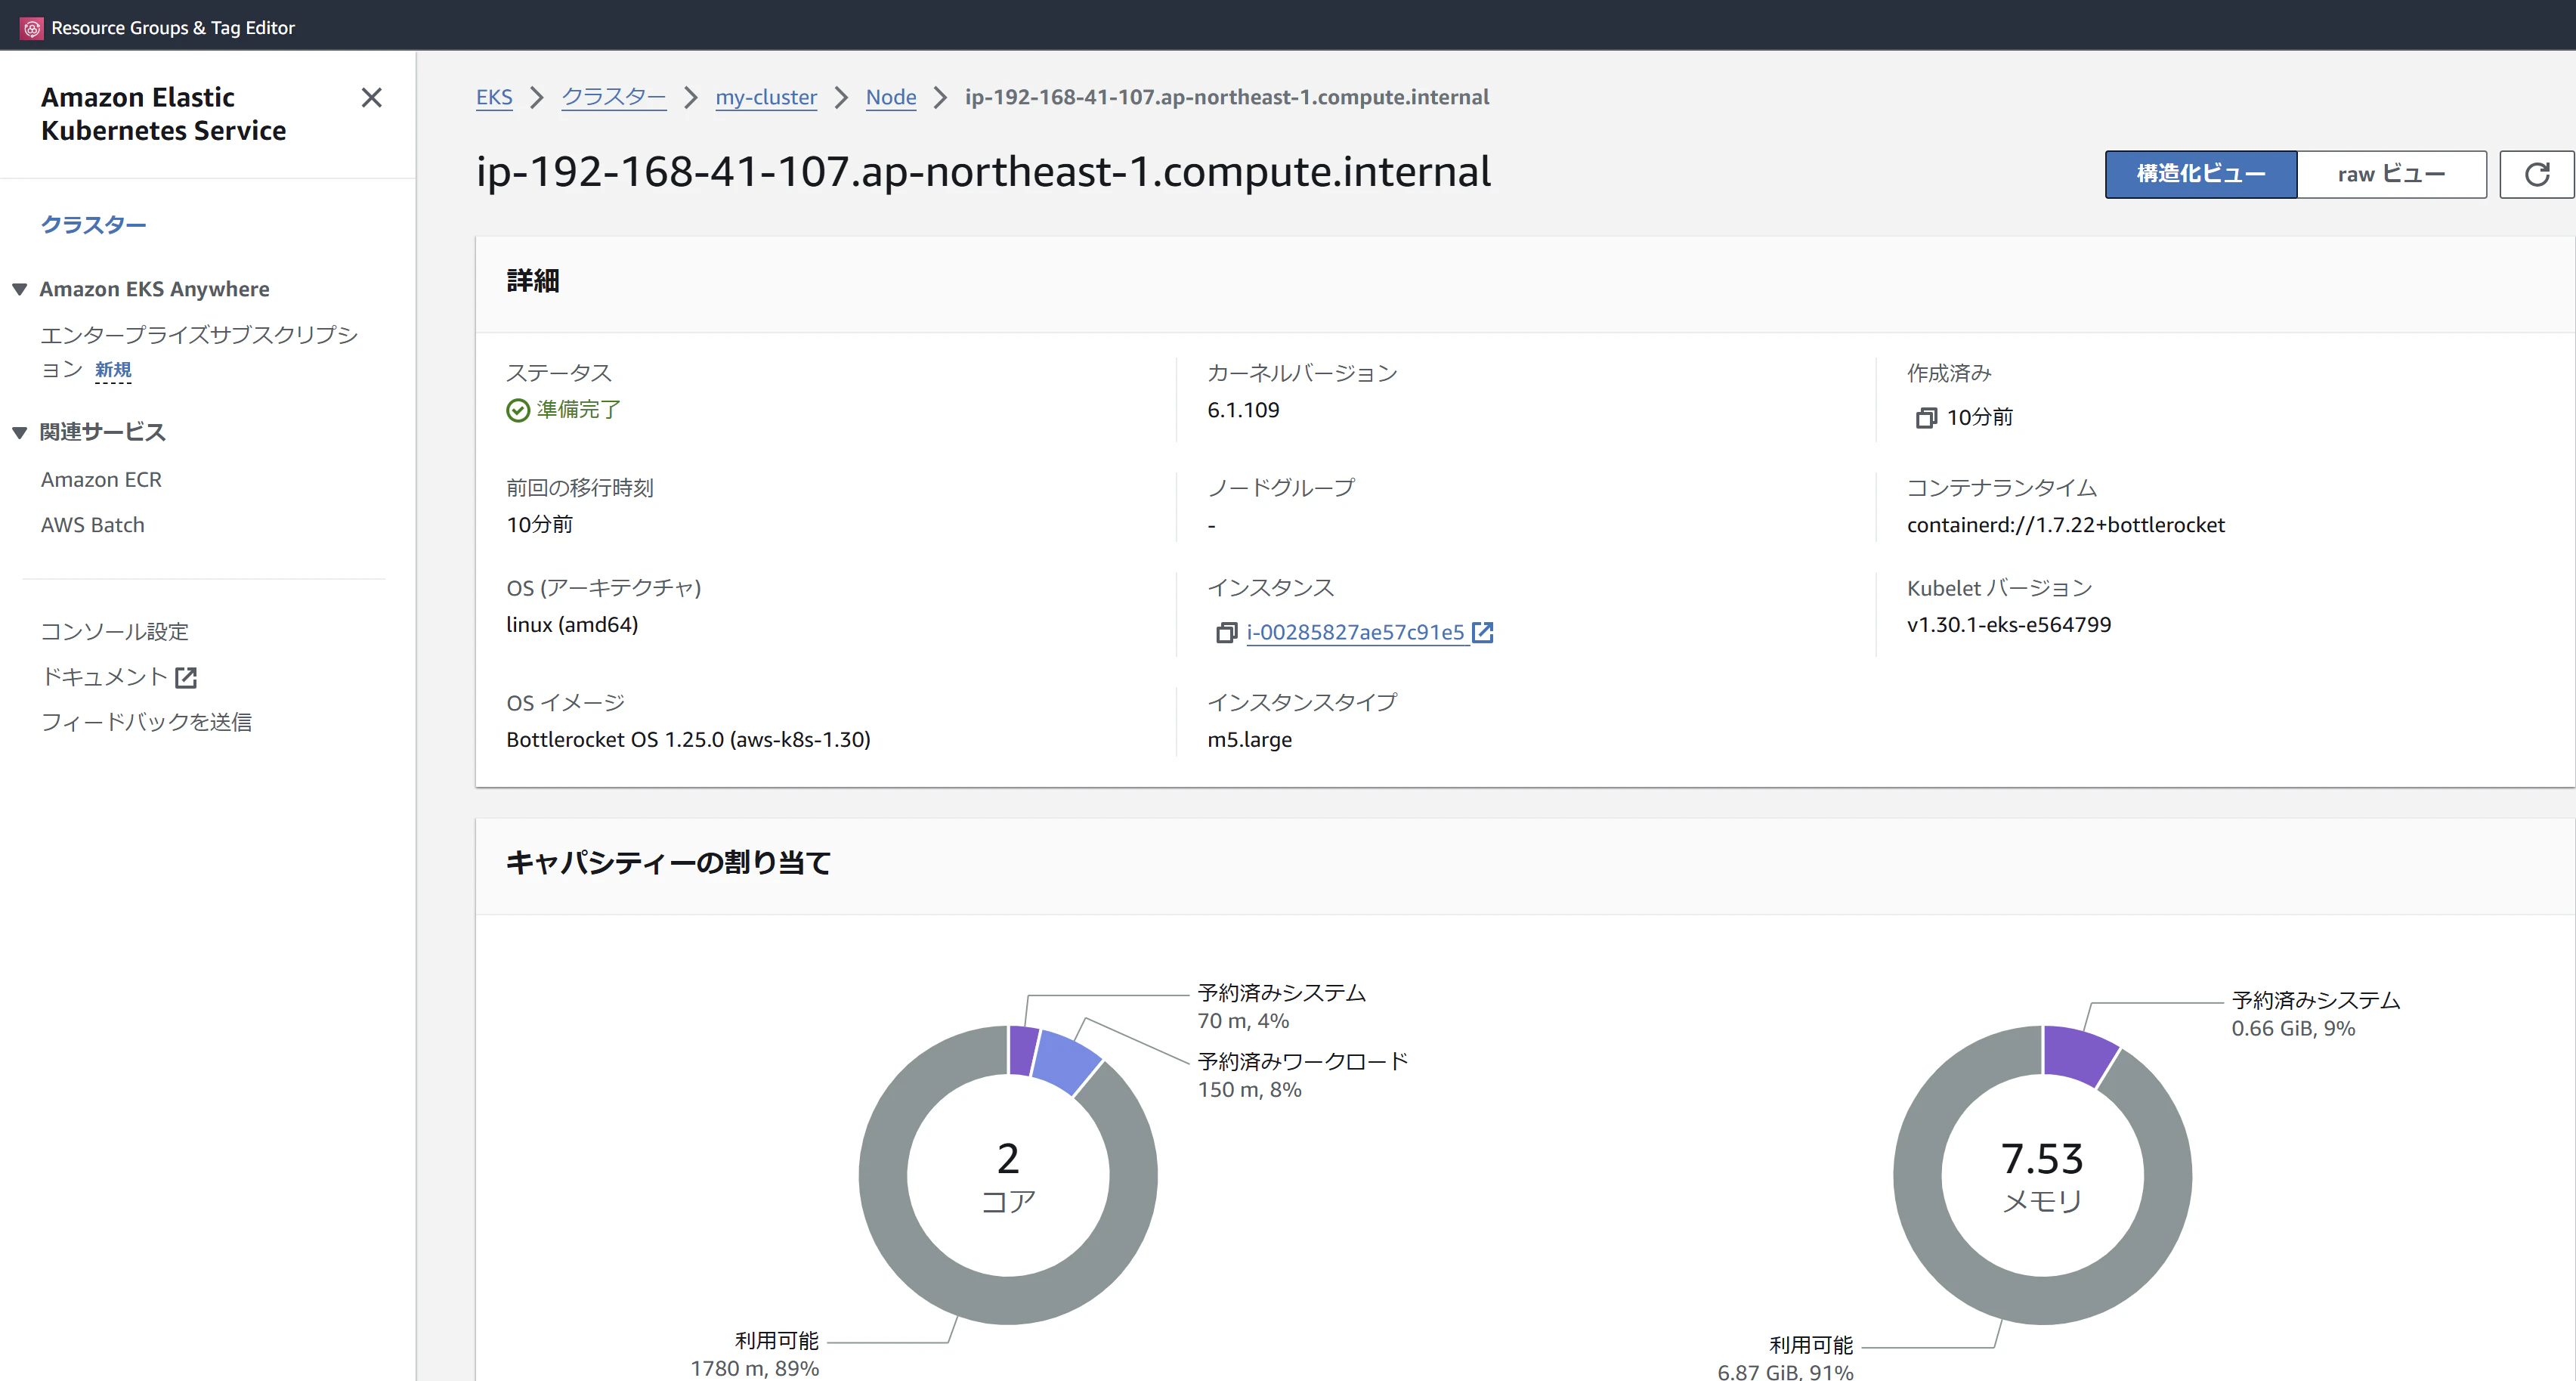
これでBottlerocketをワーカーノードとして利用するEKSクラスターが展開できました。
2. FSx for NetApp ONTAPを展開
次に、Amazon FSx for NetApp ONTAP を 展開します。
Amazon FSx for NetApp ONTAPは、AWSコンソールからも簡単に利用開始が可能ですが、
今回は以前のBlogで紹介したTerraformでの展開をしたいと思います。
2-1 TFファイル準備
今回 利用するTFファイルを記載します。
長いので折り畳みしていますが、5つのファイル(aws_resource.tf / fsxn_fs.tf / fsxn_svm / provider.tf / variable.tf)を作成しています。
④FSx展開用のtfファイル
TFファイル作成command:
- aws_resource.tf / fsxn_fs.tf / fsxn_svm / provider.tf / variable.tf
$ # 各tfファイル作成
$ cat <<EOF>aws_resource.tf
resource "aws_security_group" "terra-lin01-sg1" {
  name        = "terra-lin01-sg1"
  description = "terraform"
  vpc_id      = aws_vpc.tera-vpc01.id

  # SSH access from anywhere
  ingress {
    from_port   = 22
    to_port     = 22
    protocol    = "tcp"
    cidr_blocks = ["0.0.0.0/0"]
  }

  ingress {
    from_port   = 443
    to_port     = 443
    protocol    = "tcp"
    cidr_blocks = ["0.0.0.0/0"]
  }

  ingress {
    from_port   = 2049
    to_port     = 2049
    protocol    = "tcp"
    cidr_blocks = [var.tera-network.cidr]
  }

  egress {
    from_port   = 0
    to_port     = 0
    protocol    = "-1"
    cidr_blocks = ["0.0.0.0/0"]
  }

  tags = {
    Name = "allow_tls"
  }
}
resource "aws_vpc" "tera-vpc01" {
  cidr_block = var.tera-network.cidr

  tags = {
    Name = var.tera-network.name
  }
}

resource "aws_subnet" "tera-subnet01" {
  count             = length(var.tera-network.subnets)
  cidr_block        = values(var.tera-network.subnets)[count.index].cidr
  availability_zone = values(var.tera-network.subnets)[count.index].availability_zone
  tags = {
    Name = keys(var.tera-network.subnets)[count.index]
  }
  vpc_id = aws_vpc.tera-vpc01.id
}
EOF
$ cat <<EOF>fsxn_fs.tf
resource "aws_fsx_ontap_file_system" "aws-fsx01" {
  storage_capacity    = 1024
  subnet_ids          = ["\${element(aws_subnet.tera-subnet01.*.id, 1)}"]
  deployment_type     = "SINGLE_AZ_1"
  throughput_capacity = 128
  preferred_subnet_id = element(aws_subnet.tera-subnet01.*.id, 1)
  fsx_admin_password  = var.tera-fsxn.fsx_admin_password
  security_group_ids  = [aws_security_group.terra-lin01-sg1.id]
  tags = {
    Name = "FSXfromTerraform"
  }

  depends_on = [aws_subnet.tera-subnet01]
}
EOF
$ cat <<EOF>fsxn_svm.tf
resource "aws_fsx_ontap_storage_virtual_machine" "fsxn_svm01" {
  file_system_id = aws_fsx_ontap_file_system.aws-fsx01.id
  name           = "svmFSXN01"
}
EOF
$ cat <<EOF>provider.tf
terraform {
  required_providers {
    aws = {
      source  = "hashicorp/aws"
      version = "~> 5.0"
    }
  }
}

provider "aws" {
  region                   = var.aws.region
#  profile                  = var.aws.profile
  shared_credentials_files = [var.aws.shared_credentials_files]
}
EOF
$ cat <<EOF>variable.tf
variable "tera-fsxn" {
  default = {
    name                       = "TerraformAWSFSX"
    region                     = "ap-northeast-1"
    fsx_admin_password         = "Passwd\$51"
    throughput_capacity        = 512
    storage_capacity_size      = "100"
    storage_capacity_size_unit = "GiB"
    size_in_megabytes          = "1024"
  }
}

variable "tera-network" {
  default = {
    name = "terraform-vpc"
    cidr = "172.19.0.0/16"
    subnets = {
      tera-subnet1 = {
        availability_zone = "ap-northeast-1a"
        cidr              = "172.19.1.0/24"
      }
      tera-subnet2 = {
        availability_zone = "ap-northeast-1c"
        cidr              = "172.19.2.0/24"
      }
      tera-subnet3 = {
        availability_zone = "ap-northeast-1d"
        cidr              = "172.19.3.0/24"
      }
    }
  }
}

variable "aws" {
  default = {
    region                   = "ap-northeast-1"
    shared_credentials_files = "~/.aws/credentials"
  }
}
EOF
2-2 FSx for NetApp ONTAPの展開(Terraformの実行)
TerraformでFSx for NetApp ONTAPと関連リソース(VPC/Subnet/セキュリティグループ等を展開します。
$ # terraform init実行
$ terraform init

Initializing the backend...

Initializing provider plugins...
- Finding hashicorp/aws versions matching "~> 5.0"...
- Installing hashicorp/aws v5.73.0...
- Installed hashicorp/aws v5.73.0 (signed by HashiCorp)

〜〜出力省略〜〜

Terraform has been successfully initialized!

〜〜出力省略〜〜

$ # terraform planで確認
$ terraform plan


Terraform used the selected providers to generate the following execution plan. Resource actions are indicated with the following symbols:
  + create

〜〜出力省略〜〜

Plan: 7 to add, 0 to change, 0 to destroy.


Note: You didn't use the -out option to save this plan, so Terraform can't guarantee to take exactly these actions if you run "terraform apply" now.
$ # terraform applyを実行(-auto-approveで確認省略)
$ terraform apply -auto-approve

Terraform used the selected providers to generate the following execution plan. Resource actions are indicated with the following symbols:
  + create

〜〜出力省略〜〜

Plan: 7 to add, 0 to change, 0 to destroy.
aws_vpc.tera-vpc01: Creating...
aws_vpc.tera-vpc01: Creation complete after 1s [id=vpc-0e435d4096c44d203]
aws_subnet.tera-subnet01[0]: Creating...

〜〜出力省略〜〜

Apply complete! Resources: 7 added, 0 changed, 0 destroyed.
$
FSx for NetApp ONTAP が展開できました。
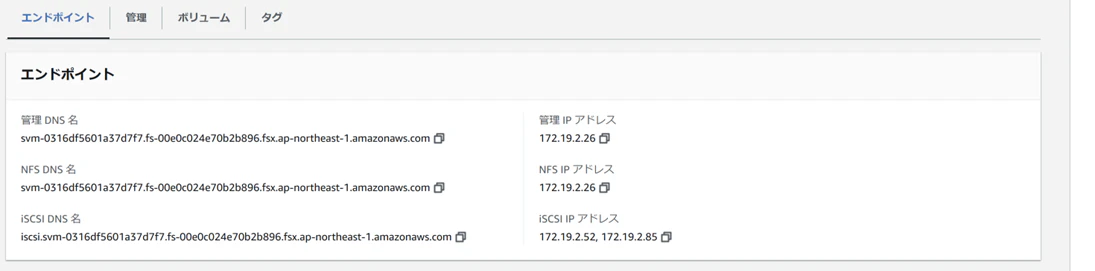
展開完了後、FSx forn NetApp ONTAPに割り当てられた IPアドレスを確認しておきます。
管理IPアドレスの確認:
AWS コンソールにログインして、Amazon FSx → ONTAP → ファイルシステム→ ファイルシステム IDをクリックし、"管理"タブの画面で "管理エンドポイント -IP アドレス"を確認しておきます。

NFS IPアドレスの確認:
AWS コンソールにログインして、Amazon FSx → ONTAP → ストレージ仮想マシン(SVM)→ SVM名をクリックし、"エンドポイント"タブの画面で NFS IP アドレス"を確認しておきます。
3. VPC Peering 設定
EKSとFSxNをそれぞれ別VPCに展開したので VPC Peeringを設定します。
設定後、ルートテーブルとセキュリティの設定を実施します
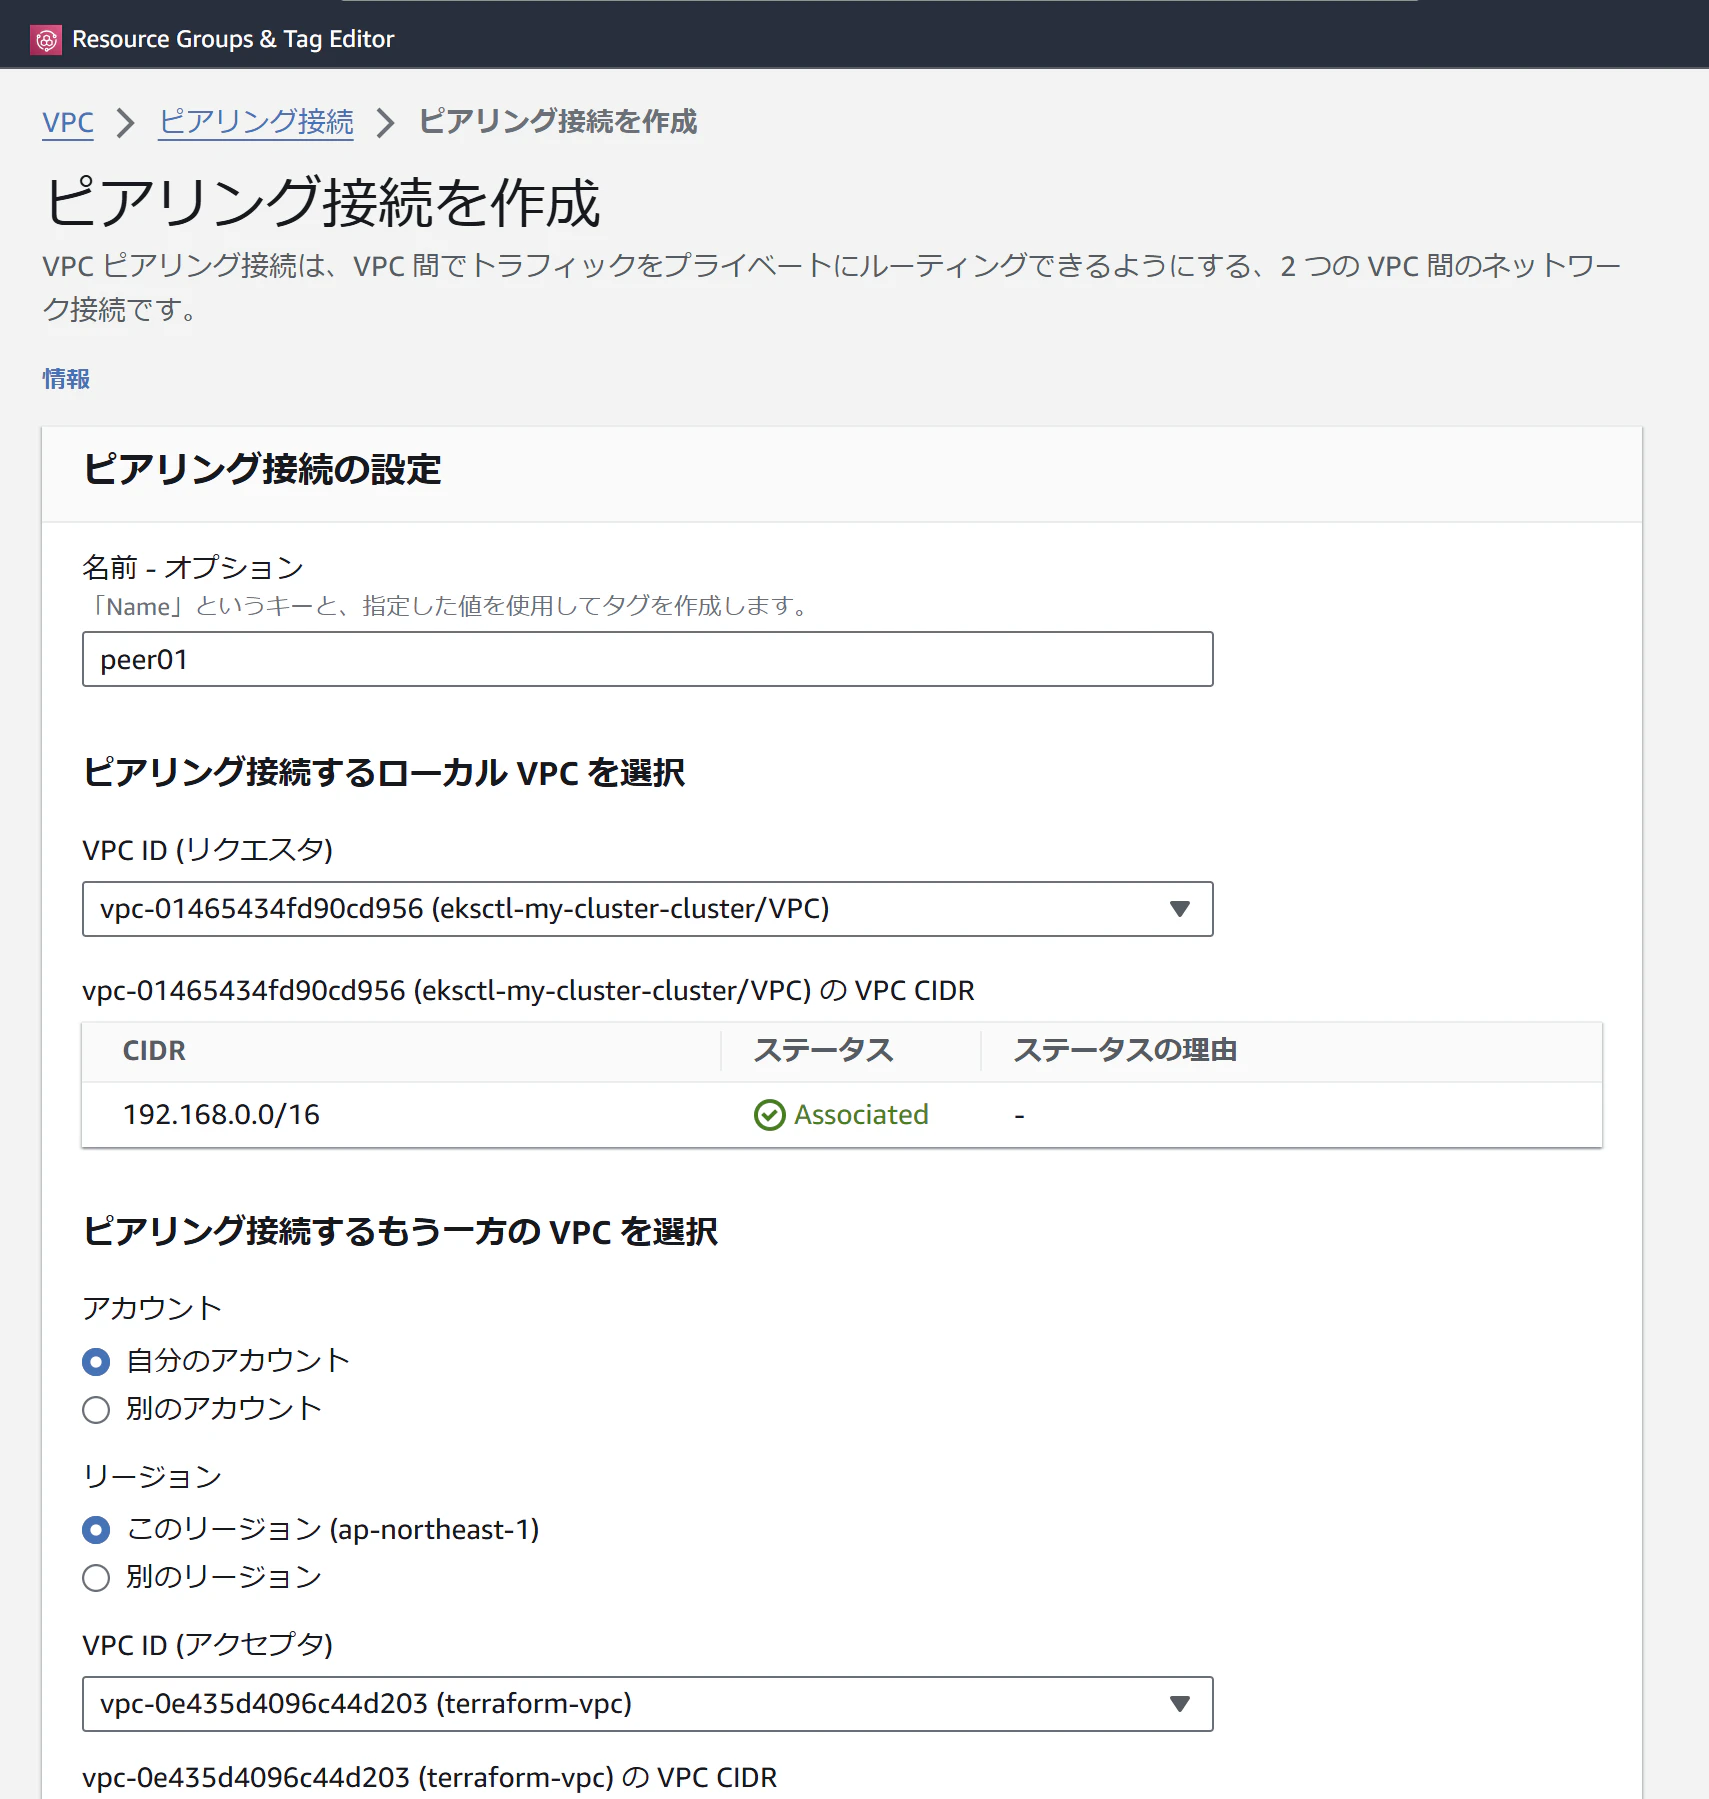
3-1 VPC Peering
AWS Console 画面で、VPC→仮想プライベートネットワーク内の"ピアリング接続"→"ピアリング接続を作成"をクリックします。
EKSとFSx fro NetApp ONTAPのPVCを選択して、”ピアリング接続を作成”をクリックし、その後 ”承認”をクリックします。
- EKS VPC:eksctl-my-cluster-cluster
- FSxN VPC:terraform-vpc
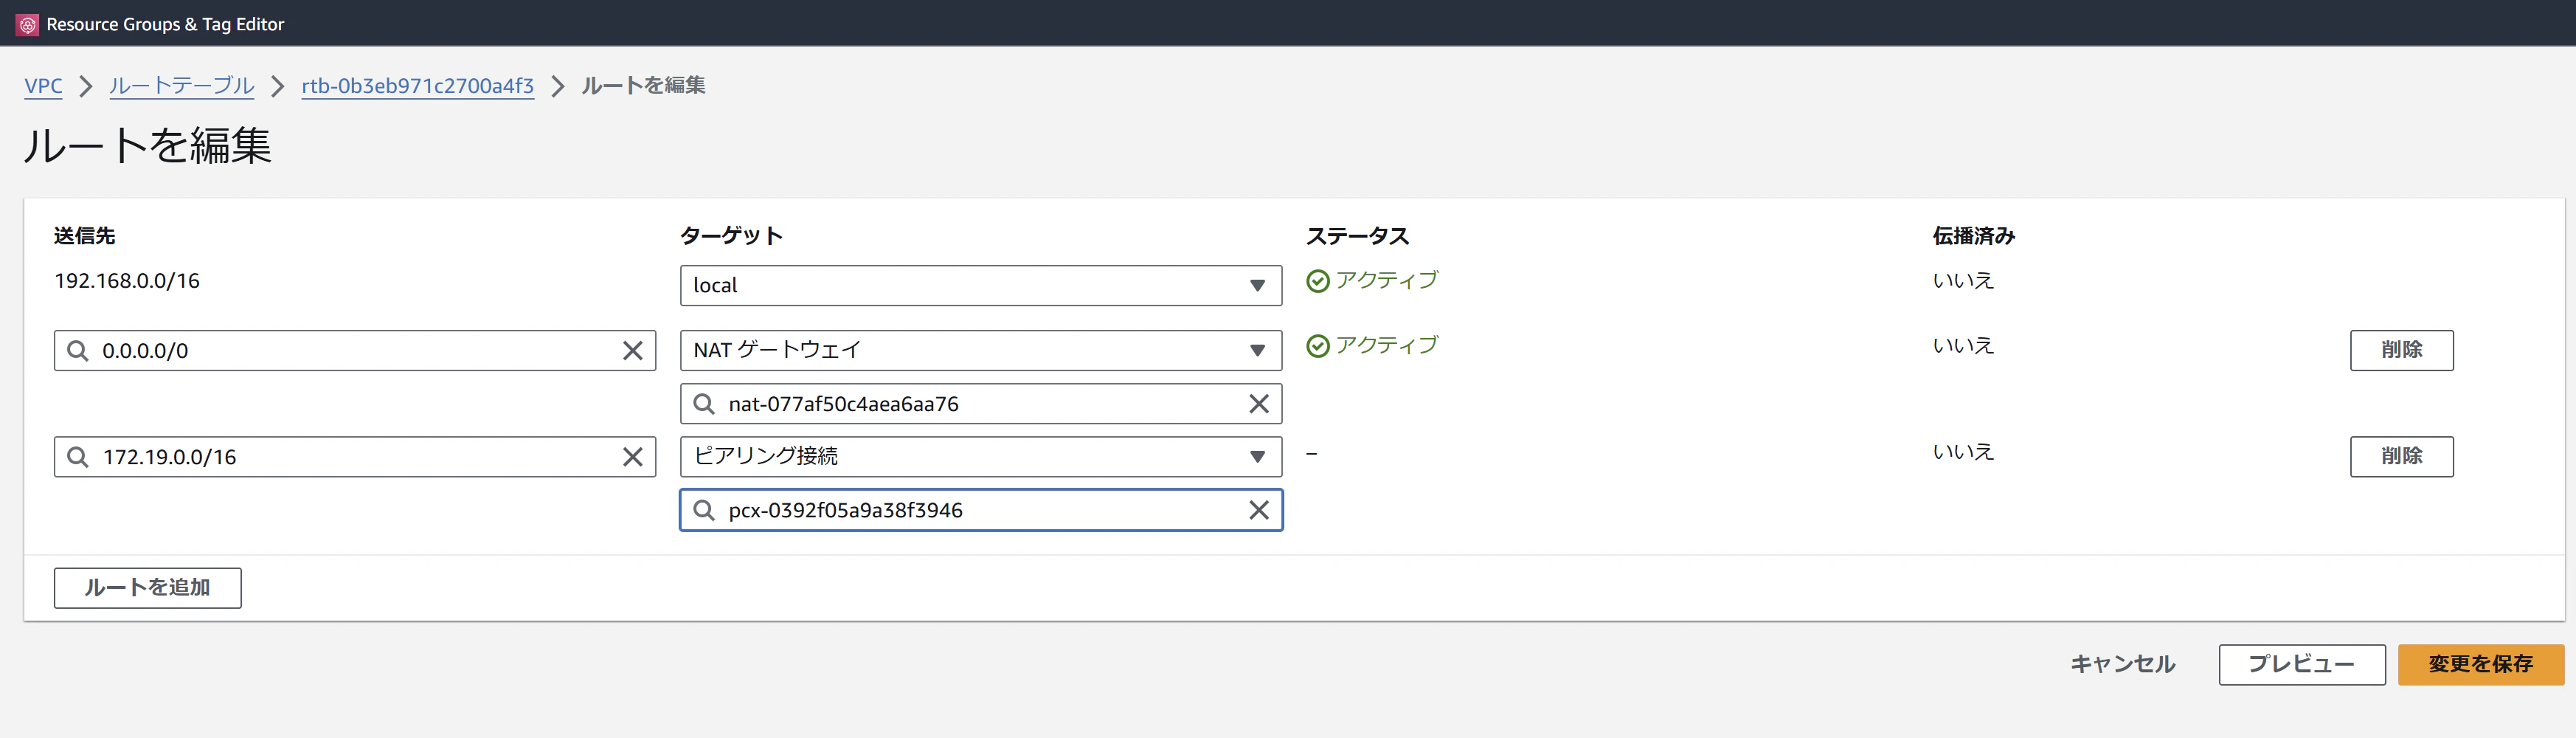
3-2 ルートテーブル
AWS Console 画面で VPC→仮想プライベートネットワーク内の"ルートテーブル"をクリックします。
EKSとFSxNの各ルートテーブルの”ルート”タブで”ルートを編集”をクリックし、それぞれ相手のVPCのCIDRあてのルートを追加します。
- EKS VPC(eksctl-my-cluster-cluster)のルートテーブル: 送信先=172.19.0.0/16、ターゲット=ピアリング接続
- FSxN VPC(terraform-vpc)のルートテーブル : 送信先=192.168.0.0/16、ターゲット=ピアリング接続
3-3 セキュリティグループの設定
AWSコンソールの画面で、VPC→セキュリティの"セキュリティグループ"をクリックします。
インバウンドルール”タブでインバウンドのルールを編集で、FSxNのセキュリティグループに、EKSのCIDRからのインバウンド通信を許可のルールを追加します。
今回は検証なのでシンプルに全てのトラフィックを許可してしまいます。
- FSxN セキュリティグループ(terra-lin01-sg1): タイプ=全てのトラフィック、 ソース=192.168.0.0/16
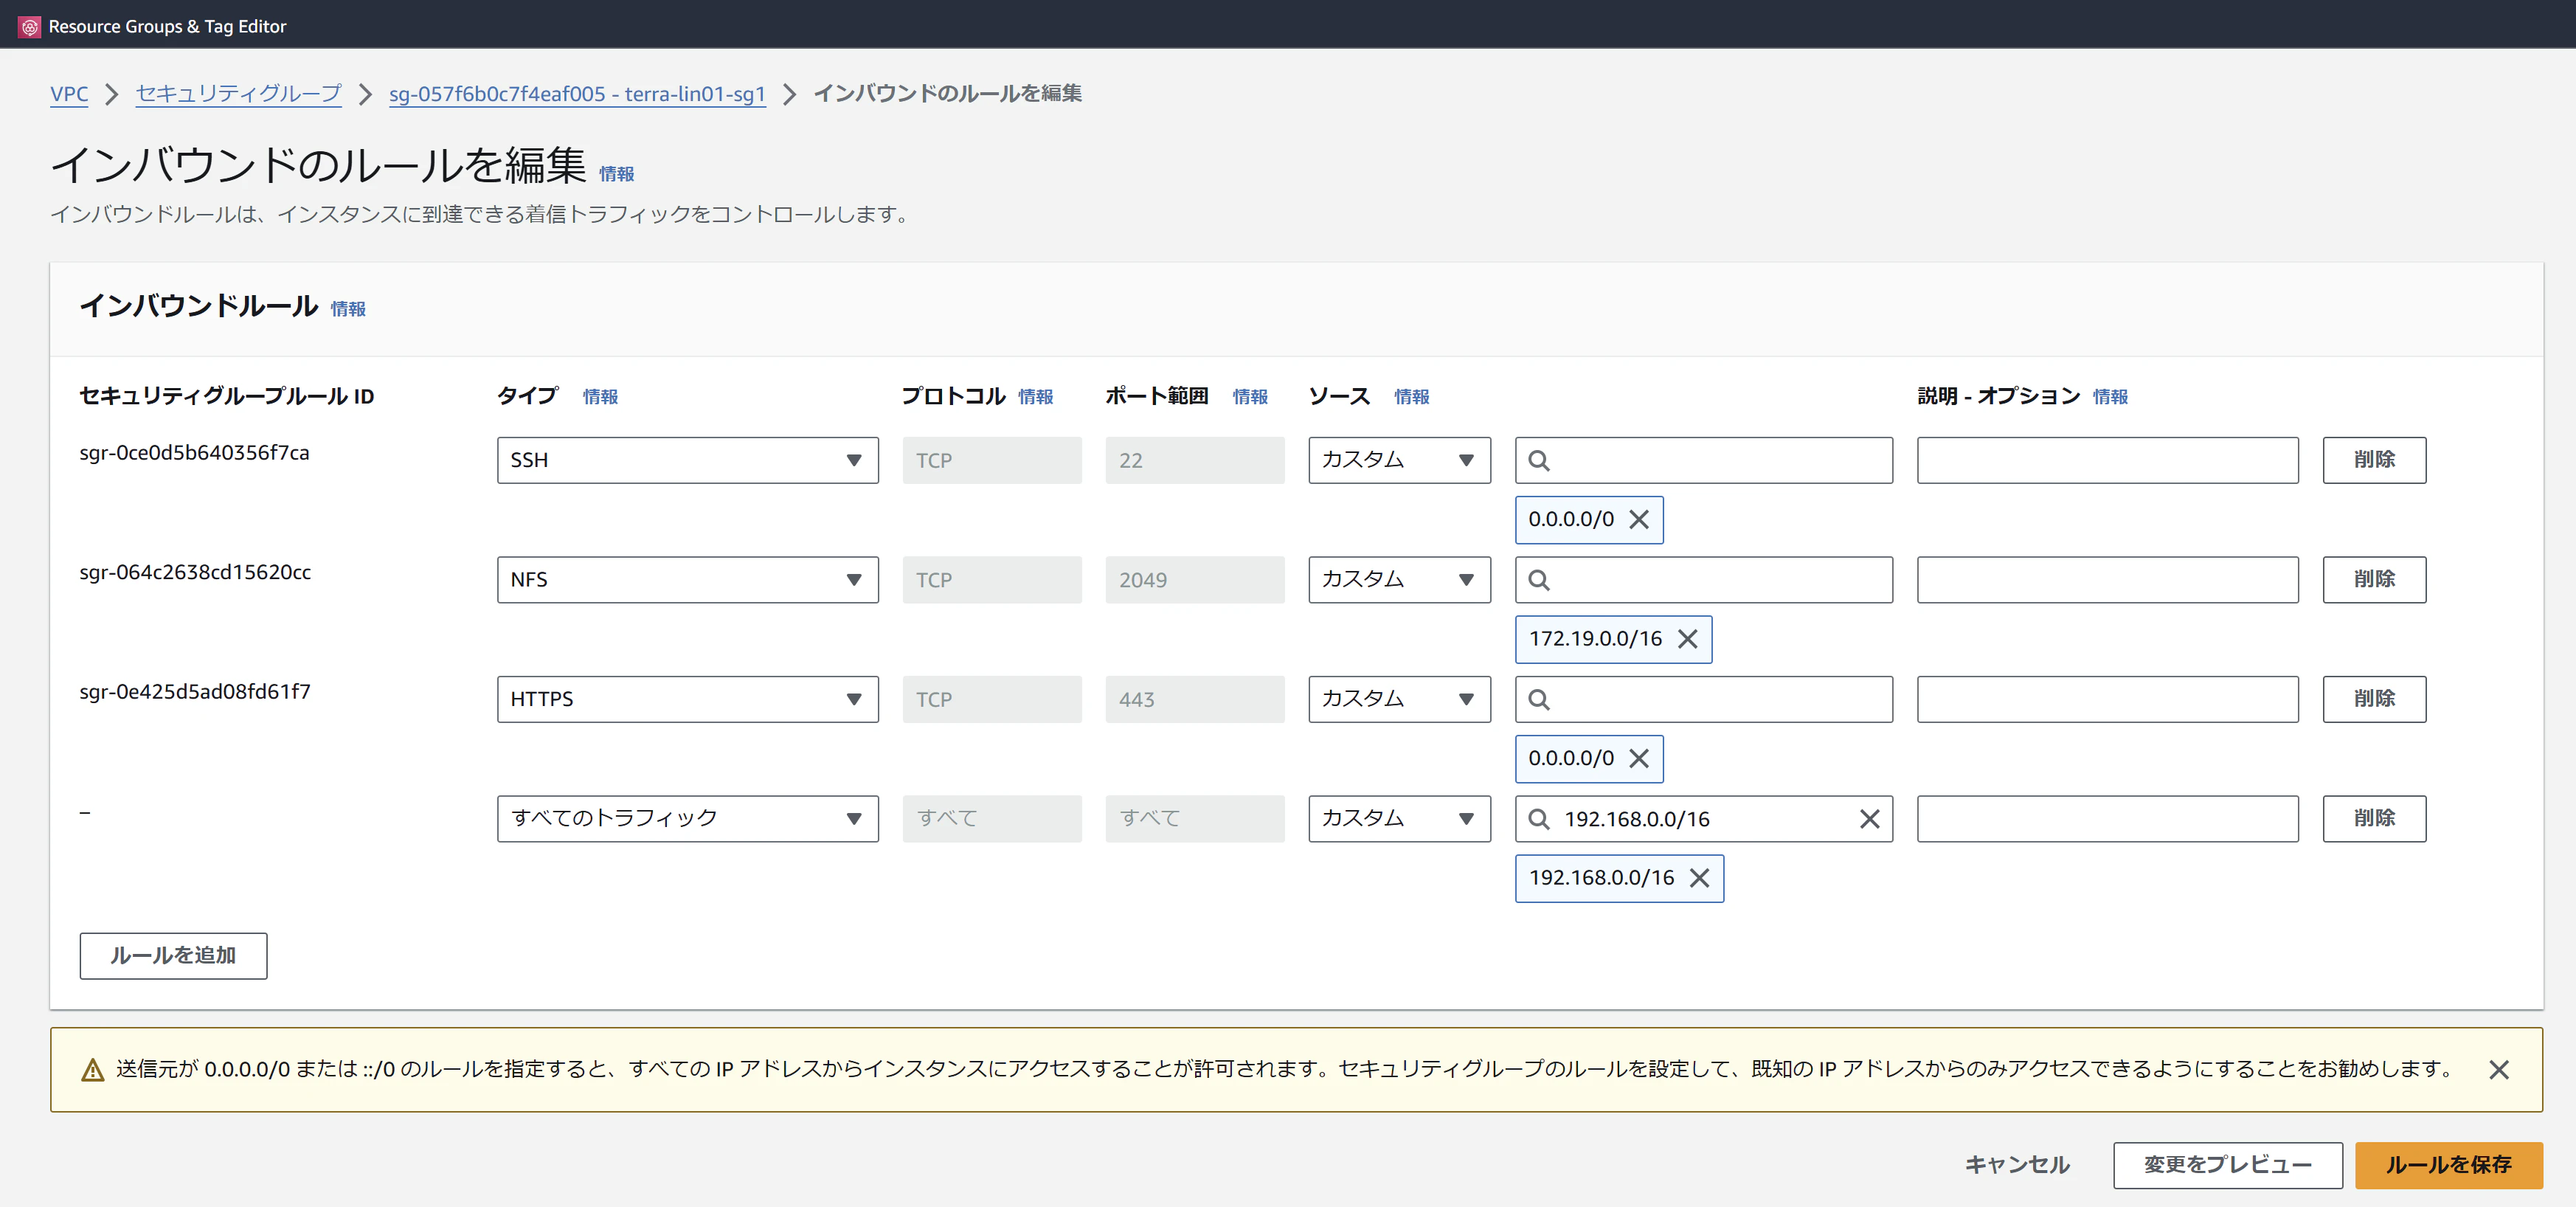
これでEKSクラスターからFSx for NetApp ONTAPを利用する準備ができました
4. Tridentを導入・構成
EKSクラスターに Tridentを導入・構成します。
4-1 Trident導入
helmを利用してTrident 24.06 を導入します。
実際にはAstra Tridentをさまざまな環境や組織に導入できるように、複数のインストールオプションを提供しています。興味ある方はTridentのドキュメントを参照してください。
$ # HELMでTridentを導入
$ helm repo add netapp-trident https://netapp.github.io/trident-helm-chart
"netapp-trident" has been added to your repositories
$ helm repo update
Hang tight while we grab the latest from your chart repositories...
...Successfully got an update from the "netapp-trident" chart repository
Update Complete. ?Happy Helming!?
$ helm search repo netapp-trident
NAME                            CHART VERSION   APP VERSION     DESCRIPTION
netapp-trident/trident-operator 100.2406.1      24.06.1         A Helm chart for deploying NetApp's Trident CSI...
$ helm install trident netapp-trident/trident-operator --version 100.2406.1 --create-namespace --namespace trident
NAME: trident
LAST DEPLOYED: Thu Oct 24 22:31:33 2024
NAMESPACE: trident
STATUS: deployed
REVISION: 1
TEST SUITE: None
NOTES:
Thank you for installing trident-operator, which will deploy and manage NetApp's Trident CSI
storage provisioner for Kubernetes.

Your release is named 'trident' and is installed into the 'trident' namespace.
Please note that there must be only one instance of Trident (and trident-operator) in a Kubernetes cluster.

To configure Trident to manage storage resources, you will need a copy of tridentctl, which is
available in pre-packaged Trident releases.  You may find all Trident releases and source code
online at https://github.com/NetApp/trident.

To learn more about the release, try:

  $ helm status trident
  $ helm get all trident
$ # Trident導入確認
$ helm -n trident list
NAME    NAMESPACE       REVISION        UPDATED                                 STATUS          CHART                           APP VERSION
trident trident         1               2024-10-24 22:31:33.733460033 -0400 EDT deployed        trident-operator-100.2406.1     24.06.1
$ kubectl -n trident get pod
NAME                                  READY   STATUS    RESTARTS   AGE
trident-controller-7d678b8466-q5xwd   6/6     Running   0          76s
trident-node-linux-fgg7d              2/2     Running   0          75s
trident-node-linux-hdnlz              2/2     Running   0          75s
trident-node-linux-pq9jx              2/2     Running   0          75s
trident-operator-64b47544d7-tmq75     1/1     Running   0          110s
$
4-2 Trident構成
Tridentの構成を実施します。
FSx for NetApp ONTAPを利用するためのBackend、StorageClassを作成します。
ここで、項番2で確認した "管理エンドポイント -IP アドレス"と"NFS IPアドレス"を利用します。(backend.yamlファイルのmanagementLIF、dataLIF行に反映)
$ # マニフェストファイルを作成
$ cat <<EOF>backend.yaml
---
apiVersion: trident.netapp.io/v1
kind: TridentBackendConfig
metadata:
  name: backend
  namespace: trident
spec:
  version: 1
  backendName: backend
  storageDriverName: ontap-nas
  managementLIF: "< FSx ファイルシステムの 管理エンドポイント -IP アドレス
 >"
  dataLIF: "< FSx ストレージ仮想マシン NFS IPアドレス >"
  svm: svmFSXN01
  credentials:
    name: secret-trident-backend
  storagePrefix:     trident_eks_
EOF
$ cat <<EOF>storageclass.yaml
---
apiVersion: storage.k8s.io/v1
kind: StorageClass
metadata:
  name: ontap-nas
provisioner: csi.trident.netapp.io
parameters:
  backendType: "ontap-nas"
EOF
$ cat <<EOF>secret.yaml
---
apiVersion: v1
kind: Secret
metadata:
  name: secret-trident-backend
  namespace: trident
type: Opaque
stringData:
  username: fsxadmin
  password: Passwd\$51
EOF
$ # 各リソースを展開
$ kubectl apply -f secret.yaml
kubec   secret/secret-trident-backend created
$ kubectl apply -f backend.yaml
kubtridentbackendconfig.trident.netapp.io/backend created
$ kubectl apply -f storageclass.yaml
storageclass.storage.k8s.io/ontap-nas created
$ #バックエンドが作成されSTATUSがSuccessであることを確認
$  kubectl -n trident get tbc
NAMESPACE   NAME      BACKEND NAME   BACKEND UUID                           PHASE   STATUS
trident     backend   backend        3066d209-9422-4f59-bfb9-963e67ccebf9   Bound   Success
$
Backend及びStorageClassが作成できました。
5. PVC/PV(NFS)を作成してPodから利用してみる
EKSからNFS Volumeを作成して Podからマウントして利用してみます。
PVC/PV(NFS)を作成して、Podから NFSマウントできることを確認します。
5-1 PVC/PV , Podを作成
Pod,PVCのマニフェストファイルを作成して展開します。
$ # Pod/PVC用のマニフェストファイルを作成
$ cat <<EOF>pvc.yaml
---
apiVersion: v1
kind: PersistentVolumeClaim
metadata:
  name: pvc-01
spec:
  accessModes:
    - ReadWriteOnce
  storageClassName: ontap-nas
  resources:
    requests:
        storage: 3Gi
EOF
$ cat <<EOF>pod.yaml
---
kind: Pod
apiVersion: v1
metadata:
  name: nginx-nfs
spec:
  containers:
  - image: nginx
    imagePullPolicy: IfNotPresent
    name: nginx-nfs
    volumeMounts:
    - name: disk01
      mountPath: /mnt
  volumes:
  - name: disk01
    persistentVolumeClaim:
      claimName: pvc-01
EOF
$ # 各リソースを展開
$ kubectl apply -f pvc.yaml
persistentvolumeclaim/pvc-01 created
$ kubectl apply -f pod.yaml
pod/nginx-nfs created
$ # 各リソースを展開が成功していることを確認
$ kubectl get pvc
NAME     STATUS   VOLUME                                     CAPACITY   ACCESS MODES   STORAGECLASS   VOLUMEATTRIBUTESCLASS   AGE
pvc-01   Bound    pvc-3c9798d7-6cbd-4081-aedb-2ddbcb782981   3Gi        RWO            ontap-nas      <unset>                 2s
$ kubectl get pod
NAME        READY   STATUS    RESTARTS   AGE
nginx-nfs   1/1     Running   0          69s
$
PVCが作成され、Podが起動しました。
5-2 PodからNFSマウントされていることを確認
起動したPodにアクセスして NFSマウントできることを確認します。
dfコマンドでNFSマウントされていることを確認し、また、マウントポイントに移動して ファイルの書き込み、読み込みができていることを確認してみます。
$ # 展開したPodにアクセス
$ kubectl exec -it nginx-nfs -- bash
root@nginx-nfs:/# # NFSマウント確認
root@nginx-nfs:/# df -h
Filesystem                                                         Size  Used Avail Use% Mounted on
overlay                                                             80G  3.2G   77G   4% /
tmpfs                                                               64M     0   64M   0% /dev
/dev/root                                                          904M  686M  156M  82% /usr/local/sbin/modprobe
172.19.2.26:/trident_eks_pvc_3c9798d7_6cbd_4081_aedb_2ddbcb782981  3.0G  256K  3.0G   1% /mnt
/dev/nvme1n1p1                                                      80G  3.2G   77G   4% /etc/hosts
shm                                                                 64M     0   64M   0% /dev/shm
tmpfs                                                              6.9G   12K  6.9G   1% /run/secrets/kubernetes.io/serviceaccount
tmpfs                                                              3.8G     0  3.8G   0% /proc/acpi
tmpfs                                                              3.8G     0  3.8G   0% /proc/scsi
tmpfs                                                              3.8G     0  3.8G   0% /sys/firmware
root@nginx-nfs:/# # NFSマウントポイントに移動して読み書き確認
root@nginx-nfs:/# cd /mnt
root@nginx-nfs:/mnt# ls
root@nginx-nfs:/mnt# date >> date.out
root@nginx-nfs:/mnt# ls
date.out
root@nginx-nfs:/mnt# cat date.out
Fri Oct 25 02:57:17 UTC 2024
root@nginx-nfs:/mnt#  exit
exit
$
マウントポイント "/mnt"ディレクトリの行 で、FSxのエンドポイント情報の画面で確認した NFS IPアドレスが表示されているのが見て取れるかと思います。また、dateコマンドの出力結果をファイルに書き込んでその情報を読み取りできることが確認できました。
このように、Bottlerocketをワーカーノードとして利用する EKSクラスターから FSx for NetApp ONTAPのNFS Volumeをプロビジョニングして Podからマウントして利用できることが確認できました。
6. 環境削除
今回試した環境用にデプロイしたリソースの削除手順を記載しておきます。
環境削除手順(長いので折り畳み)
6-1 EKSに展開したリソース(Pod,PVC Trident関連)削除
EKSクラスターに展開したリソースを削除します。
$ # EKSクラスター上のリソース削除
$ kubectl delete -f pvc.yaml -f pod.yaml
persistentvolumeclaim "pvc-01" deleted
pod "nginx-nfs" deleted
$ kubectl get pvc
No resources found in default namespace.
$  kubectl delete -f backend.yaml -f secret.yaml -f storageclass.yaml
tridentbackendconfig.trident.netapp.io "backend" deleted
secret "secret-trident-backend" deleted
storageclass.storage.k8s.io "ontap-nas" deleted
$ helm -n trident uninstall trident
release "trident" uninstalled
$ kubectl -n trident get pod
No resources found in trident namespace.
$ helm -n trident list
NAME    NAMESPACE       REVISION        UPDATED STATUS  CHART   APP VERSION
$
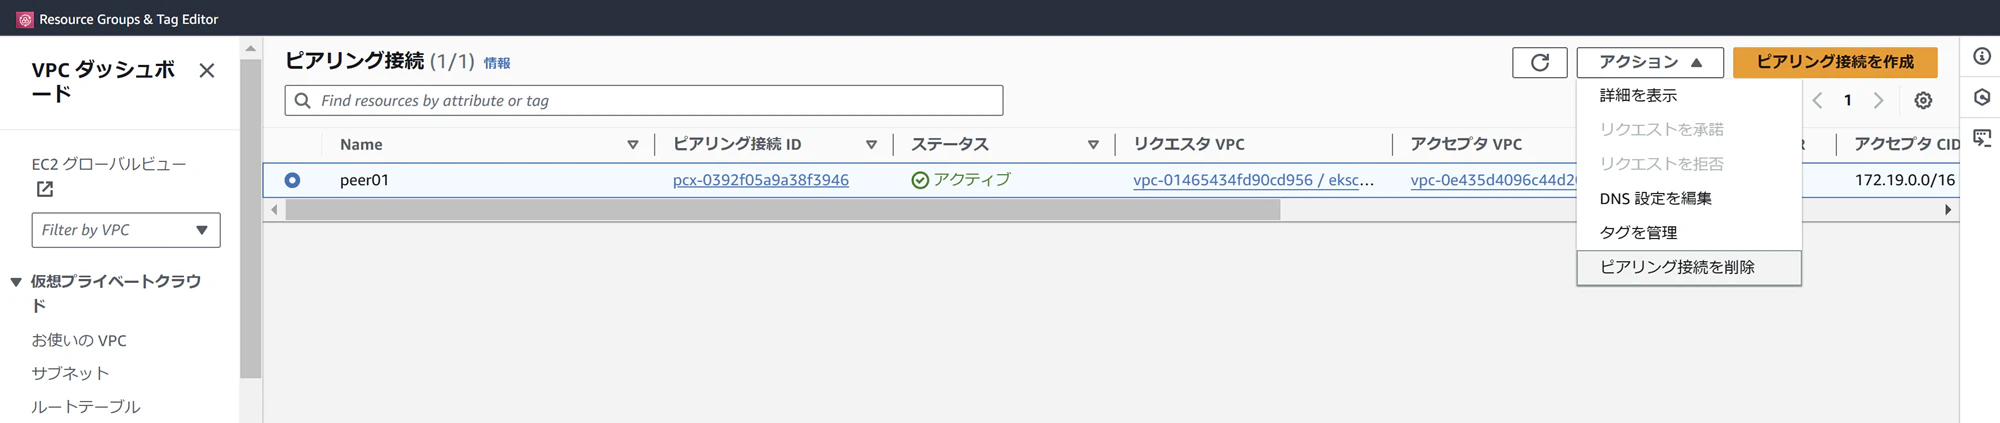
6-2 VPC Peering設定削除
手動で設定していたたVPC Peeringを削除します。
AWS Console 画面で、VPC→仮想プライベートネットワーク内の"ピアリング接続"をクリックします。
アクションでピアリング接続を削除を選択し、関連するルートテーブルエントリを削除するを選択して削除を実行します。
6-3 FSx for NetApp ONTAP削除
FSx for NetApp ONTAPを削除します。展開に利用したTerraformを使って関連リソースを削除します。
$ # FSx for NetApp ONTAPと関連リソース削除
$ terraform destroy
aws_vpc.tera-vpc01: Refreshing state... [id=vpc-0e435d4096c44d203]
aws_subnet.tera-subnet01[1]: Refreshing state... [id=subnet-0e2c2956a5895a875]
aws_subnet.tera-subnet01[2]: Refreshing state... [id=subnet-045aa7507bc080a18]

〜〜出力省略〜〜

Plan: 0 to add, 0 to change, 7 to destroy.

Do you really want to destroy all resources?
  Terraform will destroy all your managed infrastructure, as shown above.
  There is no undo. Only 'yes' will be accepted to confirm.

  Enter a value:
 ↑ yesを入力してEnter

〜〜出力省略〜〜

aws_fsx_ontap_file_system.aws-fsx01: Destruction complete after 8m35s
aws_subnet.tera-subnet01[2]: Destroying... [id=subnet-045aa7507bc080a18]
aws_security_group.terra-lin01-sg1: Destroying... [id=sg-057f6b0c7f4eaf005]
aws_subnet.tera-subnet01[0]: Destroying... [id=subnet-023b530301608d92e]
aws_subnet.tera-subnet01[1]: Destroying... [id=subnet-0e2c2956a5895a875]
aws_subnet.tera-subnet01[2]: Destruction complete after 0s
aws_subnet.tera-subnet01[0]: Destruction complete after 0s
aws_subnet.tera-subnet01[1]: Destruction complete after 0s
aws_security_group.terra-lin01-sg1: Destruction complete after 1s
aws_vpc.tera-vpc01: Destroying... [id=vpc-0e435d4096c44d203]
aws_vpc.tera-vpc01: Destruction complete after 0s

Destroy complete! Resources: 7 destroyed.
$
6-4 EKSクラスターを削除
eksctlコマンドで EKSクラスターを削除します。
$ # EKSクラスター削除
$ eksctl delete cluster --config-file ./bottlerocket.yaml
2024-10-24 23:03:50 [?]  deleting EKS cluster "my-cluster"
2024-10-24 23:03:51 [?]  will drain 1 unmanaged nodegroup(s) in cluster "my-cluster"
2024-10-24 23:03:51 [?]  starting parallel draining, max in-flight of 1
2024-10-24 23:03:51 [?]  cordon node "ip-192-168-10-32.ap-northeast-1.compute.internal"
2024-10-24 23:03:51 [?]  cordon node "ip-192-168-41-107.ap-northeast-1.compute.internal"
2024-10-24 23:03:51 [?]  cordon node "ip-192-168-73-90.ap-northeast-1.compute.internal"
2024-10-24 23:04:58 [!]  1 pods are unevictable from node ip-192-168-10-32.ap-northeast-1.compute.internal
2024-10-24 23:05:58 [!]  1 pods are unevictable from node ip-192-168-10-32.ap-northeast-1.compute.internal
2024-10-24 23:06:58 [!]  1 pods are unevictable from node ip-192-168-10-32.ap-northeast-1.compute.internal
2024-10-24 23:07:59 [!]  1 pods are unevictable from node ip-192-168-10-32.ap-northeast-1.compute.internal
2024-10-24 23:08:59 [!]  1 pods are unevictable from node ip-192-168-10-32.ap-northeast-1.compute.internal
2024-10-24 23:09:59 [!]  1 pods are unevictable from node ip-192-168-10-32.ap-northeast-1.compute.internal
2024-10-24 23:11:00 [!]  1 pods are unevictable from node ip-192-168-10-32.ap-northeast-1.compute.internal
2024-10-24 23:12:00 [!]  1 pods are unevictable from node ip-192-168-10-32.ap-northeast-1.compute.internal
2024-10-24 23:12:13 [?]  drained all nodes: [ip-192-168-10-32.ap-northeast-1.compute.internal ip-192-168-73-90.ap-northeast-1.compute.internal ip-192-168-41-107.ap-northeast-1.compute.internal]
2024-10-24 23:12:13 [?]  failed to acquire semaphore while waiting for all routines to finish: context canceled
2024-10-24 23:12:13 [?]  deleted 0 Fargate profile(s)
2024-10-24 23:12:13 [?]  kubeconfig has been updated
2024-10-24 23:12:13 [?]  cleaning up AWS load balancers created by Kubernetes objects of Kind Service or Ingress
2024-10-24 23:12:15 [?]
4 sequential tasks: { delete nodegroup "ng-bottlerocket", delete IAM OIDC provider, delete addon IAM "eksctl-my-cluster-addon-vpc-cni", delete cluster control plane "my-cluster" [async]
}
2024-10-24 23:12:15 [?]  will delete stack "eksctl-my-cluster-nodegroup-ng-bottlerocket"
2024-10-24 23:12:15 [?]  waiting for stack "eksctl-my-cluster-nodegroup-ng-bottlerocket" to get deleted
2024-10-24 23:12:15 [?]  waiting for CloudFormation stack "eksctl-my-cluster-nodegroup-ng-bottlerocket"
2024-10-24 23:12:45 [?]  waiting for CloudFormation stack "eksctl-my-cluster-nodegroup-ng-bottlerocket"
2024-10-24 23:13:21 [?]  waiting for CloudFormation stack "eksctl-my-cluster-nodegroup-ng-bottlerocket"
2024-10-24 23:14:05 [?]  waiting for CloudFormation stack "eksctl-my-cluster-nodegroup-ng-bottlerocket"
2024-10-24 23:15:30 [?]  waiting for CloudFormation stack "eksctl-my-cluster-nodegroup-ng-bottlerocket"
2024-10-24 23:15:31 [?]  will delete stack "eksctl-my-cluster-addon-vpc-cni"
2024-10-24 23:15:31 [?]  will delete stack "eksctl-my-cluster-cluster"
2024-10-24 23:15:31 [?]  all cluster resources were deleted
$
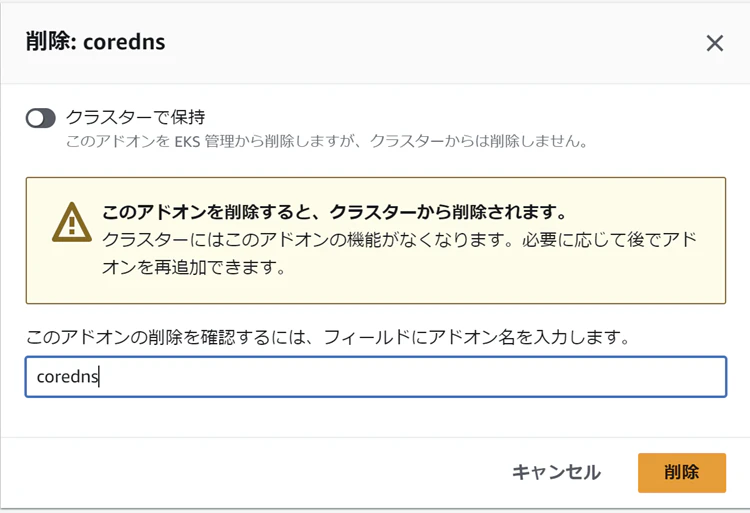
なお、私が削除処理を実行しているときに、”1 pods are unevictable from node ip-192-168-13-145.ap-northeast-1.compute.internal”のメッセージが出力されつづけて 削除処理が進まない事象が発生しました。その場合、EKS クラスターのアドオン”coredns”を手動で削除したところ削除処理が進むようになりました。
また、Cloud FormationのEKSクラスター展開用のスタックを削除でも EKSクラスター及び関連リソースを削除できましたので、備忘録として記載しておきます。
まとめ
Bottlerocketを利用するワーカーノードからNFSボリュームをマウント可能なことが確認してみました。
Bottlerocketを利用する場合でも、追加の手順なく従来OSと同様に 、FSx for NetApp ONTAPのNFS Volumeを シンプルに利用できました。コンテナに最適化された安全なワーカーノードから 信頼性の高いエンタープライズグレードのストレージサービスの機能を利用できるようになるので、なかなか便利なのではないかと思います。
今回 利用している NetApp Trident はストレージプロビジョニングおよびオーケストレーションツールで、Kuberentesライフサイクルにあわせて定期的な更新がされています。 機能追加はもちろん、今回のように新しい使い方のサポート等も また提供されるかと思います。興味のある更新がでてきたら試してみると面白いかと思います。