はじめに
こんにちは、XR系Unityエンジニアのやうです。Twitterはこちら
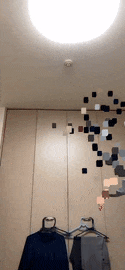
今回は、こんな感じで人からパーティクルを出すやつを作ります!
簡単に仕組みを説明すると、
ARFoundation(ARKit3)で、人のいる位置の深度情報を持った画像(HumanDepthTexture)が取得できるので、それをワールド座標に変換したTextureを作成し、VFXGraphに渡してパーティクル(Cube)を出現させています。
では、早速作っていきましょう!
今回のサンプルのリポジトリはこちらになります↓
https://github.com/YoHana19/HumanParticleEffect
環境
- Unity2019.3.4f1
- Universal RP 7.2.1
- AR Foundation preview.3 - 3.1.0
- ARKit XR Plugin preview.4 - 3.1.0
- XR Legacy Input Helpers 2.0.6
- Visual Effect Graph 7.2.1
- Xcode 11.3.1
- iPhone 11 pro (iOS 13.3.1)
HumanDepthTextureを取得してみる
まずは、下準備として環境構築と、HumanDepthTextureの取得をします。
ARFoundationのインストール
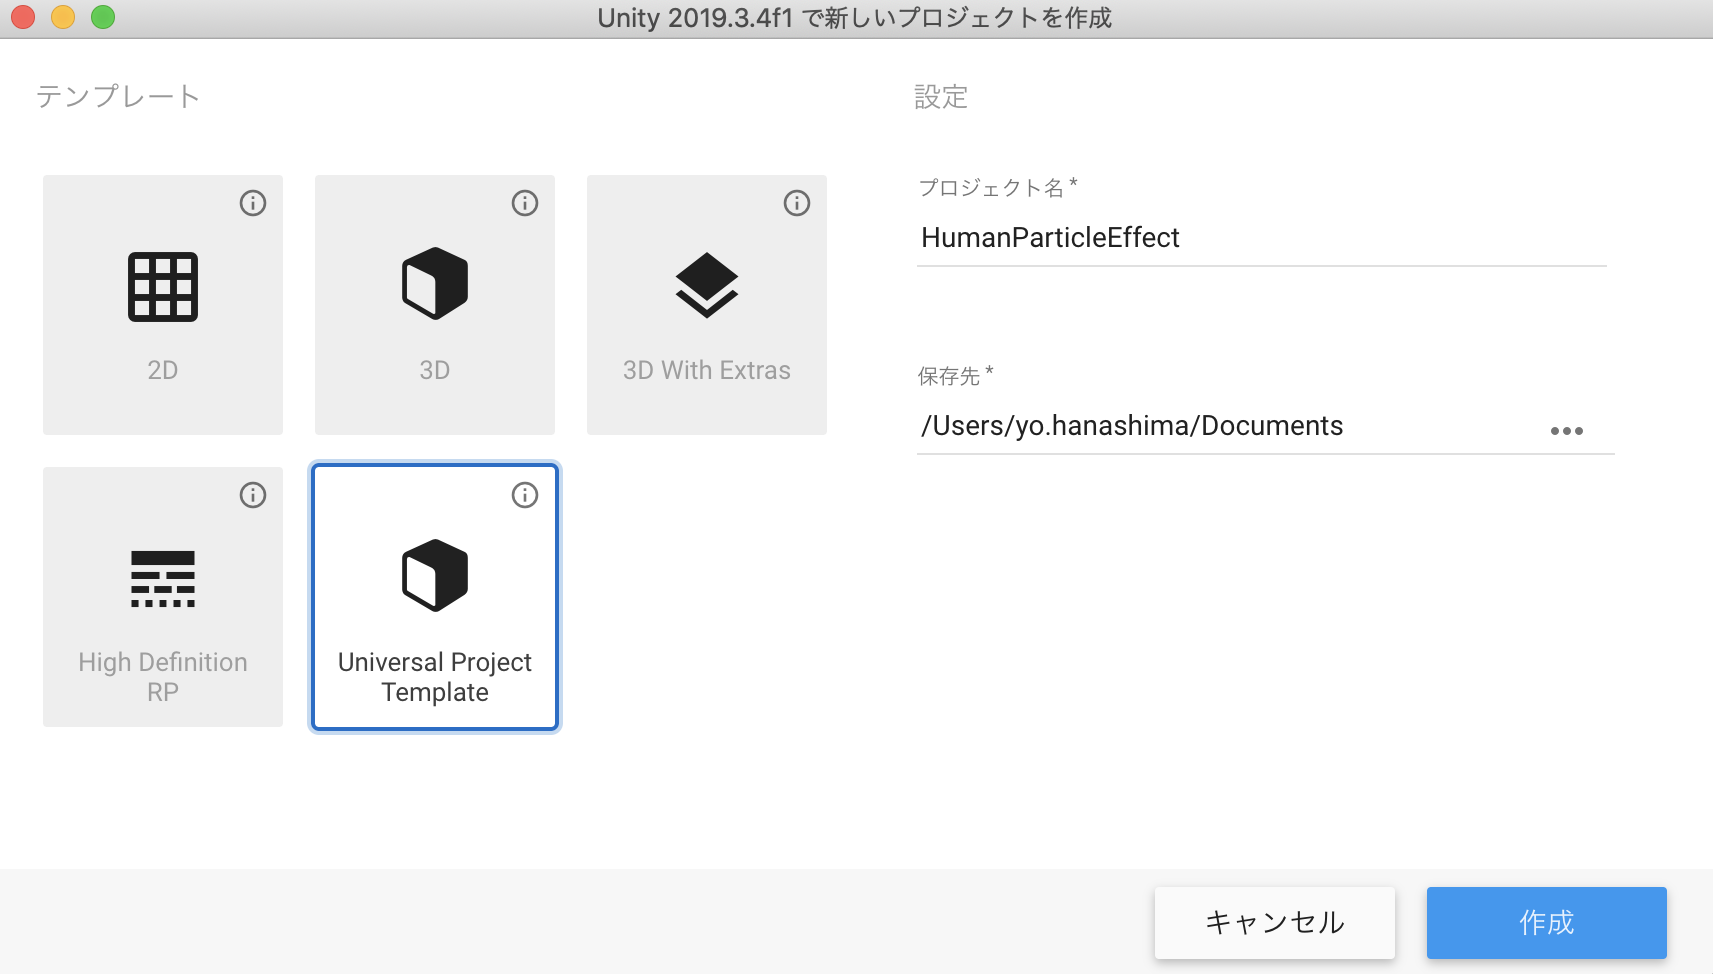
Universal Project Templateのプロジェクトを作成します。
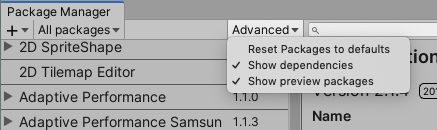
続いてPackage Managerで、以下のものをインストールします。
- AR Foundation
- ARKit XR Plugin
- XR Legacy Input Helpers
- Visual Effect Graph
パッケージのversionは、上述の環境を見て適宜選択してください。
(previewのversionを表示するには、上部のAdvancedタブをクッリクし、show preview packagesを選択します)
シーンのセットアップ
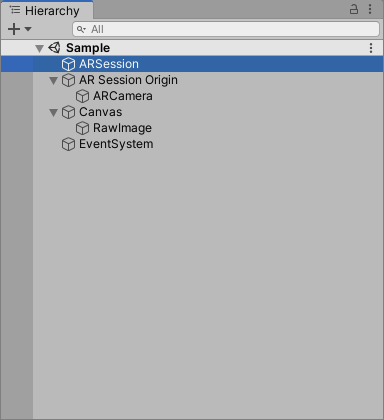
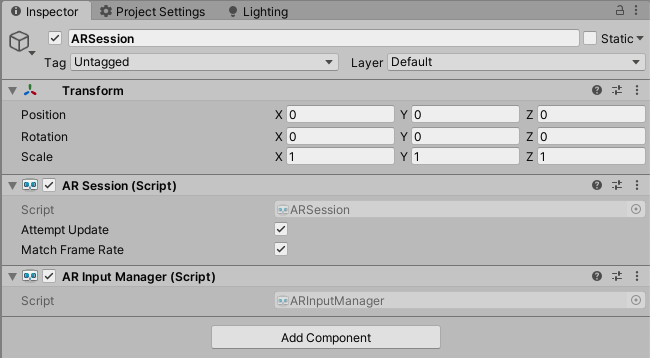
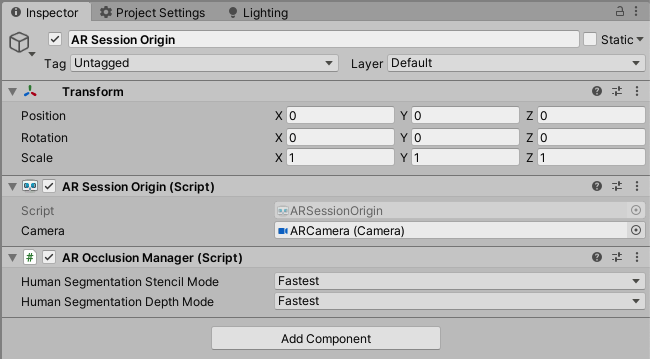
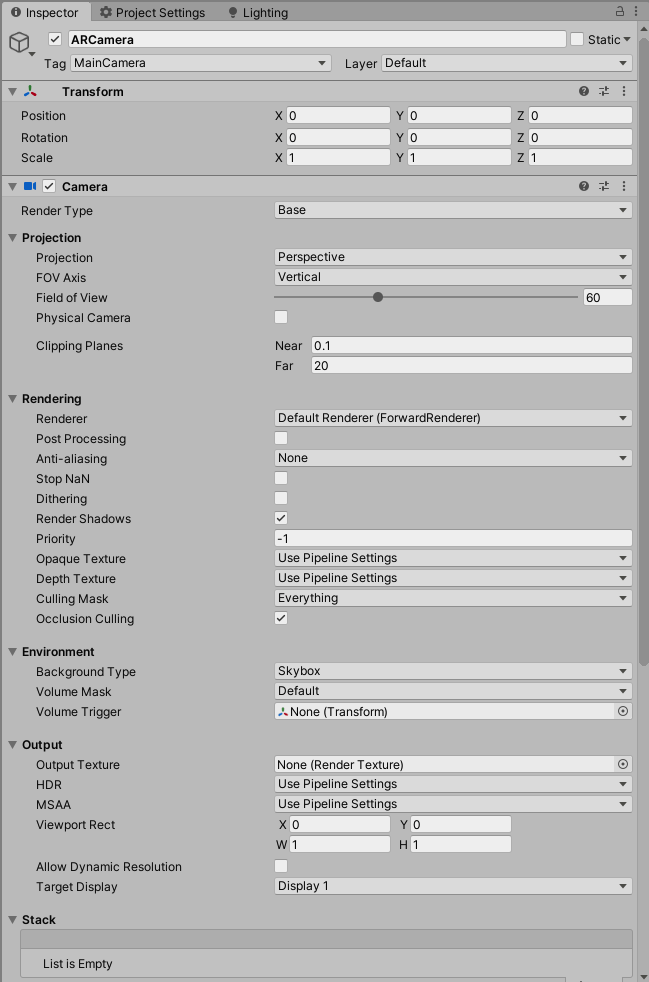
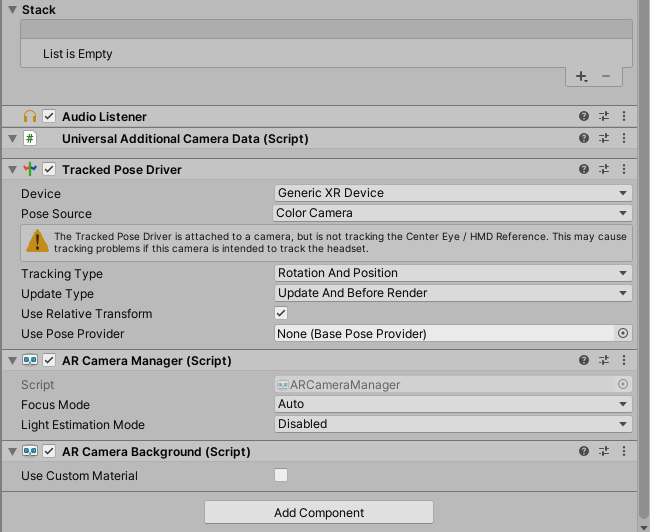
以下の画像を参考に、ヒエラルキー及びコンポーネントの設定を行ってください。
CanvasとRawImageは、今回はHumanDepthTextureの表示に使うだけなので、適当に設定してください。
パイプラインアセットの作成
ARFoundationをURPなどのSRPで使うためには、もう一手間必要です。
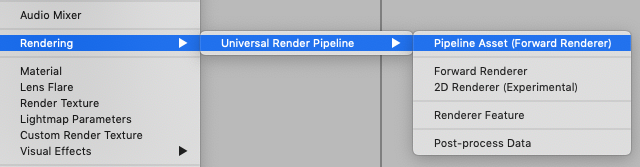
Projectウィンドウで、Rendering > Universal Render Pipeline > Pipeline Asset(Forward Renderer) を新規追加します。
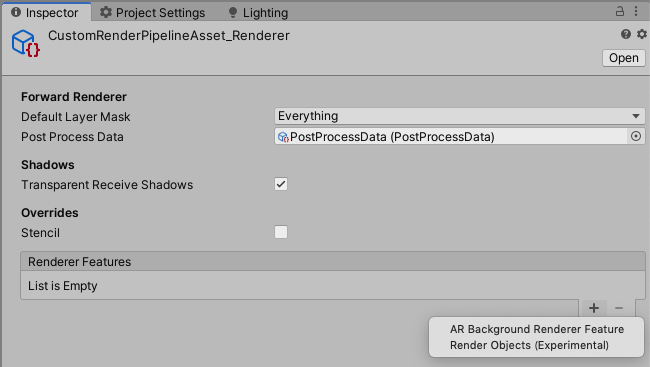
すると、名前、名前_Rendererという二つのアセットが生成されます。(自分はCustomRenderPipelineAssetと命名しました)

名前_Rendererのインスペクターの、Renderer FeaturesにAR Background Renderer Featureを追加します。
次に、Project SettingsのGraphicsを開きます。
その中の、Scriptable Render PipelineSettingsの項目に、先ほど作成したPipeline Assetを設定します。
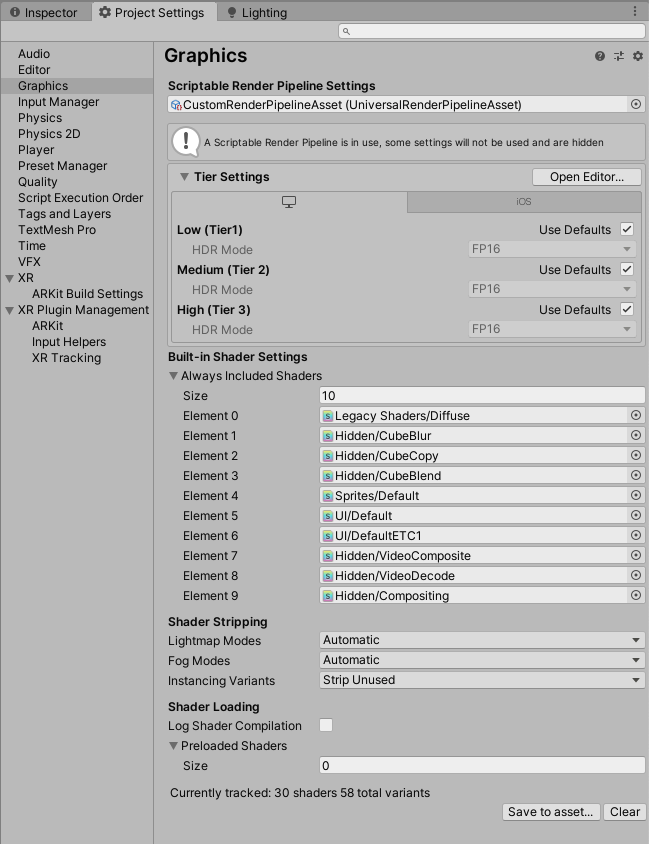
続いて、Project Settingsの Qualityを開き、Renderingの項目に作成したPipeline Assetを設定します。
この時、iOSにチェックが入っているレベルを選択するのを忘れないようにしましょう。(自分はこれで2時間くらい無駄にしましたorz)

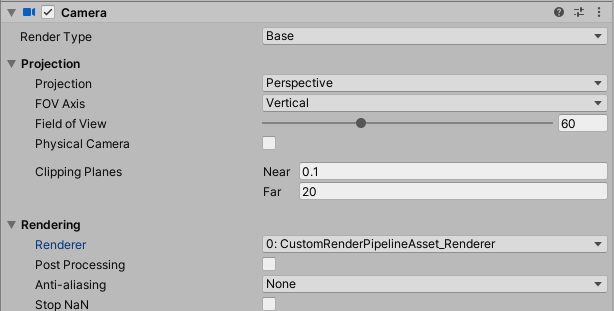
最後に、カメラのインスペクターのRendering内のRendererのドロップダウンで、作成したRendererを選択します。
これで、ARFoundationを動かす準備が整いました。
※ちなみに、このパイプラインアセットの作成が必要な理由は、ARFoundationが実機のカメラ画像を描画するのにCommand Bufferを使用するのですが、レガシーパイプラインはカメラに直接Command Bufferを追加できたのに対し、SRPの場合は、ScriptableRendererFeature及びScriptableRenderPassを継承したクラスを自分で作って、そこでCommand Bufferなど、描画に関する様々なカスタマイズをするようになっているためです。
また、ARBackgroundRendererFeature.csのスクリプトを見れば、ARFoundationがどのように実機のカメラ画像を描画しているかわかります。
HumanDepthTextureの取得
さて、本命のHumanDepthTextureの取得ですが、とっても簡単です。
以下にスクリプトをのせます。
using UnityEngine;
using UnityEngine.UI;
using UnityEngine.XR.ARFoundation;

public class Sample : MonoBehaviour
{
    [SerializeField] private AROcclusionManager _arOcclusionManager;
    [SerializeField] private RawImage _rawImage;

    private void Update()
    {
        _rawImage.texture = _arOcclusionManager.humanDepthTexture;
    }
}
AROcclusionManagerのhumanDepthTextureで、人の深度画像が取れるので、それを毎フレーム取得してRawImageに表示するだけです。
このスクリプトを適当な所につけて、ビルドします。
実機で確認
ビルドする際に、カメラ使用の許可が必要なので、Player SettingsのCamera Usage Descriptionに適当な文言を入力します。
さらに、ARKit3を使うので、Target minimum iOS Versionを13.0にし、ArchitectureをARM64にします。
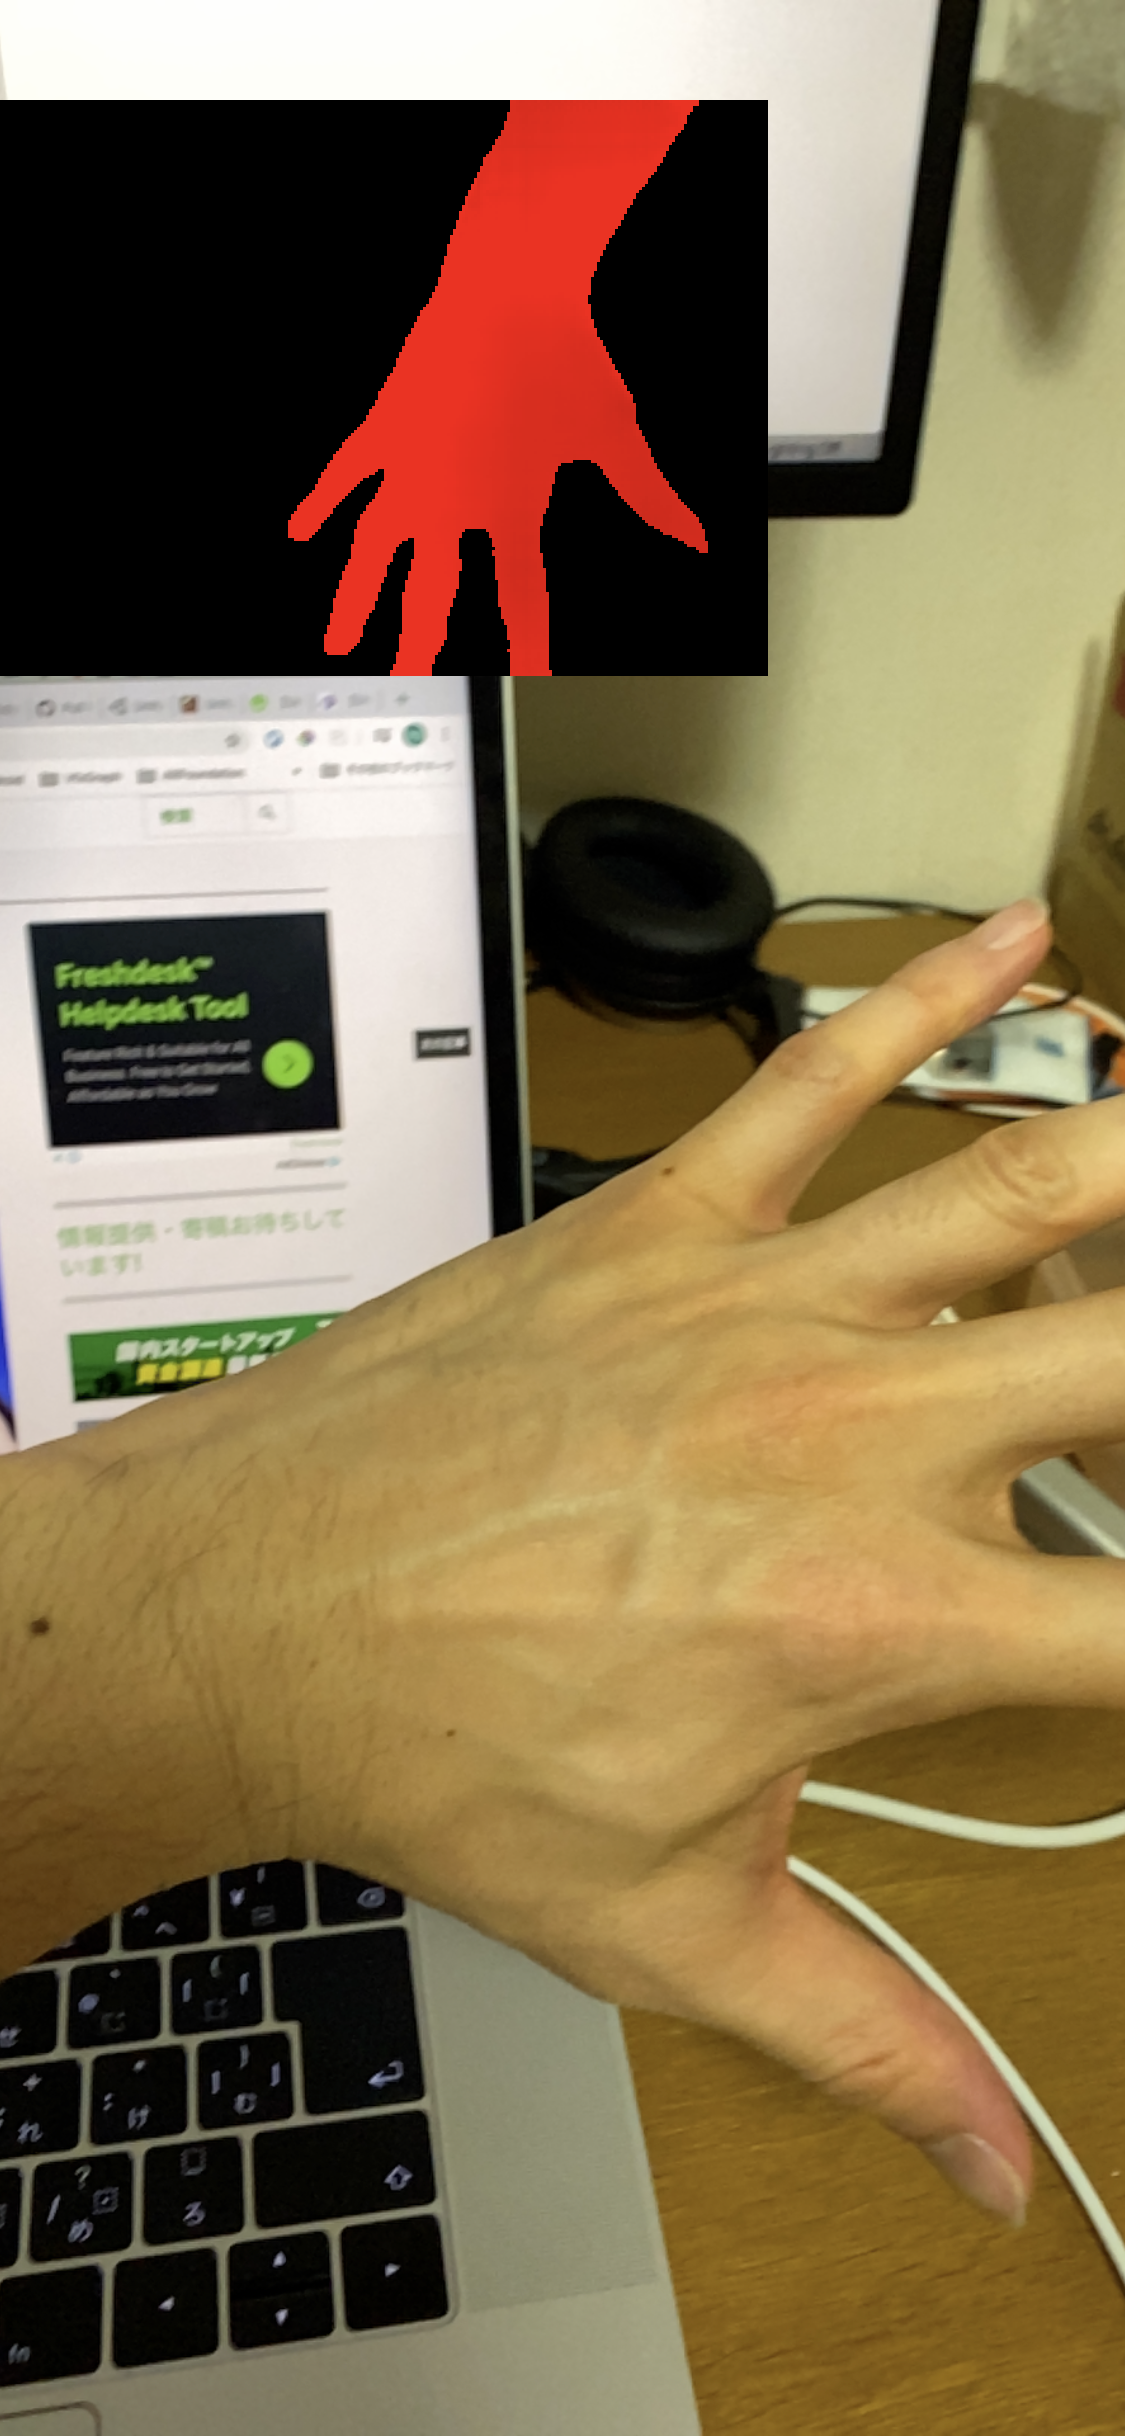
人間の部分だけ赤い画像が取得できるのが確認できます。よく見ると、赤い部分にも微かに明暗があるのが分かります。それが、深度を表してます。r値に深度を示す数値が格納されており、相対値ではなく絶対値なので、0~1ではなく0以上の値をとります。
実装の流れ
今回の実装の流れを説明します。
- ComputeShaderを使って、HumanDepthTextureを元に、スクリーンの各ピクセルの深度情報を取得する
- ピクセルの位置と深度情報を元にワールド座標に変換し、各ピクセルにその座標を格納したTextureを作成する
- Visual Effect GraphのSet Position From Mapに2で作成したTextureを渡して、パーティクルを発生させる
- Command Bufferを使ってカメラ画像を取得し、Set Color From Mapに渡して、パーティクルのカラーをつける
肝はやはり1,2の手順です。iPhone 11 proのスクリーンサイズ1125×2436の全ピクセル分処理するので、ComputeShaderを使って並列化します。
ComputeShaderで各ピクセルの深度情報を取得する
まず、厄介なのがHumanDepthTextureとスクリーンのUVが全く異なることです。上の画像でも、スクリーンでは手が左から出てるのに対し、デプス画像では上から出てます。さらに、解像度も異なるし、キャプチャしている範囲も若干異なることがわかります(カメラ画像では人差し指とかほとんど映ってないが、デプス画像はそこそこ映っている)。
しかし、そこは先人の方々がUVを調整する計算式をあげてくれているので、それを利用します。
また、ここではComputeShaderの説明は割愛しますが、以下の二つの記事がとても分かり易いのでおすすめです。
Unity : ComputeShader のシンプルなサンプル(1)
Unity : ComputeShader のシンプルなサンプル(2)
(2020.08.31追記)
残念ながら上の記事がリンク切れを起こしているようなので、他の参考記事を載せておきます。
ComputeShaderを触ってみる その1 ~スレッド編~
では、まずc#スクリプトとComputeShaderのコード全文をのせます。
using UnityEngine;
using UnityEngine.UI;
using UnityEngine.VFX;
using UnityEngine.XR.ARFoundation;

[RequireComponent(typeof(Camera))]
public class HumanParticle : MonoBehaviour
{
    public RenderTexture LatestCameraFeedBuffer
    {
        get
        {
            if (_lastDeviceOrientation == DeviceOrientation.Portrait)
            {
                return _colorMapPortrait;
            }
            return _colorMapLandscape;
        }
    }

    [SerializeField] private AROcclusionManager _arOcclusionManager;
    [SerializeField] private ComputeShader _computeShader;
    [SerializeField] private RenderTexture _positionMapPortrait;
    [SerializeField] private RenderTexture _positionMapLandscape;
    [SerializeField] private RenderTexture _colorMapPortrait;
    [SerializeField] private RenderTexture _colorMapLandscape;
    [SerializeField] private VisualEffect _visualEffect;

    private RenderTexture _tempRenderTexture;
    private Camera _camera;
    private DeviceOrientation _lastDeviceOrientation;
    private uint _threadSizeX, _threadSizeY, _threadSizeZ;
    private int _portraitKernel, _landscapeKernel;
    private Matrix4x4 _viewportInv;

    // Compute Shader
    private readonly int PropertyID_CameraPos = Shader.PropertyToID("cameraPos");
    private readonly int PropertyID_Converter = Shader.PropertyToID("converter");
    private readonly int PropertyID_Target = Shader.PropertyToID("target");
    private readonly int PropertyID_Origin = Shader.PropertyToID("origin");
    private readonly int PropertyID_IsWide = Shader.PropertyToID("isWide");
    private readonly int PropertyID_UVFlip = Shader.PropertyToID("uVFlip");
    private readonly int PropertyID_UVMultiplierPortrait = Shader.PropertyToID("uVMultiplierPortrait");
    private readonly int PropertyID_UVMultiplierLandScape = Shader.PropertyToID("uVMultiplierLandScape");

    // Visual Effect Graph
    private readonly int PropertyID_PositionMap = Shader.PropertyToID("PositionMap");
    private readonly int PropertyID_ColorMap = Shader.PropertyToID("ColorMap");

    void Start()
    {
        _camera = GetComponent<Camera>();

        _portraitKernel = _computeShader.FindKernel("Portrait");
        _landscapeKernel = _computeShader.FindKernel("Landscape");

        // Init Portrait at first
        _lastDeviceOrientation = DeviceOrientation.Portrait;
        _computeShader.SetInt(PropertyID_IsWide, 0);
    }

    void Update()
    {
        var humanDepthTexture = _arOcclusionManager.humanDepthTexture;
        if (humanDepthTexture)
        {
            if (_lastDeviceOrientation != Input.deviceOrientation)
            {
                if (Input.deviceOrientation == DeviceOrientation.LandscapeRight)
                {
                    _computeShader.SetFloat(PropertyID_UVFlip, 0);
                    _computeShader.SetInt(PropertyID_IsWide, 1);
                }
                else if (Input.deviceOrientation == DeviceOrientation.LandscapeLeft)
                {
                    _computeShader.SetFloat(PropertyID_UVFlip, 1);
                    _computeShader.SetInt(PropertyID_IsWide, 1);
                }
                else
                {
                    _computeShader.SetInt(PropertyID_IsWide, 0);
                }
                _lastDeviceOrientation = Input.deviceOrientation;
                InitSetup(humanDepthTexture);
            }

            if (_tempRenderTexture)
            {
                _computeShader.SetVector(PropertyID_CameraPos, _camera.transform.position);
                _computeShader.SetMatrix(PropertyID_Converter, GetConverter());

                if (_lastDeviceOrientation == DeviceOrientation.Portrait)
                {
                    _computeShader.SetTexture(_portraitKernel, PropertyID_Origin, humanDepthTexture);
                    _computeShader.Dispatch(_portraitKernel, Screen.width / (int) _threadSizeX,
                        Screen.height / (int) _threadSizeY, (int) _threadSizeZ);
                    Graphics.CopyTexture(_tempRenderTexture, _positionMapPortrait);
                }
                else
                {
                    _computeShader.SetTexture(_landscapeKernel, PropertyID_Origin, humanDepthTexture);
                    _computeShader.Dispatch(_landscapeKernel, Screen.width / (int) _threadSizeX,
                        Screen.height / (int) _threadSizeY, (int) _threadSizeZ);
                    Graphics.CopyTexture(_tempRenderTexture, _positionMapLandscape);
                }
            }
            else
            {
                InitSetup(humanDepthTexture);
            }
        }
    }

    private void InitSetup(Texture humanDepthTexture)
    {
        if (_lastDeviceOrientation == DeviceOrientation.Portrait)
        {
            _tempRenderTexture = new RenderTexture(_positionMapPortrait.width, _positionMapPortrait.height, 0, _positionMapPortrait.format) {enableRandomWrite = true};
            _tempRenderTexture.Create();
            _computeShader.SetTexture(_portraitKernel, PropertyID_Target, _tempRenderTexture);
            _computeShader.GetKernelThreadGroupSizes(_portraitKernel, out _threadSizeX, out _threadSizeY, out _threadSizeZ);
            _computeShader.SetFloat(PropertyID_UVMultiplierPortrait, CalculateUVMultiplierPortrait(humanDepthTexture));
            _visualEffect.SetTexture(PropertyID_PositionMap, _positionMapPortrait);
            _visualEffect.SetTexture(PropertyID_ColorMap, _colorMapPortrait);
        }
        else
        {
            _tempRenderTexture = new RenderTexture(_positionMapLandscape.width, _positionMapLandscape.height, 0, _positionMapLandscape.format) {enableRandomWrite = true};
            _tempRenderTexture.Create();
            _computeShader.SetTexture(_landscapeKernel, PropertyID_Target, _tempRenderTexture);
            _computeShader.GetKernelThreadGroupSizes(_landscapeKernel, out _threadSizeX, out _threadSizeY, out _threadSizeZ);
            _computeShader.SetFloat(PropertyID_UVMultiplierLandScape, CalculateUVMultiplierLandScape(humanDepthTexture));
            _visualEffect.SetTexture(PropertyID_PositionMap, _positionMapLandscape);
            _visualEffect.SetTexture(PropertyID_ColorMap, _colorMapLandscape);
        }

        SetViewPortInv();
    }

    private float CalculateUVMultiplierLandScape(Texture textureFromAROcclusionManager)
    {
        float screenAspect = (float) Screen.width / Screen.height;
        float cameraTextureAspect = (float) textureFromAROcclusionManager.width / textureFromAROcclusionManager.height;
        return screenAspect / cameraTextureAspect;
    }

    private float CalculateUVMultiplierPortrait(Texture textureFromAROcclusionManager)
    {
        float screenAspect = (float) Screen.height / Screen.width;
        float cameraTextureAspect = (float) textureFromAROcclusionManager.width / textureFromAROcclusionManager.height;
        return screenAspect / cameraTextureAspect;
    }

    private void SetViewPortInv()
    {
        _viewportInv = Matrix4x4.identity;
        _viewportInv.m00 = _viewportInv.m03 = Screen.width / 2f;
        _viewportInv.m11 = Screen.height / 2f;
        _viewportInv.m13 = Screen.height / 2f;
        _viewportInv.m22 = (_camera.farClipPlane - _camera.nearClipPlane) / 2f;
        _viewportInv.m23 = (_camera.farClipPlane + _camera.nearClipPlane) / 2f;
        _viewportInv = _viewportInv.inverse;
    }

    private Matrix4x4 GetConverter()
    {
        Matrix4x4 viewMatInv = _camera.worldToCameraMatrix.inverse;
        Matrix4x4 projMatInv = _camera.projectionMatrix.inverse;
        return viewMatInv * projMatInv * _viewportInv;
    }
}
# pragma kernel Portrait
# pragma kernel Landscape

RWTexture2D<float4> target;
Texture2D<float4> origin;
float3 cameraPos;
float4x4 converter;

int isWide;
float uVFlip;
float uVMultiplierPortrait;
float uVMultiplierLandScape;

SamplerState _LinearClamp;

float2 adjustUV(float2 uv)
{
    if (isWide == 1) {
        float2 forMask = float2(uv.x, (1.0 - (uVMultiplierLandScape * 0.5f)) + (uv.y / uVMultiplierLandScape));
        return float2(lerp(1.0 - forMask.x, forMask.x, uVFlip), lerp(forMask.y, 1.0 - forMask.y, uVFlip));
    } else {
        float2 forMask = float2((1.0 - (uVMultiplierPortrait * 0.5f)) + (uv.x / uVMultiplierPortrait), uv.y);
        return float2(1.0 - forMask.y, 1.0 - forMask.x);
    }
}

float3 getWorldPosition(uint2 screenPos, float distanceFromCamera)
{
    float4 pos = float4((float)screenPos.x, (float)screenPos.y, 0, 1);
    float4 converted = mul(converter, pos);
    float3 onNearClip = converted.xyz / converted.w;
    float3 vec = onNearClip - cameraPos;
    float dist = sqrt(vec.x * vec.x + vec.y * vec.y + vec.z * vec.z);
    return cameraPos + vec * distanceFromCamera / dist;
}

[numthreads(25,29,1)]
void Portrait (uint3 id : SV_DispatchThreadID)
{
    float tWidth, tHeight;
    target.GetDimensions(tWidth, tHeight);
    float2 uvOrigin = adjustUV(float2((float)id.x/tWidth, (float)id.y/tHeight));
    float4 t = origin.SampleLevel(_LinearClamp, uvOrigin, 0);
    if (t.x > 0) {
        float4 depth = float4(getWorldPosition(id.xy, t.x * 0.625f), 1); // 0.625 hack occlusion depth based on real world observation
        target[id.xy] = depth;
    } else {
        target[id.xy] = float4(0, -10, 0, 1); // Just make sure to be outside of view sight
    }
}

[numthreads(29,25,1)]
void Landscape (uint3 id : SV_DispatchThreadID)
{
    float tWidth, tHeight;
    target.GetDimensions(tWidth, tHeight);
    float2 uvOrigin = adjustUV(float2((float)id.x/tWidth, (float)id.y/tHeight));
    float4 t = origin.SampleLevel(_LinearClamp, uvOrigin, 0);
    if (t.x > 0) {
        float4 depth = float4(getWorldPosition(id.xy, t.x * 0.625f), 1); // 0.625 hack occlusion depth based on real world observation
        target[id.xy] = depth;
    } else {
        target[id.xy] = float4(0, -10, 0, 1); // Just make sure to be outside of view sight
    }
}
深度情報を取得するところから見ていきましょう。
RWTexture2D<float4> target;
Texture2D<float4> origin;
まずこのtargetが、最終的にスクリーンの各ピクセルに、人がいる位置のワールド座標を格納するTextureです。c#側のスクリプトでスクリーンと同サイズのRenderTextureを生成して、ここにセットします(後述します)。また書き込む必要があるのでRWTexture2Dとして宣言します。
次にoriginが、深度情報を取得する元となるHumanDepthTextureをセットするものです。
そして、実際に深度情報を取得する処理は以下の通りです。
SamplerState _LinearClamp;

[numthreads(25,29,1)]
void Portrait (uint3 id : SV_DispatchThreadID)
{
    float tWidth, tHeight;
    target.GetDimensions(tWidth, tHeight);
    float2 uvOrigin = adjustUV(float2((float)id.x/tWidth, (float)id.y/tHeight));
    float4 t = origin.SampleLevel(_LinearClamp, uvOrigin, 0);
    ...
}

int isWide;
float uVFlip;
float uVMultiplierPortrait;
float uVMultiplierLandScape;

float2 adjustUV(float2 uv)
{
    if (isWide == 1) {
        float2 forMask = float2(uv.x, (1.0 - (uVMultiplierLandScape * 0.5f)) + (uv.y / uVMultiplierLandScape));
        return float2(lerp(1.0 - forMask.x, forMask.x, uVFlip), lerp(forMask.y, 1.0 - forMask.y, uVFlip));
    } else {
        float2 forMask = float2((1.0 - (uVMultiplierPortrait * 0.5f)) + (uv.x / uVMultiplierPortrait), uv.y);
        return float2(1.0 - forMask.y, 1.0 - forMask.x);
    }
}
カーネルの引数のuint3 id : SV_DispatchThreadIDには、実行スレッドの3次元のidが入ってきて、カーネルを実行するスレッド数とグループ数を適切に設定すれば、Textureの各テクセル座標がid.x, id.yとして取得できます。
target.GetDimensions(tWidth, tHeight)でスクリーンサイズを取得し、テクセル座標を幅及び高さで割ってあげれば、スクリーン上のUVが求められます。
それを、先人が作ってくれた計算式に通せば、HumanDepthTextureに調整されたUVになるので、そのUVを使って、
float4 t = origin.SampleLevel(_LinearClamp, uvOrigin, 0)で、HumanDepthTextureから該当するテクセルの値、つまり深度情報を取得します。
ちなみに、このUV調整の計算式の仕組みは正直わからないです(笑)。
では、次にc#側でのComputeShaderへ各値をセットしているコードを見ていきましょう。
[SerializeField] private ComputeShader _computeShader;
// スクリーンサイズに合わせたRenderTextureをあらかじめ用意(これをVisual Effect Graphにセットする)
[SerializeField] private RenderTexture _positionMapPortrait;
[SerializeField] private RenderTexture _positionMapLandscape;

private int _portraitKernel, _landscapeKernel;
// ComputeShaderで処理する用のRenderTexture
private RenderTexture _tempRenderTexture;

void Start() {
    // カーネル取得
    _portraitKernel = _computeShader.FindKernel("Portrait");
    _landscapeKernel = _computeShader.FindKernel("Landscape");
    ...
}

void Update()
{
    var humanDepthTexture = _arOcclusionManager.humanDepthTexture;
    if (humanDepthTexture)
    {
        // 端末のOerientationが変わる度に値をセット
        if (_lastDeviceOrientation != Input.deviceOrientation)
        {
            if (Input.deviceOrientation == DeviceOrientation.LandscapeRight)
            {
                _computeShader.SetFloat(PropertyID_UVFlip, 0);
                _computeShader.SetInt(PropertyID_IsWide, 1);
            }
            else if (Input.deviceOrientation == DeviceOrientation.LandscapeLeft)
            {
                _computeShader.SetFloat(PropertyID_UVFlip, 1);
                _computeShader.SetInt(PropertyID_IsWide, 1);
            }
            else
            {
                _computeShader.SetInt(PropertyID_IsWide, 0);
            }
            _lastDeviceOrientation = Input.deviceOrientation;
            InitSetup(humanDepthTexture);
        }
        ...
    }
}

private void InitSetup(Texture humanDepthTexture)
{
    if (_lastDeviceOrientation == DeviceOrientation.Portrait)
    {
        // 該当するOrientationのRenderTextureと同じものを複製
        _tempRenderTexture = new RenderTexture(_positionMapPortrait.width, _positionMapPortrait.height, 0, _positionMapPortrait.format) {enableRandomWrite = true};
        _tempRenderTexture.Create();
        _computeShader.SetTexture(_portraitKernel, PropertyID_Target, _tempRenderTexture);
        // カーネルのスレッド数を取得
        _computeShader.GetKernelThreadGroupSizes(_portraitKernel, out _threadSizeX, out _threadSizeY, out _threadSizeZ);
        _computeShader.SetFloat(PropertyID_UVMultiplierPortrait, CalculateUVMultiplierPortrait(humanDepthTexture));
        ...
    }
    else
    {
        _tempRenderTexture = new RenderTexture(_positionMapLandscape.width, _positionMapLandscape.height, 0, _positionMapLandscape.format) {enableRandomWrite = true};
        _tempRenderTexture.Create();
        _computeShader.SetTexture(_landscapeKernel, PropertyID_Target, _tempRenderTexture);
        _computeShader.GetKernelThreadGroupSizes(_landscapeKernel, out _threadSizeX, out _threadSizeY, out _threadSizeZ);
        _computeShader.SetFloat(PropertyID_UVMultiplierLandScape, CalculateUVMultiplierLandScape(humanDepthTexture));
        _visualEffect.SetTexture(PropertyID_PositionMap, _positionMapLandscape);
        ...
    }
    ...
}

private float CalculateUVMultiplierLandScape(Texture textureFromAROcclusionManager)
{
    float screenAspect = (float) Screen.width / Screen.height;
    float cameraTextureAspect = (float) textureFromAROcclusionManager.width / textureFromAROcclusionManager.height;
    return screenAspect / cameraTextureAspect;
}

private float CalculateUVMultiplierPortrait(Texture textureFromAROcclusionManager)
{
    float screenAspect = (float) Screen.height / Screen.width;
    float cameraTextureAspect = (float) textureFromAROcclusionManager.width / textureFromAROcclusionManager.height;
    return screenAspect / cameraTextureAspect;
}
端末のOrientationが変わると、UV調整も変える必要があるので、変わる度に値をセットします。
また、スクリーンサイズが変わるので、書き込むRenderTextureも変える必要があり、それに伴ってカーネルのスレッド数も変えなければならなくなったので、今回はPortraitとLandscapeの二つのカーネルを用意しています。ただ、中身の処理は全く一緒です。
次に、ComputeShaderの実行呼び出しを見てみましょう。
void Update()
{
    var humanDepthTexture = _arOcclusionManager.humanDepthTexture;
    if (humanDepthTexture)
    {
        ...
        if (_tempRenderTexture)
        {
            ...
            if (_lastDeviceOrientation == DeviceOrientation.Portrait)
            {
                // HumanDepthTextureをComputeShaderにセット
                _computeShader.SetTexture(_portraitKernel, PropertyID_Origin, humanDepthTexture);
                // ComputeShaderを実行
                _computeShader.Dispatch(_portraitKernel, Screen.width / (int) _threadSizeX,
                    Screen.height / (int) _threadSizeY, (int) _threadSizeZ);
                // 書き込み終わった_tempRenderTextureをVisual Effect GraphにセットするRenderTextureにコピー
                Graphics.CopyTexture(_tempRenderTexture, _positionMapPortrait);
            }
            else
            {
                _computeShader.SetTexture(_landscapeKernel, PropertyID_Origin, humanDepthTexture);
                _computeShader.Dispatch(_landscapeKernel, Screen.width / (int) _threadSizeX,
                    Screen.height / (int) _threadSizeY, (int) _threadSizeZ);
                Graphics.CopyTexture(_tempRenderTexture, _positionMapLandscape);
            }
        }
    }
}
ComputeShaderの実行は、Dispatch (int kernelIndex, int threadGroupsX, int threadGroupsY, int threadGroupsZ)で行います。
今回Portraitの場合は、スレッド数を[numthreads(25,29,1)] にしています。
これは、スクリーンの幅、高さを割り切れる値を適当に選択しています。そうした上で、スレッドグループ数のxを幅 / スレッド数x、yを幅 / スレッド数yとすれば、1125×2436のテクセル全てにアクセスすることができます。
詳しくは、上述の記事を読んでみてください。
ピクセル位置と深度情報からワールド座標に変換する
さて、以上までで1125×2436のテクセル全ての深度情報が取得できました(人が映っていないテクセルは0になります)。
これをワールド座標に変換していきます。c#であれば、Camera.ScreenToWorldPoint(Vector3 position)という素晴らしいメソッドがありますが、今回は、これと同様のことをComputeShader内で行います。
ネットで探すと、ドンピシャな記事がありましたので、これを参考にしていきます。
UnityのCamera#ScreenToWorldPointを自前で計算してみる
詳しい説明は、上述の記事に任せますが、簡単に説明するとオブジェクト空間の座標がいくつかの座標変換を経てスクリーン空間の座標に描画されるので、その変換を遡るように変換行列の逆行列をかけてあげれば良いということです。
ただ、自分の理解が浅いこともあって、記事内で紹介されていたコードをそのまま使ってもうまく行かない部分があったので、少し力技で改変しています。
では、早速コードをみていきましょう。
float3 cameraPos;
float4x4 converter;

float3 getWorldPosition(uint2 screenPos, float distanceFromCamera)
{
    float4 pos = float4((float)screenPos.x, (float)screenPos.y, 0, 1);
    float4 converted = mul(converter, pos);
    float3 onNearClip = converted.xyz / converted.w;
    float3 vec = onNearClip - cameraPos;
    float dist = sqrt(vec.x * vec.x + vec.y * vec.y + vec.z * vec.z);
    return cameraPos + vec * distanceFromCamera / dist;
}

[numthreads(25,29,1)]
void Portrait (uint3 id : SV_DispatchThreadID)
{
    ...
    float4 t = origin.SampleLevel(_LinearClamp, uvOrigin, 0);
    // t.x > 0 => 人がいるテクセル
    if (t.x > 0) {
        float4 depth = float4(getWorldPosition(id.xy, t.x * 0.625f), 1); // 0.625 hack occlusion depth based on real world observation
        target[id.xy] = depth;
    } else {
        // 人がいないテクセルはとりあえず見えないだろう適当な座標を入れる(あんまり良くないが...)
        target[id.xy] = float4(0, -10, 0, 1);
    }
}
cameraPosには、カメラのワールド座標が入り、converterには、上述の必要な変換行列の逆行列を掛け合わせたものが入ります。
これを、スクリーンのピクセル位置と深度を表したベクトルにかければワールド座標が出ると思っていたのですが、z値(深度)がうまく反映されませんでした。(この辺情報提供してくれる方いたら嬉しいです!!)
ただ色々試した結果、深度を0としてやれば、nearClipの視錐台面上で正しいワールド座標が取れたので、そこからカメラまでの距離を計算し、それと実際の深度との比で正しいワールド座標を出すという力技的なことをしています。
float4 depth = float4(getWorldPosition(id.xy, t.x * 0.625f), 1); // 0.625 hack occlusion depth based on real world observation
target[id.xy] = depth;
以上のコードで、スクリーンのピクセル座標と深度を使って、ワールド座標を計算し、それをRenderTextureの各テクセルに格納しています。
また、HumanDepthTextureから取得した深度値を0.625倍しているのは、上述のフォーラムを参考にして調整したものです。
c#側の実装は以下の通りです。
private Matrix4x4 _viewportInv;

void Update()
{
    var humanDepthTexture = _arOcclusionManager.humanDepthTexture;
    if (humanDepthTexture)
    {
        if (_tempRenderTexture)
        {
            _computeShader.SetVector(PropertyID_CameraPos, _camera.transform.position);
            _computeShader.SetMatrix(PropertyID_Converter, GetConverter());
            ...
        }
        ...
    }
}

private void InitSetup(Texture humanDepthTexture)
{
    ...
    SetViewPortInv();
}

private void SetViewPortInv()
{
    _viewportInv = Matrix4x4.identity;
    _viewportInv.m00 = _viewportInv.m03 = Screen.width / 2f;
    _viewportInv.m11 = Screen.height / 2f;
    _viewportInv.m13 = Screen.height / 2f;
    _viewportInv.m22 = (_camera.farClipPlane - _camera.nearClipPlane) / 2f;
    _viewportInv.m23 = (_camera.farClipPlane + _camera.nearClipPlane) / 2f;
    _viewportInv = _viewportInv.inverse;
}

private Matrix4x4 GetConverter()
{
    Matrix4x4 viewMatInv = _camera.worldToCameraMatrix.inverse;
    Matrix4x4 projMatInv = _camera.projectionMatrix.inverse;
    return viewMatInv * projMatInv * _viewportInv;
}
ビューポート変換行列は、スクリーンサイズが変わる度に計算し、他は、毎フレーム計算しComputeShaderにセットしています。
中身は上述の記事の通りなので割愛します。
これで、HumanDepthTextureからワールド座標に変換したTextureを作成することができました。
あとは、これをVisual Effect Graphに渡してやればOKです。
Visual Effect GraphでTextureを元にParticleを発生させる
以上で作成したTextureは、rgb値にワールド座標が入っています。その値を使って、Particleを発生させるには、Set Position From Mapを使います。
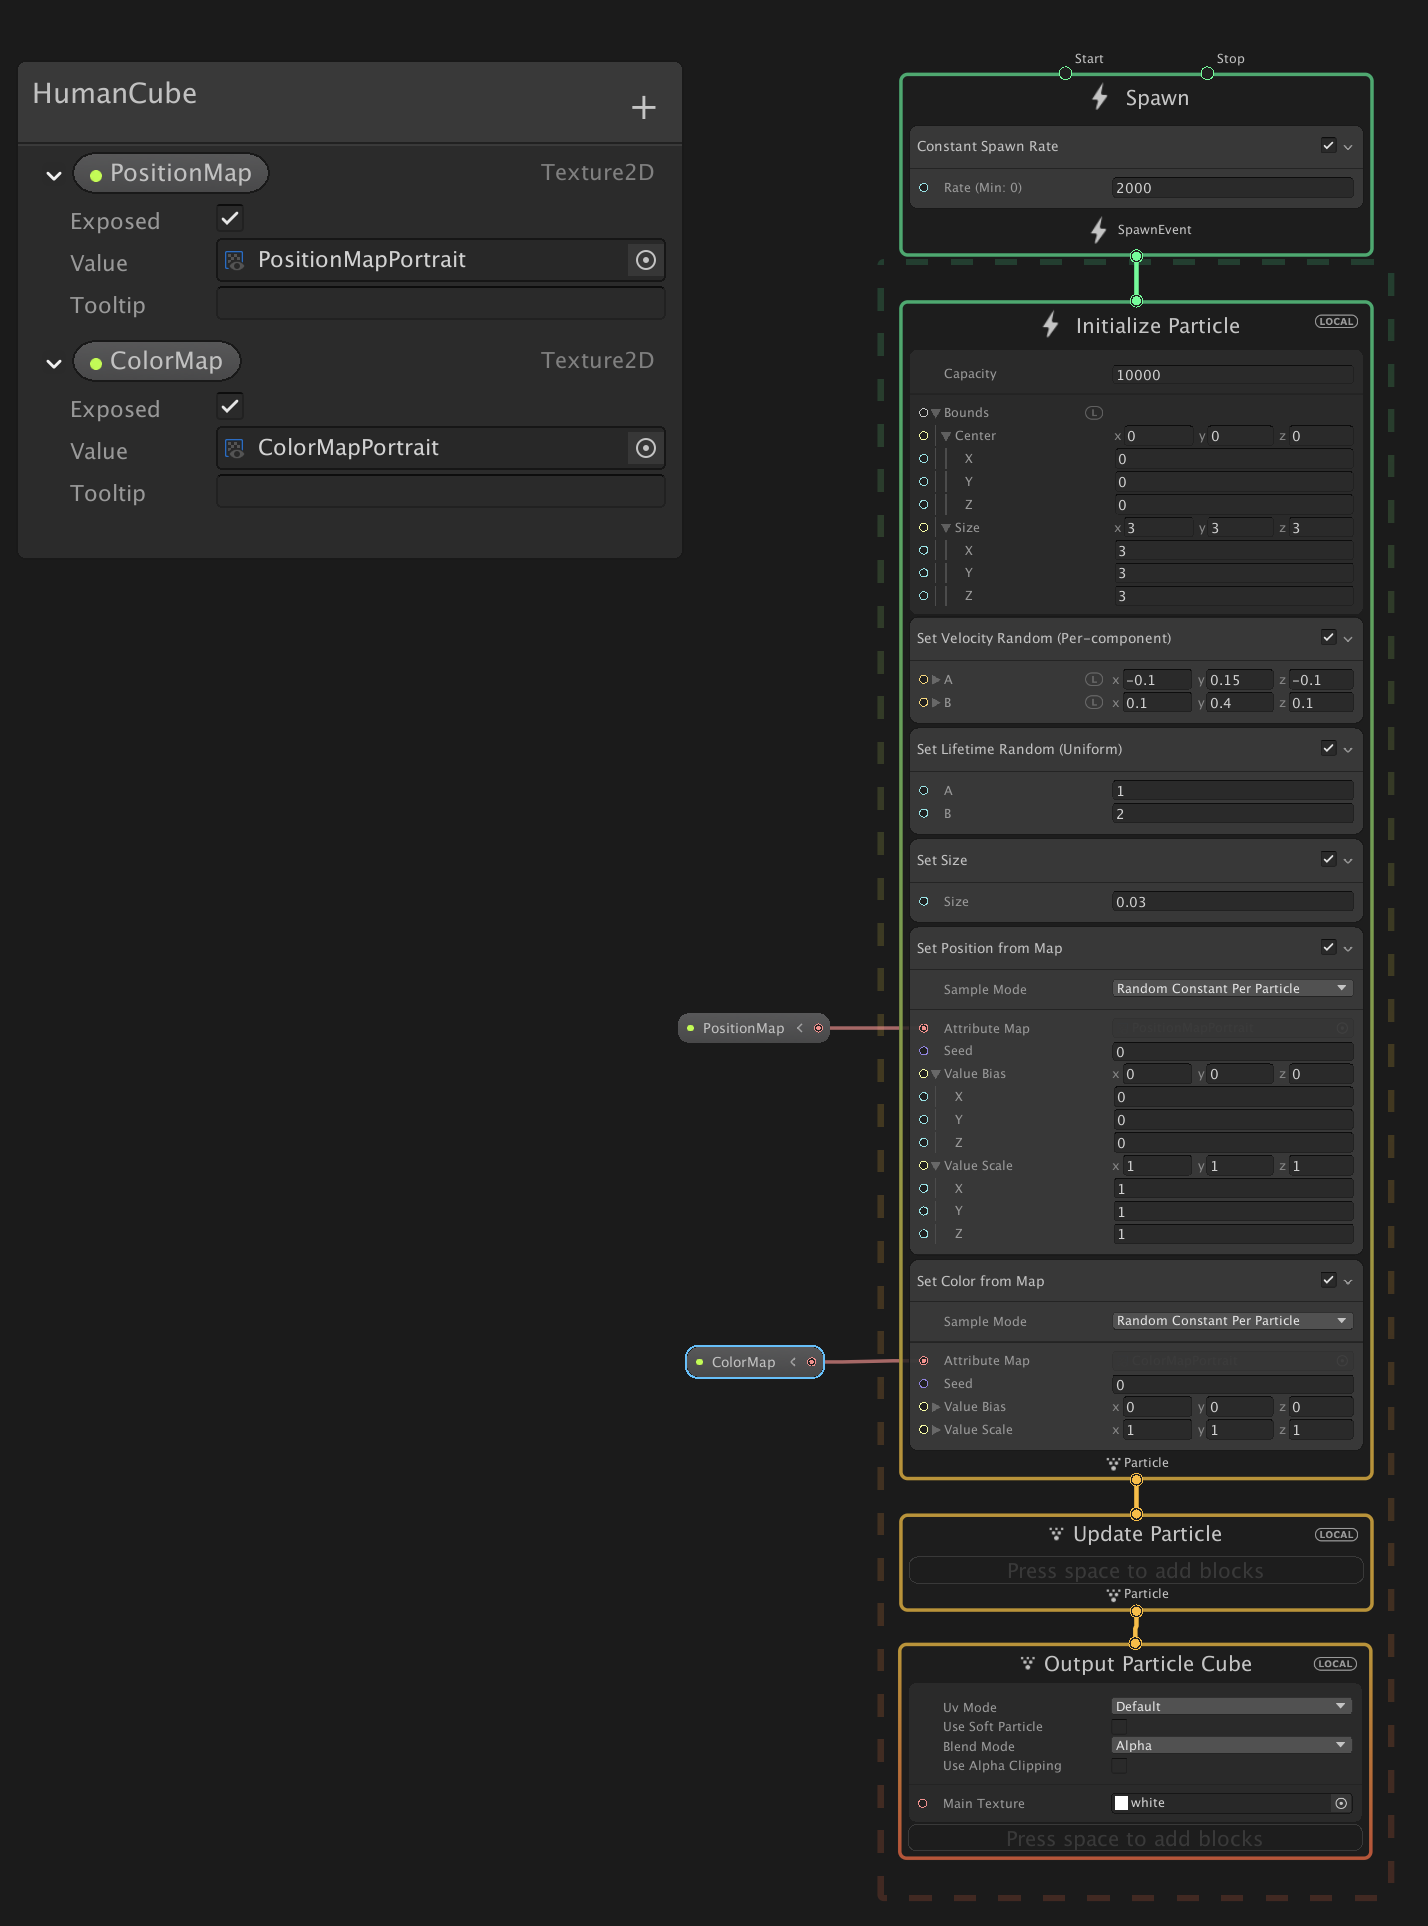
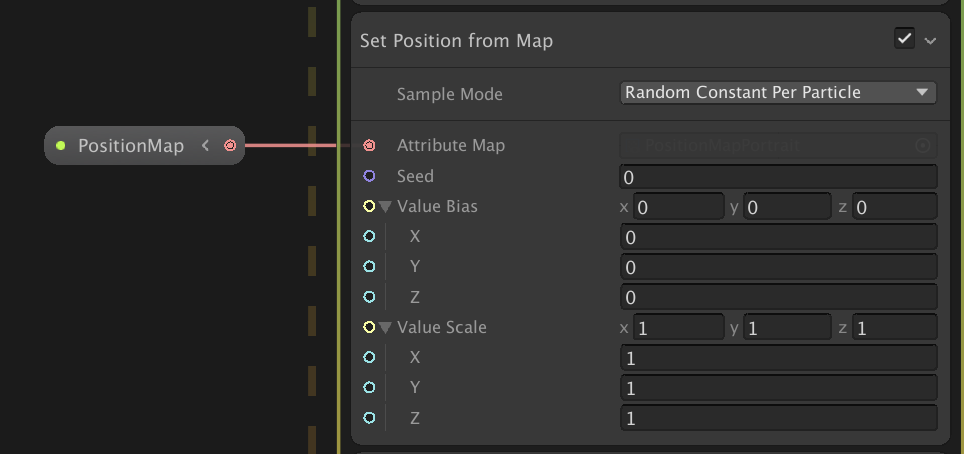
Initialize ParticleのコンテキストにSet Position From Mapブロックを追加します。
また、Texture2Dのプロパティを作って外部から設定できるようにし、それをSet Position From MapのAttribute Mapにセットします。
これで、セットしたTextureのrgb値を読んでParticleがその座標から発生するようになります。
Position Mapには、あらかじめ作ったRenderTextureをセットします。
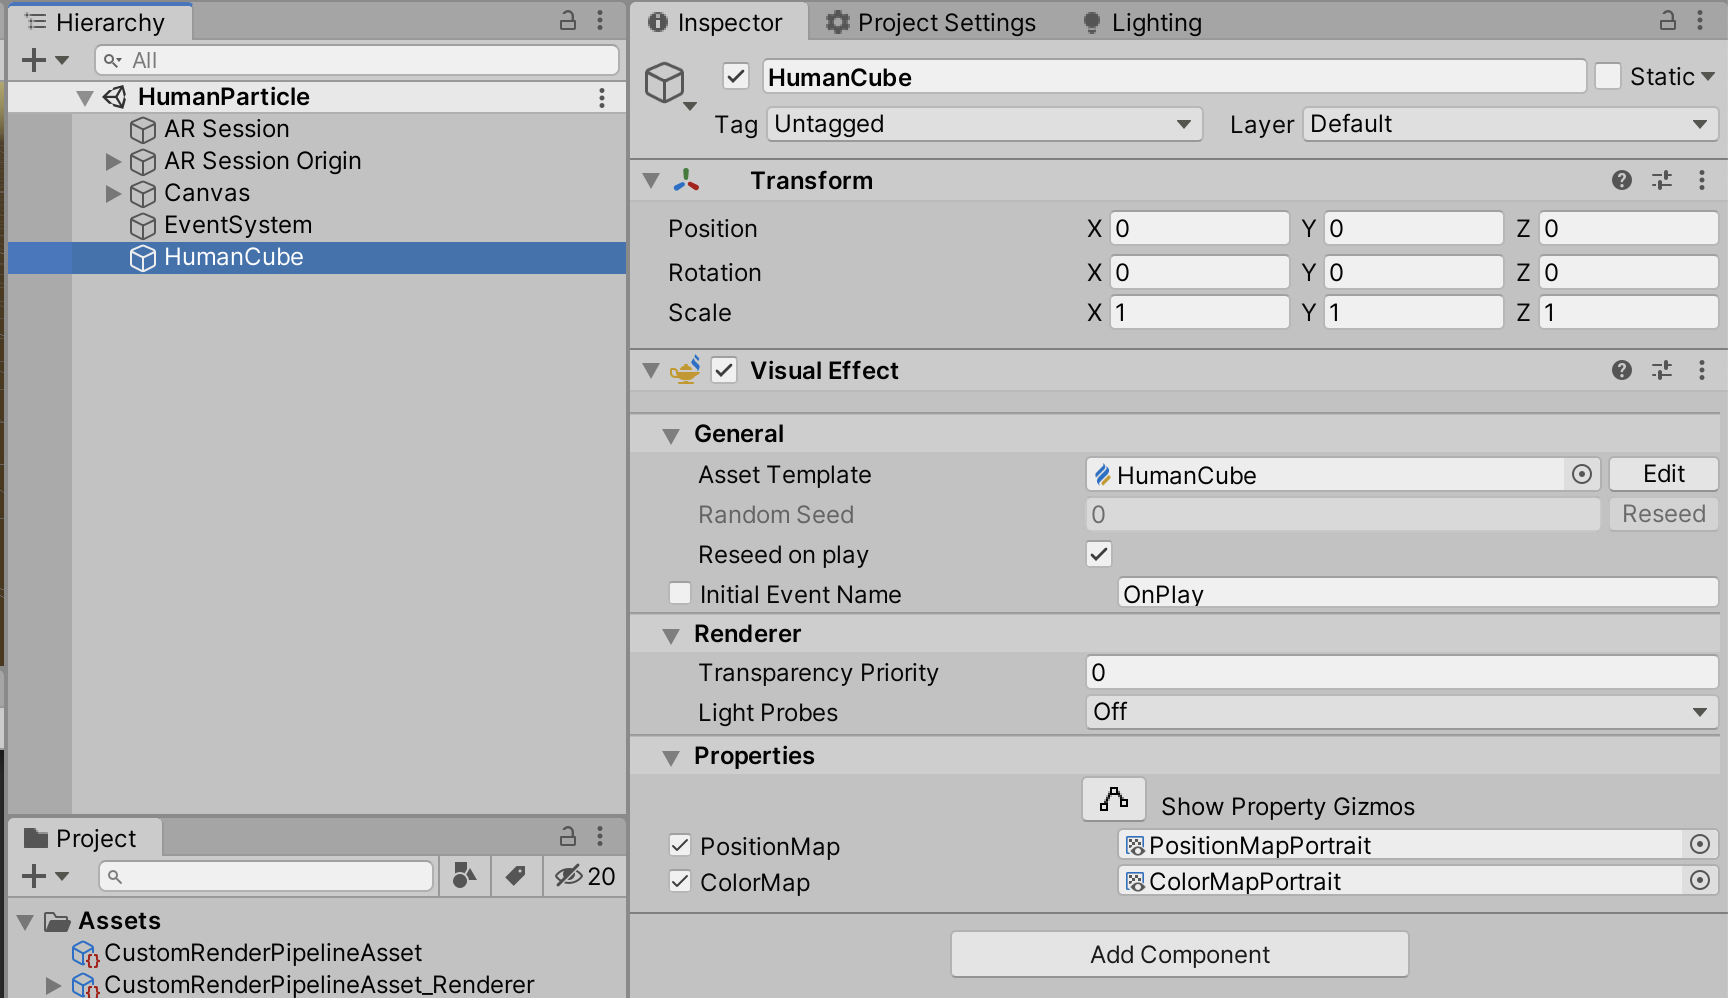
ここで気をつける必要があるのが、RenderTextureのColor Formatです。
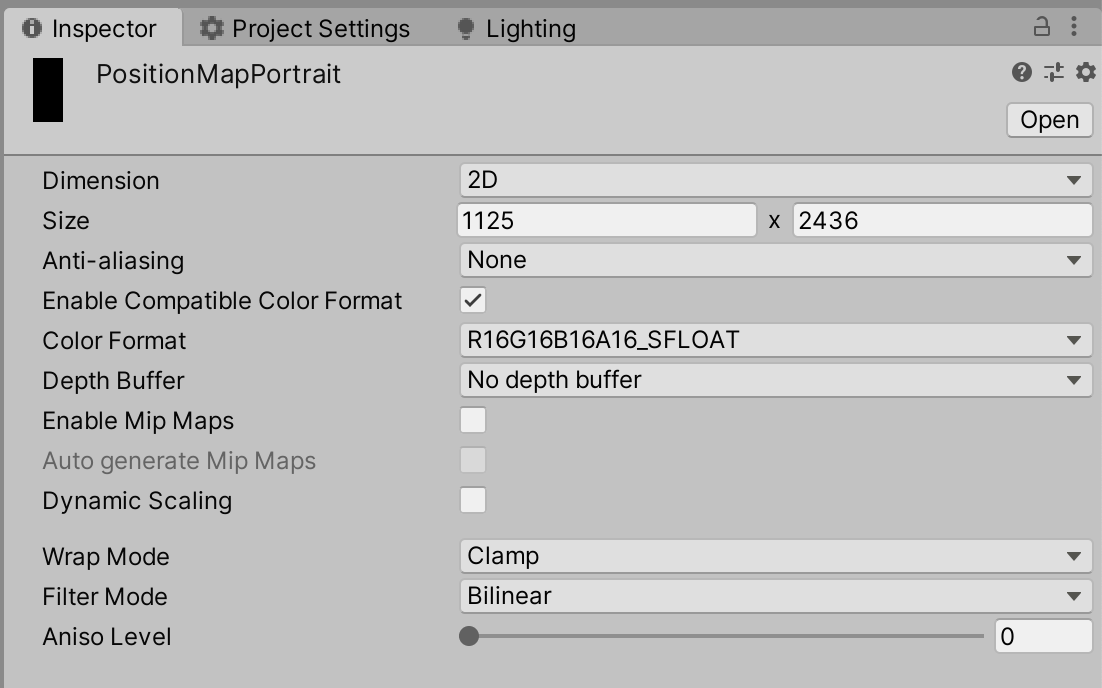
今回は、R16G16B16A16_SFLOATを選択していますが、これを下手な値にするとrbg値が0~1にclampされたりしてしまうので気をつけてください。SFLOATのSはsignedの意味で負の値を受け付けることができます。
ちなみに自分は、最初はスクリプトでRenderTextureを生成し、その際Color FormatをARGB32にしていたのですが、これが0~1にclampされるのに気づかず、2時間くらい無駄にしました。
あとは、端末のOrientationが変わる度に、セットするRenderTextureを切り替えます。
private void InitSetup(Texture humanDepthTexture)
{
    if (_lastDeviceOrientation == DeviceOrientation.Portrait)
    {
        ...
        _visualEffect.SetTexture(PropertyID_PositionMap, _positionMapPortrait);
        ...
    }
    else
    {
        ...
        _visualEffect.SetTexture(PropertyID_PositionMap, _positionMapLandscape);
        ...
    }
}
Command Bufferでカメラ画像を取得し、パーティクルにカラーをつける
最後に発生させたパーティクルに、その発生元の位置の色を反映させます。
Visual Effect GraphのSet Color From Mapで、Positionと同じようにTextureを読み込んで色をつけることができます。
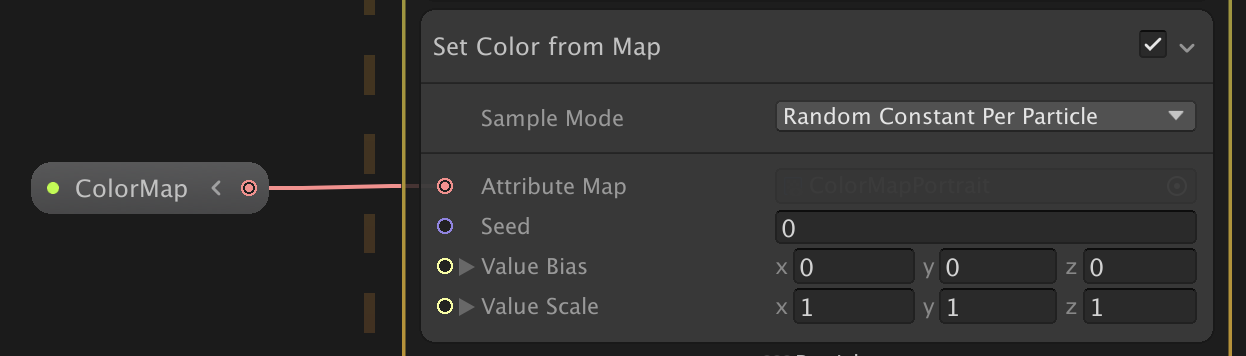
あとは、このColorMapにセットするRenderTextureにカメラ画像をコピーします。
カメラ画像のコピーはいくつか方法がありますが、今回は、ARFoundationがカメラ画像をスクリーンに描画した後に、CommandBuffer.Blitで、スクリーンをコピーすることでカメラ画像をコピーします。
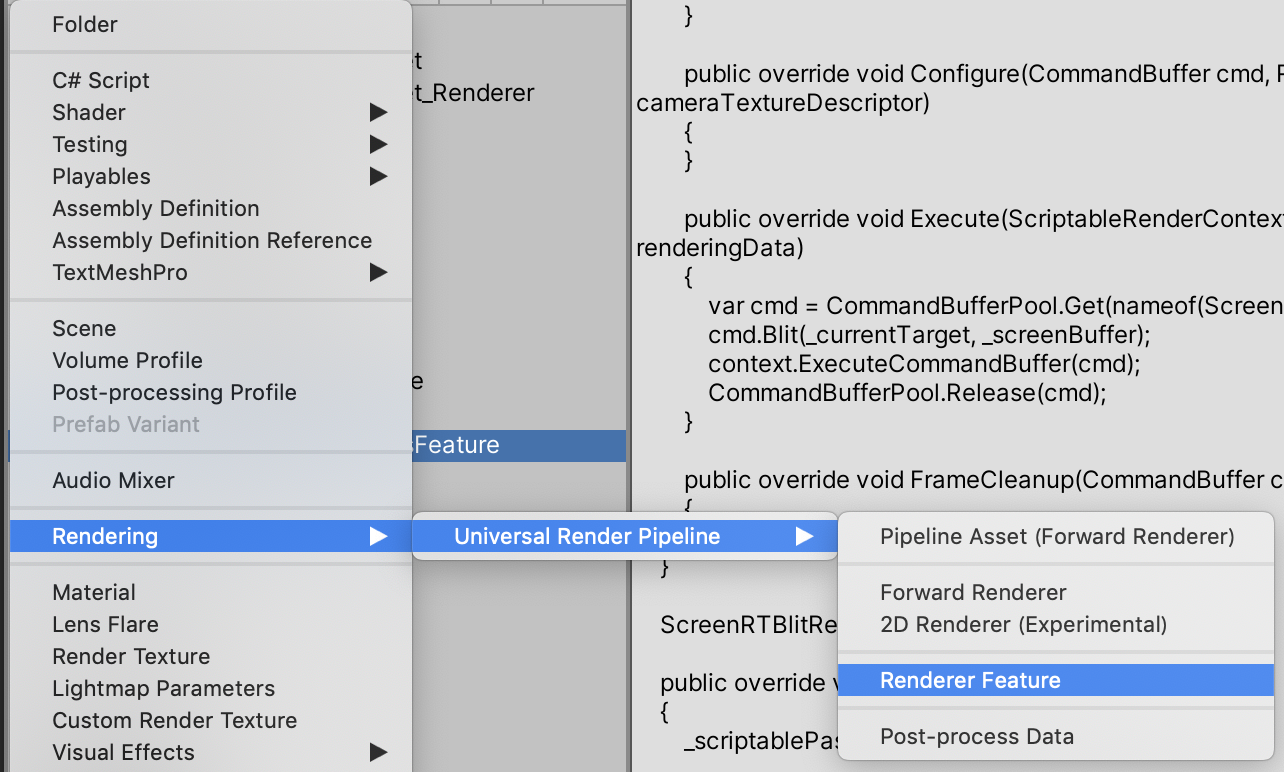
Rendere Featureを実装してカメラ画像を取得する
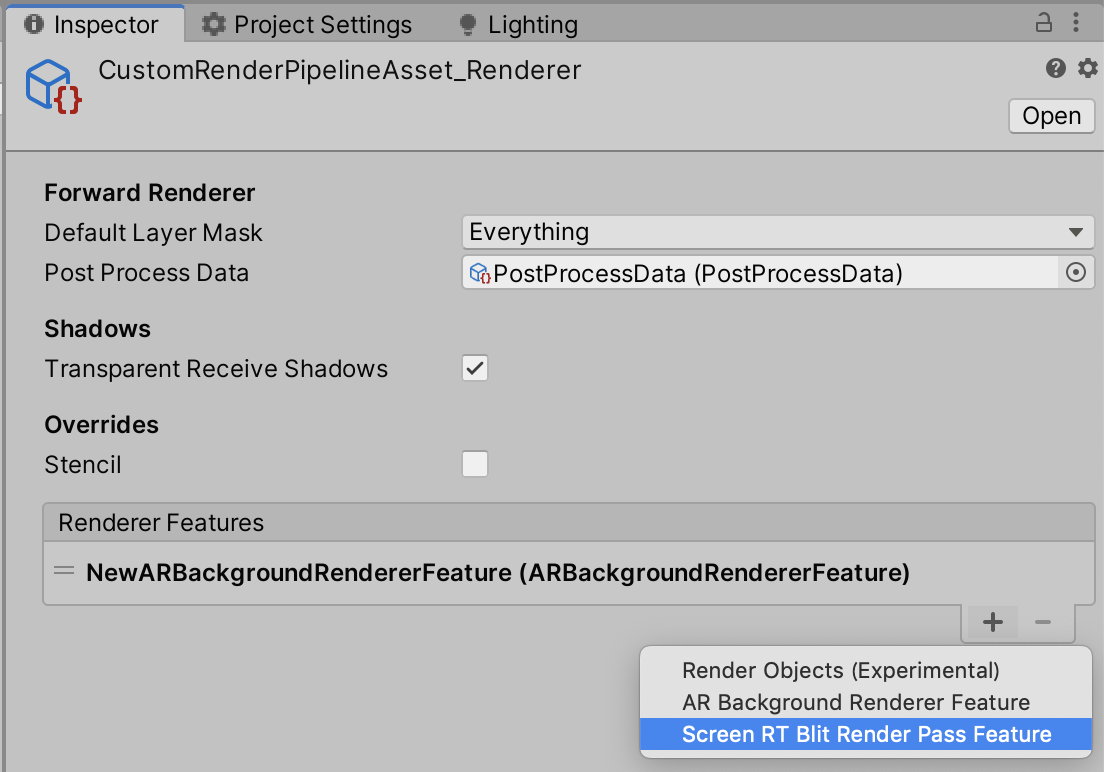
まず、CommandBufferを使うために、Render Featureを作成します。(ScreenRTBlitRenderPassFeatureと命名しています)
そして、それを下準備の際に作成したCustomRenderPipelineAsset_RendererのRenderer Featuresに追加します。
あとは、このRender Featureの中身を実装していきます。
まずコード全文をのせます。
using UnityEngine;
using UnityEngine.Rendering;
using UnityEngine.Rendering.Universal;

public class ScreenRTBlitRenderPassFeature : ScriptableRendererFeature
{
    class ScreenRTBlitRenderPass : ScriptableRenderPass
    {
        private RenderTargetIdentifier _currentTarget;
        private RenderTexture _screenBuffer;

        public void Setup(RenderTargetIdentifier target, RenderTexture buffer)
        {
            _currentTarget = target;
            _screenBuffer = buffer;
        }

        public override void Configure(CommandBuffer cmd, RenderTextureDescriptor cameraTextureDescriptor)
        {
        }

        public override void Execute(ScriptableRenderContext context, ref RenderingData renderingData)
        {
            var cmd = CommandBufferPool.Get(nameof(ScreenRTBlitRenderPass));
            cmd.Blit(_currentTarget, _screenBuffer);
            cmd.SetRenderTarget(_currentTarget);
            context.ExecuteCommandBuffer(cmd);
            CommandBufferPool.Release(cmd);
        }

        public override void FrameCleanup(CommandBuffer cmd)
        {
        }
    }

    ScreenRTBlitRenderPass _scriptablePass;

    public override void Create()
    {
        _scriptablePass = new ScreenRTBlitRenderPass();
        _scriptablePass.renderPassEvent = RenderPassEvent.BeforeRenderingOpaques;
    }

    public override void AddRenderPasses(ScriptableRenderer renderer, ref RenderingData renderingData)
    {
        var currentCamera = renderingData.cameraData.camera;
        if (currentCamera != null && currentCamera.cameraType == CameraType.Game)
        {
            var humanParticle = currentCamera.GetComponent<HumanParticle>();
            if (humanParticle == null) return;
            if (humanParticle.LatestCameraFeedBuffer == null) return;
            _scriptablePass.Setup(renderer.cameraColorTarget, humanParticle.LatestCameraFeedBuffer);
            renderer.EnqueuePass(_scriptablePass);
        }
    }
}
public RenderTexture LatestCameraFeedBuffer
{
    get
    {
        if (_lastDeviceOrientation == DeviceOrientation.Portrait)
        {
            return _colorMapPortrait;
        }
        return _colorMapLandscape;
    }
}
詳しい説明は割愛しますが、コピー先のRenderTextureを取得し、以下の部分で、スクリーンに描画されているものをBlitしています。
public override void Execute(ScriptableRenderContext context, ref RenderingData renderingData)
{
    var cmd = CommandBufferPool.Get(nameof(ScreenRTBlitRenderPass));
    cmd.Blit(_currentTarget, _screenBuffer);
    cmd.SetRenderTarget(_currentTarget);
    context.ExecuteCommandBuffer(cmd);
    CommandBufferPool.Release(cmd);
}
この処理を、RenderPassEvent.BeforeRenderingOpaquesのタイミングで行うようにしています。
_scriptablePass.renderPassEvent = RenderPassEvent.BeforeRenderingOpaques;
その理由は、ARFoundationがカメラ画像を描画するタイミングが同じくRenderPassEvent.BeforeRenderingOpaquesで(ARBackgroundRendererFeature.cs参照のこと)、これより後だと発生させたパーティクルも描画された後になってしまうため都合がよくないからです。
また、同じRenderPassEventに設定した場合、その順番はRenderer Featuresに追加した順番で実行されるようです(たぶん)。なので、この場合はうまくカメラ画像のコピーをすることができます。
これで、カメラ画像のコピーはできましたが、Blitするとカメラのレンダリング先が第2引数に設定したRenderTextureに変わってしまうので、再度cmd.SetRenderTarget(_currentTarget)をして、レンダリング先を元に戻します。
以上で、今回の実装の解説は終わりです!
おわりに
かなり長めの内容になって、最後めっちゃ駆け足になってしまいすいません。m( )m
所々微妙な実装があるので、もっと良い方法を知っている方がいれば教えてもらえると幸いです!!
これを使えば、あとはVFXGraphをゴリゴリ実装していけば面白い表現が色々できると思うので、今後はその辺りがんばっていきたいと思います。
作ったものをどんどんアップしていくので、よければフォローお願いします! → Twitter
以上!