追記(2017/09/02)
成績に四球が追加されたのでプログラムを変更しました.
ハチナイとは
2017年6月にリリースされた青春体験型野球ソーシャルゲームです.
正式タイトルは「八月のシンデレラナイン」
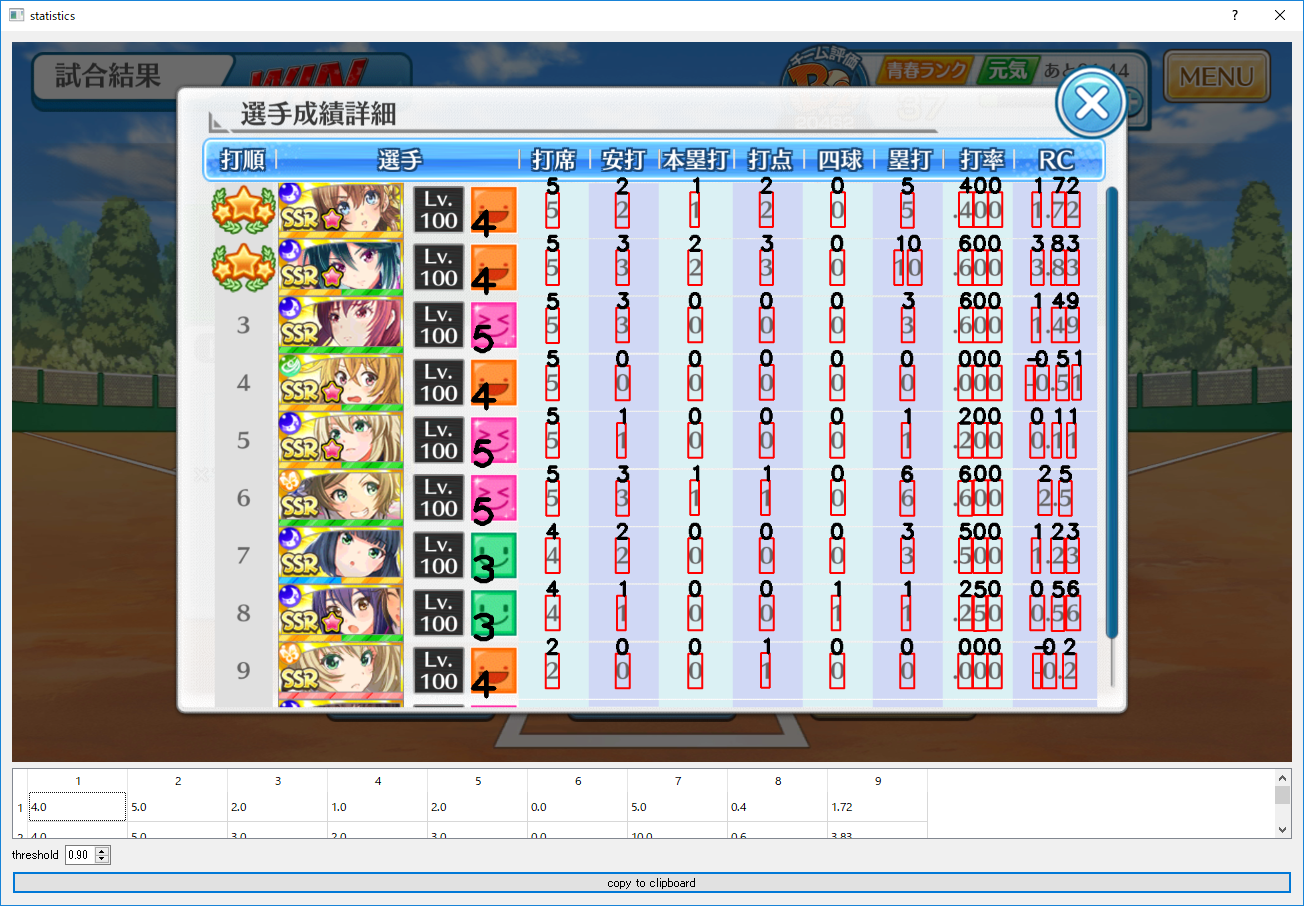
ゲーム内容を一言で言うなら,キャラクターを育ててオーダーを組み試合を見守るゲームです.感覚としてはパワプロのオーペナをやっているような感じです.試合の処理もしっかり行ってるらしく,このように(気になる点はありますが)試合ごとに打撃成績を確認することができます.
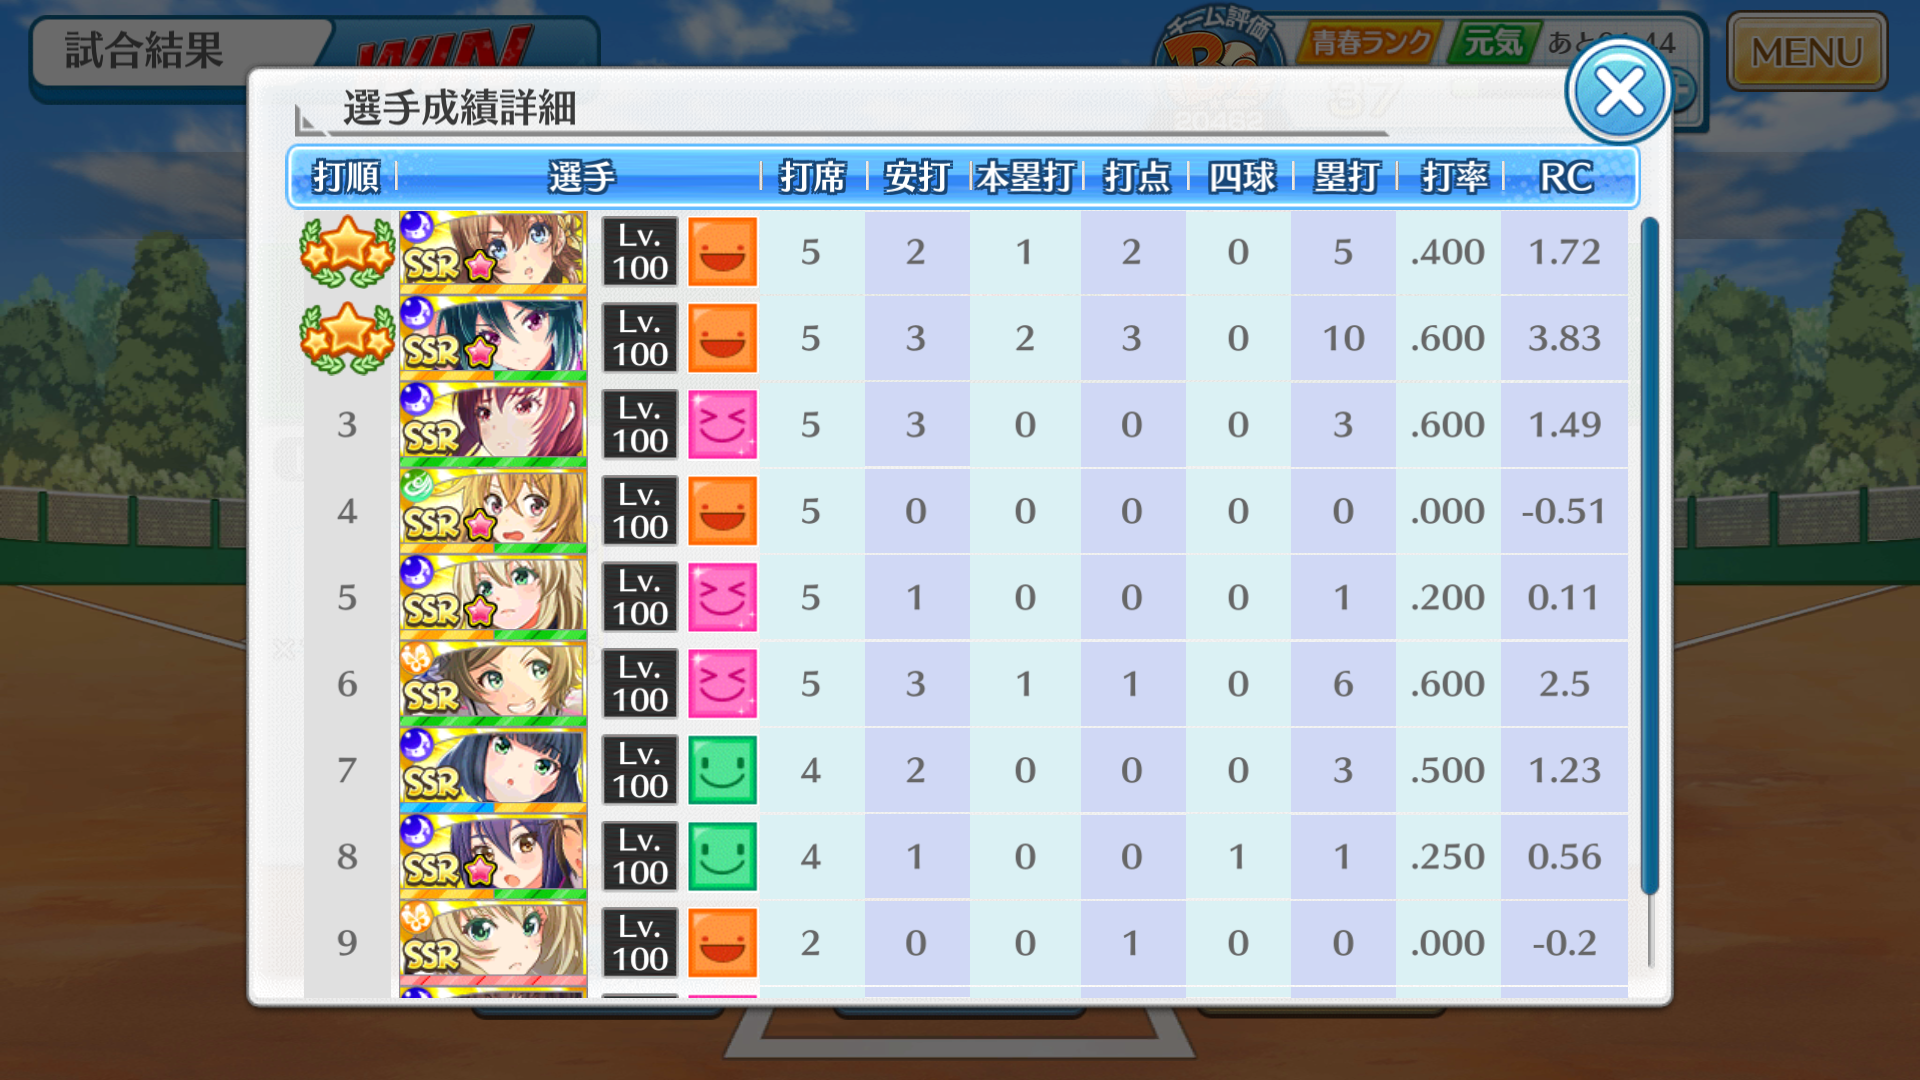
しかし,このゲームでは選手の通算成績を確認することができません.適切なオーダーを組むには自分で成績や調子,対戦相手などを管理する必要があります.成績を手入力で打ち込むのは面倒なので,画像処理を用いて自動で成績を取得するようにプログラムを組んでみました.
目標
- 上記の画像からスタメンの調子(5段階),成績を取得する.
- 代打,継投は考慮しない.
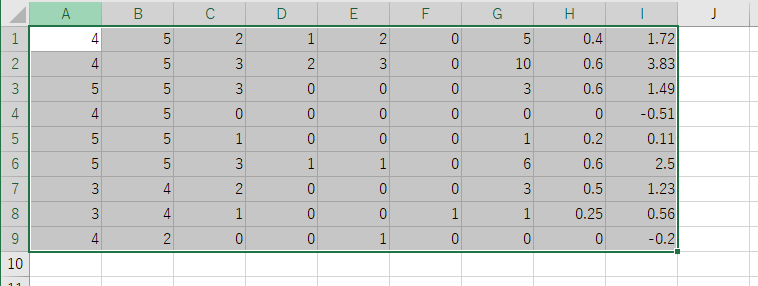
- 取得した成績をエクセルに張り付けられるようにする.
環境
使用言語
Python3.5
使用したライブラリ
- OpenCV
- PyQt5
- Pandas
具体的な手法
数字の検出
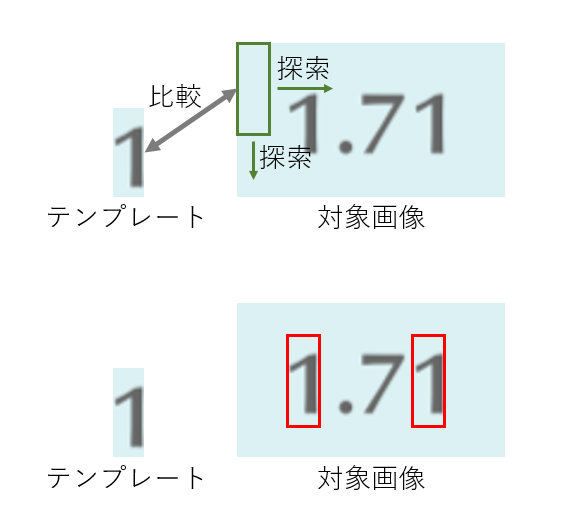
今回は機械学習などの難しい技術を使わずに,テンプレートマッチングを用いて数字の検出をします.テンプレートマッチングとは下図のように,対象画像の中からテンプレートと一致する部分を少しずつずらしながら探索していくという手法です.
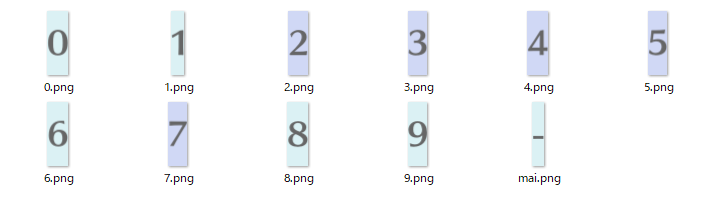
今回はOpenCVで用意されている関数を用いてテンプレートマッチングを行います.また,テンプレートマッチングを行うため以下のような画像を用意しました.処理を行う際はグレースケール画像に変換するので,色の違いはそれほど影響はないと思います.
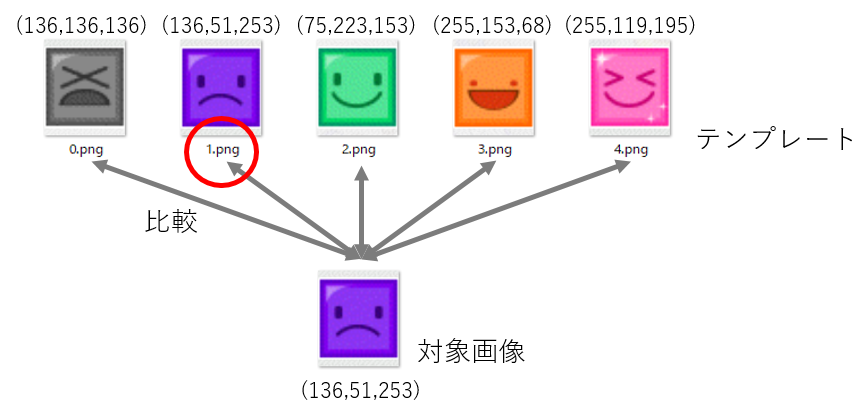
調子の認識
調子の認識はもっと単純で,対象画像とテンプレートの画素値の差分を取り,一番差が小さいものを選びます.
ソースコード
# -*- coding: utf-8 -*-

import sys
import cv2
import numpy as np
import PyQt5.QtCore as QtCore
import PyQt5.QtGui as QtGui
import PyQt5.QtWidgets as QtWidgets
import pandas as pd

# OpenCVの画像をPyQtで表示できるように変換
# こちらのソースコードを利用
# http://qiita.com/odaman68000/items/c8c4093c784bff43d319
def create_QPixmap(image):
    qimage = QtGui.QImage(image.data, image.shape[1], image.shape[0], image.shape[1] * image.shape[2], QtGui.QImage.Format_RGB888)
    pixmap = QtGui.QPixmap.fromImage(qimage)
    return pixmap

# テンプレートマッチングの実行
def matching(img,num,threshold,img_res,cell_y,cell_x):
    template = cv2.imread('./template/number/{}.png'.format(num),0)
    template = template[6:-6,:]
    w, h = template.shape[::-1]

    res = cv2.matchTemplate(img,template,cv2.TM_CCOEFF_NORMED)
    loc = np.where( res >= threshold)
    res_loc = []
    for pt in zip(*loc[::-1]):
        #重複して検出されたものを除外
        flag=True
        for pt2 in res_loc:
            if pt2[0] + w > pt[0]:
                flag = False
        if flag:
            res_loc.append(pt)
            #元の画像に検出した数字と枠を描画
            cv2.rectangle(img_res, (pt[0]+cell_x, pt[1]+cell_y), (pt[0]+cell_x+w, pt[1]+cell_y+h), (0,0,255), 2)
            n = "-" if num == "mai" else num
            cv2.putText(img_res, str(n), (pt[0]+cell_x,pt[1]+cell_y), cv2.FONT_HERSHEY_SIMPLEX, 1, (0, 0, 0), 3)
    return res_loc

# 画像をドロップした際に開くウィンドウ
class Add_widget(QtWidgets.QDialog):

    def __init__(self,frame,clipboard,parent=None):
        super(Add_widget, self).__init__(parent)
        self.initUI(frame,clipboard,parent)

    def initUI(self,frame,clipboard,parent):
        self.lbl = QtWidgets.QLabel()
        self.frame = frame

        self.datatable = QtWidgets.QTableWidget()
        self.datatable.setColumnCount(9)
        self.datatable.setRowCount(9)

        self.spinlbl = QtWidgets.QLabel("threshold")
        self.spinbox = QtWidgets.QDoubleSpinBox()
        self.spinbox.setRange(0,1)
        self.spinbox.setSingleStep(0.01)
        self.spinbox.setValue(0.90)
        self.spinbox.valueChanged.connect(self.get_result)
        self.sbin_hbox = QtWidgets.QHBoxLayout()
        self.sbin_hbox.addWidget(self.spinlbl)
        self.sbin_hbox.addWidget(self.spinbox)
        self.sbin_hbox.addStretch(1)

        self.button = QtWidgets.QPushButton("copy to clipboard")
        self.button.clicked.connect(self.copy_to_clipboard)

        self.vbox = QtWidgets.QVBoxLayout()
        self.vbox.addWidget(self.lbl)
        self.vbox.addWidget(self.datatable)
        self.vbox.addLayout(self.sbin_hbox)
        self.vbox.addWidget(self.button)
        self.setLayout(self.vbox)
        self.setWindowTitle('result')
        self.clipboard = clipboard

        self.get_result()

    #テーブルを取得した成績で更新
    def update_table(self,df):
        for i in range(len(df.index)):
            for j in range(len(df.columns)):
                self.datatable.setItem(i,j,QtWidgets.QTableWidgetItem(str(df.get_value(i, j))))

    #調子の識別や数字の検出を行う
    def detection_value(self,frame,threshold):
        img_res = frame.copy()
        img_gray = cv2.cvtColor(img_res, cv2.COLOR_BGR2GRAY)

        df = pd.DataFrame()
        li=[0,2,3,2,2,3,2,3,2]

        #1行ごとに成績を取得
        for row in range(9):
            player_list = []

            #調子の識別
            condi_cell = frame[210+sum(li[:row+1])+(84*(row)):210+sum(li[:row+1])+(84*(row+1)),687:758]
            condi_list = np.zeros(5)

            for i in range(5):
                condi = cv2.imread("./template/condition/{}.png".format(i))
                #差分値を計算
                sad = np.sum(np.abs(np.mean(condi_cell.astype(np.float32),axis=(0,1))-np.mean(condi.astype(np.float32),axis=(0,1))))
                #sad = np.sum(np.abs(condi_cell.astype(np.float32) - condi.astype(np.float32)))
                condi_list[i] = sad
            #1番差分が小さい画像を選択
            c = np.argmin(condi_list)
            player_list.append(c+1)
            cv2.putText(img_res, str(c+1), (687, 210+sum(li[:row+1])+(84*(row+1))), cv2.FONT_HERSHEY_PLAIN, 4, (0, 0, 0), 5)

            #列ごとに分割
            for col in range(8):
                cell_y = 210+sum(li[:row+1])+(84*(row))
                cell_width = 105 if col < 7 else 128
                cell_x = 759+col*105
                img_cell = img_gray[cell_y:cell_y+84,cell_x:cell_x+cell_width]
                list_num = []

                #0~9までテンプレートマッチングを行う
                for num in range(10):
                    loc = matching(img_cell,num,threshold,img_res,cell_y,cell_x)
                    for pt in loc:
                        list_num.append([num,pt[0],pt[1]])

                #x座標でソートする
                list_num.sort(key=lambda x:(x[1]))

                #x座標でソートした数字を連結する
                s = ""
                for i in range(len(list_num)):
                    #打率の場合は頭に"0."を付ける
                    if col == 6 and i == 0:
                        s += "0."
                    s += "{}".format(list_num[i][0])
                    #RCの場合は1番目の数字の後に"."を付ける(RCが二桁になることはほぼないという前提)
                    if col == 7 and i == 0:
                        s += "."
                #連結した打率が最終的に"0.100"になった場合,"1.00"に変える(1試合で10打数1安打はないという前提)
                if col == 6 and s == "0.100":
                    s = "1.00"
                #数字を検出できなかった場合,-10000にする
                try:
                    res_num = float(s)
                except ValueError:
                    res_num = -10000.0
                #RC検出時はマイナスについてテンプレートマッチングを行い,マイナスがあればー1倍する
                if col == 7:
                    loc = matching(img_cell,"mai",threshold,img_res,cell_y,cell_x)
                    if len(loc) > 0:
                        res_num *= -1
                player_list.append(res_num)
            #pandasを用いて1行ずつ成績を追加
            se = pd.Series(player_list)
            df = df.append(se, ignore_index=True)

        return img_res, df

    #テーブルの中身をクリップボードにコピーする
    def copy_to_clipboard(self):
        s = ""
        for r in range(self.datatable.rowCount()):
            for c in range(self.datatable.columnCount()):
                try:
                    s += str(self.datatable.item(r,c).text()) + "\t"
                except AttributeError:
                    s += "\t"
            s = s[:-1] + "\n"
        self.clipboard.setText(s)

    #成績を取得する
    def get_result(self):
        img_res, df = self.detection_value(self.frame,self.spinbox.value())
        self.update_table(df)

        img_res = cv2.cvtColor(img_res, cv2.COLOR_BGR2RGB)
        img_res = cv2.resize(img_res, (1280,720))
        qt_img = create_QPixmap(img_res)
        self.lbl.setPixmap(qt_img)

    def show(self):
        self.exec_()

# ドラッグアンドドロップに対応したQLabelクラス
class DropLabel(QtWidgets.QLabel):
    def __init__(self,parent):
        super().__init__(parent)
        self.parent = parent
        self.setAcceptDrops(True)
        self.setAlignment(QtCore.Qt.AlignCenter);
        self.setText("Drop here")

    def dragEnterEvent(self, e):
            e.accept()

    def dropEvent(self, e):
        mimeData = e.mimeData()
        files = [u.toLocalFile() for u in mimeData.urls()]
        for f in files:
            print("loading {}".format(f))
            #ドロップされた画像を読み込み
            frame = cv2.imread(f)
            #読み込みに失敗した場合は処理を行わない
            if frame is not None:
                frame = cv2.resize(frame, self.parent.size)
                add_widget = Add_widget(frame,self.parent.clipboard)
                add_widget.show()

# 画像をドロップをするウィンドウ
class Image_widget(QtWidgets.QWidget):

    def __init__(self,clipboard):
        super().__init__()

        self.initUI(clipboard)

    def initUI(self,clipboard):
        self.height = 1080
        self.width = 1920
        self.size = (self.width,self.height)
        self.clipboard = clipboard

        self.lbl = DropLabel(self)
        self.lbl.resize(640,480)

        self.vbox = QtWidgets.QVBoxLayout()
        self.vbox.addWidget(self.lbl)
        self.setWindowTitle('hachinai')
        self.show()
        sys.exit(app.exec_())

if __name__ == '__main__':
    app = QtWidgets.QApplication(sys.argv)
    clipboard = app.clipboard()
    screen = Image_widget(clipboard)
プログラムの実行
このプログラムを実行するには具体的な手法の図にあるような画像を「template/number/」「template/condition/」に入れる必要があります.
プログラムを実行すると,次のような殺風景なウィンドウが表示されます.
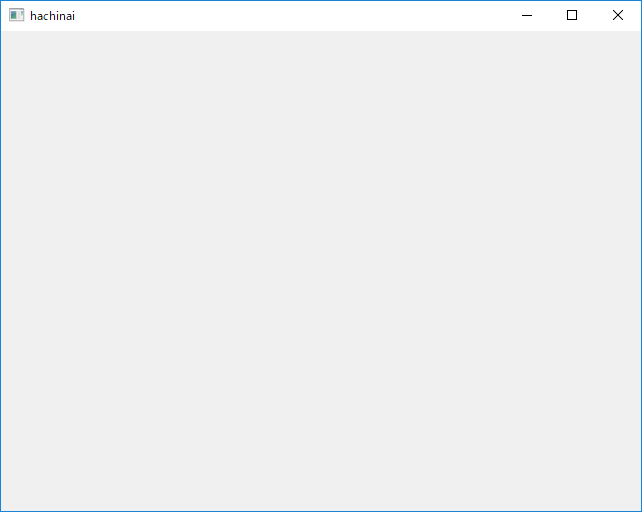
このウィンドウに対して,画像をドラッグアンドドロップすると成績を取得してくれます.パスに日本語が含まれている画像は読み込めません.
成績のセルを絶対位置で取得しているため,表が大きくずれると正しく認識できません.それ以外で認識に失敗した場合,thresholdを変えるとうまくいくことがあります.そして,「copy to clipboard」をクリックすることで成績をコピーでき,エクセルに張り付けられます.
おわりに
とりあえず目標は達成できました.使ってみた感想としては,エクセルのマクロと組み合わせれば成績管理が少し楽になるかなといった感じです.
参考
OpenCVを使ったテンプレートマッチング
OpenCV/numpyで扱う画像データをQt Widget上に表示する
【PythonでGUI】PyQt5 -ウィジェットⅡ-
PythonのPyQtによるクロスプラットフォームGUIアプリ作成入門
Fastest way to populate QTableView from Pandas data frame
copy pyqt table selection, including column and row headers
PyQtでファイルのドラッグ&ドロップ