■初めに
■Dockerfileを使用してコンテナにJenkinsをインストールとSSH接続(SSHクライアントより)本記事では、Azure仮想マシンにDockerをインストールし、JenkinsのインストールとSSH接続可能にしたDockerファイルからコンテナを起動させるところまでを行います
最終的にはJenkinsからAnsibleを実行しAzureVMの作成を行います。
■予定
V1 : Dockerインストール,Dockerfile(Jenkins)作成からイメージ起動,コンテナへの直接SSH
V2 : Ansibleイメージ起動,コンテナ間のSSH設定,Ansibleの稼働確認
URL : DockerコンテナでAnsible実行
V3 : Jenkins設定(JenkinsでのSSH接続)、リモートホストへのジョブ実行
URL : Jenkinsでコンテナ間接続とジョブ実行
V4 : AnsiblePlaybook(AZVMと関連リソースの作成)、稼働確認(Jenkinsからの実行)
URL : Ansibleでクラウド構築(Azure)
■イメージ
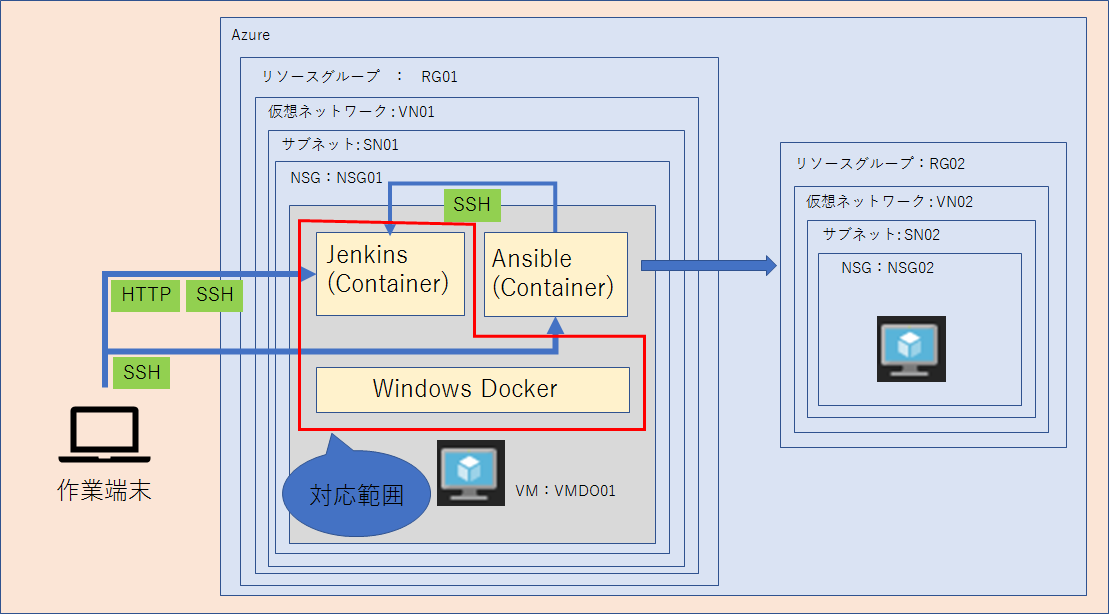
■環境
-AzureVM
host : VMDO001
OSType : CentOS 7.3
Size : Standard D2s v3
-NSG
SSH (Any/Any) Accept
7033 (Any/Any) Accept ※後述するコンテナとホストのポートバインドで使用
8033 (Any/Any) Accept ※後述するコンテナとホストのポートバインドで使用
■やること
【1】Docker-IO(Docker-ce)インストール
【2】Dockerfileによるコンテナ起動
【3】コンテナへのSSHクライアントログイン
【4】コンテナ起動確認(Jenkinsコンテナ)
■手順
【1】Docker-IO(Docker-ce)インストール
(1).AzureVMの作成
※以下の環境でPowerCLI2.0で作成
# VNET
az network vnet create --name "VN01" --resource-group "RG01" --location "japaneast" --address-prefix "10.10.0.0/16" --subnet-name "SN01" --subnet-prefix "10.10.1.0/24"
# NSG
az network nsg create --resource-group "RG01" --name "NSG01" --location "japaneast"
# NSG Rule
az network nsg rule create --resource-group "RG01" --nsg-name "NSG01" --name "CON-SSH-ALLOW" --description "SSHCON" --access "Allow" --protocol "Tcp" --direction "Inbound" --priority "1001" --source-address-prefix * --source-port-range * --destination-address-prefix * --destination-port-range "7033"
az network nsg rule create --resource-group "RG01" --nsg-name "NSG01" --name "CON-JEN-ALLOW" --description "JENCON" --access "Allow" --protocol "Tcp" --direction "Inbound" --priority "1002" --source-address-prefix * --source-port-range * --destination-address-prefix * --destination-port-range "8033"

# subnet
az network vnet subnet update --vnet-name "VN01" --name "SN01" --resource-group "RG01" --network-security-group "NSG01"

# VM
az vm create --resource-group "RG01" --name "VMDO001" --location "japaneast" --admin-username "hoge" --admin-password "naisyonopass" --size "Standard_D2s_v3" --vnet-name "VN01" --subnet "SN01" --image "CentOS" --public-ip-address "VMDO01" --nsg ""
(2).作成したVMにログイン
(3).VMDO001に「Docker-io」をインストール
yum -y install docker-io
注意:Docker-ioでもインストールは可能ですがパッケージ自身が古いようです
2018/11/20現在は[Docker-io]ではなく[Docker-ce]を入れるのが推奨らしい
# 前提パッケージインストール
yum install -y yum-utils device-mapper-persistent-data lvm2
# リポジトリ追加
yum-config-manager --add-repo https://download.docker.com/linux/centos/docker-ce.repo
# パッケージインデックスを更新
yum makecache fast
# docker-ce インストール
yum install -y docker-ce
# dockerバージョンチェック(導入確認)
docker -v
(4).サービス関連(再起動時起動)
systemctl enable docker.service
(5).サービス関連(起動)
systemctl start docker.service
(6).DockerImageのPull
docker pull centos
(7).Docker imageを起動
docker run -i -t centos /bin/bash
(8).Docker プロセスの終了
exit
【2】Dockerfileによるコンテナ起動
目的:イメージファイルを作りビルドする
~DockerFile内容~
カスタマイズ1:[ifconfig]等を使用可能に
カスタマイズ2:Jenkinsをインストール
カスタマイズ3:SSHをインストール
カスタマイズ4:[sshd_config]の編集
カスタマイズ5:[root]パスワード設定
(1).AzureVMにログイン
(2).Dockerfileの格納ディレクトリの作成
mkdir /doc.file
vi /doc.file/dockerfile
# Used CentOS
FROM centos
# SSH PKG Install
RUN yum install -y passwd
RUN yum install -y openssh
RUN yum install -y openssh-server
RUN yum install -y openssh-clients

# Jenkins PKG Install 1
RUN yum -y install epel-release
RUN yum -y install net-tools
RUN yum -y install initscripts
RUN yum -y install java

# Jenkins Repogistory
RUN echo "[jenkins]" >> /etc/yum.repos.d/jenkins.repo
RUN echo "name=Jenkins" >> /etc/yum.repos.d/jenkins.repo
RUN echo "baseurl=http://pkg.jenkins.io/redhat" >> /etc/yum.repos.d/jenkins.repo
RUN echo "gpgcheck=1" >> /etc/yum.repos.d/jenkins.repo

# Jenkins PKG Install 2
RUN rpm --import https://jenkins-ci.org/redhat/jenkins-ci.org.key
RUN yum -y install jenkins

# root password
RUN echo p@ssw0rd | passwd --stdin root

# sshd_config edit
RUN sed -ri "s/#PermitRootLogin yes/PermitRootLogin yes/g" /etc/ssh/sshd_config
(3).作成したファイルをビルドしてイメージに変換
docker images
docker build -t centos/jenkinsbuild .
docker images
[root@hoge-c01 doc.file]# docker images
REPOSITORY            TAG                 IMAGE ID            CREATED             SIZE
docker.io/centos      latest              ff426288ea90        6 weeks ago         207.2 MB
[root@hoge-c01 doc.file]# docker build -t centos/jenkinsbuild .
Sending build context to Docker daemon  2.56 kB
Step 1 : FROM centos:7
<…>
Successfully built efe713566224
[root@hoge-c01 doc.file]# docker images
REPOSITORY            TAG                 IMAGE ID            CREATED             SIZE
centos/jenkinsbuild   latest                   efe713566224        23 minutes ago      730.6 MB
docker.io/centos      latest              ff426288ea90        6 weeks ago         207.2 MB
(4).作成したImageをポートバインドして起動させる
docker run -p 8033:8080 -p 7033:22 -itd --privileged centos/jenkinsbuild /sbin/init
補足)
ポートバインドさせるためには以下の構成でコマンドを実行させる(複数指定が可能)
-p <ホスト側で使用するポート>:<コンテナ側で使用するポート>
(5).Dockerコンテナ起動
# DockerのContainerIDを確認
docker ps -a
# DockerのContainerIDを使用し起動
docker exec -it <ConatainerID> /bin/bash
(6).サービス起動確認
※SSHとJenkinsのサービスを確認
※すでにできてるなら無視!
[jenkins]
systemctl enable jenkins.service
systemctl start jenkins.service

[ssh]
systemctl enable sshd
systemctl start sshd
【3】コンテナへのSSHクライアントログイン
(1).コンテナをポートバインド(以下補足参照)で起動させる
docker run -p 8033:8080 -p 7033:22 -itd --privileged centos/jenkinsbuild:1 /sbin/init
[root@hoge-c01 ~]# docker ps -a
CONTAINER ID        IMAGE                   COMMAND             CREATED             STATUS              PORTS                                          NAMES
064989cee0cf        centos/jenkinsbuild:1   "/sbin/init"        10 seconds ago      Up 8 seconds        0.0.0.0:7033->22/tcp, 0.0.0.0:8033->8080/tcp   xxxxxxx
[root@hoge-c01 ~]#
(2).TeraTerm(SSHクライアント)を起動
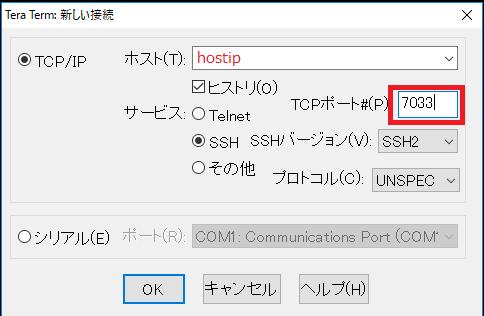
(3).ホストIPを指定し,ポートをポートバインドで割り当てたを指定
【4】コンテナ起動確認(Jenkinsコンテナ)
(1).コンテナをポートバインドで起動させる
# docker run -p 8033:8080 -p 7033:22 -itd --privileged centos/jenkinsbuild:1 /sbin/init
※上記同様の為割愛
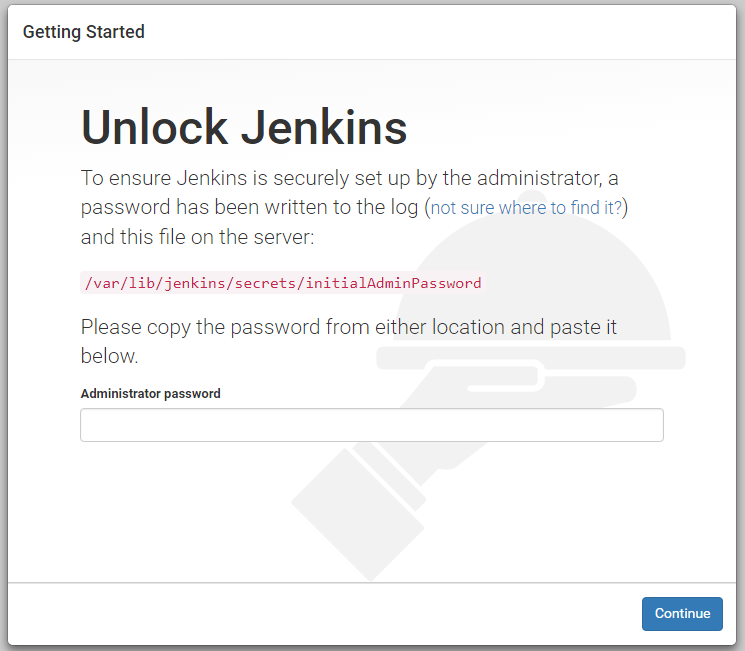
(2).作業端末のWEBブラウザに以下を入力
http://:8033
補足)Docker関連コマンド
# 今現在起動しているDockerプロセスの確認
docker ps -a

# ホストとコンテナの切り替え
コンテナ内で・・・
(ctrl+p+q)

# Dockerの停止
docker stop <ContainerID>

# Dockerプロセスの破棄
docker rm <ContainerID>

# Dockerプロセスの破棄(強制)
docker rm -f <ContainerID>

# Docker image 確認
docker images

# Docker image 破棄
docker rmi <imageID>

# Docker image 破棄(強制)
docker rmi -f <imageID>

# Docker 起動
docker run -it <REPOSITORY:TAG> /bin/bash

# Docker 起動(特権モード(サービス操作))
docker run -itd --privileged <REPOSITORY:TAG> /sbin/init
docker exec -it <ContainerID> /bin/bash

# Docker 起動(ポートバインド)
docker run -p <hostport:containerport> -p <hostport:containerport> -itd --privileged <REPOSITORY:TAG> /sbin/init
docker exec -it <ContainerID> /bin/bash

# Docker imagefile path
これを消したらimageすべてを消すことになる
■まとめ
結構簡単でした。お手軽に環境が作れるのでお勧めです。次回は同じ手法を使ってAnsibleのDokerfileを作成します。その後こんかいで作ったJenkinsと連携させます