環境
ubunntu 18.04
Realsense d415
参考:Intel-RealSense-D400-Series-Calibration-Tools-User-Guide.pdf
日本語でのキャリブレーションについてまとめがなかったので作っておきます
不具合あれば言ってください。
インストール手順
ターミナルを開く。
press Ctrl + Alt + T.
順番に入力
sudo apt-get update
sudo apt-get upgrade
sudo apt-get dist-upgrade
sudo reboot
上記、3つのコマンド終了後再起動を行う
sudo apt-get install libusb-dev libusb-1.0-0-dev
sudo apt-get install libglfw3 libglfw3-dev
sudo apt-get install freeglut3 freeglut3-dev

sudo sh -c 'echo 'deb https://librealsense.intel.com/Debian/apt-repo bionic main' | sudo tee/etc/apt/sources.list.d/realsense-public.list
sudo apt-key adv --keyserver keyserver.ubuntu.com --recv-keys C8B3A55A6F3EFCDE
sudo apt-get update
sudo apt-get install librscalibrationtool
パッケージのインストールが完了したら、インストールされているファイルを確認します。
sudo dpkg -L librscalibrationtool

yo4hi6o@yo4hi6o:~$ sudo dpkg -L librscalibrationtool
/.
/usr
/usr/share
/usr/share/doc
/usr/share/doc/librscalibrationtool
/usr/share/doc/librscalibrationtool/api
/usr/share/doc/librscalibrationtool/api/DynamicCalibrationAPI-Linux-2.11.1.0.tar.gz
/usr/share/doc/librscalibrationtool/target
/usr/share/doc/librscalibrationtool/target/print-target-fixed-width.pdf
/usr/share/doc/librscalibrationtool/changelog
/usr/share/doc/librscalibrationtool/attributions.txt
/usr/share/doc/librscalibrationtool/copyright
/usr/share/doc/librscalibrationtool/license.txt
/usr/share/doc/librscalibrationtool/readme.txt
/usr/share/doc/librscalibrationtool/README.md
/usr/bin
/usr/bin/Intel.Realsense.DynamicCalibrator
/usr/bin/Intel.Realsense.CustomRW
キャリブレーションにはlibrealsense2-dkmsが必要です。
sudo apt-get install librealsense2-dkms
参考:https://github.com/IntelRealSense/librealsense/blob/development/doc/distribution_linux.md
#キャリブレーションツール使い方
1. 次のコマンドを実行して、動的キャリブレーションツールのバージョンを確認します。
yo4hi6o@yo4hi6o:~$ /usr/bin/Intel.Realsense.DynamicCalibrator -v
2.11.1.0
2. デバイス情報を画面に印刷するには、カメラデバイスをシステムに接続し、次の手順を実行します.
yo4hi6o@yo4hi6o:~$ /usr/bin/Intel.Realsense.DynamicCalibrator -list
Device Name                   Serial Number       Firmware Version
Intel RealSense D415          902512060178        05.12.15.50
3. デバイスのキャリブレーションデータを確認するには、次のコマンドを実行します。
yo4hi6o@yo4hi6o:~$ /usr/bin/Intel.Realsense.CustomRW -r
CustomRW for Intel RealSense D400, Version: 2.11.1.0

  Device PID: 0AD3
  Device name: Intel RealSense D415
  Serial number: 902512060178
  Firmware version: 05.12.15.50

Calibration parameters from the device:
  resolutionLeftRight: 1920 1080

  FocalLengthLeft: 1310.079590 1308.582642
  PrincipalPointLeft: 970.199768 540.931458
  DistortionLeft: 0.152367 -0.384179 -0.000664 0.000925 0.254600

  FocalLengthRight: 1311.334717 1309.831665
  PrincipalPointRight: 985.831177 537.896851
  DistortionRight: 0.152993 -0.387886 -0.001023 0.001136 0.257808

  RotationLeftRight: 0.999975 0.000839 -0.007050
                     -0.000893 0.999971 -0.007592
                     0.007043 0.007598 0.999946
  TranslationLeftRight: -55.055161 0.026452 -0.776613

  HasRGB: 1

  resolutionRGB: 1920 1080

  FocalLengthColor: 1380.792114 1380.017578
  PrincipalPointColor: 960.382141 526.787231
  DistortionColor: 0.000000 0.000000 0.000000 0.000000 0.000000
  RotationLeftColor: 0.999937 -0.002633 0.010891
                     0.002660 0.999994 -0.002428
                     -0.010885 0.002457 0.999938
  TranslationLeftColor: 15.217321 0.063116 -0.448760
4. キャリブレータを試すには、次のコマンドを実行すると起動します。
/usr/bin/Intel.Realsense.DynamicCalibrator
#アンインストール
アンインストールは次のコマンドを実行。
sudo dpkg -r librscalibrationtool
#キャリブレーションの方法
1. ターミナルを開く。
press Ctrl + Alt + T.
2. カメラを接続
3. カメラのシリアルナンバーを確認。
yo4hi6o@yo4hi6o:~$ /usr/bin/Intel.Realsense.DynamicCalibrator -list
Device Name                   Serial Number       Firmware Version
Intel RealSense D415          902512060178        05.12.15.50
3. 次のコマンドでキャリブレーションツール起動
/usr/bin/Intel.Realsense.DynamicCalibrator
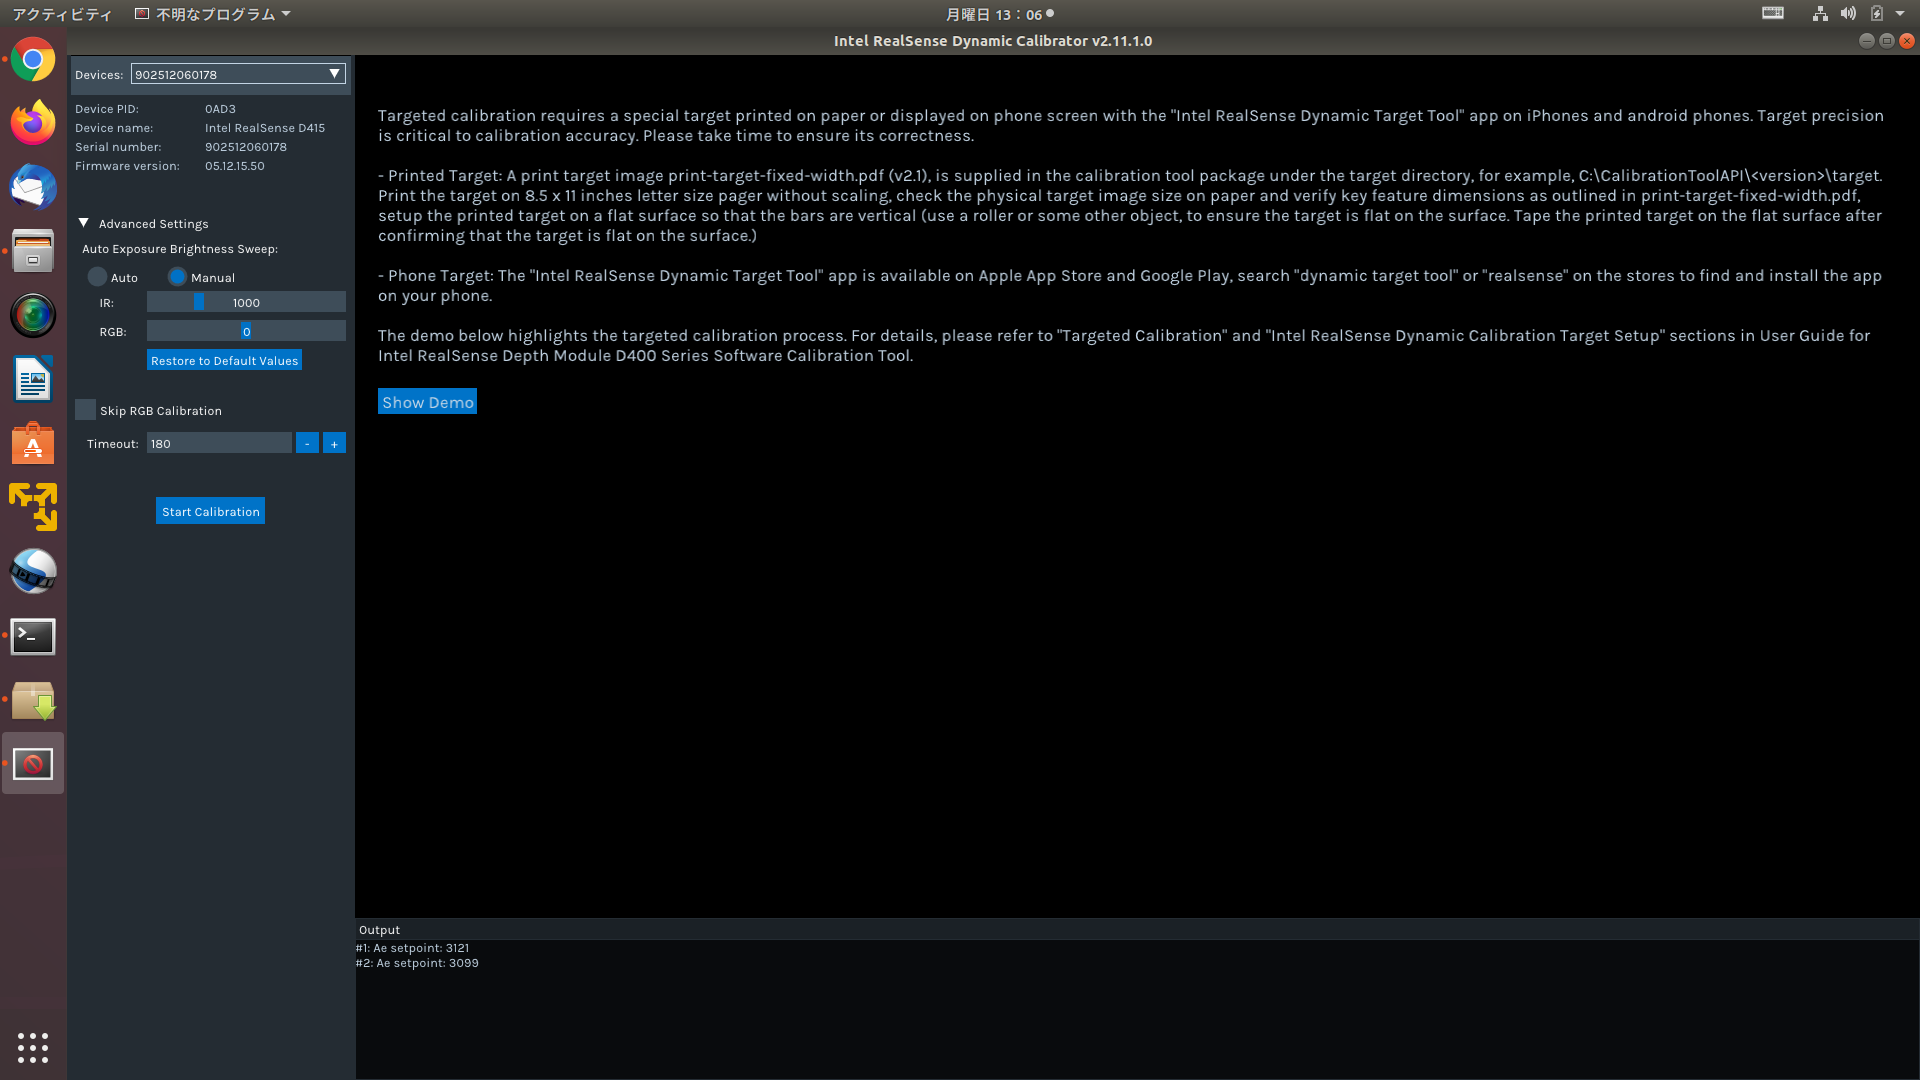
左上のデバイスで確認したシリアルナンバーと合致する番号を指定する。
直下に表示されるデバイスネームなどが合致するか確認してください。

/home/yo4hi6o/Pictures/Screenshot from 2021-10-18 12-56-33.png
AE(自動露出)セットポイントをカスタマイズできますが、今回は自動で行います。
自動の場合、現環境の照度に合わせたキャリブレーションとなります。
実際に稼働させる環境で行うか、または照度を手動で稼働環境にセットする事をおすすめします。
デバイスネーム直下のAdcanced Settingを展開すると自動、手動モードで切替ができ、
手動にすると任意の値を入力できます。
※直下の『Timeout』でキャリブレーションを操作中の時間を決めれます。
初期設定は’180秒ですが、慣れないときはもたつくので、500秒前後で設定することをおすすめします。
/home/yo4hi6o/Pictures/Screenshot from 2021-10-18 13-06-27.png
直下の「Start Calibration」ボタンをクリックしてキャリブレーションを開始します。
※注:机の上散らかっていますが、皆さんが行う際は極力物を無くして行ってください。
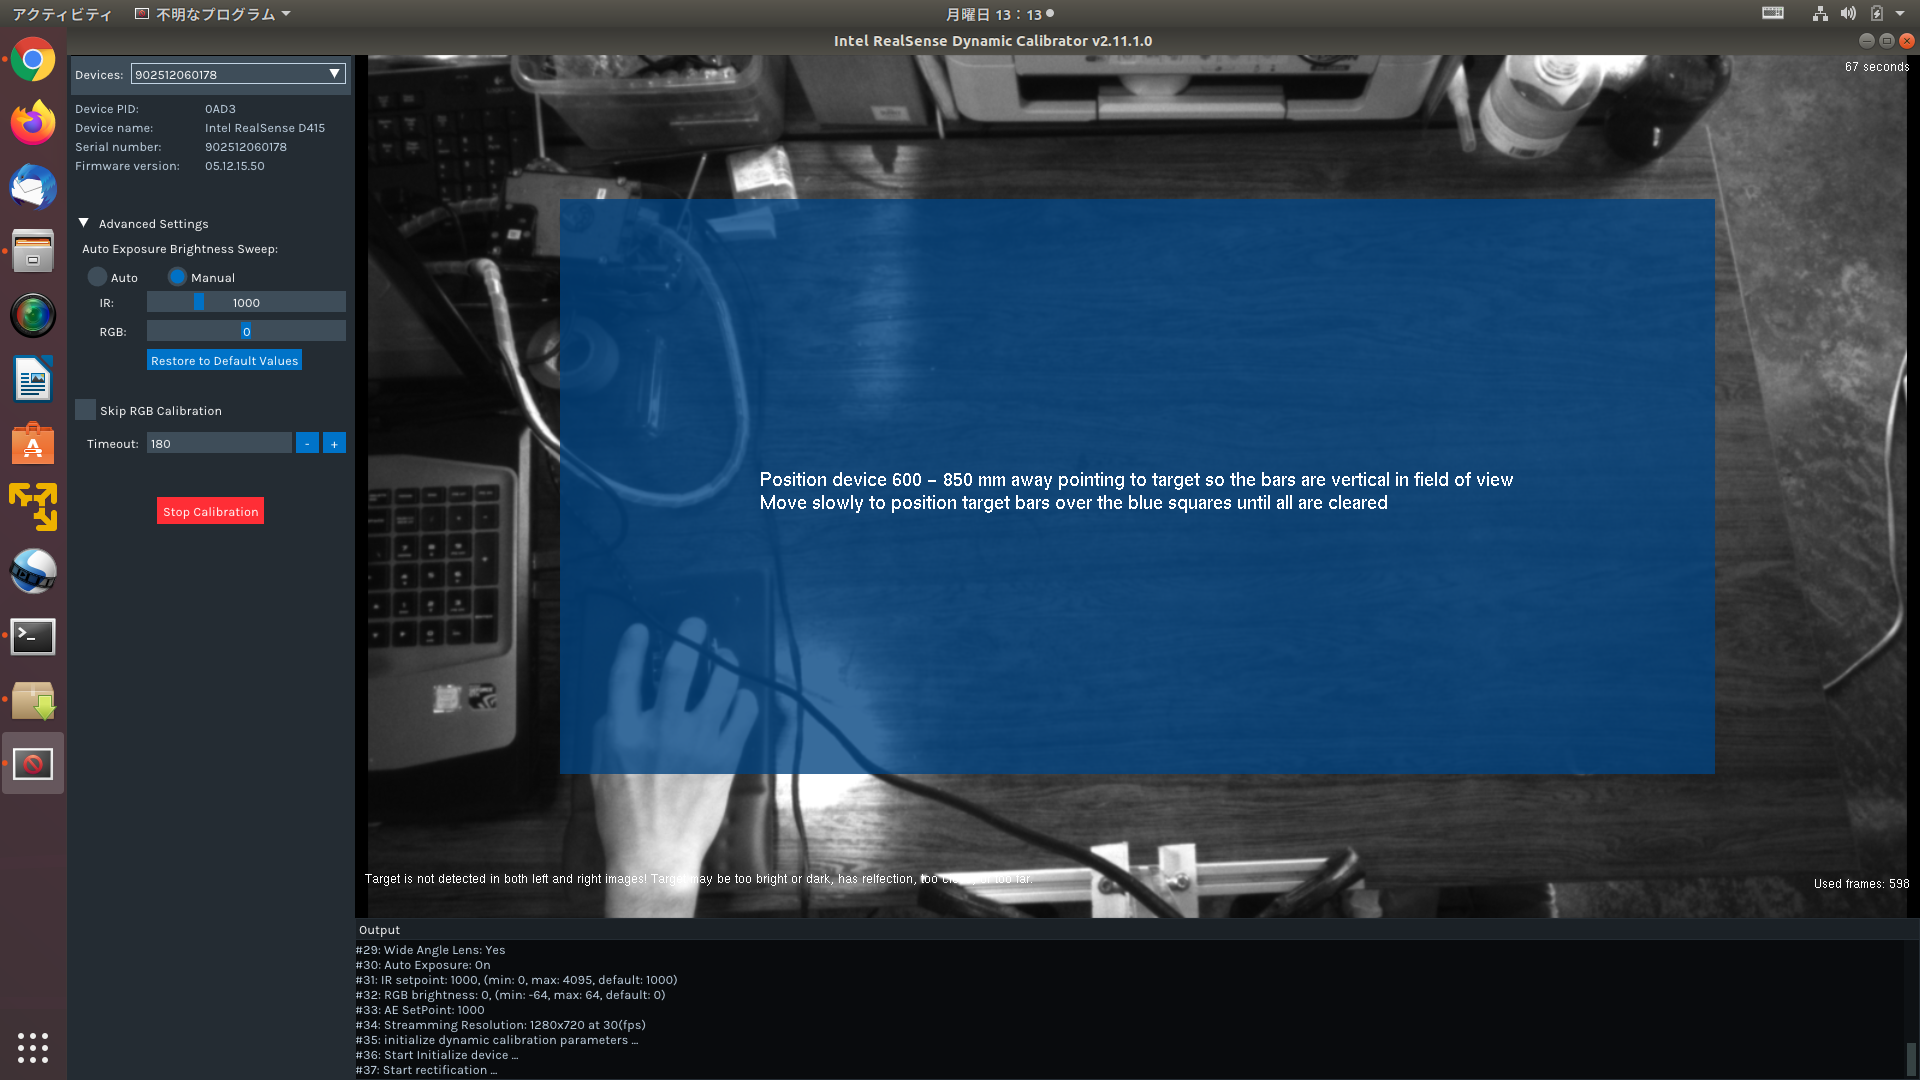
/home/yo4hi6o/Pictures/Screenshot from 2021-10-18 13-13-13.png
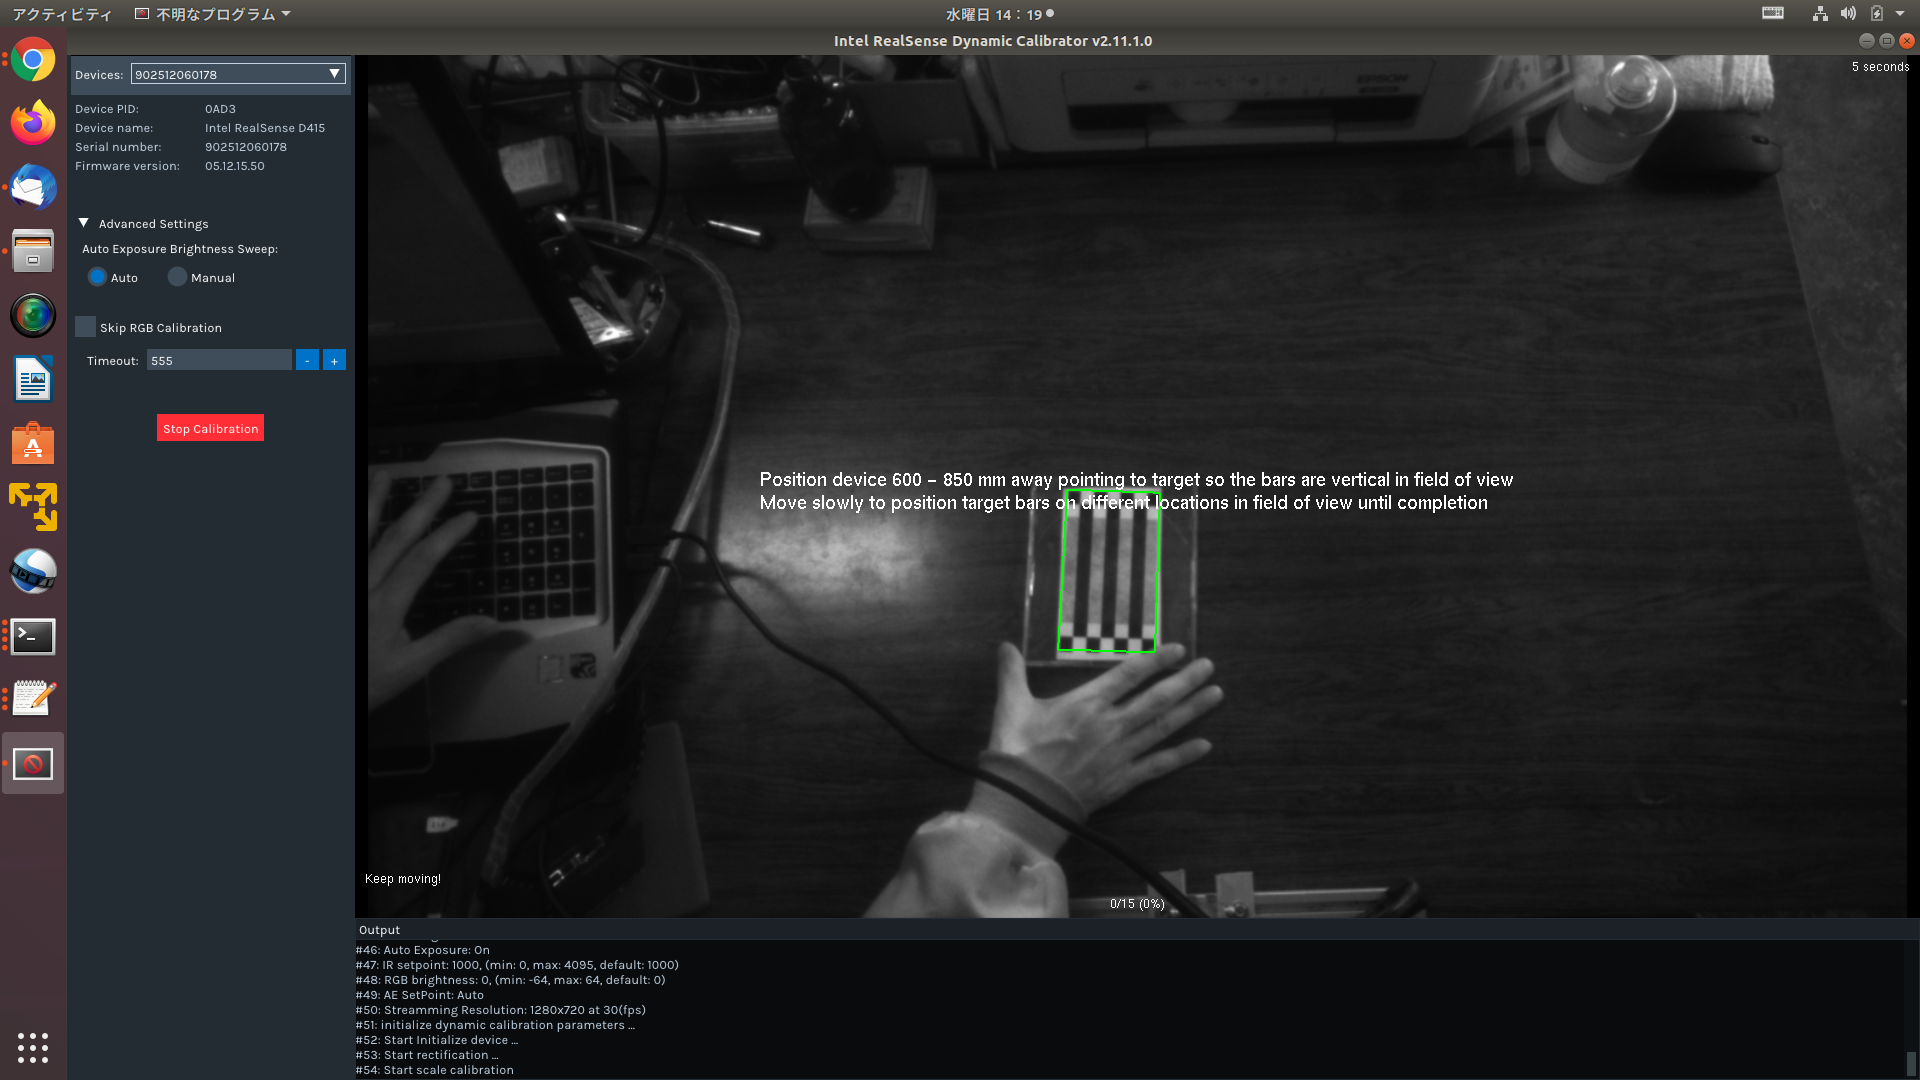
※カメラ画像が表示されると思います。できるだけ、画像に映る箇所の物は無くしてください。
カメラ位置は設定基準位置から60センチから80センチまでの位置で固定してください。
キャリブレーション用の用紙は下記で印刷してください。
A4サイズで『既定サイズ』にすれば、恐らく寸法通りの大きさになると思います。
印刷後は念の為、記載通りの寸法を確認してください。
カメラの中央あたりに用紙をセット。
一定時間過ぎ用紙が認識されると下の画像のように用紙の箇所の青色の四角のみが透明になります。
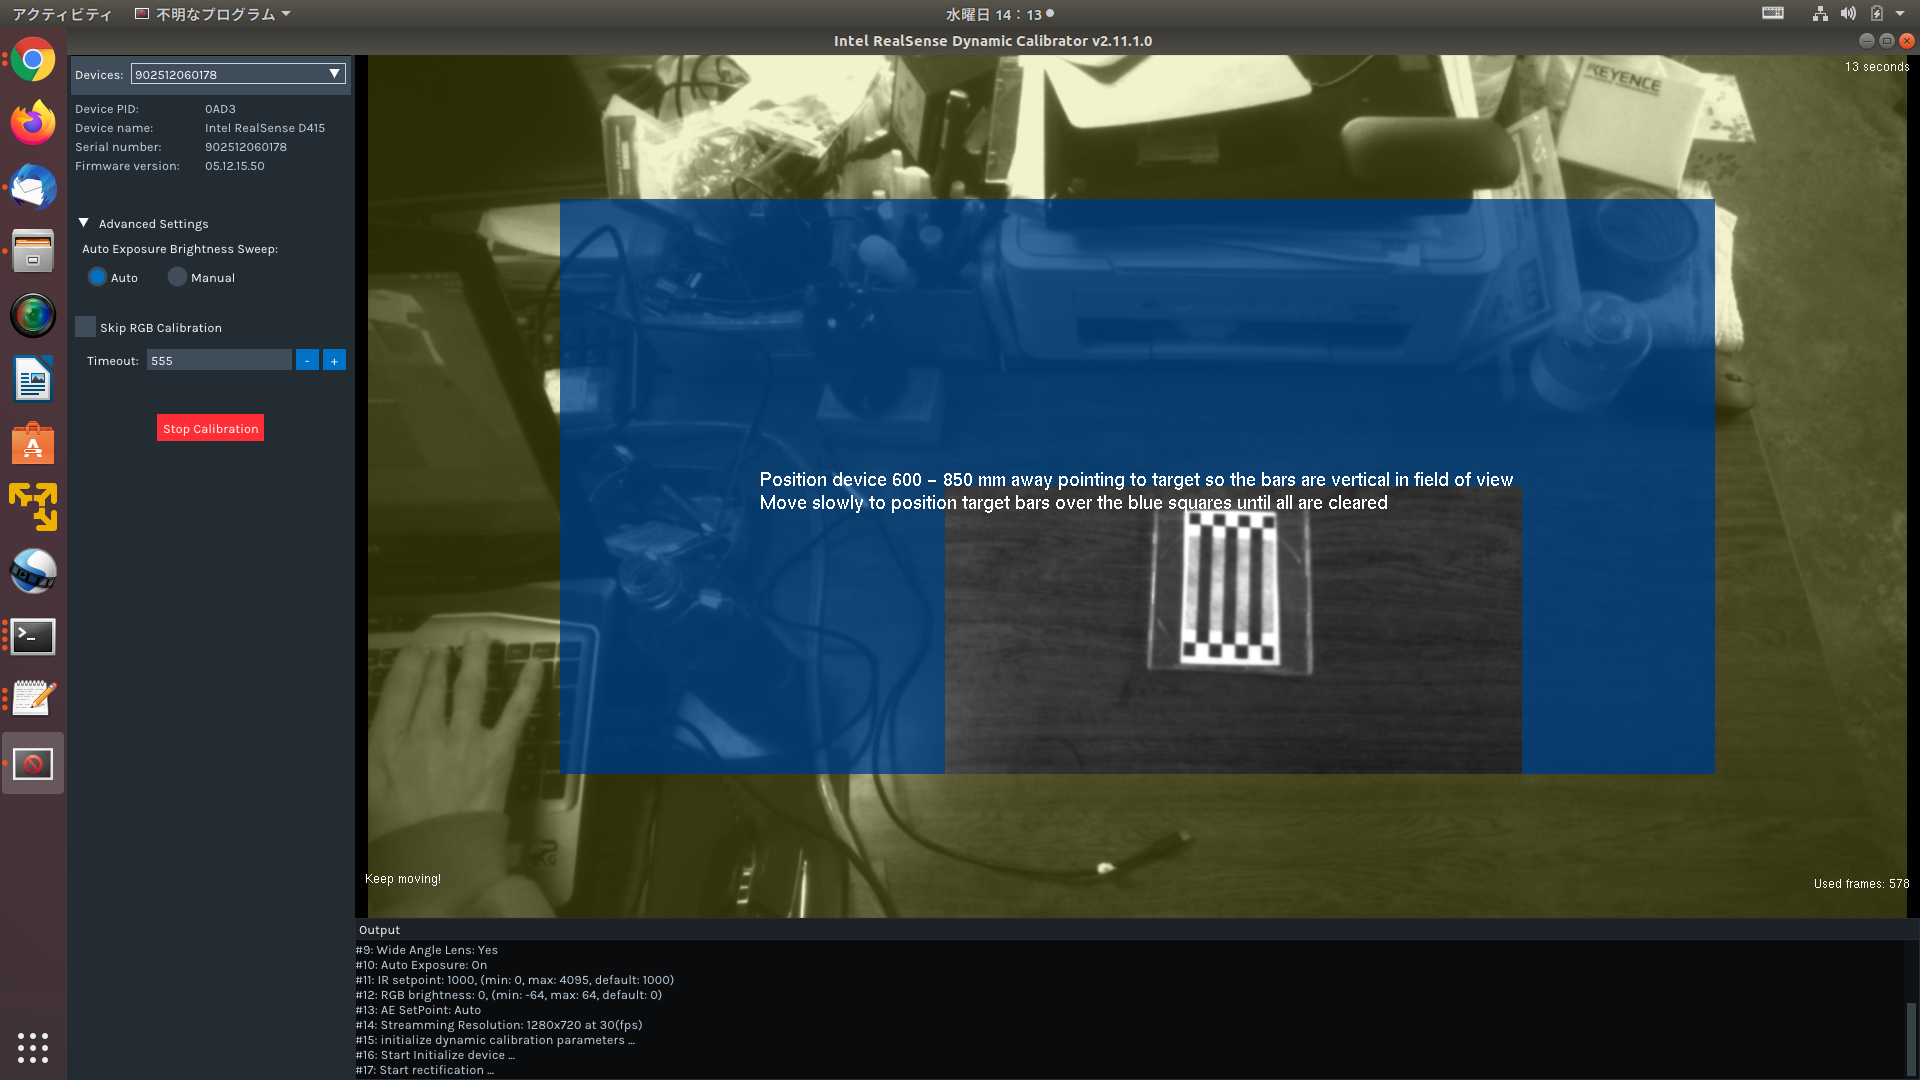
青色が全て無くなるように様子を上下左右にゆっくりと移動させます。
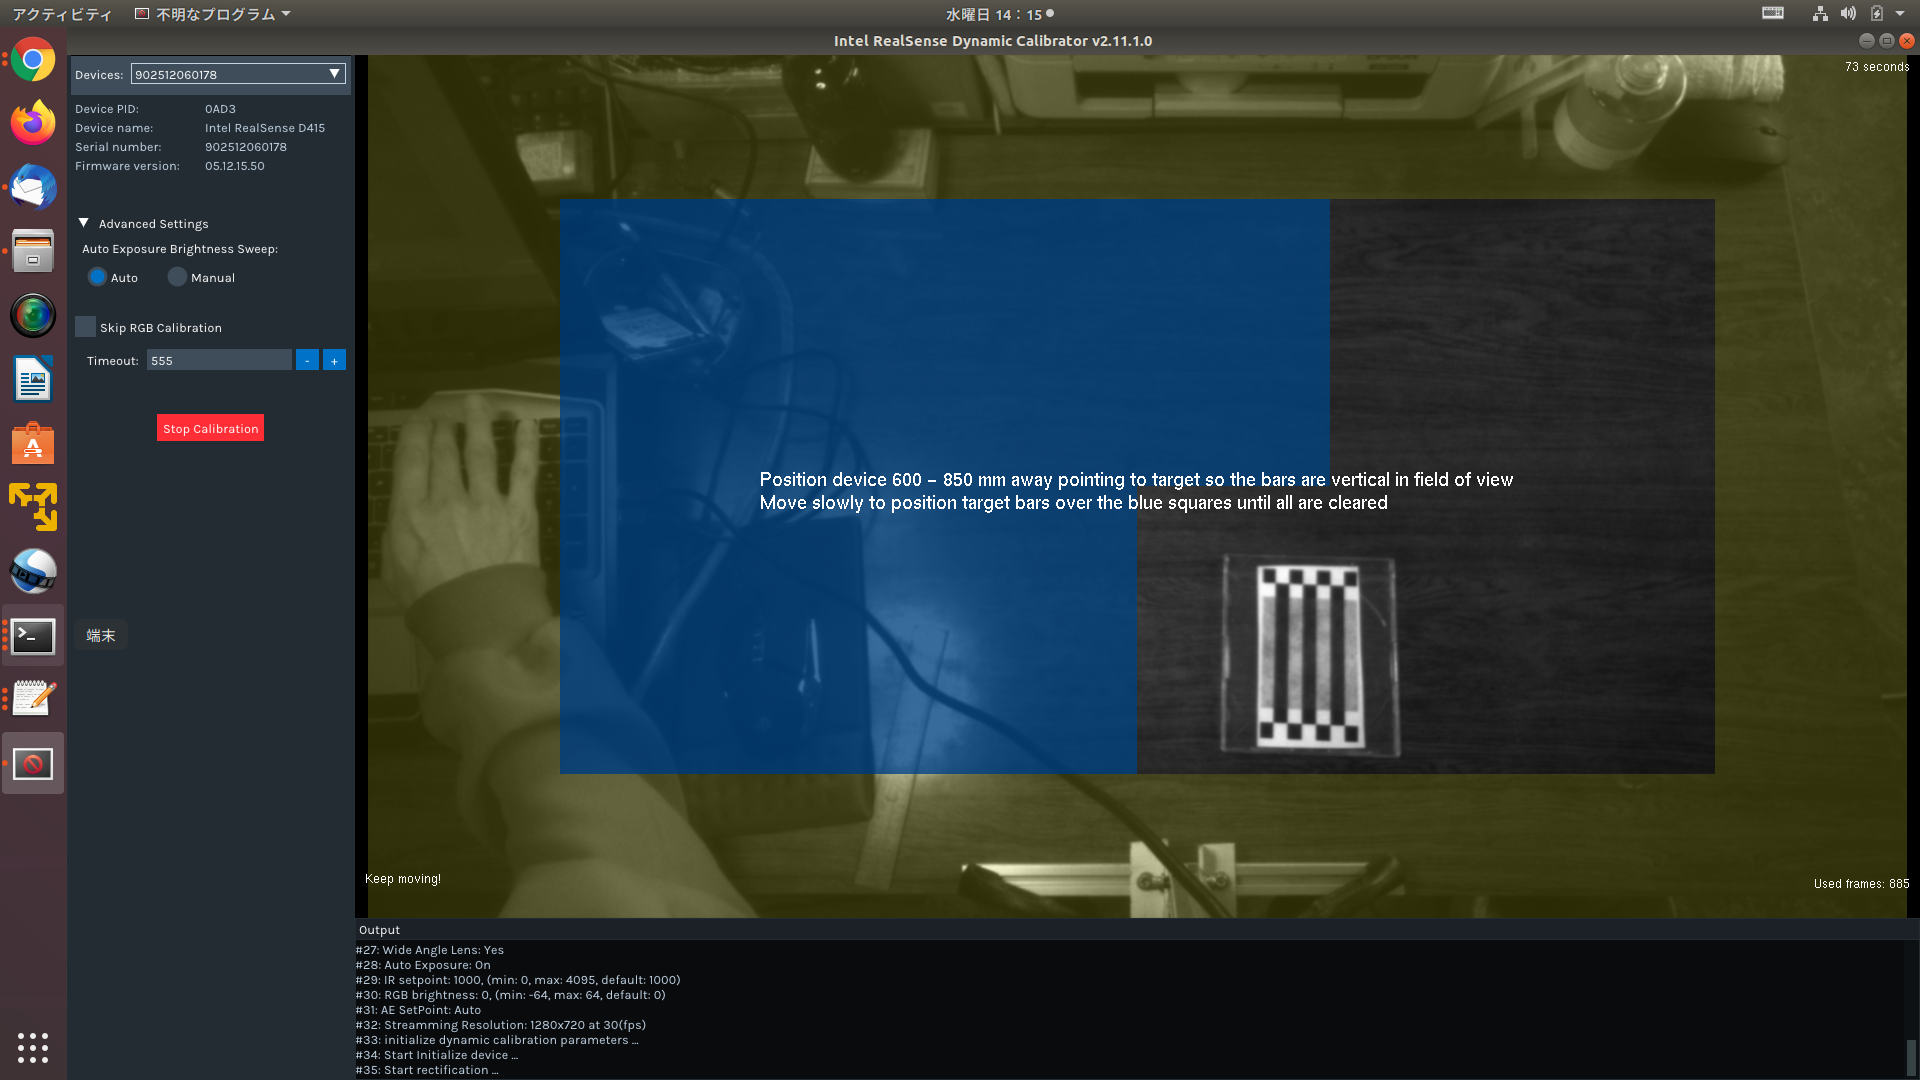
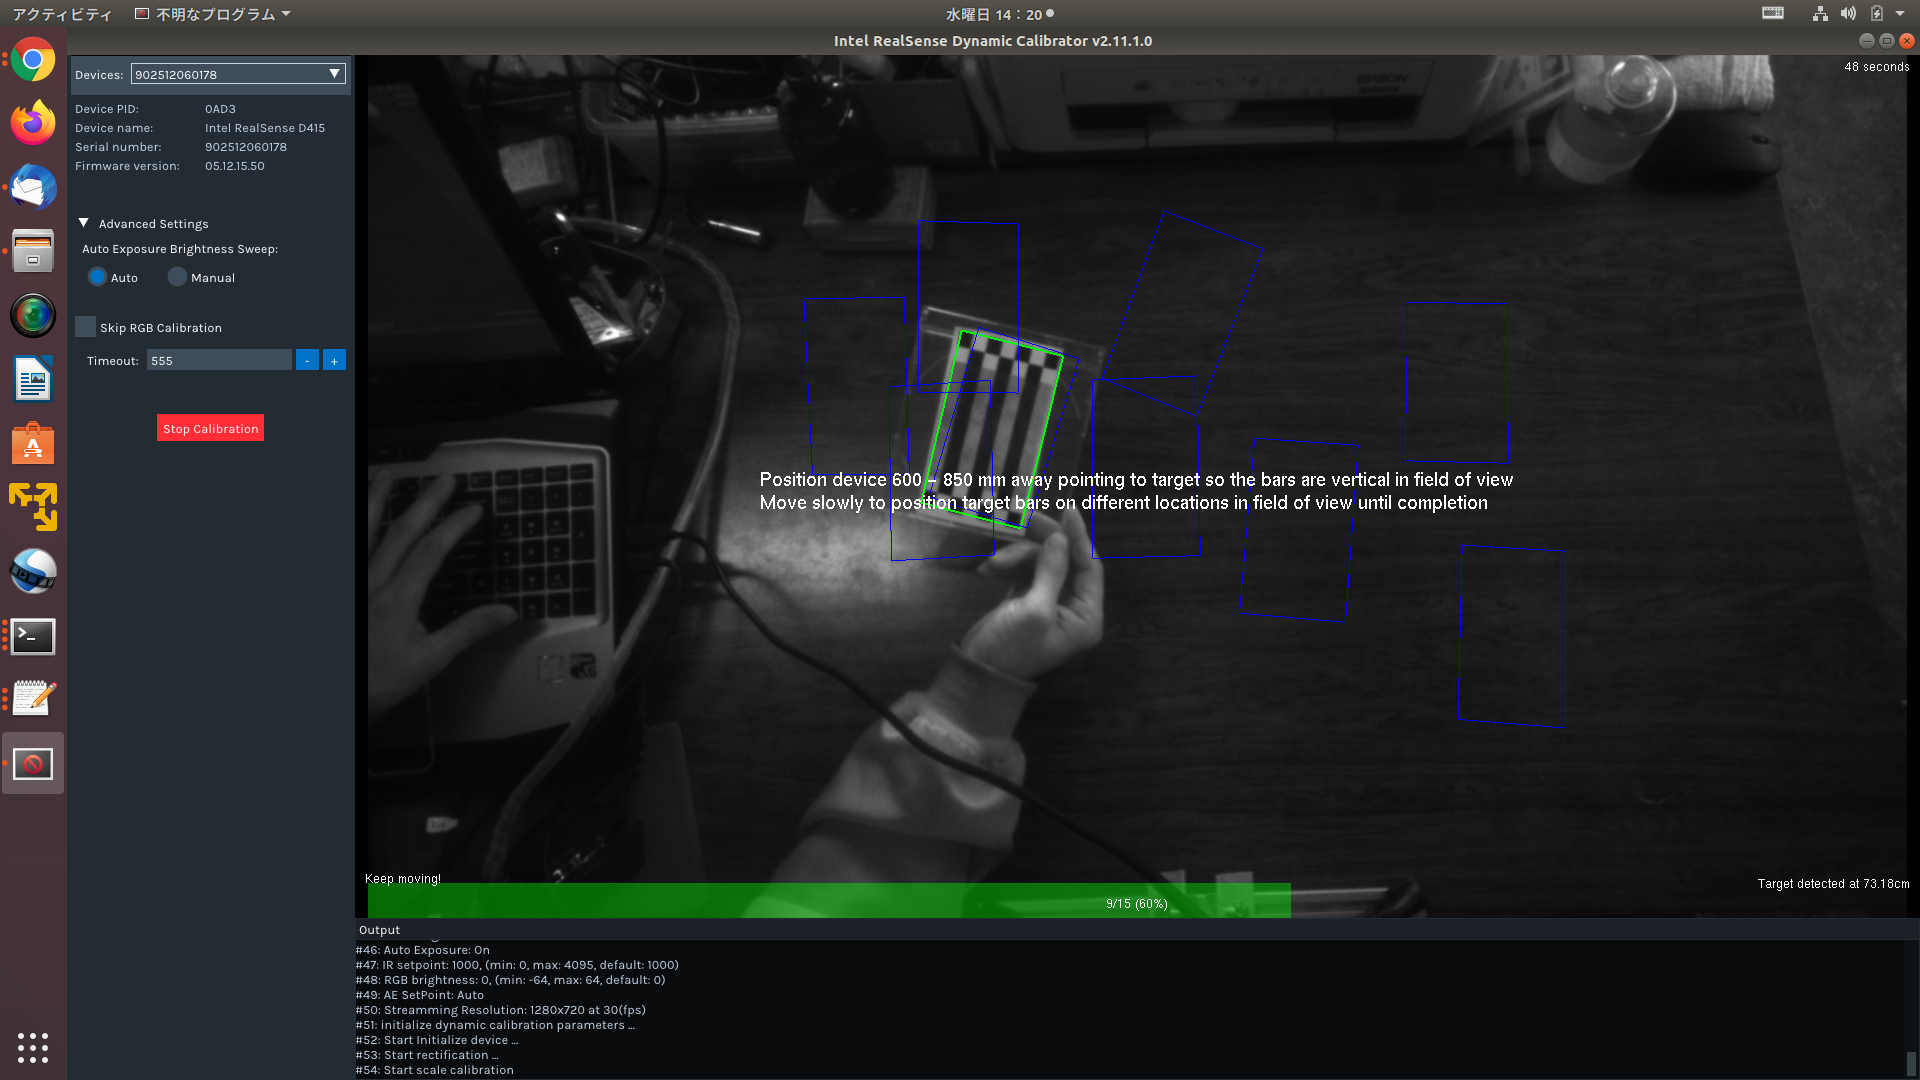
次に用紙が緑の線で四角で覆われます。
四角で覆われたらゆっくりと前後左右と上下にも動かしましょう。
緑の四角で覆われていたところが青色に
変わり、それが15箇所になれば次の設定に移ります。
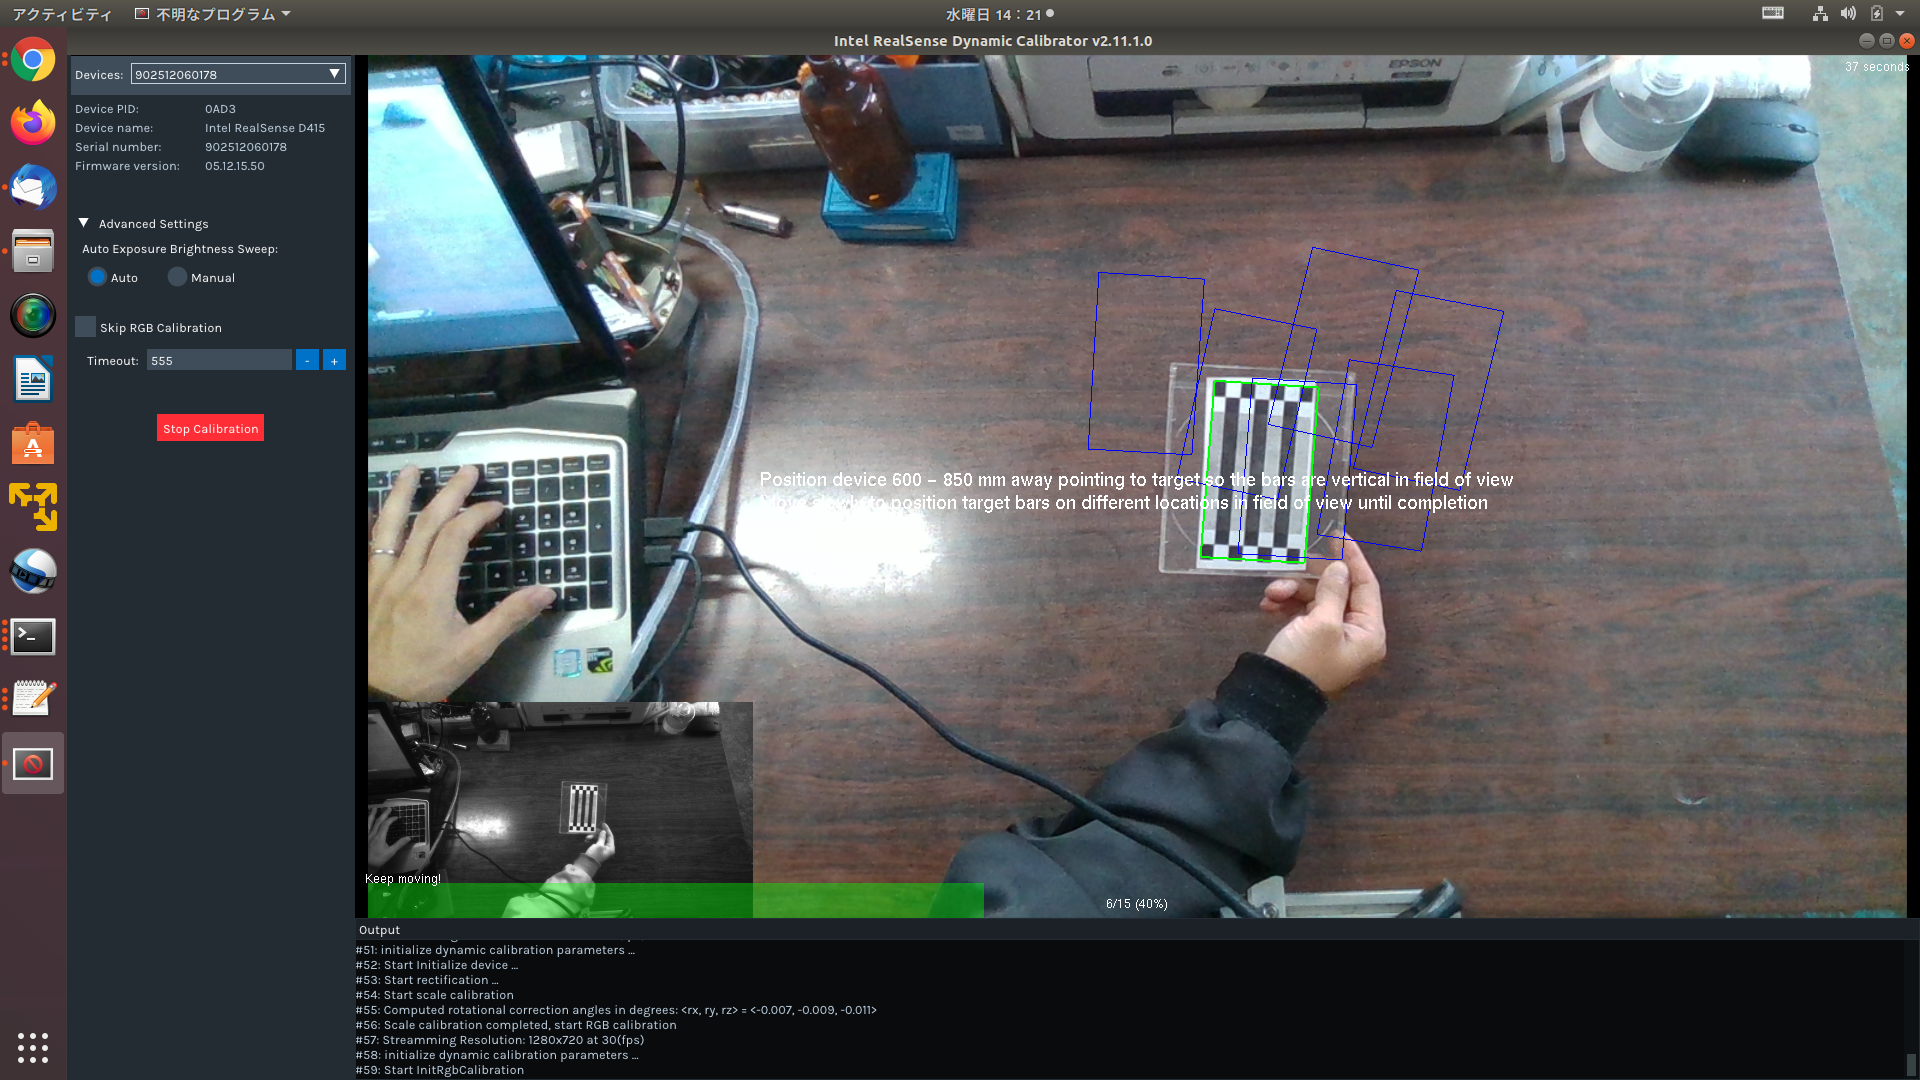
次はカラー画像になります。
先ほどと同じくゆっくりと用紙を移動させて15箇所の青い四角で覆われれば終了です。
緑の枠の近くに持っていくと判定してくれます。
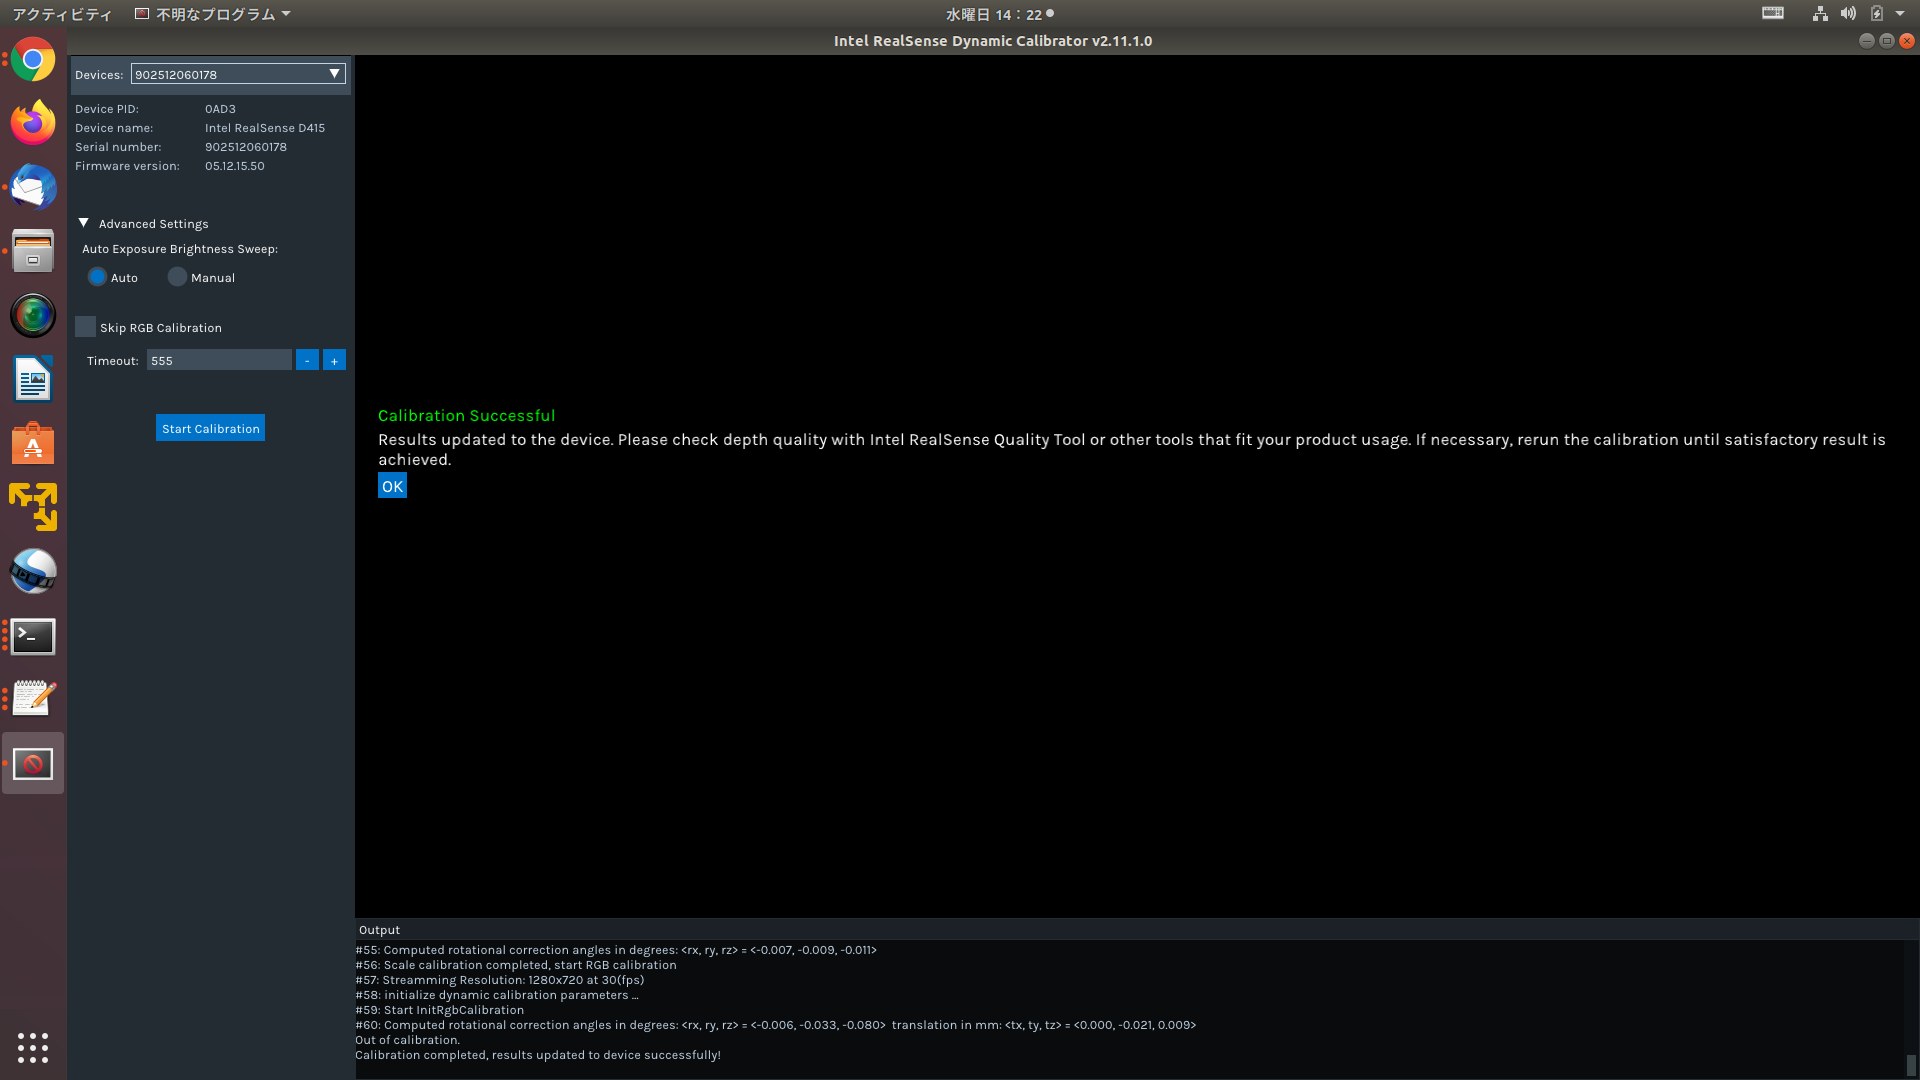
最後に下記画像のように『succesfuly calibration』と表示されれば終了です。
###キャリブレーション内容の確認
/usr/bin/Intel.Realsense.CustomRW -r
最初確認した値と変わっていると思います。
yo4hi6o@yo4hi6o:~$ /usr/bin/Intel.Realsense.CustomRW -r
CustomRW for Intel RealSense D400, Version: 2.11.1.0

  Device PID: 0AD3
  Device name: Intel RealSense D415
  Serial number: 902512060178
  Firmware version: 05.12.15.50

Calibration parameters from the device:
  resolutionLeftRight: 1920 1080

  FocalLengthLeft: 1310.079590 1308.582642
  PrincipalPointLeft: 970.199768 540.931458
  DistortionLeft: 0.152367 -0.384179 -0.000664 0.000925 0.254600

  FocalLengthRight: 1311.334717 1309.831665
  PrincipalPointRight: 985.831177 537.896851
  DistortionRight: 0.152993 -0.387886 -0.001023 0.001136 0.257808

  RotationLeftRight: 0.999975 0.001124 -0.007033
                     -0.001176 0.999972 -0.007387
                     0.007024 0.007395 0.999948
  TranslationLeftRight: -55.055161 0.041970 -0.775555

  HasRGB: 1

  resolutionRGB: 1920 1080

  FocalLengthColor: 1380.792114 1380.017578
  PrincipalPointColor: 960.382141 526.787231
  DistortionColor: 0.000000 0.000000 0.000000 0.000000 0.000000
  RotationLeftColor: 0.999949 -0.002417 0.009812
                     0.002437 0.999995 -0.001947
                     -0.009808 0.001971 0.999950
  TranslationLeftColor: 15.217810 0.059581 -0.432378

yo4hi6o@yo4hi6o:~$