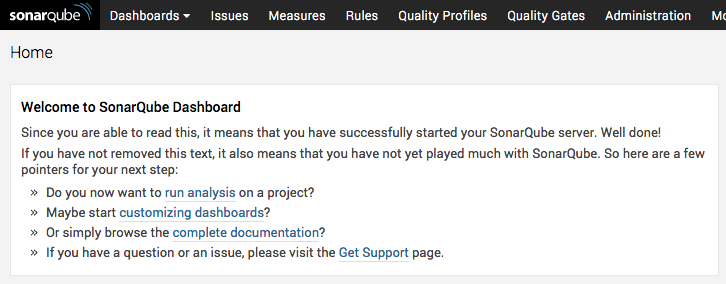
老舗のコード静的解析ツールである SonarQube。
以前はビジュアライゼーションがイマイチで、個人的にもそこまで有用性を感じていなかったのですが、ここ最近のバージョンではこれが非常に改善されていました。
コードの可視化って、客観的なコード評価だけでなく、意外とオエライさんなんかへの説明にも便利なので、環境ひとつで解決できるならこれはサイコーのやつ。
というわけでひとつ構築してみる。
環境
- Ubuntu 14.04.3 LTS
- ORACLE Java 1.8.0_66
- Apache Maven 3.0.5
- Git 1.9.1
- SonarQube 5.2
$ cat /etc/lsb-release
DISTRIB_ID=Ubuntu
DISTRIB_RELEASE=14.04
DISTRIB_CODENAME=trusty
DISTRIB_DESCRIPTION="Ubuntu 14.04.3 LTS"

$ mvn --version
Apache Maven 3.0.5
Maven home: /usr/share/maven
Java version: 1.8.0_66, vendor: Oracle Corporation
Java home: /usr/lib/jvm/java-8-oracle/jre
Default locale: en_US, platform encoding: UTF-8
OS name: "linux", version: "3.16.0-51-generic", arch: "amd64", family: "unix"

$ git --version
git version 1.9.1
セットアップ
とくに準備せずに立ち上げると SonarQube は、組み込み DB を使用して環境を構築しようとする。
ただこの場合だと、簡単に立ち上がる反面、画面上に組み込み DB が使用されている旨、表示されたり、環境スケーリングなどを考えたときに問題がある模様。
というわけで、ちゃんと DB から準備していきます。
メジャーな RDBMS はほとんどサポートされていますが、今回は PostgreSQL でのセットアップをおこないます。
PostgreSQL のセットアップ
apt-get でインストールして、SonarQube 用のユーザー、データベースを作成する。
$ sudo apt-get install postgresql
$ sudo apt-get install postgresql-client

$ sudo su postgres
[sudo] password for :

postgres@..$ createuser -P -d -l sonarqube
Enter password for new role:
Enter it again:

postgres@..$ psql
psql (9.3.10)
Type "help" for help.

postgres=# \du
                             List of roles
 Role name |                   Attributes                   | Member of
-----------+------------------------------------------------+-----------
 postgres  | Superuser, Create role, Create DB, Replication | {}
 sonarqube | Create DB                                      | {}

postgres=# CREATE DATABASE sonarqube;
CREATE DATABASE

postgres=# ALTER USER sonarqube SET search_path to sonarqube;

postgres=# \connect sonarqube;
You are now connected to database "sonarqube" as user "postgres".

sonarqube=# CREATE SCHEMA sonarqube AUTHORIZATION sonarqube;
CREATE SCHEMA

sonarqube=# \q

postgres@..$ exit
SonarQube のダウンロード・デプロイ
wget で取得。
/opt に配置して、シンボリックリンクをはっておく。
先ほど作成したデータベースへの接続情報と、Web サーバー設定を記述していく。
$ wget https://sonarsource.bintray.com/Distribution/sonarqube/sonarqube-5.2.zip
$ unzip sonarqube-5.2.zip
$ sudo mkdir -p /opt/lib
$ sudo mv sonarqube-5.2 /opt/lib/
$ sudo ln -s /opt/lib/sonarqube-5.2 /opt/lib/sonarqube

$ sudo vi /opt/lib/sonarqube/conf/sonar.properties
SonarQube の設定・起動
以下のように、必要な設定を埋める。
# --------------------------------------------------------------------------------------------------
# DATABASE
#
# IMPORTANT: the embedded H2 database is used by default. It is recommended for tests but not for
# production use. Supported databases are MySQL, Oracle, PostgreSQL and Microsoft SQLServer.

# User credentials.
# Permissions to create tables, indices and triggers must be granted to JDBC user.
# The schema must be created first.
sonar.jdbc.username=sonarqube
sonar.jdbc.password=SONARQUBE_PASSWORD

# ----- PostgreSQL 8.x/9.x
# If you don't use the schema named "public", please refer to http://jira.sonarsource.com/browse/SONAR-5000
sonar.jdbc.url=jdbc:postgresql://localhost:5432/sonarqube

# --------------------------------------------------------------------------------------------------
# WEB SERVER

# Web server is executed in a dedicated Java process. By default heap size is 768Mb.
# Use the following property to customize JVM options.
#    Recommendations:
#
#    The HotSpot Server VM is recommended. The property -server should be added if server mode
#    is not enabled by default on your environment: http://docs.oracle.com/javase/7/docs/technotes/guides/vm/server-class.html
#
sonar.web.javaOpts=-Xmx768m -Xms256m -XX:MaxPermSize=160m -XX:+HeapDumpOnOutOfMemoryError -Djava.net.preferIPv4Stack=true

# Binding IP address. For servers with more than one IP address, this property specifies which
# address will be used for listening on the specified ports.
# By default, ports will be used on all IP addresses associated with the server.
sonar.web.host=0.0.0.0

# Web context. When set, it must start with forward slash (for example /sonarqube).
# The default value is root context (empty value).
sonar.web.context=

# TCP port for incoming HTTP connections. Disabled when value is -1.
sonar.web.port=9000
ここまでの設定が完了したら、SonarQube サーバーを起動する。
なお、セットアップ直後は、Login=admin, Password=admin でログインできる。
$ sudo /opt/lib/sonarqube/bin/linux-x86-64/sonar.sh start
Starting SonarQube...
Started SonarQube.
http://localhost:9000/
無事に起動した。
コード解析
環境が整ったので、適当なリポジトリを解析してみる。
今回は、JUnit を解析してみます。
$ sudo mkdir -p /var/opt/sonarqube/repos

$ sudo git clone https://github.com/junit-team/junit.git
$ cd junit/

$ sudo mvn clean org.jacoco:jacoco-maven-plugin:prepare-agent install -Dmaven.test.failure.ignore=true -Dmaven.compiler.source=1.5 -Dmaven.compiler.target=1.5

$ sudo mvn verify sonar:sonar -Dsonar.host.url=http://localhost:9000
-Dmaven.compiler.source=1.5 および -Dmaven.compiler.target=1.5 の部分は、解析するプロジェクトが使用している Java のバージョンに応じて、1.6 や、1.7、1.8 などに変更してください。
-Dsonar.host.url=http://localhost:9000 の部分を変更すれば、リモートからでも解析結果を SonarQube に集めることができるようです。
CI プロセスの終わりなんかに配しておくと、都度結果がアップデートされて捗りそう。
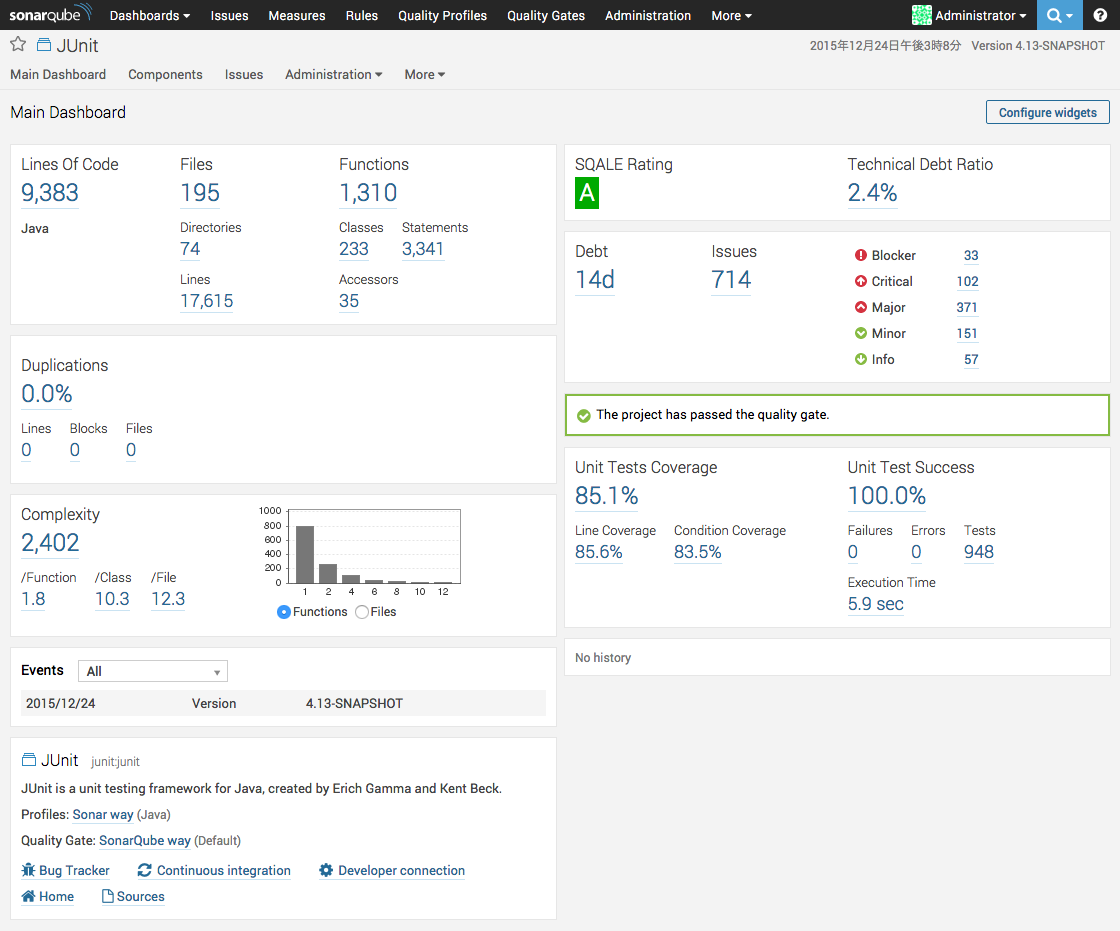
結果はこんな感じ。
良さそうですね。
指標の読み方
初見だとアルファベットだらけでちょっと面食らう。
よく使いそうなものをピックして簡単に紹介。
以下のとおり。
| 表記 | 和訳・意味 | 使いみち |
|---|---|---|
| Lines Of Code | コード行数 | プロジェクトの規模感を把握する。 |
| Duplications | 重複 | コピペを検出する。 |
| Complexity | 複雑度 (循環的複雑度) | 分岐の多さなど、コードの複雑さを把握する。 |
| Technical Debt Ratio | 技術的負債割合 | 技術的負債の相対量を把握する。 |
| Debt | 負債 (技術的負債) | 何日で技術的負債を返済できるかを把握する。 単位は、d (日数) で表現され、デフォルトでは d=8h で計算されている。 |
ちなみに、メニューから [Administration] > [System] > [Update Center] > [Available] を進めていくと、"Japanese Pack" という日本語化プラグインが見つかるので、これを適用することでも、ある程度までは日本語化される。
[Install] ボタンからインストールしたあとは、以下のように SonarQube を再起動すると日本語化が適用される。
$ sudo /opt/lib/sonarqube/bin/linux-x86-64/sonar.sh stop
Stopping SonarQube...
Stopped SonarQube.

$ sudo /opt/lib/sonarqube/bin/linux-x86-64/sonar.sh start
Starting SonarQube...
Started SonarQube.
だいたいこんな感じで使えるようになった。
職場でプロジェクトの数値化を求められたら、まず導入してみると良いかもしれない。
参考 URL
http://docs.sonarqube.org/display/SONAR/Requirements
http://docs.sonarqube.org/display/SONAR/Setup+and+Upgrade
http://docs.sonarqube.org/display/SONAR/Installing+the+Server
http://www.sonarqube.org/unit-test-execution-in-sonarqube/
http://stackoverflow.com/questions/33523826/maven-build-for-sonar-failed-while-installing-jdbc-driver
http://stackoverflow.com/questions/13293062/maven-compile-error
http://qiita.com/mkamotsu/items/98c6d721a87a74f2b36f

