今回は前回作成したプロジェクトを元にしてカスタム Cell を作成して見た目を変えていきます。
株価一覧を表示するイメージのサンプルアプリを作ってみます。
完成イメージ
こんな感じのシンプルなものです。

環境
- macOS Mojave:10.14.6
- Xcode:10.3
カスタムセルの作成
今回は StoryBoard を利用してカスタムセルを作成しました。
個人的には大きいプロジェクトでは XIB を利用して個々のパーツに分解して作った方がメンテしやすいと思います。
カスタムセルのイメージ
株価のステータス表示用の ImageView が左側に配置されていて、右側に企業名と株価を表示する TextField を配置するシンプルな構成です。

StoryBoard でアイテムを配置

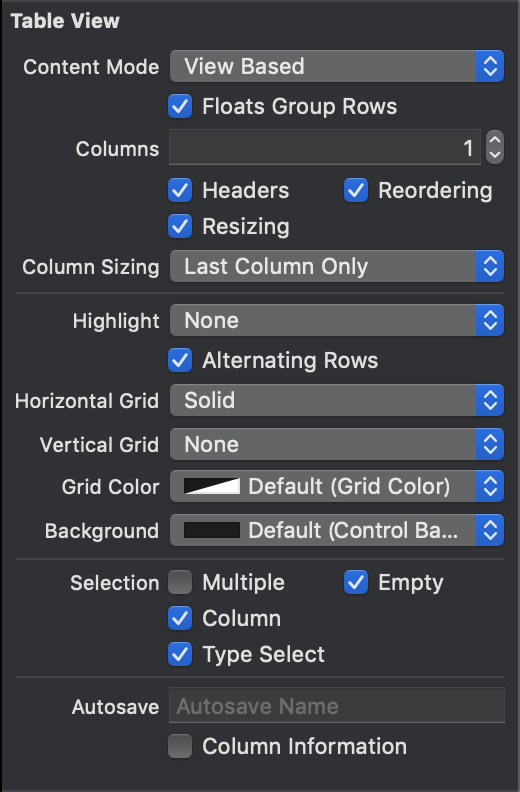
TableView の見え方を変更
表示するだけのViewのため、Clickした時に選択できないようにし(Highlight:None)、見やすいように縞模様表記にし(Alternating Rows:チェック)、水平のグリッド線を表示(Horizontal Grid:Solid)します。
カスタムセルクラスを作成
それぞれのアイテムを持っているだけの単純なクラスです。
CustomNSTableCellView.swift
import Cocoa

class CustomNSTableCellView: NSTableCellView {

    @IBOutlet weak var stockImage: NSImageView!
    @IBOutlet weak var companyName: NSTextField!
    @IBOutlet weak var stockPrice: NSTextField!

}
StoryBoard とカスタムセルクラスを紐づける

ソースコード:カスタムセルクラスの利用
下準備としてセルの高さと表示するアイテムデータを作成
ViewController.swift
    @IBOutlet weak var tableView: NSTableView! {
        didSet {
            self.tableView.dataSource = self
            self.tableView.delegate = self

            self.tableView.rowHeight = 88
        }
    }

    // MARK: - private variables
    private var values = [
        ["name" : "○○株式会社", "price": 1000, "status": "up"]
        ,["name" : "○×水産", "price": 12345, "status": "down"]
        ,["name" : "株式会社□○", "price": 345, "status": "flat"]
        ,["name" : "×△ホールディングス", "price": 321, "status": "up"]
        ,["name" : "ABC BANK", "price": 20, "status": "down"]
        ,["name" : "▼○重工", "price": 98000, "status": "up"]
    ]
状態によってテキストやイメージ画像を差し替える
CustomNSTableCellView.swift
    func tableView(_ tableView: NSTableView, viewFor tableColumn: NSTableColumn?, row: Int) -> NSView? {
        let result = tableView.makeView(withIdentifier: NSUserInterfaceItemIdentifier(rawValue: "MyView"), owner: self) as? CustomNSTableCellView

        // Set the stringValue of the cell's text field to the nameArray value at row
        switch self.values[row]["status"] as! String {
        case "up":
            result?.stockImage.image = NSImage(named: NSImage.Name("up"))
            result?.stockImage.contentTintColor = NSColor.red
            result?.companyName.textColor = NSColor.red
        case "down":
            result?.stockImage.image = NSImage(named: NSImage.Name("down"))
            result?.stockImage.contentTintColor = NSColor.green
            result?.companyName.textColor = NSColor.green
        case "flat":
            result?.stockImage.image = NSImage(named: NSImage.Name("flat"))
            result?.stockImage.contentTintColor = NSColor.gray
            result?.companyName.textColor = NSColor.gray
        default:
            break
        }
        result?.companyName.stringValue = self.values[row]["name"] as! String
        let formatter = NumberFormatter()
        formatter.numberStyle = .decimal
        let commaString = formatter.string(from: self.values[row]["price"] as! NSNumber)
        result?.stockPrice.stringValue = commaString ?? "-"

        // Return the result
        return result
    }
全ソースコード(ViewController)
ViewController.swift
import Cocoa

class ViewController: NSViewController {

    // MARK: - IBOutlet
    @IBOutlet weak var tableView: NSTableView! {
        didSet {
            self.tableView.dataSource = self
            self.tableView.delegate = self

            self.tableView.rowHeight = 88
        }
    }

    // MARK: - private variables
    private var values = [
        ["name" : "○○株式会社", "price": 1000, "status": "up"]
        ,["name" : "○×水産", "price": 12345, "status": "down"]
        ,["name" : "株式会社□○", "price": 345, "status": "flat"]
        ,["name" : "×△ホールディングス", "price": 321, "status": "up"]
        ,["name" : "ABC BANK", "price": 20, "status": "down"]
        ,["name" : "▼○重工", "price": 98000, "status": "up"]
    ]


    // MARK: - override func
    override func viewDidLoad() {
        super.viewDidLoad()

        // Do any additional setup after loading the view.
    }

    override var representedObject: Any? {
        didSet {
        // Update the view, if already loaded.
        }
    }
}

extension ViewController: NSTableViewDataSource, NSTableViewDelegate {

    // MARK: - NSTableViewDataSource
    func numberOfRows(in tableView: NSTableView) -> Int {
        return self.values.count
    }

    // MARK: - NSTableViewDelegate
    func tableView(_ tableView: NSTableView, viewFor tableColumn: NSTableColumn?, row: Int) -> NSView? {
        let result = tableView.makeView(withIdentifier: NSUserInterfaceItemIdentifier(rawValue: "MyView"), owner: self) as? CustomNSTableCellView

        // Set the stringValue of the cell's text field to the nameArray value at row
        switch self.values[row]["status"] as! String {
        case "up":
            result?.stockImage.image = NSImage(named: NSImage.Name("up"))
            result?.stockImage.contentTintColor = NSColor.red
            result?.companyName.textColor = NSColor.red
        case "down":
            result?.stockImage.image = NSImage(named: NSImage.Name("down"))
            result?.stockImage.contentTintColor = NSColor.green
            result?.companyName.textColor = NSColor.green
        case "flat":
            result?.stockImage.image = NSImage(named: NSImage.Name("flat"))
            result?.stockImage.contentTintColor = NSColor.gray
            result?.companyName.textColor = NSColor.gray
        default:
            break
        }
        result?.companyName.stringValue = self.values[row]["name"] as! String
        let formatter = NumberFormatter()
        formatter.numberStyle = .decimal
        let commaString = formatter.string(from: self.values[row]["price"] as! NSNumber)
        result?.stockPrice.stringValue = commaString ?? "-"

        // Return the result
        return result
    }
}
よかったら いいね してください。