毎度、ググっても出てこない小ネタを取り扱っております。
本記事は個人的な見解であり、筆者の所属するいかなる団体にも関係ございません。
0. はじめに
2020年の年末に以下の記事を2つ書きました。
社内でもDockerの利用とGitLab CI/CDの利用が増えており、早晩DockerHubのRateLimitには引っかかるだろうなと考えておりました。
オンプレGitLabで依存関係プロキシ(Dependency Proxy)を設定してDockerHubのダウンロード制限を回避する(設定編) - Qiita
https://qiita.com/ynott/items/fd03b0341b443e617bd5
オンプレGitLabで依存関係プロキシ(Dependency Proxy)を利用する(docker pull利用編) - Qiita
https://qiita.com/ynott/items/fbd1177940d49d1f014f
しかし、実際にRateLimitに引っかかる人が出てくるのは半年ぐらい先なのではないかとのんびり構えていたのですが、早速2月からDockerHubのRateLimitに引っかかる事がありました。
以下のようなメッセージが出ていました。
Running with gitlab-runner 13.8.0 (775dd39d)  on gitlab-runner-11 BsA4TzTk
Preparing the "docker" executor
Using Docker executor with image docker:19.03.12 ...
Starting service docker:19.03.12-dind ...
Pulling docker image docker:19.03.12-dind ...
WARNING: Failed to pull image with policy "always": toomanyrequests: You have reached your pull rate limit. You may increase the limit by authenticating and upgrading: https://www.docker.com/increase-rate-limit (docker.go:147:2s)
ERROR: Preparation failed: failed to pull image "docker:19.03.12-dind" with specified policies [always]: toomanyrequests: You have reached your pull rate limit. You may increase the limit by authenticating and upgrading: https://www.docker.com/increase-rate-limit (docker.go:147:2s)
Will be retried in 3s ...
慌ててRateLimitを確認すると、以下のようになっていました。
/etc/gitlab-runner# TOKEN=$(curl "https://auth.docker.io/token?service=registry.docker.io&scope=repository:ratelimitpreview/test:pull" | jq --raw-output .token) && curl --head --header "Authorization: Bearer $TOKEN" "https://registry-1.docker.io/v2/ratelimitpreview/test/manits/latest" 2>&1 | grep RateLimit
  % Total    % Received % Xferd  Average Speed   Time    Time     Time  Current
                                 Dload  Upload   Total   Spent    Left  Speed
100  4368    0  4368    0     0   6117      0 --:--:-- --:--:-- --:--:--  6109
RateLimit-Limit: 100;w=21600
RateLimit-Remaining: 8;w=21600
そこで、GitLab CI/CDにもDependency Proxyを設定してみます。
1. .gitlab-ci.ymlのimage:を変更する
通常の.gitlab-ci.ymlでは、Dockerで実行するimageの指定は以下のようにします。
これによりDockerHubよりalpine:latestのDockerイメージを取得して実行します。
image: alpine:latest
これを以下のように${CI_DEPENDENCY_PROXY_GROUP_IMAGE_PREFIX}/を追加します。
image: ${CI_DEPENDENCY_PROXY_GROUP_IMAGE_PREFIX}/alpine:latest
全てのimageオプションに記載してください。
もし、.gitlab-ci.yml内でdocker pullしていた場合は、
docker pull alpine:latest
を以下のように変更してください。
docker pull https://gitlab.example.co.jp/<グループ名>/dependency_proxy/containers/alpine:latest
参照:
Dependency Proxy | GitLab
https://docs.gitlab.com/ee/user/packages/dependency_proxy/#authenticate-within-cicd
2. 変数にDOCKER_AUTH_CONFIGを追加する(バージョン13.8まで)
バージョン 13.9がリリースされ以下のDOCKER_AUTH_CONFIGの設定は不要になりました。
GitLab 13.9 released with a Security Alert Dashboard and Maintenance Mode | GitLab
https://about.gitlab.com/releases/2021/02/22/gitlab-13-9-released/#automatically-authenticate-when-using-the-dependency-proxy
上記1.だけで動いて欲しいところなのですが、以下のバグチケットで管理されているとおり、13.9までは、DOCKER_AUTH_CONFIGの設定が必要です。(注:13.9は、2021年2月18日リリース予定です)
Automatically authenticate with the Dependency Proxy (#27302) · Issues · GitLab.org / gitlab-runner · GitLab
https://gitlab.com/gitlab-org/gitlab-runner/-/issues/27302
2-1. docker loginでのDOCKER_AUTH_CONFIGの作り方
以下のようにDockerレジストリにユーザー名とパスワードでログインします。
docker login registry.example.com:5000 --username my_username --password my_password
Dependency Proxyだと、
docker login <あなたのGitLabサーバーのDependency ProxyのURL> --username <GitLabユーザーID --password <GitLabログインパスワード>
になるかと思います。
そうすると以下のメッセージが表示されますので、
WARNING! Your password will be stored unencrypted in /user/.docker/config.json.
.docker/config.jsonを見れば以下のように書かれています
{
  "auths": {
    "gitlab.example.co.jp": {
      "auth": "aG9nZXVzZXI6aG9nZXBhc3N3b3Jk"
    }
  }
}
このままでは、Dockerレジストリのポート5000番に接続してしまうので、以下のようにポート番号を変更します。
{
  "auths": {
    "gitlab.example.co.jp:443": {
      "auth": "aG9nZXVzZXI6aG9nZXBhc3N3b3Jk"
    }
  }
}
内容をコピーしたら、docker logoutしておきましょう。
docker logout
参照:
Using Docker images | GitLab
https://docs.gitlab.com/ee/ci/docker/using_docker_images.html#determining-your-docker_auth_config-data
2-2. echo と base64で作る方法
まず、user名とパスワードを用意します。サンプルとしてユーザー名を hogeuser、パスワードをhogepasswordとします。この2つをコロンでつないでbase64にかけます。この時、echo -nにする事を忘れないようにしましょう。そうでないと改行が入ってしまってエラーになります。
$ echo -n "hogeuser:hogepassword" | base64
aG9nZXVzZXI6aG9nZXBhc3N3b3Jk
上で得られた文字列を2-1と同じようにconfig.jsonフォーマットの"auth": の後にいれます。
3. DOCKER_AUTH_CONFIGをGitLab CI/CDの変数に登録する(バージョン13.8まで)
バージョン 13.9がリリースされ以下のDOCKER_AUTH_CONFIGの設定は不要になりました。
GitLab 13.9 released with a Security Alert Dashboard and Maintenance Mode | GitLab
https://about.gitlab.com/releases/2021/02/22/gitlab-13-9-released/#automatically-authenticate-when-using-the-dependency-proxy
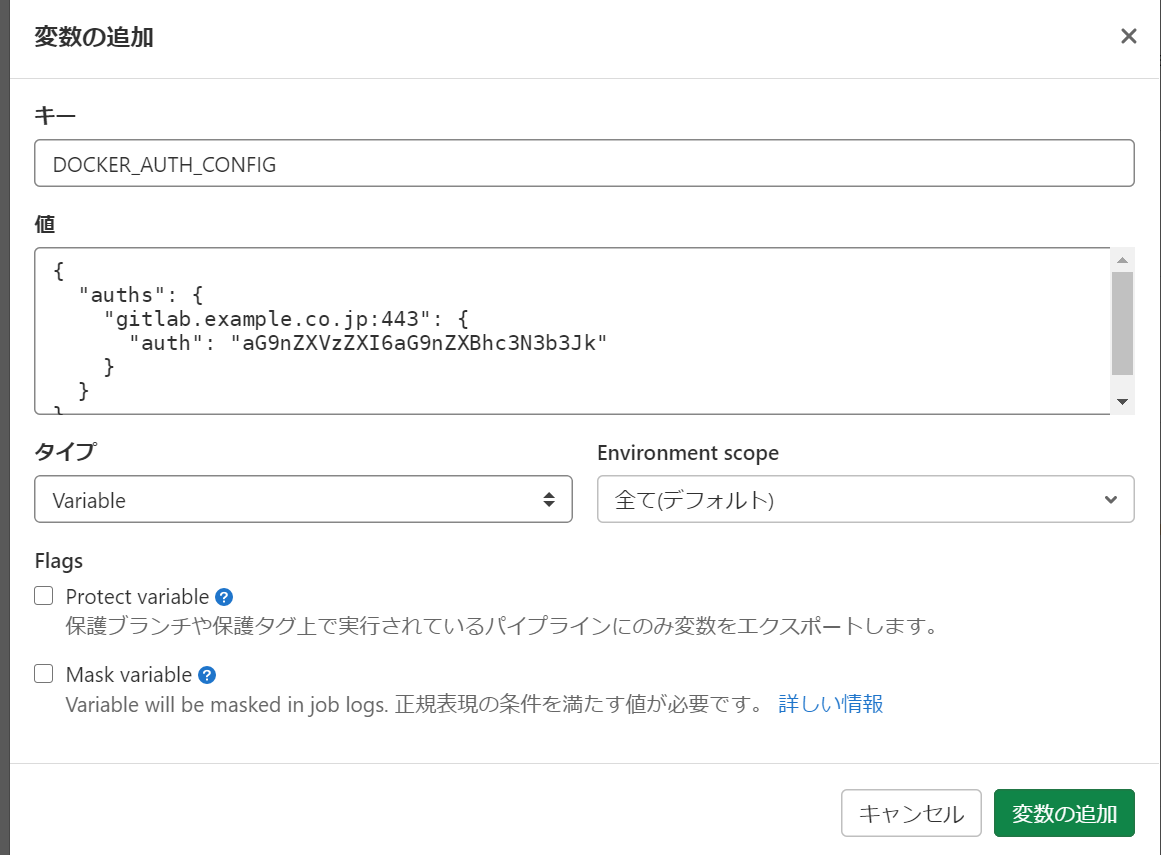
各CI/CDを実行するGitLabのリポジトリーを開いて、「設定」--->「CI/CD」へ移動します。
「変数」を展開して、「変数を追加」をクリックします。以下のように2.作成したconfg.jsonを貼り付けます。
「変数を追加」ボタンを押します。
4. まとめ
GitLab CI/CDのパイプラインでDependency Proxyを利用できるようになります。
5. 補足
.gitlab-ci.ymlで以下のようにserviceを書いている場合、
services:
  - docker:dind
Docker-in-Dockerでのdocker pullはイメージが保存されないためDocker Download Rate-Limit対象になります。

