会社メールとしてgmailを使用している方に是非オススメな設定です。
gmailのメール作成時、ToやCcの入力補助は名前のアタマを少し入力するだけで候補をずらっと並べてくれてとても便利なのですが、ときたま名前が似ている方がいると誤送信のおそれが有ります。
それが社外の人だとなおさら危険です。
また、メール一覧画面では、差出人の名前しか表示されず、それが社内の人なのか、社外の人なのかがぱっと見でわからりづらいです。
たしかThunderbirdとかにはドメインごとに文字色を変える機能があったと思うのですが、、、
その社外の人だけ文字色を変える機能をgmailで実現する方法です。
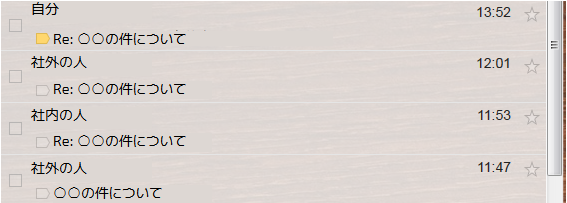
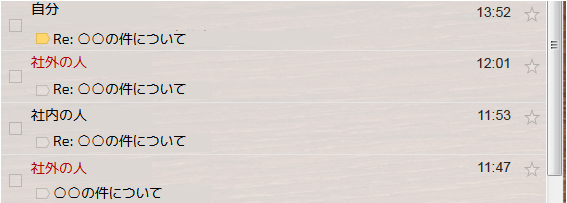
イメージ
イメージとしては以下の様な感じで、社外の差出人だけを強調表示します。
| 適用前 | 適用後 |
|---|---|
 |
 |
Stylishのインストール
ブラウザにStylishアドオンをインストールします。
指定したページごとに独自CSSを流しこんでくれるアドオンです。
Firefox用: https://addons.mozilla.org/ja/firefox/addon/stylish/
Chrome用: https://chrome.google.com/webstore/detail/stylish/fjnbnpbmkenffdnngjfgmeleoegfcffe?hl=ja
「ユーザスタイル」の登録
Stylishの「新しいスタイルを書く」or「新しいスタイルを作成」で以下を入力します。
"xxxxxxx.com"の部分は自社のドメインを記載します。
span[email]:not([email$="xxxxxxx.com"]) {
    color: #AA3322;
}
「適用先」は、"ドメイン上のURL"を選択し、"mail.google.com"を入力します。
Firefoxの場合はこうなるかも。
@namespace url(http://www.w3.org/1999/xhtml);
@-moz-document domain("mail.google.com") {
    span[email]:not([email$="xxxxxxx.com"]) {
        color: #AA3322;
    }
}
最後に保存を押して、gmailを念のため再読込させると、社外の差出人や宛先が赤色の文字になっていると思います。
色については上記の #AA3322 を変更してください。
font-weight: bold; を追加すれば太文字にもできます。