Antrea とは
Antrea とは、オープンソースの Kubernetes CNI で、L3/4 のネットワーキングの機能とセキュリティを Kubernetes クラスターに提供するものです。オープンな仮想スイッチとして長い実績を誇る Open vSwitch をデータプレーンに利用しています。
Antrea では標準的な Kubernetes クラスターネットワーキングではサポートされない様々な機能の実装が試みられています。これまでに Antrea ClusterNetworkPolicy や NodePortLocal を試してきましたが、今回は、Antrea 1.6 からベータリリースとなった Egress 機能を試してみたいと思います。
Egress 機能は、Kubernetes クラスタ内の Pod が外部と通信を行う際に、特定のアドレスブロックでの通信を行うようにするものです。この機能により得られる利点は以下となります。
- Pod が外部通信を行う際に NodeIP ではなく指定された SNAT IP アドレスを使うように指定できる
- 外部のファイアウォールなどでアプリケーション毎に IP アドレスによる明示的なアクセス制御やトレーシングができるようになる
- アプリケーション毎に外部通信を行うノードを指定できる
本記事では、Antrea Egress に注目して機能の確認をしていきます。
Antrea クラスターの準備・アップデート
K8s クラスタのアップグレード
今回も以前用意した Antrea クラスターを利用して Egress を動作させてみます。これから Kubernetes クラスターを準備する場合は、こちらの記事もご参照ください。
現在のクラスタの状況は以下のようになっています。
$ kubectl get nodes
NAME             STATUS   ROLES                  AGE    VERSION
k8s-master-201   Ready    control-plane,master   285d   v1.21.9
k8s-worker-202   Ready    <none>                 285d   v1.21.9
k8s-worker-203   Ready    <none>                 285d   v1.21.9
Antrea のアップグレード
本記事執筆中の2022年11月時点では、Antrea の最新バージョンは 1.9.0 ですが、本記事では 1.7.1 を使用します。構築済みの Antrea クラスターを 1.7.1 にバージョンアップします。
Antrea と antctl の初期セットアップについてはこちらもご参照下さい:
https://github.com/vmware-tanzu/antrea/blob/main/docs/getting-started.md
今回は Antrea v1.7.1 を使うので、以下のように指定して適用します。
$ kubectl apply -f https://github.com/vmware-tanzu/antrea/releases/download/v1.7.1/antrea.yml
antctl も同じようにアップグレードします。
$ curl -Lo ./antctl "https://github.com/vmware-tanzu/antrea/releases/download/v1.7.1/antctl-linux-x86_64"
$ chmod +x ./antctl
$ mv ./antctl /usr/local/bin
antctl で新しいバージョンが適用されていることを確認します。
$ antctl version
antctlVersion: v1.7.1
controllerVersion: v1.7.1
設定の確認
Antrea Egress を使うには、featuregates で Egress が Enable されている必要があります。antctl コマンドで確認します。
$ antctl get featuregates
Antrea Agent Feature Gates
FEATUREGATE              STATUS         VERSION
AntreaPolicy             Enabled        BETA
Egress                   Enabled        BETA
AntreaIPAM               Disabled       ALPHA
Multicast                Disabled       ALPHA
ServiceExternalIP        Disabled       ALPHA
FlowExporter             Disabled       ALPHA
NodePortLocal            Enabled        BETA
AntreaProxy              Enabled        BETA
EndpointSlice            Disabled       ALPHA
Traceflow                Enabled        BETA
NetworkPolicyStats       Enabled        BETA
Multicluster             Disabled       ALPHA

Antrea Controller Feature Gates
FEATUREGATE              STATUS         VERSION
AntreaPolicy             Enabled        BETA
Egress                   Enabled        BETA
ServiceExternalIP        Disabled       ALPHA
NodeIPAM                 Disabled       ALPHA
Traceflow                Enabled        BETA
NetworkPolicyStats       Enabled        BETA
念のため、Antrea の configmap も確認します。antrea-configを表示してみます。
$ kubectl get configmap antrea-config -n kube-system -o yaml
Egress の設定を探して確認します。antrea-agent.conf 設定の Egress と antrea-controller.conf 設定の Egress がどちらも enable: true となっています。コメントアウトされていますが、この Antrea バージョンでは Egress がデフォルトで enable になっているので、この状態ですでに有効です。
apiVersion: v1
data:
  antrea-agent.conf: |
    # FeatureGates is a map of feature names to bools that enable or disable experimental features.
    featureGates:
    # Enable AntreaProxy which provides ServiceLB for in-cluster Services in antrea-agent.
    # It should be enabled on Windows, otherwise NetworkPolicy will not take effect on
    # Service traffic.
    #  AntreaProxy: true

(snip...)

    # Enable controlling SNAT IPs of Pod egress traffic.
    #  Egress: true

(snip...)

  antrea-controller.conf: |
    # FeatureGates is a map of feature names to bools that enable or disable experimental features.
    featureGates:
    # Enable traceflow which provides packet tracing feature to diagnose network issue.
    #  Traceflow: true

    # Enable Antrea ClusterNetworkPolicy feature to complement K8s NetworkPolicy for cluster admins
    # to define security policies which apply to the entire cluster, and Antrea NetworkPolicy
    # feature that supports priorities, rule actions and externalEntities in the future.
    #  AntreaPolicy: true

    # Enable collecting and exposing NetworkPolicy statistics.
    #  NetworkPolicyStats: true

    # Enable multicast traffic. This feature is supported only with noEncap mode.
    #  Multicast: false

    # Enable controlling SNAT IPs of Pod egress traffic.
    #  Egress: true

(snip...)
Antrea Egress を試す
では実際に Antrea Egress を使ってみます。
最初に、テスト用のコンテナを作成する Namespace egress-test を作成します。同時に Namespace を切り替えておきます。
$ kubectl create namespace egress-test
namespace/egress-test created
$
$ kubectl get namespace
NAME                   STATUS   AGE
default                Active   25d
egress-test            Active   44s
kube-node-lease        Active   25d
kube-public            Active   25d
kube-system            Active   25d
$
$ kubectl config set-context --current --namespace=egress-test
Context "kubernetes-admin@kubernetes" modified.
サンプルアプリのデプロイ
まず、動作確認のために使用するアプリケーションをデプロイします。egress-test Namespace に Ubuntu イメージをデプロイします。
$ kubectl create deploy egress-test-app --image=ubuntu:20.04 --replicas=2 -n egress-test -- sleep infinity
作成された Pod の Label と Node を確認します。Label として app=egress-test-app が作成されています。起動した2つの Pod は異なる Node に展開されています。
$ kubectl get pod -L=app -o wide
NAME                               READY   STATUS    RESTARTS   AGE   IP             NODE             NOMINATED NODE   READINESS GATES   APP
egress-test-app-5dc7b7d94d-hhglr   1/1     Running   0          84s   192.168.1.59   k8s-worker-202   <none>           <none>            egress-test-app
egress-test-app-5dc7b7d94d-pd8lp   1/1     Running   0          84s   192.168.2.47   k8s-worker-203   <none>           <none>            egress-test-app
さらに、後のテストで使用するために両方の Pod に ping ツールをインストールしておきます。
$ kubectl exec -it egress-test-app-5dc7b7d94d-hhglr -- apt-get -y update
$ kubectl exec -it egress-test-app-5dc7b7d94d-hhglr -- apt-get -y install iputils-ping
$ kubectl exec -it egress-test-app-5dc7b7d94d-pd8lp -- apt-get -y update
$ kubectl exec -it egress-test-app-5dc7b7d94d-pd8lp -- apt-get -y install iputils-ping
動作確認(Egress未使用の場合)
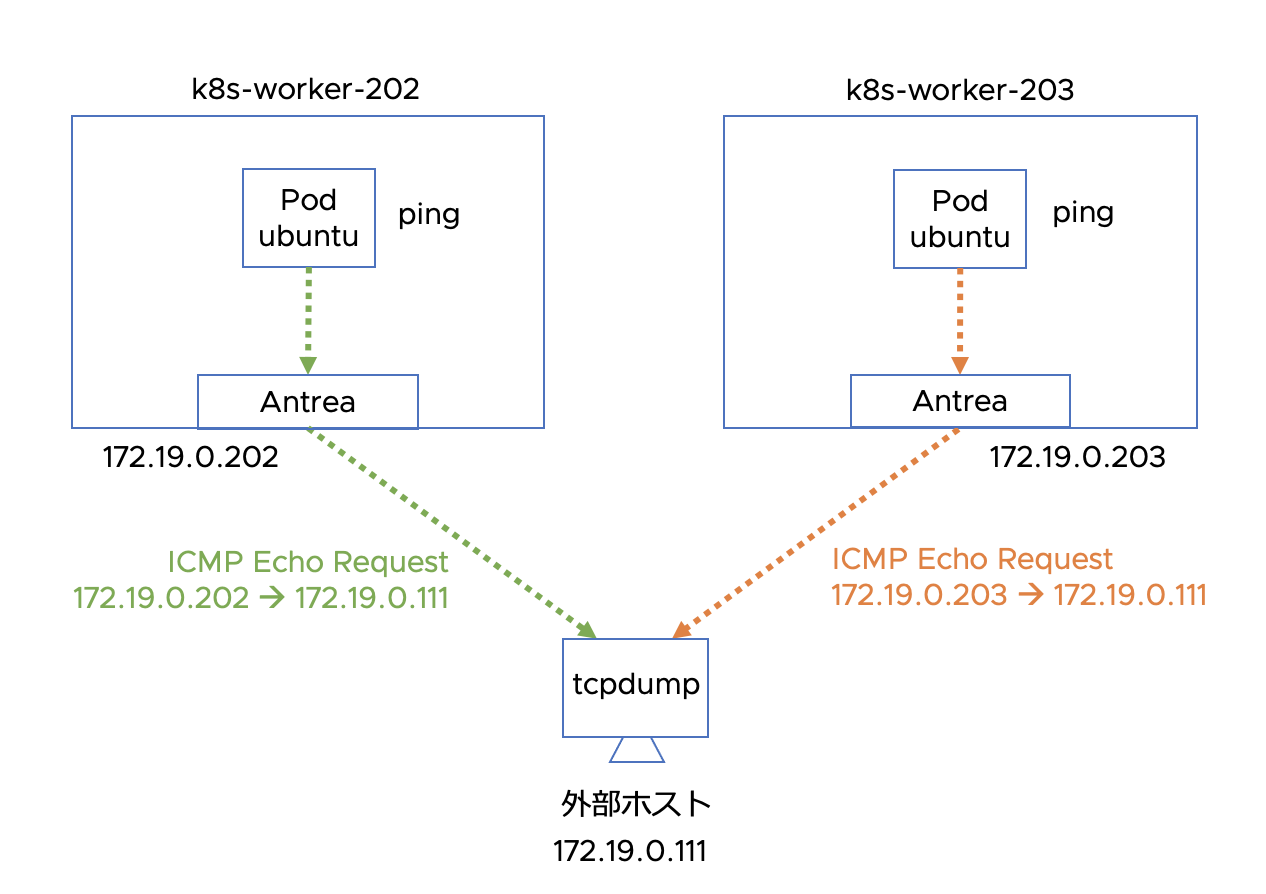
次にクラスターの外部にホストを準備し、作成した Pod から ICMP Echo Requestを送信して、Antrea CNI での通常の挙動を確認します。全体の構成は以下のようになります。外部ホストの IP アドレスは 172.19.0.111 です。外部ホストでは tcpdump を使って Pod からのパケットをキャプチャします。
tcpdump -n -i ens192 icmp
tcpdump: verbose output suppressed, use -v or -vv for full protocol decode
listening on ens192, link-type EN10MB (Ethernet), capture size 262144 bytes
まず1つ目の Pod から外部ホスト向けに ping を実行します。
$ kubectl exec -it egress-test-app-5dc7b7d94d-hhglr -- ping 172.19.0.111
PING 172.19.0.111 (172.19.0.111) 56(84) bytes of data.
64 bytes from 172.19.0.111: icmp_seq=1 ttl=63 time=0.714 ms
64 bytes from 172.19.0.111: icmp_seq=2 ttl=63 time=0.459 ms
64 bytes from 172.19.0.111: icmp_seq=3 ttl=63 time=0.292 ms
64 bytes from 172.19.0.111: icmp_seq=4 ttl=63 time=0.258 ms
64 bytes from 172.19.0.111: icmp_seq=5 ttl=63 time=0.343 ms
^C
--- 172.19.0.111 ping statistics ---
5 packets transmitted, 5 received, 0% packet loss, time 4098ms
rtt min/avg/max/mdev = 0.258/0.413/0.714/0.165 ms
外部ホストでの受信結果は以下のようになります。
23:55:19.538683 IP 172.19.0.202 > 172.19.0.111: ICMP echo request, id 312, seq 1, length 64
23:55:19.538716 IP 172.19.0.111 > 172.19.0.202: ICMP echo reply, id 312, seq 1, length 64
23:55:20.568170 IP 172.19.0.202 > 172.19.0.111: ICMP echo request, id 312, seq 2, length 64
23:55:20.568195 IP 172.19.0.111 > 172.19.0.202: ICMP echo reply, id 312, seq 2, length 64
23:55:21.587973 IP 172.19.0.202 > 172.19.0.111: ICMP echo request, id 312, seq 3, length 64
23:55:21.588002 IP 172.19.0.111 > 172.19.0.202: ICMP echo reply, id 312, seq 3, length 64
23:55:22.611962 IP 172.19.0.202 > 172.19.0.111: ICMP echo request, id 312, seq 4, length 64
23:55:22.611984 IP 172.19.0.111 > 172.19.0.202: ICMP echo reply, id 312, seq 4, length 64
23:55:23.636017 IP 172.19.0.202 > 172.19.0.111: ICMP echo request, id 312, seq 5, length 64
23:55:23.636042 IP 172.19.0.111 > 172.19.0.202: ICMP echo reply, id 312, seq 5, length 64
2つ目の Pod からも同様に ping を行います。
$ kubectl exec -it egress-test-app-5dc7b7d94d-pd8lp -- ping 172.19.0.111
PING 172.19.0.111 (172.19.0.111) 56(84) bytes of data.
64 bytes from 172.19.0.111: icmp_seq=1 ttl=63 time=1.11 ms
64 bytes from 172.19.0.111: icmp_seq=2 ttl=63 time=0.515 ms
64 bytes from 172.19.0.111: icmp_seq=3 ttl=63 time=0.297 ms
64 bytes from 172.19.0.111: icmp_seq=4 ttl=63 time=0.541 ms
64 bytes from 172.19.0.111: icmp_seq=5 ttl=63 time=0.293 ms
^C
--- 172.19.0.111 ping statistics ---
5 packets transmitted, 5 received, 0% packet loss, time 4061ms
rtt min/avg/max/mdev = 0.293/0.551/1.111/0.298 ms
外部ホストでの受信結果は以下のようになります。
23:51:21.375070 IP 172.19.0.203 > 172.19.0.111: ICMP echo request, id 2867, seq 1, length 64
23:51:21.375144 IP 172.19.0.111 > 172.19.0.203: ICMP echo reply, id 2867, seq 1, length 64
23:51:22.375629 IP 172.19.0.203 > 172.19.0.111: ICMP echo request, id 2867, seq 2, length 64
23:51:22.375658 IP 172.19.0.111 > 172.19.0.203: ICMP echo reply, id 2867, seq 2, length 64
23:51:23.391417 IP 172.19.0.203 > 172.19.0.111: ICMP echo request, id 2867, seq 3, length 64
23:51:23.391449 IP 172.19.0.111 > 172.19.0.203: ICMP echo reply, id 2867, seq 3, length 64
23:51:24.411654 IP 172.19.0.203 > 172.19.0.111: ICMP echo request, id 2867, seq 4, length 64
23:51:24.411683 IP 172.19.0.111 > 172.19.0.203: ICMP echo reply, id 2867, seq 4, length 64
23:51:25.435396 IP 172.19.0.203 > 172.19.0.111: ICMP echo request, id 2867, seq 5, length 64
23:51:25.435430 IP 172.19.0.111 > 172.19.0.203: ICMP echo reply, id 2867, seq 5, length 64
外部ホストから見ると、Pod から外部に転送されるトラフィックのソースは各 Node のアドレス(172.19.0.202と172.19.0.203)が使われていることが分かります。同じ Deployment 内の Pod からの通信をクラスタの外部で識別し、ファイアウォールで制御したいようなケースでは、すべての Node のアドレスを制御対象の送信元に設定する必要があり、運用上困難な面があると思います。
Antrea Egress を使う場合
では、Antrea Egressを設定して動作を見ていきたいと思います。Egress の設定方法はいくつかありますが、ここではまず Egress が使用するアドレスプールである ExternalIPPool リソースを設定し、それを参照する Egress リソースを作成していきます。
ExternalIPPool の作成
まず、以下のような ExternalIPPool マニフェストファイル extippool.yaml を準備します。
apiVersion: crd.antrea.io/v1alpha2
kind: ExternalIPPool
metadata:
  name: external-ip-pool-1
spec:
  ipRanges:
  - start: 172.19.0.101
    end: 172.19.0.110
  nodeSelector:
    matchLabels:
      kubernetes.io/hostname: k8s-worker-202
Nodes が所属するアドレスブロックから 172.19.0.101 ~ 172.19.0.110 をプールにしています。
また、特定の Node をこのプールの割当先に指定するために nodeSelector を設定しています。ここでは hostname のラベルで k8s-worker-202 を指定していますので、このプールを定義された Egress は必ずこの Node に割り当てられるようになります。もし Node を指定する必要がない場合は nodeSelector: {} のように設定することもできます。
ではこのマニフェストをクラスタに適用します。
$ kubectl apply -f extippool.yaml
externalippool.crd.antrea.io/external-ip-pool-1 created
$
$ kubectl get externalippool external-ip-pool-1
NAME                 TOTAL   USED   AGE
external-ip-pool-1   10      0      7s
リソースを表示すると、トータル10個のアドレスを持つプールが作成されており、まだ使用されていないことが分かります。
Egress の作成
次に Egress 用のマニフェストファイル egress.yaml を準備します。
apiVersion: crd.antrea.io/v1alpha2
kind: Egress
metadata:
  name: egress-test-1
spec:
  appliedTo:
    namespaceSelector:
      matchLabels:
        kubernetes.io/metadata.name: egress-test
    podSelector:
      matchLabels:
        app: egress-test-app
  externalIPPool: external-ip-pool-1
spec.appliedTo.namespaceSelector にて、名前が egress-test の Namespace にマッチするよう条件を指定しています。また spec.appliedTo.PodSelector にて Pod ラベルが app: egress-test-app を指定しています。これにより指定した Namespace 内の特定の Pod にだけ Egress が設定されます。
割り当てる IP アドレスをプールのアドレス内から指定することも可能ですが、ここでは指定していません。
ではこのマニフェストを適用します。
$ kubectl apply -f egress.yaml
egress.crd.antrea.io/egress-test-1 created
$
$ kubectl get egress egress-test-1
NAME            EGRESSIP       AGE   NODE
egress-test-1   172.19.0.101   4s    k8s-worker-202
external-ip-pool-1 から 172.19.0.101 が割り当てられています。Node としては、external-ip-pool-1 で指定した k8s-worker-202 が選択されています。
プールの状態を確認すると、以下のように1つのアドレスが使用中になっています。
$ kubectl get externalippool external-ip-pool-1
NAME                 TOTAL   USED   AGE
external-ip-pool-1   10      1      10m
この段階で、クラスタ構成は以下のようになっています。

Egress の動作確認
では、Egress を設定した状態での動作を確認していきます。
まず、1つ目の Pod から外部ホスト 172.19.0.111 に対して ping を実行します。
$ kubectl exec -it egress-test-app-5dc7b7d94d-hhglr -- ping 172.19.0.111
PING 172.19.0.111 (172.19.0.111) 56(84) bytes of data.
64 bytes from 172.19.0.111: icmp_seq=1 ttl=63 time=0.301 ms
64 bytes from 172.19.0.111: icmp_seq=2 ttl=63 time=0.286 ms
64 bytes from 172.19.0.111: icmp_seq=3 ttl=63 time=0.322 ms
64 bytes from 172.19.0.111: icmp_seq=4 ttl=63 time=0.331 ms
64 bytes from 172.19.0.111: icmp_seq=5 ttl=63 time=0.292 ms
^C
--- 172.19.0.111 ping statistics ---
5 packets transmitted, 5 received, 0% packet loss, time 4104ms
rtt min/avg/max/mdev = 0.286/0.306/0.331/0.017 ms
外部ホスト側の tcpdump の結果は以下のようになります。
22:23:49.078889 IP 172.19.0.101 > 172.19.0.111: ICMP echo request, id 347, seq 1, length 64
22:23:49.078914 IP 172.19.0.111 > 172.19.0.101: ICMP echo reply, id 347, seq 1, length 64
22:23:50.110362 IP 172.19.0.101 > 172.19.0.111: ICMP echo request, id 347, seq 2, length 64
22:23:50.110383 IP 172.19.0.111 > 172.19.0.101: ICMP echo reply, id 347, seq 2, length 64
22:23:51.134386 IP 172.19.0.101 > 172.19.0.111: ICMP echo request, id 347, seq 3, length 64
22:23:51.134411 IP 172.19.0.111 > 172.19.0.101: ICMP echo reply, id 347, seq 3, length 64
22:23:52.158370 IP 172.19.0.101 > 172.19.0.111: ICMP echo request, id 347, seq 4, length 64
22:23:52.158394 IP 172.19.0.111 > 172.19.0.101: ICMP echo reply, id 347, seq 4, length 64
22:23:53.182341 IP 172.19.0.101 > 172.19.0.111: ICMP echo request, id 347, seq 5, length 64
22:23:53.182365 IP 172.19.0.111 > 172.19.0.101: ICMP echo reply, id 347, seq 5, length 64
次に2つ目の Pod からも同様に ping を実行します。
$ kubectl exec -it egress-test-app-5dc7b7d94d-pd8lp -- ping 172.19.0.111
PING 172.19.0.111 (172.19.0.111) 56(84) bytes of data.
64 bytes from 172.19.0.111: icmp_seq=1 ttl=62 time=2.07 ms
64 bytes from 172.19.0.111: icmp_seq=2 ttl=62 time=0.921 ms
64 bytes from 172.19.0.111: icmp_seq=3 ttl=62 time=0.503 ms
64 bytes from 172.19.0.111: icmp_seq=4 ttl=62 time=0.422 ms
64 bytes from 172.19.0.111: icmp_seq=5 ttl=62 time=0.429 ms
^C
--- 172.19.0.111 ping statistics ---
5 packets transmitted, 5 received, 0% packet loss, time 4040ms
rtt min/avg/max/mdev = 0.422/0.869/2.074/0.629 ms
同じく外部ホスト側の tcpdump の結果は以下のようになります。
22:23:59.557835 IP 172.19.0.101 > 172.19.0.111: ICMP echo request, id 2898, seq 1, length 64
22:23:59.557938 IP 172.19.0.111 > 172.19.0.101: ICMP echo reply, id 2898, seq 1, length 64
22:24:00.558560 IP 172.19.0.101 > 172.19.0.111: ICMP echo request, id 2898, seq 2, length 64
22:24:00.558583 IP 172.19.0.111 > 172.19.0.101: ICMP echo reply, id 2898, seq 2, length 64
22:24:01.559621 IP 172.19.0.101 > 172.19.0.111: ICMP echo request, id 2898, seq 3, length 64
22:24:01.559645 IP 172.19.0.111 > 172.19.0.101: ICMP echo reply, id 2898, seq 3, length 64
22:24:02.572947 IP 172.19.0.101 > 172.19.0.111: ICMP echo request, id 2898, seq 4, length 64
22:24:02.572970 IP 172.19.0.111 > 172.19.0.101: ICMP echo reply, id 2898, seq 4, length 64
22:24:03.596977 IP 172.19.0.101 > 172.19.0.111: ICMP echo request, id 2898, seq 5, length 64
22:24:03.596997 IP 172.19.0.111 > 172.19.0.101: ICMP echo reply, id 2898, seq 5, length 64
外部ホストでは各 Pod からの ICMP の送信元が両方とも 172.19.0.101 となっていることが分かるかと思います。2つの Pod は実際には2つの Node に分散配置されていますが、Egress 設定の下ではクラスターネットワークを介していったん k8s-worker-202 に転送された後、Egress が送信元を 172.19.0.101 に SNAT 変換した上で外部に送信しています。
Egress IP を指定した場合の動作
Egress ではプールから割り当てられる IP アドレスを指定することも可能です。Egress のマニフェストファイルを以下のように修正し、アドレスを 172.19.0.105 に指定します。spec.egressIP を追加しています。
apiVersion: crd.antrea.io/v1alpha2
kind: Egress
metadata:
  name: egress-test-1
spec:
  appliedTo:
    namespaceSelector:
      matchLabels:
        kubernetes.io/metadata.name: egress-test
    podSelector:
      matchLabels:
        app: egress-test-app
  egressIP: 172.19.0.105
  externalIPPool: external-ip-pool-1
ではこのマニフェストを適用します。
$ kubectl apply -f egress.yaml
egress.crd.antrea.io/egress-test-1 configured
$
$ kubectl get egress egress-test-1
NAME            EGRESSIP       AGE   NODE
egress-test-1   172.19.0.105   43m    k8s-worker-202
割り当てられた IP アドレスが 172.19.0.105 に変わっています。172.19.0.101 はリリースされています。
それでは Pod から ping を実行してみます。
 kubectl exec -it egress-test-app-5dc7b7d94d-hhglr -- ping 172.19.0.111
PING 172.19.0.111 (172.19.0.111) 56(84) bytes of data.
64 bytes from 172.19.0.111: icmp_seq=1 ttl=63 time=0.631 ms
64 bytes from 172.19.0.111: icmp_seq=2 ttl=63 time=0.313 ms
64 bytes from 172.19.0.111: icmp_seq=3 ttl=63 time=0.262 ms
64 bytes from 172.19.0.111: icmp_seq=4 ttl=63 time=0.278 ms
64 bytes from 172.19.0.111: icmp_seq=5 ttl=63 time=0.307 ms
^C
--- 172.19.0.111 ping statistics ---
5 packets transmitted, 5 received, 0% packet loss, time 4096ms
rtt min/avg/max/mdev = 0.262/0.358/0.631/0.137 ms
外部ホスト側での tcpdump 結果は以下となります。
22:47:33.304642 IP 172.19.0.105 > 172.19.0.111: ICMP echo request, id 359, seq 1, length 64
22:47:33.304669 IP 172.19.0.111 > 172.19.0.105: ICMP echo reply, id 359, seq 1, length 64
22:47:34.328187 IP 172.19.0.105 > 172.19.0.111: ICMP echo request, id 359, seq 2, length 64
22:47:34.328209 IP 172.19.0.111 > 172.19.0.105: ICMP echo reply, id 359, seq 2, length 64
22:47:35.352101 IP 172.19.0.105 > 172.19.0.111: ICMP echo request, id 359, seq 3, length 64
22:47:35.352123 IP 172.19.0.111 > 172.19.0.105: ICMP echo reply, id 359, seq 3, length 64
22:47:36.376304 IP 172.19.0.105 > 172.19.0.111: ICMP echo request, id 359, seq 4, length 64
22:47:36.376327 IP 172.19.0.111 > 172.19.0.105: ICMP echo reply, id 359, seq 4, length 64
22:47:37.400164 IP 172.19.0.105 > 172.19.0.111: ICMP echo request, id 359, seq 5, length 64
22:47:37.400185 IP 172.19.0.111 > 172.19.0.105: ICMP echo reply, id 359, seq 5, length 64
外部ホスト側でも送信元アドレスが 172.19.0.105 に変わっていることが確認できます。
K8s Node のインタフェースを確認
最後に、各 Node にログインして Egress の設定状態を確認してみます。Antrea Egress が提供する SNAT IP は各 Node の antrea-egress0 インタフェースとして実現されています。
-
k8s-worker-202の状態
$ ip address show dev antrea-egress0
19: antrea-egress0: <BROADCAST,NOARP> mtu 1500 qdisc noop state DOWN group default
    link/ether 4a:c5:06:17:35:4c brd ff:ff:ff:ff:ff:ff
    inet 172.19.0.105/32 scope global antrea-egress0
       valid_lft forever preferred_lft forever
-
k8s-worker-203の状態
$ ip address show dev antrea-egress0
6: antrea-egress0: <BROADCAST,NOARP> mtu 1500 qdisc noop state DOWN group default
    link/ether 36:4c:3a:3f:92:6c brd ff:ff:ff:ff:ff:ff
今の設定状態では k8s-worker-203 に Egress が存在しないため、antrea-egress0 インタフェースに IP アドレスが割り当てられていません。新しい Egress を作成すると、割り当てられた Node の antrea-egress0 に IP アドレスが追加されて有効になります。
最後に
Antrea Egress の基本的な設定と動作を確認してみました。Antrea では ClusterNetworkPolicy を使うことで特定のアプリケーションと外部との通信を K8s クラスタ内のポリシーで制御できますが、クラスター外部のファイアウォール等で K8s クラスタからのトラフィックを制御したいような場合に、Egress の仕組みが有効ではないかと思います。