はじめに
これはIBM RedbooksのDeveloping Node.js Applications on IBM Cloudをなぞってみたものです。
この記事では第4章の「Building a rich front-end application by using React and ES6」に取り組んでいきます。
必要物
- IBM Cloudアカウント
- インターネットに接続できる環境
- Google Chrome または Firefox
ES6
ES6は、JavaScriptの仕様である、European Computer Manufacturers Association (ECMA)Scriptのバージョンの1つです。
React
Reactはクライアントサイドの動的なWebアプリケーションを構築するためのフレームワークです。
Reactは、HTMLシンタックスを拡張し、アプリケーションの状態と同期したUI構成要素のコードの必要性を減らすために、動的データバインディングとDocument Object Model(DOM)を用います。Reactを使えば、UI構成要素の状態とバックエンドアプリケーションの変化を同期させるために用いられるコードを作成する労力を減らすことができます。
ExpressアプリケーションをGitからクローンする
(ここからしばらくの内容は、Part3で構築したExpressアプリを残してある人は飛ばすことができます)
以下のリンクをクリックします。
https://console.bluemix.net/devops/setup/deploy?repository=https://github.com/ibm-redbooks-dev/vy102-XXX-express
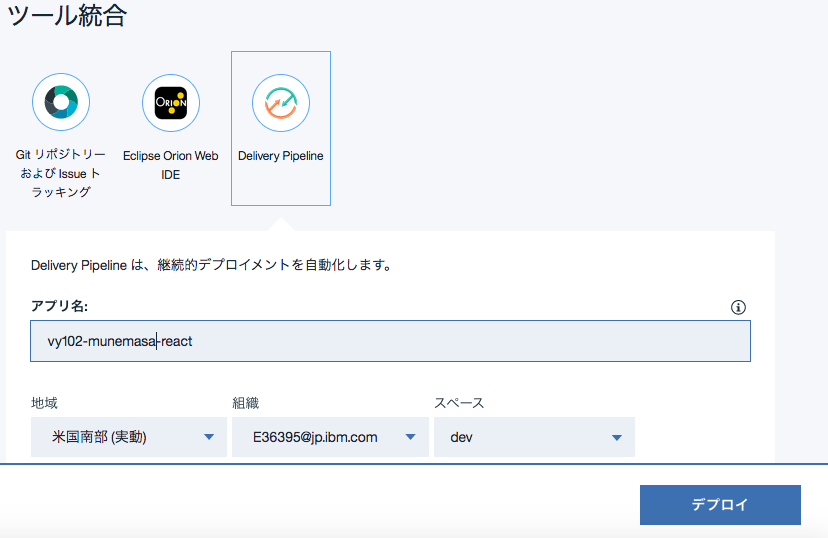
出てきた画面のツール統合欄で「Delivery Pipeline」を選択します。
任意のアプリ名をつけて、「デプロイ」をクリックします。

ツールチェーンから、Eclipse Orion Web IDEをクリックします。

Part3でExpressアプリを作った際と同じ状態のフォルダとファイルが揃っています。

manifest.ymlを開き、アプリ名とホスト名を直します。
上部の「新規起動構成の作成」をクリックし、中にある「+」をクリックします。
出てきた構成情報を確認し、よければ「保存」をクリックします。

三角のデプロイマークをクリックしてデプロイをします。
再デプロイを求められるので、OKをクリックします。

Reactページを作成する。
ReactはJavaScriptベースのフロントエンドWebアプリケーションのフレームワークで、主にシングルページのアプリケーションの構築に用いられます。シングルページアプリケーションは1枚のHTMLページをロードし、それを動的にアップデートするものです。
app.jsを編集していきます。
//Routes module のまとまりの後に以下を加えます。
//Serve the files in /frontend as static files
app.use(express.static(__dirname + '/frontend'));
全体としては以下のようになります。
var port = process.env.VCAP_APP_PORT || 8080;

//Express Web Framework, and create a new express server
var express = require('express'),
	app = express();

var path = require('path');

var bodyParser = require('body-parser');
//parse application/x-www-form-urlencoded
app.use(bodyParser.urlencoded({
	extended: false
}));

//Routes modules
var index = require('./routes'),
    author = require('./routes/author');

//Serve the files in /frontend as static files
app.use(express.static(__dirname + '/frontend'));

//In case the caller access any resource under the root /, call index route
app.use('/', index);

//In case the caller access any resource under /author, call author route
app.use('/author', author);

// start server on the specified port and binding host
app.listen(port);
app.jsはユーザーがアプリ内のURLにアクセスしようとしたときに、/frontendフォルダ内のパスにそれと合致するものがあるかを探します。
パスが指定されていなければ、Expressフォルダ内のindex.htmlを探しにいきます。
というわけで、「frontend」というフォルダを新規作成し、その中に「index.html」というファイルを新規作成して、以下のコードを記述します。
<html>
<head>
	<title>React JS - Author Finder</title>
	<link rel="stylesheet"
href="//netdna.bootstrapcdn.com/bootstrap/3.0.0/css/bootstrap.min.css" />
</head>

<body>
	<!-- Loading the script in body is a recommendation to ensure faster loading,
		putting all scripts at the header will cause the page to wait till all scripts
loaded
		Load React related files from internet -->
	<script crossorigin
src="https://unpkg.com/react@16/umd/react.production.min.js"></script>
	<script crossorigin
src="https://unpkg.com/react-dom@16/umd/react-dom.production.min.js"></script>

	<!-- Load babel JavaScript compiler from internet -->
	<script src="https://unpkg.com/babel-standalone@6.15.0/babel.min.js"></script>

	<div class="container">
		<div class="row">
			<!-- You do not need to write much html code, you will
				build the whole html on your JSPX code            -->
			<div class="col-sm-10 col-sm-offset-1 text-center" id="root">
			</div>
		</div>
	</div>

</body>

</html>
これで、「/frontend/index.html」により代替されたので、「/views/index.html」が必要なくなりました。
不必要になったファイルを削除していきます。
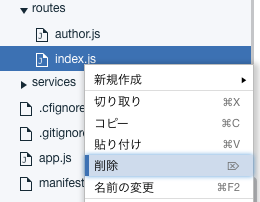
「views」フォルダを右クリックし「削除」を選択し、中のファイルごと削除します。

「routes」フォルダ内のindex.jsファイルを削除します。routesフォルダ自体は削除しません。

app.jsファイルを開き編集します。
「//Routes model」内の index = require('./routes'), を削除します。
varを削除せず、その場所にauthorを詰めます。
次の部分を削除します。
//In case the caller access any resource under the root /, call index route
app.use('/', index);
全体としては以下のようになります。
var port = process.env.VCAP_APP_PORT || 8080;

//Express Web Framework, and create a new express server
var express = require('express'),
	app = express();

var path = require('path');

var bodyParser = require('body-parser');
//parse application/x-www-form-urlencoded
app.use(bodyParser.urlencoded({
	extended: false
}));

//Routes modules
var author = require('./routes/author');

//Serve the files in /frontend as static files
app.use(express.static(__dirname + '/frontend'));

//In case the caller access any resource under /author, call author route
app.use('/author', author);

// start server on the specified port and binding host
app.listen(port);
ページに動的フォームを加える。
ページにテキストボックス・ラベル・ボタンなどを加え、ボタンを押したらReactがNode.jsのバックエンドサービスにアクセスするという仕組みを作っていきましょう。
frontendフォルダ内に「components」フォルダを作成し、その中に「components.js」ファイルを新規作成しましょう。
components.jsファイルに以下を記述します。
class Container extends React.Component {
    constructor(props) {
        super(props);
        this.state = {
            url: '',
            authors: [],
            inputVal: ''
        };

    }

    updateUrl(e) {
        this.setState({
            inputVal: e.target.value
        });
    }

    // getAuthor uses the fetch function to retrieve authors
    // from the Rest service created in the previous exercise
    getAuthor() {}

    // Render is the core function behind React components.
    // It defines components and elements in XML format.
    // This is only feasible  if using JSPX and Babel JavaScript compiler.
    render() {
        return (
            <div class="jumbotron text-center">
                    <h1>Author Finder</h1>
                    <div id='input-form' class='text-center'>
                         <input type="text" class="form-control input-lg text-center"
onChange={e=>this.updateUrl(e)}  placeholder="Enter URL of Article here!"/>
                    </div>
                    <br/>
                    <button type="button" class="btn btn-primary btn-lg" disabled =
{this.state.inputVal.length===0} onClick={()=>{this.getAuthor()}}>Retrieve Author</button>
                </div>
        )
    }
}

ReactDOM.render(<Container />, document.getElementById("root"));
index.htmlを編集します。
最後の <script></script> タグの次の行に <script type="text/babel" src="./components/components.js"></script> を加えます。
全体としては以下のようになります。
<html>

<head>
	<title>React JS - Author Finder</title>
	<link rel="stylesheet"
href="//netdna.bootstrapcdn.com/bootstrap/3.0.0/css/bootstrap.min.css" />
</head>

<body>
	<!-- Loading the script in body is a recommendation to ensure faster loading,
		putting all scripts at the header will cause the page to wait till all scripts loaded
		Load React related files from internet -->
	<script crossorigin src="https://unpkg.com/react@16/umd/react.production.min.js"></script>
	<script crossorigin src="https://unpkg.com/react-dom@16/umd/react-dom.production.min.js"></script>

	<!-- Load babel JavaScript compiler from internet -->
	<script src="https://unpkg.com/babel-standalone@6.15.0/babel.min.js"></script>

	<script type="text/babel" src="./components/components.js"></script>

	<div class="container">
		<div class="row">
			<!-- You do not need to write much html code, you will
				build the whole html on your JSPX code            -->
			<div class="col-sm-10 col-sm-offset-1 text-center" id="root">
			</div>
		</div>
	</div>

</body>

</html>
できたら、デプロイしてアプリを立ち上げます。
フォームにさらにコンポーネントを加える
ここまででHTMLフォームを使って、ContainerというReactのコンポーネントをページに加えてきましたが、ここからさらに手を加えていきたいと思います。
「/frontend/components/components.js」ファイルを開きます。
ReactDOM.render(<Container />, document.getElementById("root"));``` の行の前に以下のコードを加えます。
render()メソッドの後に以下を加えます。
/*
  Notice that the AuthorRecord is defined in a separate file. This is a
powerful feature of the React Component: Putting the AuthorRecord in a separate
file and making it a reusable component.
  */
renderAuthors() {
    /*
    When developing a component, you should capitalize it.
    Hence, you should use "AuthorRecord" instead of "authorrecord" to identify
it as a component to React.
    */
    let authors = this.props.authors;
    return authors.map(a => {
        return <AuthorRecord author = {a}/>;
    });
}
button typeの行の下に <Results url={this.state.url} hide={this.state.authors.length === 0} authors={this.state.authors}/> を加えます。
全体としては以下のようになります。
// Container: consider it the main component the descripe the whole page
class Container extends React.Component {

    constructor(props) {
        super(props);
        this.state = {
            url: '',
            authors: [],
            inputVal: ''
        };
    }

    updateUrl(e) {
        this.setState({inputVal: e.target.value});
    }

    // getAuthor uses the fetch function to retrieve authors from the Rest service created in the previous exercise
    getAuthor() {}

    // Render is the core function behind React components. It defines components and elements in XML format. This is only feasible  if using JSPX and Babel JavaScript compiler.
    render() {
        return (
            <div class="jumbotron text-center">
            	<h1>Author Finder</h1>
                <div id='input-form' class='text-center'>
                	<input type="text" class="form-control input-lg text-center" onChange={e=>this.updateUrl(e)}  placeholder="Enter URL of Article here!"/>
                </div>
                <br/>
                <button type="button" class="btn btn-primary btn-lg" disabled = {this.state.inputVal.length===0} onClick={()=>{this.getAuthor()}}>Retrieve Author</button>
                <Results url={this.state.url} hide={this.state.authors.length === 0} authors={this.state.authors}/>

            </div>
        	)
    }
}

// Results: is another React component that creates the list of AuthorRecords
class Results extends React.Component {
    constructor(props) {
        super(props);
    }

	// Notice that the AuthorRecord is defined in a separate file.
	// This is a powerful feature of the React Component: Putting the AuthorRecord in a separate file and making it a reusable component.undefined
	renderAuthors() {
	    let authors = this.props.authors;
	    return authors.map(a => {
	        return <AuthorRecord author = {a}/>;
	    });
	}

    render() {

        if (this.props.hide) {
            return null;
        }

        return (
            <div class='form-inline'>
                   <div class="row">
                        <div class="col-xs-12 col-md-3">
                            <h2>Article URL:</h2>
                        </div>
                        <div class="col-xs-12 col-md-9">
                            {this.props.url}
                        </div>
                    </div>
                    <div class="row">
                            <div class="col-xs-12 col-md-3">
                                <h2>Authors:</h2>
                            </div>
                            <div class="col-xs-12 col-md-9">
                                <div class="row">
                                	{this.renderAuthors()}
                                </div>
                            </div>
                    </div>
            </div>
        )
    }

}

ReactDOM.render(<Container />, document.getElementById("root"));
componentsフォルダ内に「authorrecords.js」ファイルを新規作成します。
これでReactの新しいコンポーネントを定義します。
以下のコードを記述します。
//AuthorRecord : a component defined to hold author names
class AuthorRecord extends React.Component{
    render() {
        return (
            <div class="row">
                 <div class="col-xs-12 col-md-6">
                    {this.props.author.name}
                </div>
            </div>
        );
    }
}
新たなコンポーネントAuthorRecordに他のコンポーネントもアクセスできるように、authorrecords.jsをindex.htmlにインポートします。
index.htmlのcomponents.jsをインポートする行の前に <script type="text/babel" src="./components/authorrecords.js"></script> を加えます。
全体としては以下のようになります。
<html>

<head>
	<title>React JS - Author Finder</title>
	<link rel="stylesheet" href="//netdna.bootstrapcdn.com/bootstrap/3.0.0/css/bootstrap.min.css" />
</head>

<body>
	<!-- Loading the script in body is a recommendation to ensure faster loading,
		putting all scripts at the header will cause the page to wait till all scripts loaded
		Load React related files from internet -->
	<script crossorigin src="https://unpkg.com/react@16/umd/react.production.min.js"></script>
	<script crossorigin src="https://unpkg.com/react-dom@16/umd/react-dom.production.min.js"></script>

	<!-- Load babel JavaScript compiler from internet -->
	<script src="https://unpkg.com/babel-standalone@6.15.0/babel.min.js"></script>

	<script type="text/babel" src="./components/authorrecords.js"></script>
	<script type="text/babel" src="./components/components.js"></script>

	<div class="container">
		<div class="row">
			<!-- You do not need to write much html code, you will
				build the whole html on your JSPX code            -->
			<div class="col-sm-10 col-sm-offset-1 text-center" id="root">
			</div>
		</div>
	</div>

</body>

</html>
authorサービスの呼び出しにFetch APIを使う
Reactは視覚的コンポーネントをmodel view controller(MVC)アーキテクチャに実装するためのフレームワークです。バックエンドサーバーからリソースを取り出すには他のライブラリが必要となります。RESTサービスの呼び出しにはXMLHttpRequestが一般的に用いられますが、ここでは、Fetch APIを利用していきます。Fetch APIでRESTサービスの呼び出しが簡単になります。
「/frontend/components/components.js」ファイルを開きます。
getAuthor()メソッドを以下に書き換えます。
    getAuthor() {
		var myHeaders = new Headers();
		myHeaders.append("Content-Type", "application/x-www-form-urlencoded");
		fetch('/author', {
			method: 'POST',
			body: "url=" + this.state.inputVal,
			headers: myHeaders
		}).then(res => res.json())
		.then(data => this.setState({
			authors: data,
			url: this.state.inputVal
		}));
	}
できたら、デプロイしてアプリを立ち上げます。
すると、以下のようなフォームが出てきます。

テキストボックスにURLを入力します。
例えば、 http://edition.cnn.com/2017/06/12/politics/hfr-dennis-rodman-north-korea/index.html を入れてみます。
Retrieve Authorボタンを押すと、以下のようにして記事の著者名を取得することができます。

終わり
これでDeveloping Node.js Applications on IBM Cloudの内容のご紹介はすべて終わりです。
すべてを訳したわけでもないので、よかったらぜひ原本も読んでみてください。


