PyTorch Mobile
去年(2019年)の10月くらいに出た。Tensolflow Liteとかではandroid iosでも機械学習ができたが、やっとpytorch 1.3からモバイル向けが登場した。tensorflow よりpytorch使う側からすると最高だね!
tensorflow Liteと同様にandroid ios で利用できるようになっている。
詳細はこちら
PyTorch Mobile公式サイト : https://pytorch.org/mobile/home/
公式サイトより

今回やること
公式サイトで紹介されているチュートリアルをやる。Kotlinで書く!
resNetの学習済みモデルを使って画像の分類を行う。(推論のみ)
github載せてます https://github.com/SY-BETA/PyTorchMobile
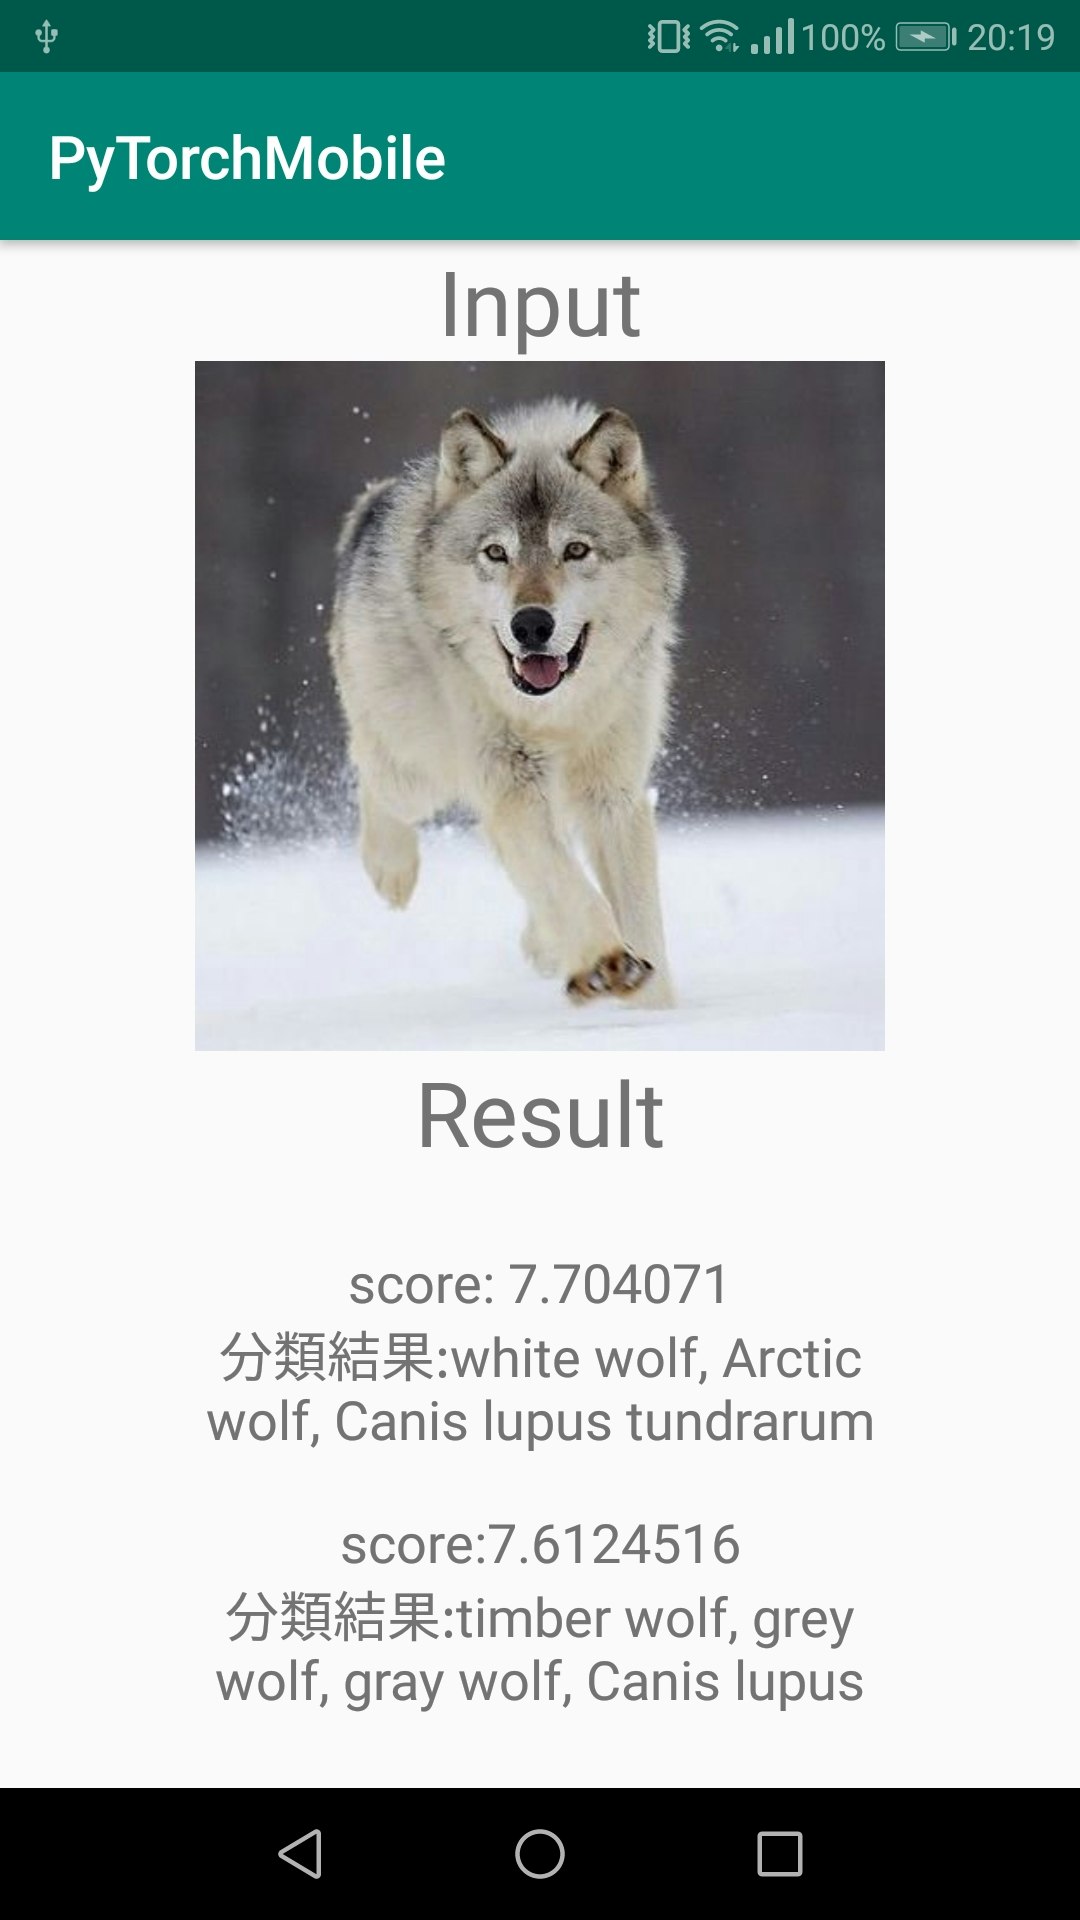
こんな感じ ↓

分類する画像と上位二つの分類結果とそのスコアを表示するだけの簡単なもの。(Canis lupusってなんだろ?)
必要なもの
- python の実行環境 (自分はjupyter notebookでやった)
- pytorch, torchVision(最新版推奨)
- android studio
こんだけ
ResNetモデルのダウンロード
まずandroid studio で新規プロジェクトを作成する。
そのプロジェクトにassetsフォルダを作成する。(「UI左のapp右クリック-> 新規 -> フォルダ -> assetsフォルダ」 でできる)
作成したらそのプロジェクトのappフォルダと同じ階層で以下のpythonコードを実行する
import torch
import torchvision

# resnetモデルを利用
model = torchvision.models.resnet18(pretrained=True)
# 推論modeに
model.eval()
example = torch.rand(1, 3, 224, 224)
traced_script_module = torch.jit.trace(model, example)
traced_script_module.save("app/src/main/assets/resnet.pt")
うまく実行できると先ほど作ったassetsフォルダにresnet.ptというファイルが追加される。
assetsフォルダとdrawableフォルダに以下のサンプル画像をimage.jpgの名前で保存する

実装
依存関係
gradleに以下を追加(2020年1月4日時点)
dependencies {
    implementation 'org.pytorch:pytorch_android:1.3.0'
    implementation 'org.pytorch:pytorch_android_torchvision:1.3.0'
}
android studio でレイアウトを作る
適当にレイアウト作成
縦に画像が1個とテキストが6個あるだけのレイアウト
<?xml version="1.0" encoding="utf-8"?>
<androidx.constraintlayout.widget.ConstraintLayout xmlns:android="http://schemas.android.com/apk/res/android"
    xmlns:app="http://schemas.android.com/apk/res-auto"
    xmlns:tools="http://schemas.android.com/tools"
    android:layout_width="match_parent"
    android:layout_height="match_parent"
    tools:context=".MainActivity">

    <TextView
        android:id="@+id/textView"
        android:layout_width="wrap_content"
        android:layout_height="wrap_content"
        android:text="Input"
        android:textSize="30sp"
        app:layout_constraintEnd_toEndOf="parent"
        app:layout_constraintStart_toStartOf="parent"
        app:layout_constraintTop_toTopOf="parent" />

    <ImageView
        android:id="@+id/imageView"
        android:layout_width="wrap_content"
        android:layout_height="230dp"
        android:scaleType="fitCenter"
        app:layout_constraintEnd_toEndOf="parent"
        app:layout_constraintStart_toStartOf="parent"
        app:layout_constraintTop_toBottomOf="@+id/textView"
        app:srcCompat="@drawable/image" />

    <TextView
        android:id="@+id/textView2"
        android:layout_width="wrap_content"
        android:layout_height="wrap_content"
        android:text="Result"
        android:textSize="30sp"
        app:layout_constraintEnd_toEndOf="parent"
        app:layout_constraintStart_toStartOf="parent"
        app:layout_constraintTop_toBottomOf="@+id/imageView" />

    <TextView
        android:id="@+id/result1Score"
        android:layout_width="wrap_content"
        android:layout_height="wrap_content"
        android:layout_marginTop="32dp"
        android:text="TextView"
        android:textSize="18sp"
        app:layout_constraintBottom_toTopOf="@+id/result1Class"
        app:layout_constraintEnd_toEndOf="parent"
        app:layout_constraintHorizontal_bias="0.5"
        app:layout_constraintStart_toStartOf="parent"
        app:layout_constraintTop_toBottomOf="@+id/textView2" />

    <TextView
        android:id="@+id/result1Class"
        android:layout_width="250dp"
        android:layout_height="wrap_content"
        android:layout_marginStart="40dp"
        android:layout_marginTop="8dp"
        android:layout_marginEnd="40dp"
        android:gravity="center"
        android:text="TextView"
        android:textSize="18sp"
        app:layout_constraintBottom_toTopOf="@+id/result2Score"
        app:layout_constraintEnd_toEndOf="@+id/result1Score"
        app:layout_constraintHorizontal_bias="0.5"
        app:layout_constraintStart_toStartOf="@+id/result1Score"
        app:layout_constraintTop_toBottomOf="@+id/result1Score" />

    <TextView
        android:id="@+id/result2Score"
        android:layout_width="wrap_content"
        android:layout_height="wrap_content"
        android:layout_marginTop="24dp"
        android:text="TextView"
        android:textSize="18sp"
        app:layout_constraintBottom_toTopOf="@+id/result2Class"
        app:layout_constraintEnd_toEndOf="parent"
        app:layout_constraintHorizontal_bias="0.5"
        app:layout_constraintStart_toStartOf="parent"
        app:layout_constraintTop_toBottomOf="@+id/result1Class"
        app:layout_constraintVertical_bias="0.94" />

    <TextView
        android:id="@+id/result2Class"
        android:layout_width="250dp"
        android:layout_height="wrap_content"
        android:layout_marginStart="40dp"
        android:layout_marginTop="8dp"
        android:layout_marginEnd="40dp"
        android:layout_marginBottom="32dp"
        android:gravity="center"
        android:text="TextView"
        android:textSize="18sp"
        app:layout_constraintBottom_toBottomOf="parent"
        app:layout_constraintEnd_toEndOf="@+id/result2Score"
        app:layout_constraintHorizontal_bias="0.5"
        app:layout_constraintStart_toStartOf="@+id/result2Score"
        app:layout_constraintTop_toBottomOf="@+id/result2Score" />
</androidx.constraintlayout.widget.ConstraintLayout>
モデルのロード
先に作成したresnet.ptをロードする
 override fun onCreate(savedInstanceState: Bundle?) {
        super.onCreate(savedInstanceState)
        setContentView(R.layout.activity_main)

        //// assetファイルからパスを取得する関数
        fun assetFilePath(context: Context, assetName: String): String {
            val file = File(context.filesDir, assetName)
            if (file.exists() && file.length() > 0) {
                return file.absolutePath
            }
            context.assets.open(assetName).use { inputStream ->
                FileOutputStream(file).use { outputStream ->
                    val buffer = ByteArray(4 * 1024)
                    var read: Int
                    while (inputStream.read(buffer).also { read = it } != -1) {
                        outputStream.write(buffer, 0, read)
                    }
                    outputStream.flush()
                }
                return file.absolutePath
            }
        }

        /// モデルと画像をロード
        /// シリアル化されたモデルをロード
        val bitmap = BitmapFactory.decodeStream(assets.open("image.jpg"))
        val module = Module.load(assetFilePath(this, "resnet.pt"))
    }
assetsフォルダから画像やモデルをロードするのは結構面倒な書き方をするので注意
推論
dependenciesに追加したモジュールとresnetを使ってサンプル画像を入力して結果を出力する
        /// テンソルに変換
        val inputTensor = TensorImageUtils.bitmapToFloat32Tensor(
            bitmap,
            TensorImageUtils.TORCHVISION_NORM_MEAN_RGB, TensorImageUtils.TORCHVISION_NORM_STD_RGB
        )

        /// 推論とその結果
        /// フォワードプロパゲーション
        val outputTensor = module.forward(IValue.from(inputTensor)).toTensor()
        val scores = outputTensor.dataAsFloatArray
推論結果
上位のscoreを取り出す
       /// scoreを格納する変数
        var maxScore: Float = 0F
        var maxScoreIdx = -1
        var maxSecondScore: Float = 0F
        var maxSecondScoreIdx = -1

        /// scoreが高いものを上から2個とる
        for (i in scores.indices) {
            if (scores[i] > maxScore) {
                maxSecondScore = maxScore
                maxSecondScoreIdx = maxScoreIdx
                maxScore = scores[i]
                maxScoreIdx = i
            }
        }
分類クラス
分類するクラスの名前
すごく長いので省略 (imageNetの1000クラス分類のアレです)
githubに載せてるのでImageNetClasses.ktの中身をコピペしてください
github クラス名リスト(ImageNetClasses.kt)
class ImageNetClasses {
    var IMAGENET_CLASSES = arrayOf(
        "tench, Tinca tinca",
        "goldfish, Carassius auratus",
      //~~~~~~~~~~~~~~略(githubからコピペしてください)~~~~~~~~~~~~~~~~//
        "toilet tissue, toilet paper, bathroom tissue"
    )
}
結果を表示
インデックスから推論したクラス名を取得し、
最後に推論結果をレイアウトに表示する
        /// インデックスから分類したクラス名を取得
        val className = ImageNetClasses().IMAGENET_CLASSES[maxScoreIdx]
        val className2 = ImageNetClasses().IMAGENET_CLASSES[maxSecondScoreIdx]

        result1Score.text = "score: $maxScore"
        result1Class.text = "分類結果:$className"
        result2Score.text = "score:$maxSecondScore"
        result2Class.text = "分類結果:$className2"
完了!!ビルドすれば冒頭のような画面ができるはず。
いろんな写真入れて遊んでみてください。
おわり
ライブラリって便利。画像分類がこんだけでできるとは。
tensorに変換とかが少しひっかかるなって感じだったけど、これでpytorchでもandroid に使えるようになった。
あと余談で、最初pytorchのバージョンが最新じゃなくてモデルのロードのときエラー出て全くできかったところと、assetsフォルダのパスの取得で結構ハマった。