はじめに
初学者がわかったつもりで発信しているものです。誤りなどあればご指摘いただけると幸いです。
- ユーザー管理機能はdevise(Gem)を使用しています
- Rails 7.0での解説となります
- ユーザー詳細ページからアクションを起こすを前提条件として解説を行っていきます
今回実装する機能

フォローボタンを押したらフォロワーカウントが増減する機能を作ってみます
- フォローするボタンを押したら 表示がフォロー中に切り替わる
- データベース内にデータが保存されるとカウントされる
仕組みを考える
フォロー機能とは、「ユーザーが→ユーザーを」フォローする機能です。
フォロー機能を実装するうえでのデータベース設計を考えてみましょう
ユーザーが ユーザーをフォローするのでこのような形を連想してしまいます。
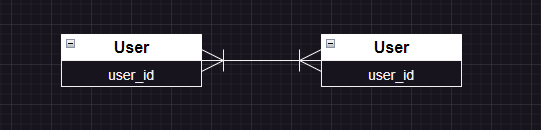
このままではUsersテーブルにUsersテーブルが紐づいてしまいN対Nの関係が生まれてしまいます。
データベース設計の鉄則としてN対Nの関係のテーブルは存在してはいけません
N対Nをさけるためには中間テーブルを用いますよね!
N対N(多対多)?中間テーブル? こちらのサイトで詳しく解説されています
中間テーブルとしてRelationshipsテーブルを作って・・
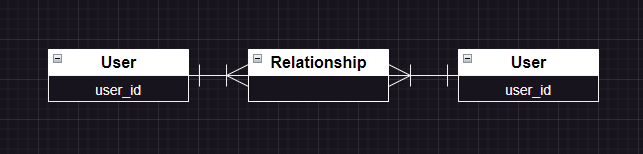
こうすればRelationshipsテーブルからフォロー中のuser_idとフォロワーのuser_idを参照でき・・
あれ?deviseを使ってユーザー管理を実現できているから Usersテーブルは1つのはず・・
フォロー中のuser_idとフォロワーのuser_idってどう判別するんだ!?
となってしまいます。
ではこうしたらどうでしょうか?
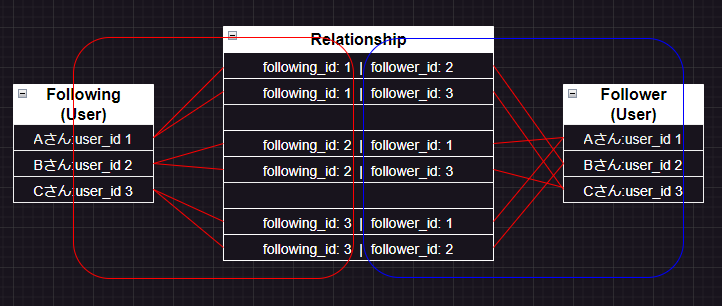
誰が、誰をフォローしているかRelationshipsテーブルを見れば一目でわかりますよね
この図ではAさんは BさんとCさんをフォローしていることがわかります。
そのためにはFollowingとFollowerのデータをUsersテーブルから参照したいです
アソシエーションを考える
1.中間テーブルを作りましょう
ここでは中間テーブルとしてRelationshipsテーブルで説明を進めます。
rails g model relationships
コマンドで中間テーブルを作ったら
class CreateRelationships < ActiveRecord::Migration[7.0]
  def change
    create_table :relationships do |t|
      t.references :following
      t.references :follower
      t.timestamps
    end
  end
end
2つのカラムを追加しましょう。
これは先述のとおり誰が、誰をフォローしているのかを区別するためです。
こうなるように作るには・・

RelationshipsテーブルとFollowingsテーブルとFollwersテーブルの間には一対多の関係ができますよね。
Relationshipsモデルに
class Relationship < ApplicationRecord
  belongs_to :following
  belongs_to :follower
end
ただ上記の記述では存在しないテーブルを参照されてしまいエラーが起きてしまいます。
なので・・
class Relationship < ApplicationRecord
  belongs_to :following, class_name: "User"
  belongs_to :follower, class_name: "User"
end
class_nameオプションを使います
参照先のモデル名(FollowingとFollower)が命名規則から外れている場合や関連先のモデルが特定の名前でない場合、class_nameオプションを使用して経路を明確にすることができます。
2. Usersモデルのアソシエーション
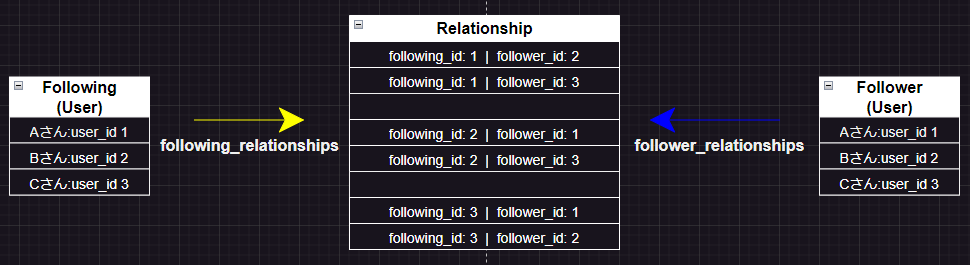
フォローする側からのリレーションを考えましょう
Userモデルに
has_many :following_relationships, class_name: "Relationship", foreign_key: :following_id
上記の記述では
Relationshipsテーブルのfollowingという経路をつたい、foreign_key: :following_idによってuser_idを外部キーとして使用しているといえます。
次にフォローされる側のリレーションです
has_many :follower_relationships, class_name: "Relationship", foreign_key: :follower_id
同じ経路ではダメなので:follower_relationshipsとforeign_key: :follower_idを変更しています。
仮想的にfollowingとfollowerというテーブルがあるので、それぞれの経路を明記しました
図で表すとこういう感じになります。
冒頭で紹介したGIF画像のような、カウント増減機能のみでしたら一通りで以上です。
フォロー中一覧やフォロワー一覧を作りたい場合は追加記述をしましょう
続いて、自分が誰をフォローしているのか、誰にフォローされているのかを表現してみましょう。
Userモデルに
has_many :followings, through: :following_relationships, source: :follower
自分がフォローしている人を参照するにはどこを見ますか?
source: :followerです。
followingを見ても それは誰がフォローしているのかの集合体なのでfollowerを参照している
という記述になります。
完成コード
  has_many :following_relationships, class_name: "Relationship", foreign_key: :following_id
  has_many :followings, through: :following_relationships, source: :follower  /これと/

  has_many :follower_relationships, class_name: "Relationship", foreign_key: :follower_id
  has_many :followers, through: :follower_relationships, source: :following  /これを追加/
この記述でできること
  <% @user.followers.each do |user| %>
    <p class=“f-user”><%= link_to user.name, user_path(user.id) %></p>
  <% end %>
でフォロー中一覧やフォロワー一覧を出力できます
ルーティングを設定する
routes.rbにフォローを可能とするcreateアクションと フォローを解除するdestroyアクションのルーティングを設定しましょう。
  resources :users, only: [:show] do
    resources :relationships, only: [:create, :destroy]
  end
UsersコントローラーとRelationshipsコントローラーとでネストを組んでいることに注意してください
ネストを組むことによってRelationshipsコントローラー内でparams[:user_id]を使用して、ユーザーIDを取得し、それを使用してcreateアクション・destroyアクションを実行できるといえます。
コントローラーを設定する
class RelationshipsController < ApplicationController
  def create
    follow = current_user.following_relationships.new(follower_id: params[:user_id])
    follow.save
    redirect_to user_path(params[:user_id])
  end

  def destroy
    follow = current_user.following_relationships.find_by(follower_id: params[:user_id])
    follow.destroy
    redirect_to user_path(params[:user_id])
  end
end
上記の記述では
- createアクション→フォローを行うとfollower_idに params[:user_id] が保存されます
- destroyアクション→フォロー解除を行うとfind_byにてアクションを起こしたparams[:user_id] を見つけてdestroyを行います
改めてルーティングを確認しましょう

<%= link_to 'フォローする', user_relationships_path(@user.id), data: { turbo_method: :post } %>

<%= link_to 'フォローを解除', user_relationship_path(@user.id), data: { turbo_method: :delete } %>
ルーティング通り、フォローするボタンにcreateアクションのパスを指定して、HttpメソッドとしてPOSTを指定します。
反対に、フォロー解除ボタンにはHttpメソッドDELETEを指定していますので解除も行えます。
これでフォロー機能とフォロー解除機能が実装できました。
続きまして、フォロー中(データベース内にデータがある場合) にビューの表示を変える記述をしていきます。
フォローしているか否かの判定メソッドを定義する
現状ではフォローリクエストを無限に送り放題です。
そのためフォローしているか否かの判定が必要になります。
Userモデルに
  def followed_by?(user)
    follower =  follower_relationships.find_by(following_id: user.id)
    return follower.present?
  end
followed_by?メソッドの引数に渡されたuserにフォローされているか否かの判定メソッドとなります。
つまり、ビューファイルにて
  <% if @user.followed_by?(current_user) %>
    <%= link_to 'フォローを解除', user_relationship_path(@user.id), data: { turbo_method: :delete } %>
  <% else %>
    <%= link_to 'フォローする', user_relationships_path(@user.id), data: { turbo_method: :post } %>
  <% end %>
<% if @user.followed_by?(current_user) %>の記述では @ userはcurrent_user(自分) にフォローされていますか?という意味になります。
followed_by?メソッドより、follower.present?で
trueを返す場合(following_idが存在=フォローしている)→フォロー解除ボタンが表示され、
falseを返す場合(following_idがnil=フォローしていない)→フォローボタンが表示される という仕組みになります。
これでフォローしているか否かでのビューの表示条件分岐が実装できました。
フォロー・フォロワーをカウントしよう
これまでに比べるとひじょーーーうに簡単です
  <div class='follow'>
    フォロー <%= @user.following_relationships.count %> 人
  </div>
  <div class='follower'>
    フォロワー <%= @user.follower_relationships.count %> 人
  </div>
ユーザー情報が入ったテーブルのレコード数をカウントすればいいだけです。
最後に
以上がフォロー機能の実装の解説でした。
ここまで読んでいただきありがとうございました。
フォロー機能に関しては、class_name?中間テーブルってなんだっけ?アソシエーションむず!!の繰り返しでした。
自分なりの解釈でまとめてみましたが 認識・解釈に誤りや 前提条件の不足などありましたらご指摘いただければ幸いでございます。
なんせ初投稿ですから見にくい箇所もあったと思います。アドバイス等いただけたら嬉しいです!
参考にさせていただいたサイト