はじめに
Amazon EKSで採用できるクラスタースケーリングの仕組みは2つあります。一般的によく使用されるCluster AutoscalerとAWSが主体となって開発しているOSSのKarpenterです。
Karpenterは2020年に最初のバージョンがリリースされたばかりの新しいツールですが、様々な面でメリットがある強力なツールです。この記事ではKarpenterの特徴や仕組みをざっくりと説明し、どのように導入すれば良いのかを1つの事例としてAWSでの利用を前提に紹介できればと思います。まだまだ世の中に情報が少ないので導入を検討されている皆様の助けになれば幸いです。
Karpenterの特徴
Karpenterは従来のクラスタースケーリングの仕組みであるCluster Autosclaerと比べてどんな特徴があるのでしょうか?Karpenterが持つ主な特徴を紹介します。
簡単にコスト最適化ができる
これがKarpenterの持つ最も強力な特徴だと思います。Karpenterは複雑な設定無しでワークロードの要求を満たす最もコストの低いInstance typeの組み合わせでクラスターノード(EC2)を起動します。
Amazon EKSでCluster Autoscalerを使用した場合でも複数のInstance typeの組み合わせでクラスターノードを起動させることはできますが、ユーザ自身でどのInstance typeを使用するか全て指定する必要があるのと、Cluster Autosclaerの制約として使用するInstance typeは同じ数のCPUコアと同じ容量のRAMを持ったものでなくてはいけません。以下はCluster Autosclaerのドキュメントからの引用です。(Using Mixed Instances Policies and Spot Instances)
Note that the instance types should have the same amount of RAM and number of CPU cores, since this is fundamental to CA's scaling calculations. Using mismatched instances types can produce unintended results.
これでは最大限のコスト最適化を図ることは難しいでしょう。Karpenterではそのような制約は一切存在しないのに加えて、使用したいInstance typeを列挙する必要はなく、簡単な条件の設定だけで、それを満たすInstance typeを全て使用してくれます。例えば以下のような設定をするだけでAMDプロセッサを持つ全てのInstance typeを使用してくれます。
apiVersion: karpenter.sh/v1
kind: NodePool
metadata:
  name: default
spec:
  template:
    spec:
      nodeClassRef:
        group: karpenter.k8s.aws
        kind: EC2NodeClass
        name: default
      requirements:
      - key: "kubernetes.io/arch"
        operator: In
        values: ["amd64"]
もちろん他にも様々な条件を簡単に設定することが可能です。詳細はこちらの公式ドキュメント(NodePools)を確認してください。
ノードの起動が速い
これも強力な特徴の一つです。KarpenterはCluster Autoscalerと比べてクラスターノードの起動が速いです。どのくらい速いかは環境によるので一概には言えませんが、起動が速い理由はKarpenterが直接EC2を管理するからです。
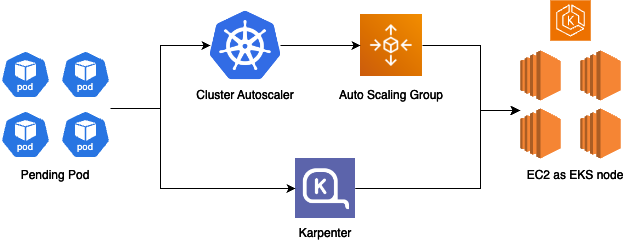
簡単な図を用意しました。Cluster AutoscalerはAuto Scaling Groupを介してクラスターノードを管理するのに対して、Karpenterは直接クラスターノードを管理します。これによりクラスターノード(EC2)の操作に必要なコンポーネントが一つ減るのでその分早く起動することができるというわけです。
Karpenterの導入
ではどのようにKarpenterを導入すれば良いのでしょうか? Amazon EKSへの導入を例に説明します。(ちなみに2024/02時点ではKarpenterがサポートしているのはAmazon EKSとAzure Kubernetes Servuceのみとなります)
Install
Installは基本的に公式ドキュメント(Getting Started with Karpenter)に従って行います。Karpenter自体はHelmなどを利用してEKS上にInstallすれば良いのですが、KarpenterがEC2などを操作するためのIAM Roleなど、いくつかAWSリソースが必要です。公式ドキュメントに沿って作成しても良いのですが、TerraformなどのIaCツールを利用して管理するのが一般的かと思います。AWSがEKS関連のAWSリソースを作成するためのModuleを提供しているので、そちらを利用しましょう。最低限必要なのは以下のModuleです。
-
EKS
- EKSクラスタの作成
-
EKS Managed Node Group
- KarpenterはKarpenter自身が管理するEC2上で起動するべきでないため、Karpenter実行用のマネージドノードグループを作成しておく
-
Karpenter
- IAM周りやSQSなど
NodeClassの作成
NodeClassはKarpenterで利用するKubernetes上のカスタムリソースです。Karpenterがノードを起動する際に利用するAMIや起動するSubnet、ノードに紐づけるセキュリティグループなどを指定します。サンプルコードは以下の通りです。
apiVersion: karpenter.k8s.aws/v1
kind: EC2NodeClass
metadata:
  name: default
spec:
  # Required, resolves a default ami and userdata
  amiFamily: AL2

  # Required, discovers subnets to attach to instances
  # Each term in the array of subnetSelectorTerms is ORed together
  # Within a single term, all conditions are ANDed
  subnetSelectorTerms:
    - tags:
        karpenter.sh/discovery: "${CLUSTER_NAME}"

  # Required, discovers security groups to attach to instances
  # Each term in the array of securityGroupSelectorTerms is ORed together
  # Within a single term, all conditions are ANDed
  securityGroupSelectorTerms:
    - tags:
        karpenter.sh/discovery: "${CLUSTER_NAME}"

  # Optional, IAM instance profile to use for the node identity.
  # Must specify one of "role" or "instanceProfile" for Karpenter to launch nodes
  instanceProfile: "KarpenterNodeInstanceProfile-${CLUSTER_NAME}"
上記の通り、KarpenterがどのSubnetにどのSecurity Groupを紐づけてEC2を起動すれば良いのかTagやリソースIDで指定する必要があります。なんでも良いのでClusterごとにTagを用意して、あらかじめSubnetとSecurity Groupに設定しておきましょう。
NodePool
NodePoolもKarpenterで利用するKubernetes上のカスタムリソースです。Karpenterがどのような種類のEC2をクラスターノードとして起動するのかや、KarpenterのScalingの挙動を設定します。
apiVersion: karpenter.sh/v1
kind: NodePool
metadata:
  name: default
spec:
  template:
    metadata:
      # Labels are arbitrary key-values that are applied to all nodes
      labels:
        role: app

      # Annotations are arbitrary key-values that are applied to all nodes
      annotations:
        example.com/owner: "my-team"
    spec:
      # References the Cloud Provider's NodeClass resource, see your cloud provider specific documentation
      nodeClassRef:
        group: karpenter.k8s.aws
        kind: EC2NodeClass
        name: default

      # Provisioned nodes will have these taints
      # Taints may prevent pods from scheduling if they are not tolerated by the pod.
      taints:
        - key: example.com/special-taint
          effect: NoSchedule

      # Provisioned nodes will have these taints, but pods do not need to tolerate these taints to be provisioned by this
      # NodePool. These taints are expected to be temporary and some other entity (e.g. a DaemonSet) is responsible for
      # removing the taint after it has finished initializing the node.
      startupTaints:
        - key: example.com/another-taint
          effect: NoSchedule

      # The amount of time a Node can live on the cluster before being removed
      # Avoiding long-running Nodes helps to reduce security vulnerabilities as well as to reduce the chance of issues that can plague Nodes with long uptimes such as file fragmentation or memory leaks from system processes
      # You can choose to disable expiration entirely by setting the string value 'Never' here

      # Note: changing this value in the nodepool will drift the nodeclaims.
      expireAfter: 720h | Never

      # The amount of time that a node can be draining before it's forcibly deleted. A node begins draining when a delete call is made against it, starting
      # its finalization flow. Pods with TerminationGracePeriodSeconds will be deleted preemptively before this terminationGracePeriod ends to give as much time to cleanup as possible.
      # If your pod's terminationGracePeriodSeconds is larger than this terminationGracePeriod, Karpenter may forcibly delete the pod
      # before it has its full terminationGracePeriod to cleanup.

      # Note: changing this value in the nodepool will drift the nodeclaims.
      terminationGracePeriod: 48h

      # Requirements that constrain the parameters of provisioned nodes.
      # These requirements are combined with pod.spec.topologySpreadConstraints, pod.spec.affinity.nodeAffinity, pod.spec.affinity.podAffinity, and pod.spec.nodeSelector rules.
      # Operators { In, NotIn, Exists, DoesNotExist, Gt, and Lt } are supported.
      # https://kubernetes.io/docs/concepts/scheduling-eviction/assign-pod-node/#operators
      requirements:
        - key: "karpenter.k8s.aws/instance-category"
          operator: In
          values: ["c", "m", "r"]
        - key: "karpenter.k8s.aws/instance-cpu"
          operator: In
          values: ["4", "8", "16", "32"]
        - key: "karpenter.k8s.aws/instance-hypervisor"
          operator: In
          values: ["nitro"]
        - key: "karpenter.k8s.aws/instance-generation"
          operator: Gt
          values: ["2"]
        - key: "topology.kubernetes.io/zone"
          operator: In
          values: ["us-west-2a", "us-west-2b"]
        - key: "kubernetes.io/arch"
          operator: In
          values: ["arm64", "amd64"]
        - key: "karpenter.sh/capacity-type"
          operator: In
          values: ["spot", "on-demand"]
  disruption:
    # Describes which types of Nodes Karpenter should consider for consolidation
    # If using 'WhenEmptyOrUnderutilized', Karpenter will consider all nodes for consolidation and attempt to remove or replace Nodes when it discovers that the Node is empty or underutilized and could be changed to reduce cost
    # If using `WhenEmpty`, Karpenter will only consider nodes for consolidation that contain no workload pods
    consolidationPolicy: WhenEmptyOrUnderutilized

    # The amount of time Karpenter should wait to consolidate a node after a pod has been added or removed from the node.
    # You can choose to disable consolidation entirely by setting the string value 'Never' here
    consolidateAfter: 1m # Added to allow additional control over consolidation aggressiveness

    # Budgets control the speed Karpenter can scale down nodes.
    # Karpenter will respect the minimum of the currently active budgets, and will round up
    # when considering percentages. Duration and Schedule must be set together.
    budgets:
    - nodes: 10%
    # On Weekdays during business hours, don't do any deprovisioning.
    - schedule: "0 9 * * mon-fri"
      duration: 8h
      nodes: "0"

  # Resource limits constrain the total size of the cluster.
  # Limits prevent Karpenter from creating new instances once the limit is exceeded.
  limits:
    cpu: "1000"
    memory: 1000Gi

  # Priority given to the NodePool when the scheduler considers which NodePool
  # to select. Higher weights indicate higher priority when comparing NodePools.
  # Specifying no weight is equivalent to specifying a weight of 0.
  weight: 10
非常に様々な設定がシンプルに定義できます。Optionalの項目も多いので必要なものだけ定義してみてください。
本番ワークロード向けの設定例
では本番環境を想定した場合、NodePoolをどのように設定すれば良いのでしょうか? ここでは以下の要件を仮定して、それに合った設定を紹介します。(異論歓迎です!)
- 顧客向けサービスアプリケーションのPodとBatch処理を行うPodを同一クラスタ上で実行する
- Batch処理は実行途中で中断させたくない
- 全てのPodはAMDプロセッサ上で動作する
- 低コストで運用したい
- Spotインスタンスを20%の割合で利用する
以下に上記要件を満たすNodePoolの設定を載せますが、要件を満たすためにはNodePoolだけでなくKubernetesリソース側での設定も必要なのでコメントで補足しています。
apiVersion: karpenter.sh/v1
kind: NodePool
metadata:
  name: app-ondemand
spec:
  template:
    metadata:
      # 顧客向けサービスアプリケーションのPodがこのノードを利用するようにNodeSelectorで"role: app"を指定する。
      labels:
        role: app
    spec:
      # NodeClassは先ほどの例で示したものを利用します。
      nodeClassRef:
        group: karpenter.k8s.aws
        kind: EC2NodeClass
        name: default

      # 最新のAMIを適用するために定期的にEC2を入れ替えます。
      # これを設定しないと古いAMIを使い続ける可能性があり、入れ替えに手動操作が必要となり管理負荷が増大します。
      expireAfter: 720h

      # VPC-CNIを利用する場合は1台のEC2上で起動できるPod数に限りがあるため大きすぎるInstanceサイズは無駄になる可能性があります。
      # プレフィックス割り当てを利用すれば1台あたりのPod数を大幅に増やすことができますが、
      # 1台の大きなEC2を利用するよりも小さめのEC2を複数利用した方が可用性の観点でメリットがあるので、
      # 特に理由がなければCPUサイズなどでフィルターしておくことをお勧めします。
      # また、小さすぎるEC2はリソース効率の面でデメリットがあるのと、VPC-CNIが未対応だったりします。
      requirements:
        - key: "karpenter.k8s.aws/instance-cpu"
          operator: Gt
          values: ["2"]
        - key: "karpenter.k8s.aws/instance-cpu"
          operator: Lt
          values: ["32"]
        - key: "kubernetes.io/arch"
          operator: In
          values: ["amd64"]
        - key: "karpenter.sh/capacity-type"
          operator: In
          values: ["on-demand"]
        # On-demandとSpotインスタンスの大まかな割合を指定する。
        # Pod側の定義にも以下の追加が必要。(詳細はhttps://karpenter.sh/docs/concepts/scheduling/#on-demandspot-ratio-splitを確認)
        # topologySpreadConstraints:
        # - maxSkew: 1
        #   topologyKey: capacity-spread
        #   whenUnsatisfiable: ScheduleAnyway
        - key: capacity-spread
          operator: In
          values:
          - "1"
          - "2"
          - "3"
          - "4"
  disruption:
    # コスト削減のため積極的にノードの統合をしてほしいため”WhenEmptyOrUnderutilized”を設定します。
    consolidationPolicy: WhenEmptyOrUnderutilized
---
apiVersion: karpenter.sh/v1
kind: NodePool
metadata:
  name: app-spot
spec:
  template:
    metadata:
      labels:
        role: app
    spec:
      nodeClassRef:
        group: karpenter.k8s.aws
        kind: EC2NodeClass
        name: default
      expireAfter: 720h
      requirements:
        - key: "karpenter.k8s.aws/instance-cpu"
          operator: Gt
          values: ["2"]
        - key: "karpenter.k8s.aws/instance-cpu"
          operator: Lt
          values: ["32"]
        - key: "kubernetes.io/arch"
          operator: In
          values: ["amd64"]
        - key: "karpenter.sh/capacity-type"
          operator: In
          values: ["spot"]
        - key: capacity-spread
          operator: In
          values:
          - "5"
  disruption:
    consolidationPolicy: WhenEmptyOrUnderutilized
---
apiVersion: karpenter.sh/v1
kind: NodePool
metadata:
  name: batch-ondemand
spec:
  template:
    metadata:
      # Batch処理を行うPodがこのノードを利用するようにNodeSelectorで"role: batch"を指定する。
      labels:
        role: batch
    spec:
      nodeClassRef:
        group: karpenter.k8s.aws
        kind: EC2NodeClass
        name: default

      # 最新のAMIを適用するために定期的にEC2を入れ替えます。
      # これを設定しないと古いAMIを使い続ける可能性があり、入れ替えに手動操作が必要となり管理負荷が増大します。
      expireAfter: 720h

      # Batchの実行中にノードを停止させたくないので、terminationGracePeriodを24hに設定する。
      # これにより完了まで24h以上かかるBatch以外はノード停止前にDrainされ、中断されない。
      terminationGracePeriod: 24h

      # 顧客向けサービスアプリケーションのPodがこちらのノードを利用しないようにtaintsを設定する。
      # もちろんBatch処理を行うPodにtolerationsの設定を追加しておく必要がある。
      taints:
        - key: role/batch
          effect: NoSchedule

      requirements:
        - key: "karpenter.k8s.aws/instance-cpu"
          operator: Gt
          values: ["2"]
        - key: "karpenter.k8s.aws/instance-cpu"
          operator: Lt
          values: ["32"]
        - key: "kubernetes.io/arch"
          operator: In
          values: ["amd64"]
        - key: "karpenter.sh/capacity-type"
          operator: In
          values: ["on-demand"]
  disruption:
    # コスト削減のため積極的にノードの統合をしてほしいため”WhenEmptyOrUnderutilized”を設定します。
    # Batch実行中にPodを停止されないようにBatch向けPodのAnnotationに"karpenter.sh/do-not-disrupt: "true""を追加する必要があります。
    consolidationPolicy: WhenEmptyOrUnderutilized
注意点
最後にKarpenterを導入する上で注意すべき点を紹介します。
RI/Savings Planの考慮
Spotインスタンス同様にコスト削減に有用なサービスとしてRIやSavings Planがあります。理想を言えばRIやSavings Planで購入した分は該当のInstance typeを使用してほしいですよね?残念ながら執筆時点ではKarpenterにそのような機能はなく、limitsを利用した使い分けしかできません。
EC2 instance rebalance recommendation
KarpenterはEC2 instance rebalance recommendationに対応していません。よって、Spotインスタンスを利用する場合は2分以内にPodが終了できるようにしなくてはなりません。よほどのことがない限り2分以内のアプリケーションの終了は可能かと思いますが、PodDisruptionBudgetを設定している場合は注意が必要です。詳しくはこちらのブログがわかりやすいので目を通しておくことをお勧めします。