Memo#
Dockerは、避けて通れないので、慣れるために。CaffeとPytorchも。
Ubuntu16.04, Docker#

環境を壊したくないので、Docker Container上でいろいろ試せるようにする。
準備中#####
Ubuntu16.04, Docker, Caffe#

そもそもCaffeがどんなものかよくわかっていないのですが、取り合えずSSDを試してみる。
Caffeのインストール##
Ubuntu 16.04 or 15.10 Installation Guideにならってインストール。
環境を壊すのが怖いので、Ubuntu16.04のDocker Containerを作成し、Container上で試す。
前準備####
$ sudo apt -y update
$ sudo apt -y upgrade
$ sudo apt install -y build-essential cmake git pkg-config;
$ sudo apt install -y libprotobuf-dev libleveldb-dev libsnappy-dev libhdf5-serial-dev protobuf-compiler libopencv-dev;
$ sudo apt install -y libatlas-base-dev;
$ sudo apt install -y --no-install-recommends libboost-all-dev;

$ sudo apt install -y libgflags-dev libgoogle-glog-dev liblmdb-dev;

$ sudo apt install -y python-dev;
$ sudo apt install -y python-numpy python-scipy;
$ sudo apt install -y python3-dev;
$ sudo apt install -y python3-numpy python3-scipy;
$ sudo apt install -y python-opencv;
pipの振舞いがよくわからないので sudo apt install -y python-pip はやらず、素のインストールを行う。
$ wget https://bootstrap.pypa.io/get-pip.py
$ sudo python get-pip.py
Caffeをgitからダウンロードする。
$ git clone https://github.com/BVLC/Caffe.git
$ cd Caffe
$ cp Makefile.config.example Makefile.config
a)Makefile.configの修正####
CPU_ONLY := 1
WITH_PYTHON_LAYER := 1
INCLUDE_DIRS := $(PYTHON_INCLUDE) /usr/local/include /usr/include/hdf5/serial
LIBRARY_DIRS := $(PYTHON_LIB) /usr/local/lib /usr/lib /usr/lib/x86_64-linux-gnu /usr/lib/x86_64-linux-gnu/hdf5/serial
b)Makefileの修正####
LIBRARIES += glog gflags protobuf boost_system boost_filesystem m hdf5_serial_hl hdf5_serial
c)ソースコード中のヘッダーファイルのファイル名の変更#####
$ cd Caffe
$ find . -type f -exec sed -i -e 's^"hdf5.h"^"hdf5/serial/hdf5.h"^g' -e 's^"hdf5_hl.h"^"hdf5/serial/hdf5_hl.h"^g' '{}' \;
ライブラリのリンク作成####
$ cd /usr/lib/x86_64-linux-gnu
$ sudo ln -s libhdf5_serial.so.10.1.0 libhdf5.so
$ sudo ln -s libhdf5_serial_hl.so.10.0.2 libhdf5_hl.so
pipでnumpy等のインストール####
オプション--userで、.localにインストールする。
$ cd Caffe/python
$ for req in $(cat requirements.txt); do pip install --user $req; done
以下のようなエラー(python-dateutilが古い?)が出て気持ち悪いので、
Collecting python-dateutil<2,>=1.4
  Downloading https://files.pythonhosted.org/packages/b4/7c/df59c89a753eb33c7c44e1dd42de0e9bc2ccdd5a4d576e0bfad97cc280cb/python-dateutil-1.5.tar.gz (233kB)
    100% |################################| 235kB 940kB/s
Building wheels for collected packages: python-dateutil
  Building wheel for python-dateutil (setup.py) ... done
  Stored in directory: /home/hoge/.cache/pip/wheels/3e/57/ae/3a3f171dc8c46ac987fa8d7a56fcc19d82ff1a7151cf46a228
Successfully built python-dateutil
pandas 0.24.2 has requirement python-dateutil>=2.5.0, but you'll have python-dateutil 1.5 which is incompatible.
matplotlib 2.2.4 has requirement python-dateutil>=2.1, but you'll have python-dateutil 1.5 which is incompatible.
Installing collected packages: python-dateutil
  Found existing installation: python-dateutil 2.8.0
    Uninstalling python-dateutil-2.8.0:
      Successfully uninstalled python-dateutil-2.8.0
Successfully installed python-dateutil-1.5
オプション--userで、.localにあるパッケージをアップデートしてみた。
$ pip install --user -U python-dateutil
Make####
$ cd Caffe
$ make all
$ make test
$ make runtest
$ make pycaffe
$ make distribute
$ vi .profile
export PYTHONPATH=~/Caffe/python:$PYTHONPATH
SSDを試す##
SSD(Single Shot MultiBox Detector)を試すにならって試してみた。Docker ContainerでのCUDAの使い方がわからないので、CPU_ONLY。
$ git clone https://github.com/weiliu89/caffe.git
$ cd caffe
$ git checkout ssd
$ CAFFE_ROOT=$(pwd)
前記でinstallしていないライブラリもある。
$ sudo apt install -y libprotobuf-dev libleveldb-dev libsnappy-dev libopencv-dev libhdf5-serial-dev protobuf-compiler libgflags-dev libgoogle-glog-dev liblmdb-dev
$ sudo apt install -y libatlas-base-dev libopenblas-dev
$ sudo apt install -y python-skimage python-protobuf
$ sudo apt install -y --no-install-recommends libboost-all-dev
$ cp Makefile.config.example Makefile.config
前記a)~c)の修正を入れ、makeする。
$ make all -j8
$ export PYTHONPATH=${CAFFE_ROOT}/python:${PYTHONPATH}
$ sudo sh -c "echo 'PYTHONPATH=$PYTHONPATH' > /etc/environment" ※これはやらないでおく
$ make pycaffe -j8
$ make test -j8
$ make runtest -j8
$ make pytest -j8
訓練済モデルのダウンロード####
weiliu89/caffeから、models_VGGNet_VOC0712_SSD_300x300.tar.gz をダウンロードしmodels下に展開する。展開すると、以下のディレクトリ構成になっていた。
models/VGGNet/VOC0712/SSD_300x300
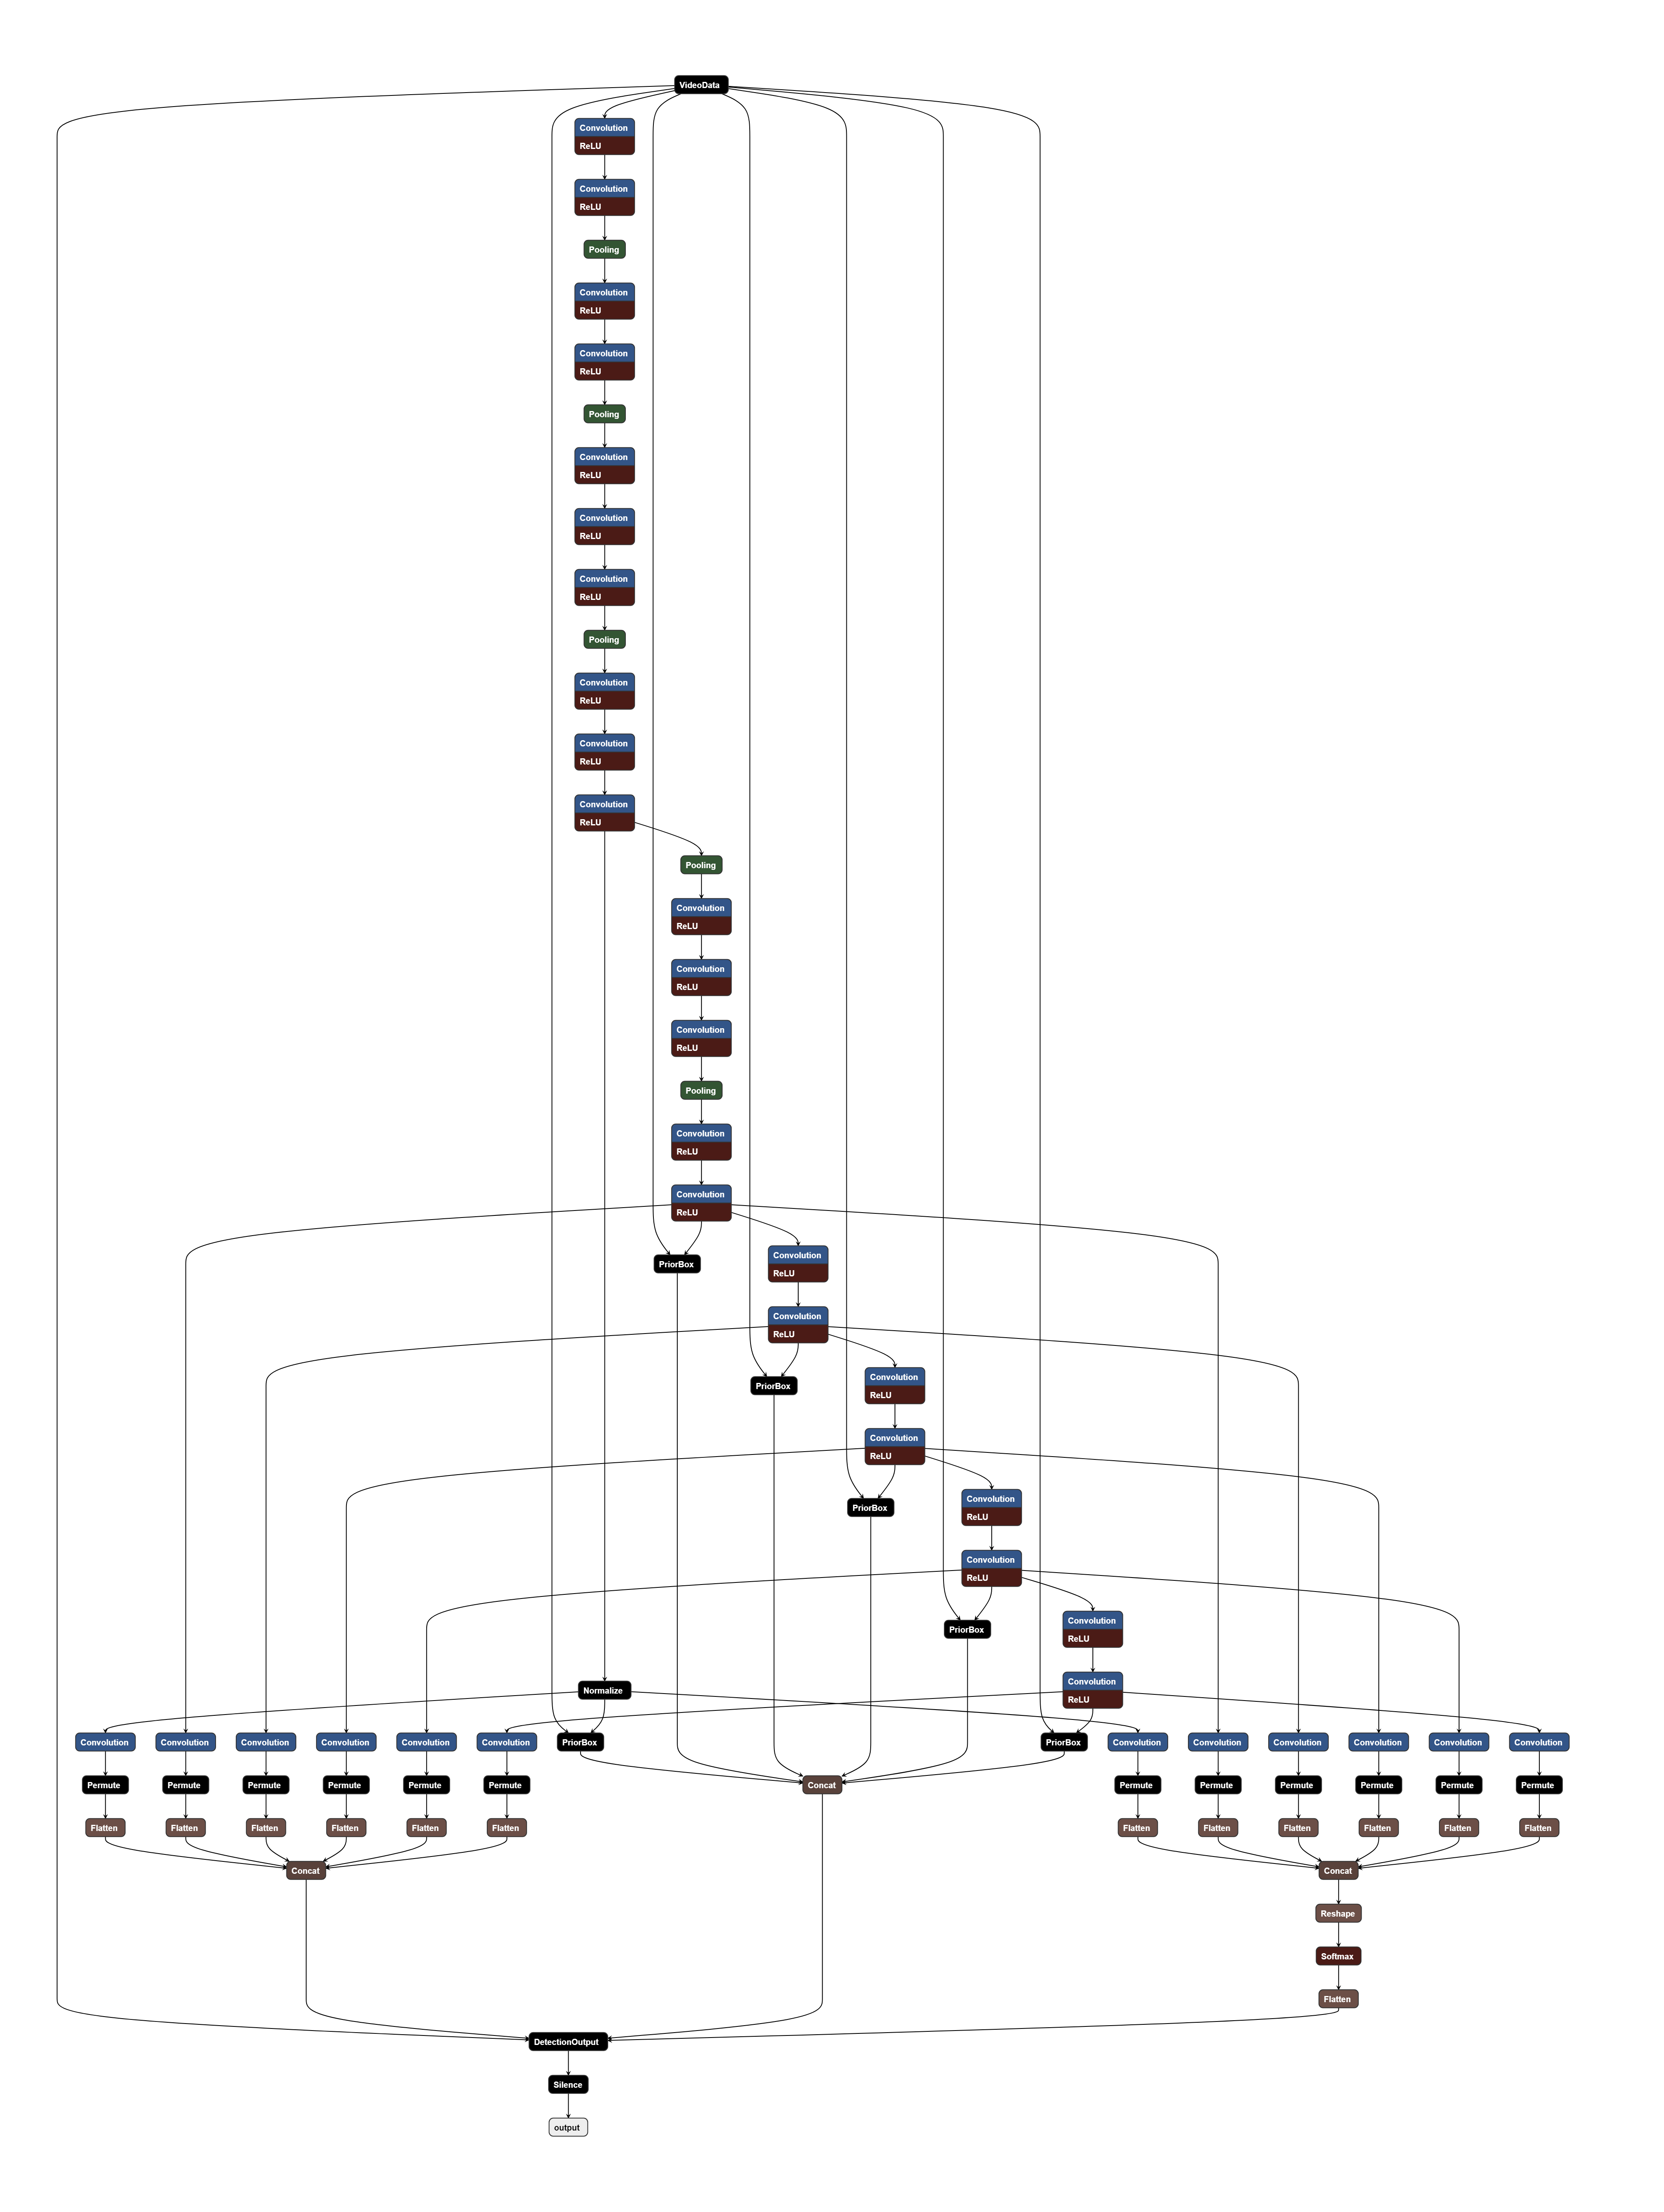
ついでに、Netronでprototxtを可視化すると
サンプルを動かす####
examples/ssd/ssd_pascal.py の gpus = "0,1,2,3" を gpus = "0" とする
solver_mode = P.Solver.CPU
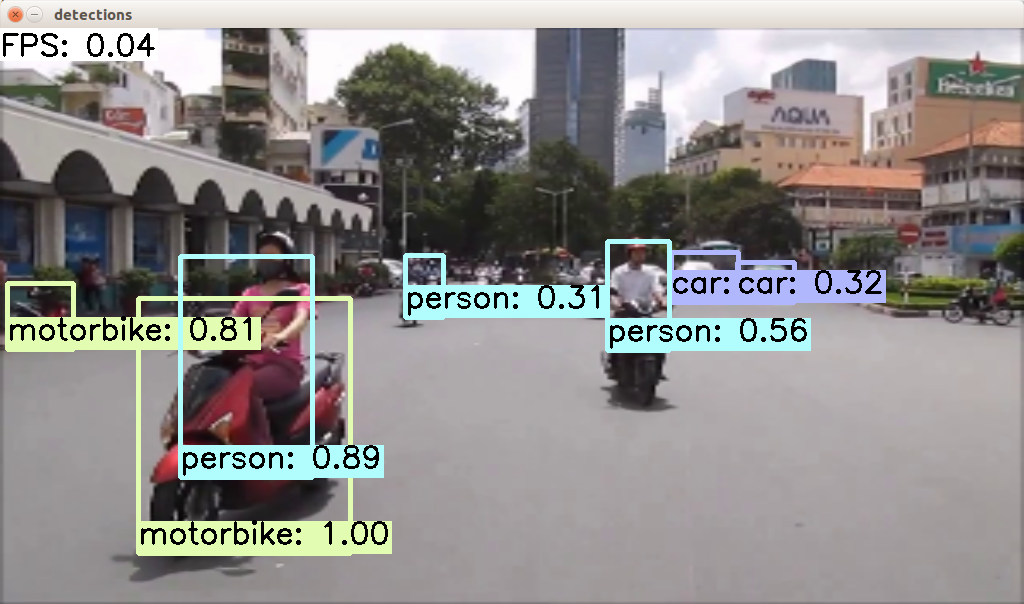
$ python examples/ssd/ssd_pascal_video.py
きたー! でも0.04fpsー![]()
Dockefile##
./cpu/Dockerfileを作成し、$ docker build ./cpu -t ubuntu1604/caffe:cpu でbuild。
FROM ubuntu:16.04
LABEL maintainer caffe-maint@googlegroups.com

RUN apt update  -yq && \
	apt upgrade -yq && \
	apt install -yq vim sudo git wget zip unzip iputils-ping net-tools xterm

RUN echo 'root:hoge' | chpasswd && \
	groupadd -g 2000               xfaegr && \
	useradd  -g 2000 -l -m -u 1000 myuser && \
	gpasswd  -a myuser sudo && \
	echo 'myuser :hoge' |chpasswd && \
	echo "myuser  ALL=(ALL:ALL) ALL" >> /etc/sudoers

RUN apt update && apt install -y --no-install-recommends \
	build-essential \
	cmake \
	git \
	wget \
	pkg-config \
	libatlas-base-dev \
	libboost-all-dev \
	libgflags-dev \
	libgoogle-glog-dev \
	libhdf5-serial-dev \
	libleveldb-dev \
	liblmdb-dev \
	libopencv-dev \
	libprotobuf-dev \
	libsnappy-dev \
	protobuf-compiler \
	python-dev \
	python-numpy \
	python-scipy \
	python-opencv \
	python-setuptools \
	python-pip \
	libopenblas-dev \
	python-skimage \
	python-protobuf && \
	rm -rf /var/lib/apt/lists/*

RUN { \
	echo ""; \
	echo "# My Alias"; \
	echo "alias ll='ls -l'"; \
	echo "alias cl='clear'"; \
	echo "alias hi='history'"; \
	echo ""; \
	} >> /root/.bashrc

ENV HOME /root
ENV PATH $HOME/bin:$HOME/.local/bin:$PATH

ENV CAFFE_ROOT /opt/caffe
ENV PYCAFFE_ROOT $CAFFE_ROOT/python
ENV PYTHONPATH $PYCAFFE_ROOT:$PYTHONPATH
ENV PATH $CAFFE_ROOT/build/tools:$PYCAFFE_ROOT:$PATH

WORKDIR $CAFFE_ROOT

RUN cd /usr/lib/x86_64-linux-gnu && ln -s libhdf5_serial.so.10.1.0 libhdf5.so && ln -s libhdf5_serial_hl.so.10.0.2 libhdf5_hl.so

RUN pip install --upgrade pip
RUN	git clone --depth 1 https://github.com/BVLC/Caffe.git .
RUN cp Makefile.config.example Makefile.config && sed -i -e 's/^# CPU_ONLY/CPU_ONLY/g' -e 's/^INCLUDE_DIRS := $(PYTHON_INCLUDE) \/usr\/local\/include/INCLUDE_DIRS := $(PYTHON_INCLUDE) \/usr\/local\/include \/usr\/local\/include \/usr\/include\/hdf5\/serial/g' -e 's/^LIBRARY_DIRS := $(PYTHON_LIB) \/usr\/local\/lib \/usr\/lib/LIBRARY_DIRS := $(PYTHON_LIB) \/usr\/local\/lib \/usr\/lib \/usr\/lib\/x86_64-linux-gnu \/usr\/lib\/x86_64-linux-gnu\/hdf5\/serial/g' Makefile.config && sed -i -e 's/^LIBRARIES += glog gflags protobuf boost_system boost_filesystem m/LIBRARIES += glog gflags protobuf boost_system boost_filesystem m hdf5_serial_hl hdf5_serial/g' Makefile
RUN find . -type f -exec sed -i -e 's^"hdf5.h"^"hdf5/serial/hdf5.h"^g' -e 's^"hdf5_hl.h"^"hdf5/serial/hdf5_hl.h"^g' '{}' \;
RUN cd python && for req in $(cat requirements.txt); do pip install --user $req; done
RUN pip install -U python-dateutil
RUN make all -j24 && make test -j24 && make runtest -j24 && make pycaffe -j24 && make distribute -j24
RUN echo "$CAFFE_ROOT/build/lib" >> /etc/ld.so.conf.d/caffe.conf && ldconfig

USER myuser
ENV HOME /home/myuser
ENV PATH $HOME/bin:$HOME/.local/bin:$PATH

ENV CAFFE_ROOT /opt/caffe
ENV PYCAFFE_ROOT $CAFFE_ROOT/python
ENV PYTHONPATH $PYCAFFE_ROOT:$PYTHONPATH
ENV PATH $CAFFE_ROOT/build/tools:$PYCAFFE_ROOT:$PATH

RUN { \
	echo ""; \
	echo "# My Alias"; \
	echo "alias ll='ls -l'"; \
	echo "alias cl='clear'"; \
	echo "alias hi='history'"; \
	echo ""; \
} >> $HOME/.bashrc

WORKDIR $HOME
Runする
$ docker run -itd -v $HOME/temp:/home/myuser/temp --rm \
        -e DISPLAY=$DISPLAY -v /tmp/.X11-unix/:/tmp/.X11-unix \
        -u myuser ubuntu1604/caffe:cpu /bin/bash
Ubuntu16.04, NVidia-Docker, Caffe#

NVIDIA Container Runtime for Docker####
Ubuntu16.04, Docker, Pytorch#

先人達の知見を、ありがたく、参考にしました。
高速化したYOLO v3を使ったリアルタイム物体検出 for PyTorch#####
Macで物体検知アルゴリズムYOLO v3を動かす#####
PyTorch学習済みモデルでサクッと物体検出をしてみる#####
Ayooshkathuria/Pytorch-YOLO-v3#####
Mashyko/Pytorch-YOLO-v3#####
Marvis/Pytorch-YOLO3#####
INSTALLING PREVIOUS VERSIONS OF PYTORCH#####
Pythonのライブラリやパッケージの管理に慣れていないので、一先ずDocker Container上でやってみた。
$ git clone https://github.com/ayooshkathuria/pytorch-yolo-v3.git
$ cd pytorch-yolo-v3
$ wget https://pjreddie.com/media/files/yolov3.weights
Anaconda3-2018.12-Linux-x86_64.shを使ってAnacondaをインストールし、Python3.6.7の仮想環境へ移行。
Anaconda/condaとpipを使う場合は注意が要る。
pipを使う場合は、condaで仮想環境にpipをインストールしておき、仮想環境内でpipを使うこと。
これ超重要。
このサイトがわかりやすかった、感謝!anancondaの仮想環境でpipを使うときの注意点
念のため、Anacondaのアンインストール方法も。ざっくり、Anacondaアンインストール
$ conda create -n py367 python=3.6.7 pip # Pythonとpipを仮想環境にインストールする
$ conda activate py367
Torch0.4.1(CUDAなし、Python3.6)をインストール。
(py367) $ pip install https://download.pytorch.org/whl/cpu/torch-0.4.1-cp36-cp36m-linux_x86_64.whl
(py367) $ pip install torchvision
一先ず実行してみる。
(py367) $ python detect.py --images imgs --det det
 Traceback (most recent call last):
   File "detect.py", line 7, in <module>
     import cv2
 ModuleNotFoundError: No module named 'cv2'
足りないmoduleをインストール。
(py367) $ pip install opencv-python
(py367) $ pip install matplotlib
(py367) $ pip install pandas
再度トライ。
(py367) $ python detect.py --images imgs --det det

Loading network.....
Network successfully loaded
/home/hoge/temp/docker/pytorch/anaconda3/envs/py367/lib/python3.6/site-packages/torch/nn/modules/upsampling.py:122: UserWarning: nn.Upsampling is deprecated. Use nn.functional.interpolate instead.
  warnings.warn("nn.Upsampling is deprecated. Use nn.functional.interpolate instead.")

herd_of_horses.jpg   predicted in  2.881 seconds
Objects Detected:    horse horse horse horse
----------------------------------------------------------
img2.jpg             predicted in  2.851 seconds
Objects Detected:    train
----------------------------------------------------------
img3.jpg             predicted in  2.904 seconds
Objects Detected:    car car car car car car car truck traffic light
----------------------------------------------------------
messi.jpg            predicted in  2.918 seconds
Objects Detected:    person person person sports ball
----------------------------------------------------------
img4.jpg             predicted in  2.916 seconds
Objects Detected:    chair chair chair clock
----------------------------------------------------------
person.jpg           predicted in  3.008 seconds
Objects Detected:    person dog horse
----------------------------------------------------------
eagle.jpg            predicted in  2.945 seconds
Objects Detected:    bird
----------------------------------------------------------
dog.jpg              predicted in  3.004 seconds
Objects Detected:    bicycle truck dog
----------------------------------------------------------
giraffe.jpg          predicted in  3.002 seconds
Objects Detected:    zebra giraffe giraffe
----------------------------------------------------------
img1.jpg             predicted in  3.000 seconds
Objects Detected:    person dog
----------------------------------------------------------

SUMMARY
----------------------------------------------------------
Task                     : Time Taken (in seconds)

Reading addresses        : 0.001
Loading batch            : 3.348
Detection (11 images)    : 32.383
Output Processing        : 0.000
Drawing Boxes            : 0.071
Average time_per_img     : 3.255
----------------------------------------------------------
(py367) $
約3秒、Darknetが20秒ぐらいだったから、結構速い。

CUDAを使えば、Webカメラでも10fpsぐらいで、そこそこ使えるかもしれない!
PyTorch Linux binaries compiled with CUDA 9.0
(py367) $ python detect.py --images imgs --det det
Loading network.....
Network successfully loaded
/home/hoge/Anaconda3/envs/py367/lib/python3.6/site-packages/torch/cuda/__init__.py:116: UserWarning:
    Found GPU0 Quadro K2000 which is of cuda capability 3.0.
    PyTorch no longer supports this GPU because it is too old.

  warnings.warn(old_gpu_warn % (d, name, major, capability[1]))
Traceback (most recent call last):
  File "detect.py", line 177, in <module>
    model(get_test_input(inp_dim, CUDA), CUDA)
  File "/home/hoge/Anaconda3/envs/py367/lib/python3.6/site-packages/torch/nn/modules/module.py", line 477, in __call__
    result = self.forward(*input, **kwargs)
  File "/home/hoge/temp/pytorch/pytorch-yolo-v3/darknet.py", line 319, in forward
    x = self.module_list[i](x)
  File "/home/hoge/Anaconda3/envs/py367/lib/python3.6/site-packages/torch/nn/modules/module.py", line 477, in __call__
    result = self.forward(*input, **kwargs)
  File "/home/hoge/Anaconda3/envs/py367/lib/python3.6/site-packages/torch/nn/modules/container.py", line 91, in forward
    input = module(input)
  File "/home/hoge/Anaconda3/envs/py367/lib/python3.6/site-packages/torch/nn/modules/module.py", line 477, in __call__
    result = self.forward(*input, **kwargs)
  File "/home/hoge/Anaconda3/envs/py367/lib/python3.6/site-packages/torch/nn/modules/conv.py", line 301, in forward
    self.padding, self.dilation, self.groups)

RuntimeError: CuDNN error: CUDNN_STATUS_MAPPING_ERROR
GPUカードが古すぎた![]()
一先ずここまで。
Ubuntu16.04, Anaconda, Caffe#
Anacondaの使い方がだいぶ理解できてきたので、Dockerコンテナ上ではなく、素のUbuntu16.04上でCaffe-SSDを動かしてみる。
$ sudo apt -y update
$ sudo apt -y upgrade
$ sudo apt install -y build-essential cmake git pkg-config \
                      libprotobuf-dev libleveldb-dev libsnappy-dev \
                      libhdf5-serial-dev protobuf-compiler libopencv-dev \
                      libatlas-base-dev libopenblas-dev
$ sudo apt install -y --no-install-recommends libboost-all-dev
$ sudo apt install -y libgflags-dev libgoogle-glog-dev liblmdb-dev

$ sudo apt install -y python-dev  python-numpy  python-scipy  python-opencv
$ sudo apt install -y python3-dev python3-numpy python3-scipy
Anaconda3-2019.03-Linux-x86_64.sh
$ ./Anaconda3-2019.03-Linux-x86_64.sh

Welcome to Anaconda3 2019.03

In order to continue the installation process, please review the license
agreement.
Please, press ENTER to continue
>>>

Do you accept the license terms? [yes|no]
[no] >>> yes

Anaconda3 will now be installed into this location:
/home/hoge/anaconda3

  - Press ENTER to confirm the location
  - Press CTRL-C to abort the installation
  - Or specify a different location below

[/home/hoge/anaconda3] >>> /home/hoge/Anaconda3

PREFIX=/home/hoge/Anaconda3
installing: python-3.7.3-h0371630_0 ...
Python 3.7.3
installing: conda-env-2.6.0-1 ...
installing: blas-1.0-mkl ...
installing: ca-certificates-2019.1.23-0 ...
...
installing: statsmodels-0.9.0-py37h035aef0_0 ...
installing: seaborn-0.9.0-py37_0 ...
installing: anaconda-2019.03-py37_0 ...
installation finished.
WARNING:
    You currently have a PYTHONPATH environment variable set. This may cause
    unexpected behavior when running the Python interpreter in Anaconda3.
    For best results, please verify that your PYTHONPATH only points to
    directories of packages that are compatible with the Python interpreter
    in Anaconda3: /home/hoge/Anaconda3
Do you wish the installer to initialize Anaconda3
by running conda init? [yes|no]
[no] >>> yes

WARNING: The conda.compat module is deprecated and will be removed in a future release.
no change     /home/hoge/Anaconda3/condabin/conda
no change     /home/hoge/Anaconda3/bin/conda
no change     /home/hoge/Anaconda3/bin/conda-env
no change     /home/hoge/Anaconda3/bin/activate
no change     /home/hoge/Anaconda3/bin/deactivate
no change     /home/hoge/Anaconda3/etc/profile.d/conda.sh
no change     /home/hoge/Anaconda3/etc/fish/conf.d/conda.fish
no change     /home/hoge/Anaconda3/shell/condabin/Conda.psm1
no change     /home/hoge/Anaconda3/shell/condabin/conda-hook.ps1
no change     /home/hoge/Anaconda3/lib/python3.7/site-packages/xonsh/conda.xsh
no change     /home/hoge/Anaconda3/etc/profile.d/conda.csh
modified      /home/hoge/.bashrc

==> For changes to take effect, close and re-open your current shell. <==

If you'd prefer that conda's base environment not be activated on startup,
   set the auto_activate_base parameter to false:

conda config --set auto_activate_base false

Thank you for installing Anaconda3!

===========================================================================

Anaconda and JetBrains are working together to bring you Anaconda-powered
environments tightly integrated in the PyCharm IDE.

PyCharm for Anaconda is available at:
https://www.anaconda.com/pycharm

$
$ conda create -n py27 python=2.7 pip
WARNING: The conda.compat module is deprecated and will be removed in a future release.
Collecting package metadata: done
Solving environment: done
~
Preparing transaction: done
Verifying transaction: done
Executing transaction: done
#
# To activate this environment, use:
# > conda activate py27
#
# To deactivate an active environment, use:
# > conda deactivate
#
$
$ conda activate py27

(py27) $ python -V
Python 2.7.16 :: Anaconda, Inc.
(py27) $ pip -V
pip 19.0.3 from /home/myuser/anaconda3/envs/py27/lib/python2.7/site-packages/pip (python 2.7)
(py27) $ git clone https://github.com/weiliu89/caffe.git
(py27) $ cd caffe
(py27) $ git checkout ssd
(py27) $ cp Makefile.config.example Makefile.config

Makefile.config

-# CPU_ONLY := 1
+CPU_ONLY := 1

-# WITH_PYTHON_LAYER := 1
+WITH_PYTHON_LAYER := 1

-INCLUDE_DIRS := $(PYTHON_INCLUDE) /usr/local/include
+INCLUDE_DIRS := $(PYTHON_INCLUDE) /usr/local/include /usr/include/hdf5/serial
-LIBRARY_DIRS := $(PYTHON_LIB) /usr/local/lib /usr/lib
+LIBRARY_DIRS := $(PYTHON_LIB) /usr/local/lib /usr/lib /usr/lib/x86_64-linux-gnu /usr/lib/x86_64-linux-gnu/hdf5/serial

Makefile

-LIBRARIES += glog gflags protobuf boost_system boost_filesystem m
+LIBRARIES += glog gflags protobuf boost_system boost_filesystem m hdf5_serial_hl hdf5_serial

(py27) $ find . -type f -exec sed -i -e 's^"hdf5.h"^"hdf5/serial/hdf5.h"^g' -e 's^"hdf5_hl.h"^"hdf5/serial/hdf5_hl.h"^g' '{}' \;

(py27) $ cd /usr/lib/x86_64-linux-gnu
(py27) $ sudo ln -s libhdf5_serial.so.10.1.0 libhdf5.so
(py27) $ sudo ln -s libhdf5_serial_hl.so.10.0.2 libhdf5_hl.so

(py27) $ cd python
(py27) $ for req in $(cat requirements.txt) pydot; do pip install $req; done
(py27) $ pip install -U python-dateutil

(py27) $ cd Caffe-SSD
(py27) $ make all
(py27) $ make test
(py27) $ make runtest
(py27) $ make pycaffe
(py27) $ make distribute
(py27) $ vi .bashrc
(py27) $ export PYTHONPATH=~/Caffe-SSD/python:$PYTHONPATH

examples/ssd/ssd_pascal.py の gpus = "0,1,2,3" を gpus = "0" とする
solver_mode = P.Solver.CPU

(py27) $ python examples/ssd/ssd_pascal_video.py
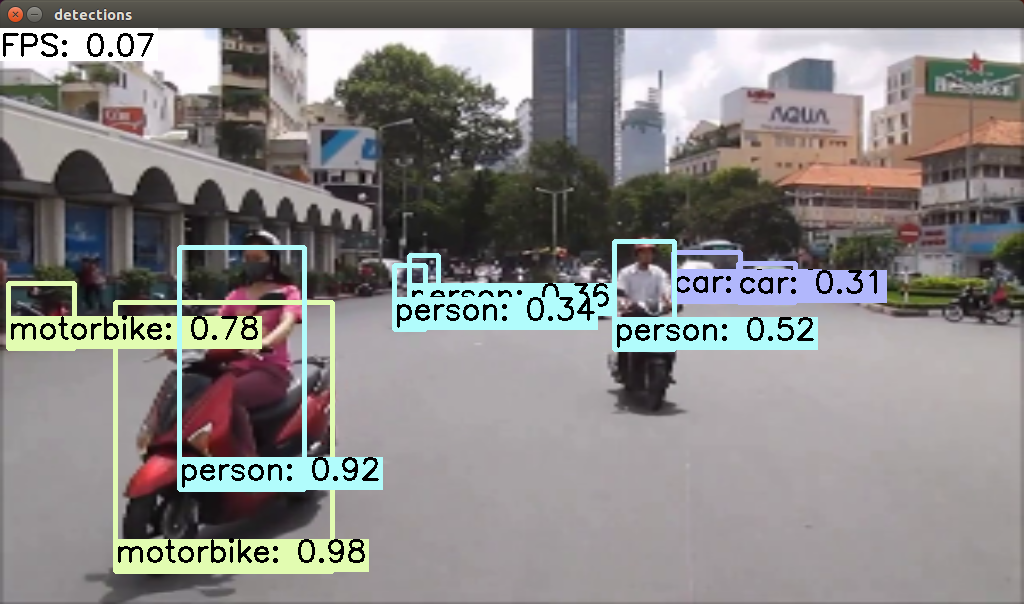
0.07FPS、少しだけ速い。