はじめに
注意: この記事はv0.39.0以降に対応していません。
初回リリースから0.39.0まで、Effect型はCombine.Publisherプロトコルに準拠していましたが、0.39.0以降はSwift ConcurrencyによりReducerの仕組みが変更されているのでそこら辺をご考慮願います。
Swiftを用いたiOS/macOS/tvOS/watchOSアプリ開発用に The Composable Architecture(TCA)というのがあり、それがめっちゃ良いやん!と思ったのでそれを書いておきます。フレームワーク的に提供されていますが、特にSwiftUIを使ってどういう構成でアプリを作ろうかと考えている人がコードを読むだけでもとてもいい教材になると思います。
The Composable Archtectureを提案しているのは、関数型プログラミングとSwiftについての動画コンテンツ提供しているPoint-Freeというサービスを提供している方たちです。
「The Composable Architecture(TCA)」とは何か
まずざっくり説明すると、Apple製品プラットフォーム上でのアプリ開発におけるシステムアーキテクチャをフレームワークのかたちで提供してくれると言ったほうがいいかもしれないですね。
概要を箇条書きにします。
- View以外のコンポーネントをViewStore, Store, Reducerとしている
- State
- アプリケーションの状態
- Reducerの関数から変更されViewに反映される
- ViewStore
- View(SwiftUI.ViewやUIKit.VIewController/UIKit.Viewなど)からStore経由でReducerへアクションを送る
- Viewに反映するStateを保持しておりViewからアクセスすることができる
- WithViewStore
- 後述のStoreから前述のViewStoreを取り出す
- SwiftUI.Viewに準拠しておりViewのように扱える
- Store
- ViewStoreからのActionによりReducerを呼び出す
- ReducerによってStateを変更された結果をViewStoreのStateに反映する
- Reducer
- Stateを変更できる
- 小さな処理を組み合わせることもできる関数
- State
コンポーネントを図にしてみると次のような感じです。
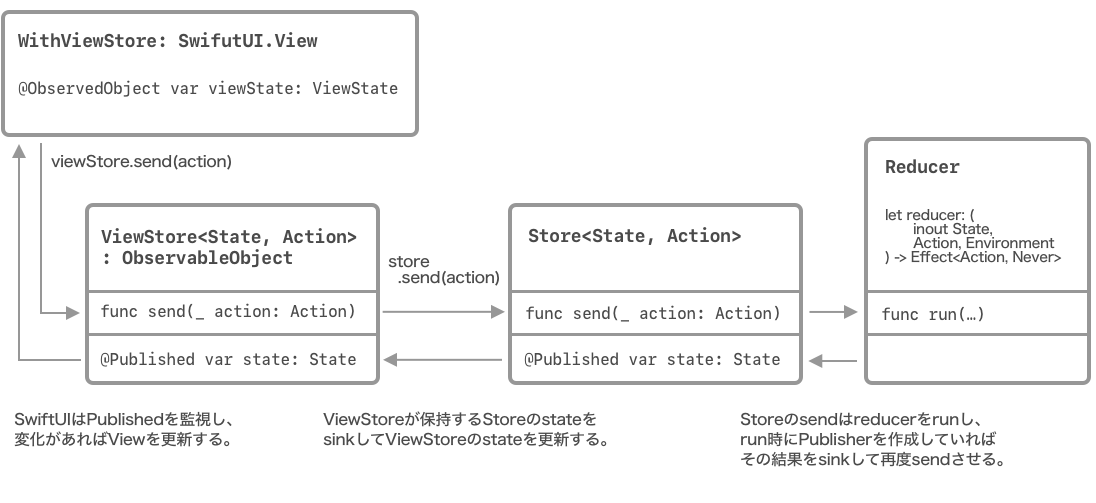
公式の作画ではなく私の作画なので間違いあるかもしれません。その場合はコメントなどをください。
必須要件
TCAの必須要件を先に書いておきます。
- iOS13以上 (macOS, tvOS, watchOSでも使用できる)
- SwiftUI, Combineが使える必要がある
- UIKitにも対応している
この記事時点でのバージョンは0.2.0です。
良い点
良い点を超ざっくり説明すると、ReduxっぽさがありながらそれをSwiftUI/Combineの仕組みを上手く使って各コンポーネント間のやりとりをしています。
- Reducerを細かく分割でき、画面によって必要があればそれを組み合わせる
- 画面ごとにReducerを作ってよくて、それは別画面で組み合わせても良い
-
pullbackとcombineオペレータを使う - 組み合わされたReducerは大きな一つのReducerとして振る舞う
- StateやActionも結局は大きな一つのStateやActionとなる
-
- 画面ごとにReducerを作ってよくて、それは別画面で組み合わせても良い
- Combineをうまく使っている点がある
- 変化をPublisherを使って反映したり
- Effectをsinkして再帰的にReducerを呼び出したりする
- SwiftUIをうまく使っている点がある
- WithViewStoreでSubView用にStoreを変換しているのが自然でいい
- 副作用をPublisherに準拠するEffect型として取り扱う
- DBアクセスやWebAPI利用に対してStateを直接変更しない副作用として分離
- Stateを変更する純粋関数と副作用の分離という関数型プログラミングの基礎を体現している
- Effectは終了を待って次のActionをReducerに対して実行できる
- DBアクセスやWebAPI利用に対してStateを直接変更しない副作用として分離
- 基本的にはStateをReducerのみが変更するようにしている
過去: そんなに良くなかった点
- ViewからアクセスできないActionというのは作れない
- Reducer内でしかアクセスできないprivateなActionが作りたくなったりすると思いますがActionをcombine/pullbackするということは、Actionも一つになるのでアクセスは可能です
- 追記
- これはTCA Action Boundariesでいい感じにする方法が紹介されていました。私もよくこの方法を使っています。
- 追記
- Reducer内でしかアクセスできないprivateなActionが作りたくなったりすると思いますがActionをcombine/pullbackするということは、Actionも一つになるのでアクセスは可能です
- Combineがわからないといけません
- Combineはクローズドソースで、プログラマの意図せずHotに変換されるようなこともあります
- RxSwiftなどを本当に分かってないと意味がわからないかもしれません
- 追記
- Swift Concurrencyに対応しておりCombineを理解する必要は少なくなりました。
- Combineはクローズドソースで、プログラマの意図せずHotに変換されるようなこともあります
- Environmentも木構造的にDIする
- 自分が必要でないEnvironmentを子のためにバケツリレー的に持たないといけない
- 複雑でない素直な作りだが、ここは工夫がほしい
- 別途記事化: SwiftLee方式のDIをすることでTCAのEnvironmentバケツリレーをやめたい話
- 追記
- PointFreeの人たち自身がswift-depndenciesという別ライブラリを作り、バケツ利用する必要がなくなりました
登場するパーツやコンポーネントの説明
Effect
ロジックをCombine.PublisherとしてつなぐためのラッパーとしてEffect型というのをいい感じに作られています。
- 副作用のPublisherを定義する
- 例えば通信、ファイルアクセスなどをEffect型としている
- キャンセルがわかりやすい
- Reducerで処理のidを決めておく
- グローバルにCancellablesを配列で保持しておりそれをidでキャンセル
- Reducerで処理のidを決めておく
具体的には、副作用の結果を取得する際にそのまま直接Publisher/Futureを使うようなことはしません。もちろんEffectの実行時にFutureを選択することはあります。
EffectからFutureを使ってる利用例は次のような感じ
 Effect<Int, Never>.future { callback in
   DispatchQueue.main.asyncAfter(deadline: .now() + 1) {
     callback(.success(42))
     callback(.success(1729)) // Will not be emitted by the effect
   }
 }
他には既存のPublisherをEffectに変換することも可能です。
let subject = PassthroughSubject<Int, Never>()
let effect = Effect(subject)
PublisherをEffectに変換するには内部でどうやってる?
ちなみに、PublisherをEffectにするためにどうやってるかというと、Publisherで初期化する場合は、それを upstreamとし、upstreamをSubscriberにreceiveすることで対応しています。すげー!!そういうことか!!!
public struct Effect<Output, Failure: Error>: Publisher {
  public let upstream: AnyPublisher<Output, Failure>

	public init<P: Publisher>(_ publisher: P) where P.Output == Output, P.Failure == Failure {
    self.upstream = publisher.eraseToAnyPublisher()
  }

  public func receive<S>(
    subscriber: S
  ) where S: Combine.Subscriber, Failure == S.Failure, Output == S.Input {
    self.upstream.receive(subscriber: subscriber)
  }

  ...
}
WithViewStore
- SwiftUI.View
- こいつが
@ObservedObjectを用意する
例えばカウンタ用のSwiftUIのViewがあったとします

その画面を示す大外のViewはObservedObjectは持たず、その中のカウンター部分でWithViewStoreを用意し、storeを渡すようにする。そしてWithViewStoreのサブビューが実際の描画用のViewになります。
struct CounterView: View {
  let store: Store<CounterState, CounterAction>
  // この大外のViewではObservedObjectは持たない

  var body: some View {
    // ↓このWithViewStoreがObservedObjectを持ちます
    WithViewStore(self.store) { viewStore in
      HStack {
        // サブビューたち
        Button("−") { viewStore.send(.decrementButtonTapped) }
        Text("\(viewStore.count)")
          .font(Font.body.monospacedDigit())
        Button("+") { viewStore.send(.incrementButtonTapped) }
      }
    }
  }
}
WithViewStoreはSwiftUI.Viewであり、こいつがObservedObjectを保持し、
サブビューとしてマイナスのButtonとTextとプラスのButtonがあります。
WithViewStoreはフレームワークとして提供されます。下記に省略しつつ紹介します。
public struct WithViewStore<State, Action, Content>: View where Content: View {
  private let content: (ViewStore<State, Action>) -> Content
  private var prefix: String?
  @ObservedObject private var viewStore: ViewStore<State, Action>

  ...

  public init(
    _ store: Store<State, Action>,
    removeDuplicates isDuplicate: @escaping (State, State) -> Bool,
    @ViewBuilder content: @escaping (ViewStore<State, Action>) -> Content
  ) {
    self.content = content
    self.viewStore = ViewStore(store, removeDuplicates: isDuplicate)
  }
}
WithViewStoreによってViewの外からやってきたstoreは @ObservedObject のViewStore型に渡されます。
ViewStore
- UIからのアクションをStore以降に送れる
- ObservableObjectに準拠している
-
@PublishedによりSwiftUI.Viewを更新することができる
-
@dynamicMemberLookup
public final class ViewStore<State, Action>: ObservableObject {
  /// A publisher of state.
  public let publisher: StorePublisher<State>

  private var viewCancellable: AnyCancellable?

  /// Initializes a view store from a store.
  ///
  /// - Parameters:
  ///   - store: A store.
  ///   - isDuplicate: A function to determine when two `State` values are equal. When values are
  ///     equal, repeat view computations are removed.
  public init(
    _ store: Store<State, Action>,
    removeDuplicates isDuplicate: @escaping (State, State) -> Bool
  ) {
    let publisher = store.$state.removeDuplicates(by: isDuplicate)
    self.publisher = StorePublisher(publisher)
    self.state = store.state
    self._send = store.send
    self.viewCancellable = publisher.sink { [weak self] in
        self?.state = $0
    }
  }

  /// The current state.
  @Published public internal(set) var state: State

  let _send: (Action) -> Void

  ...
}
Store
- StateとActionを持つ
- ActioinによるReducerを呼び出しStateを変更
- Stateが変化するとViewStoreに反映
- ActioinによるReducerを呼び出しStateを変更
- 一つの画面に一つのStateの塊
- Stateの子供もしくはNestedStateとして配列を保持できる
- scopeによって複数ステートを分けて扱える
Reducer
- 画面ごとにReducerがある
- その画面で実行する処理をまとめられる
- 例
- ボタンタップしてカウントアップ
- キャンセル処理
- 通信結果の成功と失敗のハンドリング
- 例
- その画面で実行する処理をまとめられる
- 別画面に使ったReducerを組み合わせたりできる
- Reducerの処理の戻り値はEffectなのでsinkできる
- Effectの結果で再帰的にReduderを呼び出せる
- Reducerに処理のハンドリングを任せる
- エラーハンドリングもReducer
- ハンドリングしたらstateを変える
- stateが変わったらStore → ViewStoreと変更が伝わりViewが変わる
- Reducerに処理のハンドリングを任せる
- Effectの結果で再帰的にReduderを呼び出せる
CounterアプリのカウントをアップダウンするだけのシンプルなReducerであるcounterReducer
let counterReducer = Reducer<CounterState, CounterAction, CounterEnvironment> { state, action, _ in
  switch action {
  case .decrementButtonTapped:
    state.count -= 1
    return .none
  case .incrementButtonTapped:
    state.count += 1
    return .none
  }
}
やっていることはActionに応じてStateを変更している。return している .none はEffectのEmptyを意味していて、これをsinkしても意味がないことを示している。
returnをする際にEffectを指定する例はCounterで用意した数字を基にWebAPIを呼び出すeffectsBasicsReducerがわかりやすい。

let effectsBasicsReducer = Reducer<
  EffectsBasicsState, EffectsBasicsAction, EffectsBasicsEnvironment
> { state, action, environment in
  switch action {
  case .decrementButtonTapped:
    state.count -= 1
    state.numberFact = nil
    // Return an effect that re-increments the count after 1 second.
    return Effect(value: EffectsBasicsAction.incrementButtonTapped)
      .delay(for: 1, scheduler: environment.mainQueue)
      .eraseToEffect()

  case .incrementButtonTapped:
    state.count += 1
    state.numberFact = nil
    return .none

  case .numberFactButtonTapped:
    state.isNumberFactRequestInFlight = true
    state.numberFact = nil
    // Return an effect that fetches a number fact from the API and returns the
    // value back to the reducer's `numberFactResponse` action.
    return environment.numberFact(state.count)
      .receive(on: environment.mainQueue)
      .catchToEffect()
      .map(EffectsBasicsAction.numberFactResponse)

  case let .numberFactResponse(.success(response)):
    state.isNumberFactRequestInFlight = false
    state.numberFact = response
    return .none

  case .numberFactResponse(.failure):
    state.isNumberFactRequestInFlight = false
    return .none
  }
}
Actionが .numberFactButtonTapped の場合に戻り値を environment.numberFact() としてEffectを作り、結果をmapして EffectsBasicsAction.numberFactResponse とすることで、sinkした結果を元にして、このeffectsBasicsReducerが再度呼び出されて action .numberFactResponse のsuccessかfailureが呼び出される。
さらに小さなcounterReducerは他のReducerでも使うことができる。次のtowCountersReducerは一つの画面にViewとして2つのカウンタがある。
let twoCountersReducer = Reducer<TwoCountersState, TwoCountersAction, TwoCountersEnvironment>
  .combine(
    counterReducer.pullback(
      state: \TwoCountersState.counter1,
      action: /TwoCountersAction.counter1,
      environment: { _ in CounterEnvironment() }
    ),
    counterReducer.pullback(
      state: \TwoCountersState.counter2,
      action: /TwoCountersAction.counter2,
      environment: { _ in CounterEnvironment() }
    )
  )
counterReducerをpullbackし、それらをcombineすることで一つのReducerにするという例となっている。

その他
複数stateを階層化できる?
- 配列としてStateを保持していくこともできる
- 並列にNestedStateを持てるし(初期画面に3つ並べる)
- 一つのStateを掘り下げていくこともできる
- サンプル
- Recursive state and actions
- 並列にNestedStateを持てるし(初期画面に3つ並べる)

Bindingはどうやるの?
- View側でStoreを直接編集させない
- (set)テキスト変更時
- Actionをストアに送信することで変更を発生させる
- (get)テキスト取得時
- stateの内容を取得する
- (set)テキスト変更時
TextField(
  "Type here",
  text: viewStore.binding(
	  get: { $0.text },
	  send: BindingBasicsAction.textChange
	)
)
public func binding<LocalState>(
    get: @escaping (State) -> LocalState,
    send localStateToViewAction: @escaping (LocalState) -> Action
  ) -> Binding<LocalState> {
    Binding(
      get: { get(self.state) },
      set: { newLocalState, transaction in
        withAnimation(transaction.disablesAnimations ? nil : transaction.animation) {
          self.send(localStateToViewAction(newLocalState))
        }
      })
  }
Reducerのキャンセル
- キャンセルもReducerに処理を渡す
- そもそもReducerでEffectのCancellableは
var cancellationCancellables: [AnyHashable: [UUID: AnyCancellable]] = [:]に保存している - Reducerでidを作成
- idは都度インスタンスを作っているがHashableなので同じ
- Hashableはメンバが同じなら同様になるんだろうがカラなのでそれでも同じ
- キャンセルのReducerではidによってキャンセルする処理を選ぶ
- idは都度インスタンスを作っているがHashableなので同じ
let effectsCancellationReducer = Reducer<
  EffectsCancellationState, EffectsCancellationAction, EffectsCancellationEnvironment
> { state, action, environment in

  struct TriviaRequestId: Hashable {}

  switch action {
  case .cancelButtonTapped:
    state.isTriviaRequestInFlight = false
    return .cancel(id: TriviaRequestId())

  case let .stepperChanged(value):
    state.count = value
    state.currentTrivia = nil
    state.isTriviaRequestInFlight = false
    return .cancel(id: TriviaRequestId())

  case .triviaButtonTapped:
    state.currentTrivia = nil
    state.isTriviaRequestInFlight = true

    return environment.trivia(state.count)
      .receive(on: environment.mainQueue)
      .catchToEffect()
      .map(EffectsCancellationAction.triviaResponse)
      .cancellable(id: TriviaRequestId())

  case let .triviaResponse(.success(response)):
    state.isTriviaRequestInFlight = false
    state.currentTrivia = response
    return .none

  case .triviaResponse(.failure):
    state.isTriviaRequestInFlight = false
    return .none
  }
}
興味深いのはHashableに準拠したTriviaRequestId型をインスタンス化したものをidとしているが、TriviaRequestId型はカラでメンバーがない。つまり、このカラの構造体のインスタンスを比較すると常に同じとなります。
TriviaRequestId() == TriviaRequestId()
リファレンスを読むともちろんこれは正常な動作なんだけど、普段私がHashableを使うのは内部の値を気にせず型を作る時、それを比較するようにするのに使うわけです。
これの何が私に興味深いかというと、普段みなさんとしたらWeb APIで取得したIntのUserIDとかをアプリ側で型にして使うはずで、その時に比較可能にしようとHashable使うと思うんだけど、メンバをカラにしてハッシュ化する対象なけりゃ同じになるという。それってEmpty的な意味合いになって都合も合う pic.twitter.com/ub6a5PPtgc
— imajô (@yimajo) May 25, 2020
内部をカラにすることでそのカラのインスタンスだけで比較することができるというのは理にかなっていて興味深いですよね。
TCAについてのリンク
私が書いた記事TCAに関する技術記事
TCAポエム
The Composable Architectureの良さをあらためて整理する2022
TCAバージョンアップ
TCA v0.19.0からのSwitchStore/CaseLetが良い
TCA v1.1で非同期処理実行時の潜在的な不具合が修正された
TCAのテストコード
TCAのテストコードについて解説
TCAのコード
TCAでViewStoreにKeyPath DynamicMemberLookupが使われてる件
Combine
SWORD ART COMBINE -アリシゼーション-
CasePath
SwiftのAssociated valuesなEnumをクロージャとして扱える話
swift-concurrency-extras
TCAは複数のライブラリから成り立っていて、swift-concurrency-extrasもその1つです。
Swift Conncurrencyを拡張するライブラリについて解説しています。
TCA公式のTips
TCAのisowordsではaccessTokenをどこで保持してどのように利用しているのか
TCAで2つのコンポーネントで共有の値を使う
TCAでViewStateとViewActionを利用する
TCAでdelegateを処理するパターン
TCAでのClient/Managerの 利用パターンでは副作用のActionやErrorを分離できる
TCA利用例
TCAでのStateの初期化はinitでデフォルト引数を使うと便利
TCAでStateに関する処理をどう書くか
TCAでStoreに関する定義をenumでまとめると便利
TCAでもUseCase/Repository/DataSourceが使いたい(おすすめできない)
SwiftLee方式のDIをすることでTCAのEnvironmentバケツリレーをやめたい話
TaskResut<Void>は使えないので、そういう場合にも副作用の出力型をつかう
動画
iOSDC Japan 2020: iOSアプリ開発のための"The Composable Architecture"がすごく良いので紹介したい
https://www.youtube.com/watch?v=bWR2vpcxzDA
おわりに
Composable ArchitectureはSwiftUI専用ってわけではないですが、SwiftUIを使ってアプリを開発する上でどのような構成にするのかという一つの指針になるはずです。