Environment
- Ubuntu 16.04 is installed on WSL.
- Vivado 2018.3 WebPack is installed both on Windows and WSL Ubuntu 16.04 to default paths.
Maybe it can be done only with WSL Ubuntu 16.04 . (But my vcXsrv often freezes with GUI applications.)
Working path
-
Windows 10
d:\xlnx -
WSL Ubuntu 16.04
/mnt/d/xlnx
Install Digilent board files into Vivado
$ sudo apt install git
$ git clone https://github.com/Digilent/vivado-boards
Then copy ./vivado-boards/new/board_files/* to C:\Xilinx\Vivado\2018.3\data\boards\board_files (See 'Digilent board file installation guide')
Create a CPU design for Zybo Z7-20 (Vivado)
Invoke Vivado on Windows 10.
- Select
File->Project->New - Click "Next" and "Next", setting:
- Project Name :
zybo_z7_20_linux - Project Path :
d:/xlnx - Board :
Zybo Z7-20
- Create Block Design
- Design Name:
cpu
- Click
+in diaglam window - Select
ZYNQ7 Processing System - Run
Block Automationand clickOK - Connect
FCLK_CLK0toM_AXI_GP0_ACLK - Create HDL wrapper (A pop-up menu appears with right click on
cpuin Sources window.), clickOK. - Click
Generate Bitstream - Select
File->Export->Hardware, checkInclude bitstream, clickOK
Setting environmet variables
Create following env.sh
# !/bin/sh

export CROSS_COMPILE=arm-linux-gnueabihf-
export ARCH=arm
export KBUILD_DIR=/mnt/d/xlnx/linux-xlnx-xilinx-v2018.3
export PATH=$PATH:/mnt/d/xlnx/u-boot-xlnx/tools
source /tools/Xilinx/Vivado/2018.3/settings64.sh
Apply it.
$ source env.sh
Build Xilinx u-boot
Because [u-boot-xlnx v2018.3][2] does not have Zybo Z7-20 configuration, need to clone snapshot
[2]:https://github.com/Xilinx/u-boot-xlnx/archive/xilinx-v2018.3.tar.gz
$ git clone https://github.com/Xilinx/u-boot-xlnx
The hash of the commit was,
$ git rev-parse HEAD
195c620e348891ca2d90c759781413f2adb3f748
Append the following line to u-boot-xlnx/configs/zynq_zybo_z7_defconfig
CONFIG_OF_EMBED=y
CONFIG_CMD_NET=n
CONFIG_OF_EMBED=y embeds device tree for the board into binary. CONFIG_CMD_NET=n prevents BOOTP tries few times before bootm runs.
If the system does not have flex and bison,
$ sudo apt install flex bison
Build u-boot.
$ cd u-boot-xlnx
$ make zynq_zybo_z7_defconfig
$ make
$ cd ..
Build Xilinx Linux kernel
$ wget https://github.com/Xilinx/linux-xlnx/archive/xilinx-v2018.3.tar.gz
$ tar zxvf xilinx-v2018.3.tar.gz
$ rm xilinx-v2018.3.tar.gz
$ cd linux-xilinx-v2018.3
$ make ARCH=arm xilinx_zynq_defconfig
$ make ARCH=arm UIMAGE_LOADADDR=0x8000 uImage
$ cd ..
Build DTC
$ git clone https://git.kernel.org/pub/scm/utils/dtc/dtc.git
$ cd dtc
$ make
$ cp dtc ../u-boot-xlnx/tools
$ cd ..
Create RAM disk image (see Xilinx wiki)
Download arm_ramdisk.image.gz to /mnt/d/xlnx (d:/xlnx) from here. Then create RAM disk image.
mkimage -A arm -T ramdisk -C gzip -d arm_ramdisk.image.gz uramdisk.image.gz
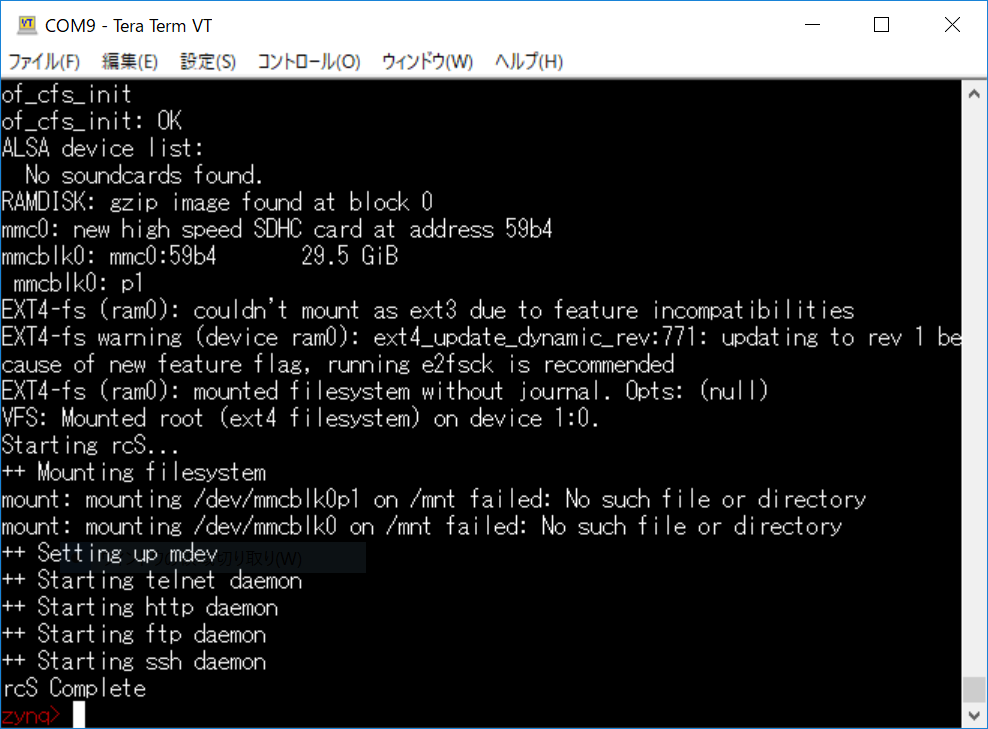
Because WSL Ubuntu does not have loop device, we cannot mount the root file system as in Xilinx wiki. To modify the image, other Linux computer should be prepared on VMs or PCs.
My own modification on rootfs
-
Eliminating two lines of
fstabmounting SD card to/mnt: I do not know the exact reason why the two lines do not work properly. (/dev/mmcblk0p1may not be prepared when the auto-mount is invoked.) -
Inserting '
mount /dev/mmcblk0p1 /mnt' into/etc/init.d/rcSjust before executing/mnt/init.sh.:init.shplaced at root of the SD card is automatically executed at the end ofrcS. Soinit.shis a convenient mean for us to insert start-up operation without modifying rootfs.
Create FSBL and Device Tree Blob (XSDK on WSL Ubuntu 16.04)
First, download device tree files.
$ wget https://github.com/Xilinx/device-tree-xlnx/archive/xilinx-v2018.3.tar.gz
$ tar zxvf xilinx-v2018.3.tar.gz
$ rm xilinx-v2018.3.tar.gz
Invoke XSDK.
$ xsdk &
Create hardware platform specification
- Set workspace directory as
/mnt/d/xlnx - Select File->New->Project, select
Xilinx->'Hardware Platform Specification', clickNext - Set
project nametozybo_z7_20_linux_hw, setTarget Hardware Specificationto/mnt/d/xlnx/zybo_z7_20_linux/zybo_z7_20_linux.sdk/cpu_wrapper.hdf, clickFinish
Create FSBL
- Select
File->New->Application Project, setproject nametozybo_z7_20_linux_fsbl - Confirm
zybo_z7_20_linux_hwis selected asHardware Platform - Click
Next, SelectZynq FSBL, clickFinish
Create devicetree
- Select
Xilinx->Repositories, select/mnt/d/xlnx/device-tree-xlnx-xilinx-v2018.3inGlobal Repositories, clickRescan Repositories,Apply, thenOK - Click
File > New > Board Support Package, setProject nametozybo_z7_20_linux_dt_0, select 'device_tree' in 'Board Support Package OS', click 'Finish', then 'OK'
Modify and build device tree
At /mnt/d/xlnx/zybo_z7_20_linux_dt_0 (WSL Ubuntu 16.04), revise following lines in system-top.dts
09 #include "zynq-7000.dtsi"
10 #include "pcw.dtsi"
21         memory {
09 /include/ "zynq-7000.dtsi"
10 /include/ "pcw.dtsi"
21         memory@0 {
Insert the description of Ethernet PHY into &gem0 node in system.dts
&gem0 {
local-mac-address = [00 0a 35 00 00 00];
phy-handle = <ðernet_phy>;
ethernet_phy: ethernet-phy@0 {
reg = <0>;
};
};
Compile device tree as,
dtc -I dts -O dtb -o devicetree.dtb system-top.dts
Create boot image
At /mnt/d/xlnx (WSL Ubuntu 16.04),
$ mkdir zybo_z7_20_linux_boot
$ cd zybo_z7_20_linux_boot
$ cp ../zybo_z7_20_linux_hw/cpu_wrapper.bit fpga.bit
$ cp ../zybo_z7_20_linux_fsbl/Debug/zybo_z7_20_linux_fsbl.elf fsbl.elf
$ cp ../u-boot-xlnx/u-boot u-boot.elf
$ cp ../linux-xlnx-xilinx-v2018.3/arch/arm/boot/uImage uImage
$ cp ../uramdisk.image.gz uramdisk.image.gz
$ cp ../zybo_z7_20_linux_dt_0/devicetree.dtb devicetree.dtb
Create boot.bif as
image : {
      [bootloader]fsbl.elf
      fpga.bit
      u-boot.elf
}
Run bootgen
bootgen -image boot.bif -o i boot.bin
Boot
Move follwing files to a SD card.
- boot.bin
- devicetree.dtb
- uramdisk.image.gz
- uImage
- Insert SD card to the slot.
- Confirm 'JP5' is in SD boot configuration.
- Connect USB cable to PROG/UART port
- Slide power switch and open the serial terminal with 115200 bps.

Appendix
Kernel configuration
First, install ncurses-dev if the system does not have.
$ sudo apt install ncurses-dev
Then, execute following at the root of the kernel source.
$ make ARCH=arm menuconfig