Node-REDでpythonスクリプトを呼び出すノードを自作してみました。
はじめに
WebスクレイピングをpythonのBeautiful Soupで作ったのですが、それをどうしてもNode-REDに組み込みたかったので、python-shellを使ってNode-REDでpythonを実行できるノードを自作してみました。
これを利用すると例えば、tensor-flow や keras で作成した AI を簡単にNode-REDに埋め込むことも可能となります。
使ったもの
- Node.js v10.16.3
- Node-RED v0.20.7
- python 3.7
- python-shell
前提
- Node.jsとNode-REDはすでにインストールされて使える状態になっていることを前提に話を進めます。
- Node-REDの自作ノードの作成方法については詳細に説明しません。
最終的にはこんな感じになります
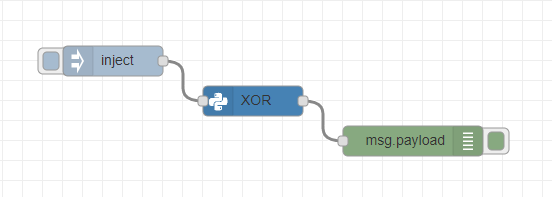
真ん中の青っぽいノードがPythonスクリプトを実行するすごいノードです。
python-shellをインストール
python-shellは、Node.jsからpythonのコードやファイルを実行できるモジュールです。
インストールは以下のコマンドを実行します。
npm install python-shell
自作ノードの構成
以下のような構成になります。
└── node-red-contrib-python
    ├── python-shell
    │   ├── icons
    │   │   └── python.png
    │   ├── python-shell.html
    │   └── python-shell.js
    └── package.json
※「node-red-contrib-python」という一般的な名前にしてしまったので、必要に応じて適宜変更してください。
package-json
package-jsonは、Node.jsモジュールの内容を記述するためのファイルです。
直接作成してもよいですし、以下のコマンドでも作成できます。
npm init
このコマンドは、対話的にpackage.jsを作成することができます。
{
    "name": "node-red-contrib-python",
    "version": "1.0.0",
    "description": "",
    "scripts": {
      "test": "echo \"Error: no test specified\" && exit 1"
    },
    "author": "",
    "license": "ISC",
    "keywords": [ "node-red" ],
    "node-red" : {
        "nodes": {
            "python-shell": "python-shell/python-shell.js"
        }
    }
}
nameにパッケージ名、node-red/nodes/python-shellにJavaScriptへの相対パスを記述します。
license等は適宜変更してください。
python-shell.html
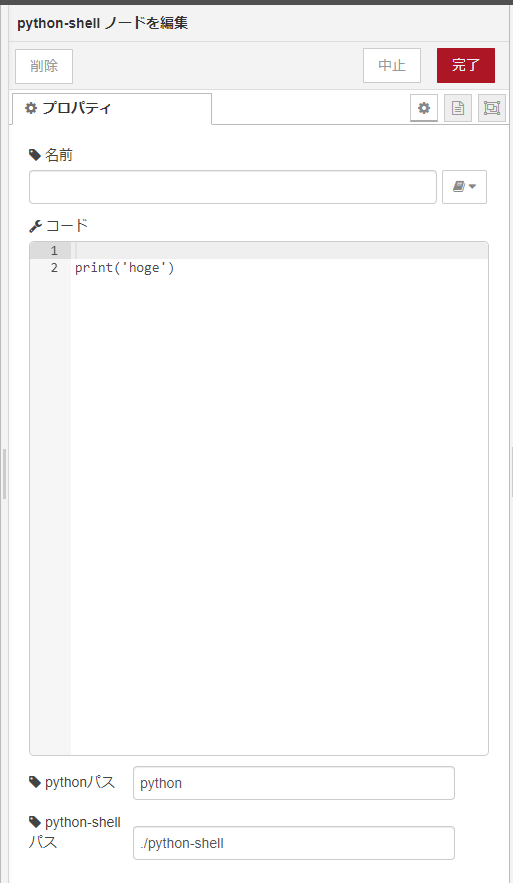
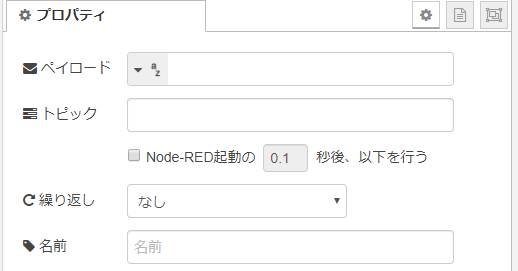
python-shell.htmlは、Node-REDでプロパティを定義させる画面を記述します。ここでは、以下のプロパティを設定します。
| プロパティ | id | 説明 | 種別 |
|---|---|---|---|
| 名前 | node-input-name | ノードの表示名を設定する | text |
| コード | node-input-python | pythonのコードを設定する | hidden |
| エディタ | node-input-python-editor | pythonコードを編集するエディタを定義する | editor |
| pythonパス | node-input-pypath | pythonのパスを指定する | text |
| python-shellパス | node-input-pyshellpath | python-shellのパスを指定する | text |
以下のようなプロパティページを定義します。
以下がHTMLの全量です。
<script type="text/x-red" data-template-name="python-shell">
    <div class="form-row">
        <label for="node-input-name"><i class="fa fa-tag"></i> 名前</label>
        <input type="text" id="node-input-name">
    </div>
    <div class="form-row" style="margin-bottom: 0px;">
        <label for="node-input-python"><i class="fa fa-wrench"></i> コード</label>
        <input type="hidden" id="node-input-python" autofocus="autofocus">
    </div>
    <div class="form-row node-text-editor-row">
        <div style="height: 250px; min-height:150px;" class="node-text-editor" id="node-input-python-editor" ></div>
    </div>
    <div class="form-row">
        <label for="node-input-pypath"><i class="fa fa-tag"></i> pythonパス</label>
        <input type="text" id="node-input-pypath">
    </div>
    <div class="form-row">
        <label for="node-input-pyshellpath"><i class="fa fa-tag"></i> python-shellパス</label>
        <input type="text" id="node-input-pyshellpath">
    </div>
</script>
<script type="text/x-red" data-help-name="python-shell">
    <p>python shell</p>
</script>
<script type="text/javascript">
    RED.nodes.registerType('python-shell',{
        color:"#4682b4",
        category: 'python',
        defaults: {
            name: {value:""},
            python: {value:"\nprint('hoge')"},
            pypath: {value:"python"},
            pyshellpath: {value:"./python-shell"}
        },
        inputs:1,
        outputs:1,
        icon: "python.png",
        label: function() {
            return this.name;
        },
        oneditprepare: function() {
            var that = this;
            this.editor = RED.editor.createEditor({
                id: 'node-input-python-editor',
                mode: 'ace/mode/none',
                value: $("#node-input-python").val()
            });
            RED.library.create({
                url:"functions", // where to get the data from
                type:"function", // the type of object the library is for
                editor:this.editor, // the field name the main text body goes to
                fields:['name','outputs']
            });
            this.editor.focus();
        },
        oneditsave: function() {
            var annot = this.editor.getSession().getAnnotations();
            $("#node-input-python").val(this.editor.getValue());
            this.editor.destroy();
            delete this.editor;
        },
        oneditcancel: function() {
            this.editor.destroy();
            delete this.editor;
        },
        oneditresize: function(size) {
            var rows = $("#dialog-form>div:not(.node-text-editor-row)");
            var height = $("#dialog-form").height();
            for (var i=0; i<rows.size(); i++) {
                height -= $(rows[i]).outerHeight(true);
            }
            var editorRow = $("#dialog-form>div.node-text-editor-row");
            height -= (parseInt(editorRow.css("marginTop"))+parseInt(editorRow.css("marginBottom")));
            $(".node-text-editor").css("height",height+"px");
            this.editor.resize();
        }
    });
</script>
oneditprepare: function()
エディタを準備するときの処理を記述しています。RED.editorのcreateEditorを呼び出し、エディタを構築しています。modeは一旦noneとしています。
oneditsave: function()
保存の際は、idがnode-input-pythonのhidden項目に値を移送しています。jsではこのhiddenの値を使用します。
python-shell.js
Node-REDでノードが呼び出されたときの処理を記述します。
設定されたコードでpython-shellを呼び出し、その戻り値をmsg.payloadに指定して、node.sendしています。
module.exports = function(RED) {
    function PythonShellNode(config) {
        RED.nodes.createNode(this,config);
        this.name = config.name;
        this.python = config.python;
        this.pypath = config.pypath;
        this.pyshellpath = config.pyshellpath;

        var node = this;
        node.on("input", function(msg) {
            try {
                var {PythonShell} = require(node.pyshellpath);
                let options = {
                    pythonPath: node.pypath,
                    pythonOptions: ['-u']
                  };

                PythonShell.runString(node.python, options, function (err, result) {
                    if (err) {
                        msg.payload = err;
                    } else {
                        if (result.length > 0) {
                            msg.payload = result[0];
                        } else {
                            msg.payload = "";
                        }
                    }
                    node.send(msg);
                });
            } catch(err) {
                node.error(err.message);
            }
        });
    }
    RED.nodes.registerType("python-shell",PythonShellNode);
}
以下のコードでpython-shellをrequireします。python-shellのパスは、プロパティに設定されたパスを使用します。
var {PythonShell} = require(node.pyshellpath);
次に、python-shellのオプションを指定します。
let options = {
    pythonPath: node.pypath,
    pythonOptions: ['-u']
};
pythonPathにプロパティで指定されたpythonのパスを設定しています。conda等で作成したpythonを利用したい場合は、そのpythonの絶対パスをプロパティで指定すればOKです。
PythonShell.runStringを呼び出し、pythonを実行します。コールバックを定義し、処理終了後の処理を記述します。
処理終了後は、msg.payloadにresult[0]を設定し、node.send(msg)で次ノードに結果を引き渡しています。
icons
アイコンは、pythonっぽいアイコンをサイトからダウンロードし、40×60で白色のPNGに編集し、iconsファイルに配置しました。
ノードの色もpythonっぽい色を指定しました。
この指定は、python-shell.htmlのRED.nodes.registerTypeのiconとcolorで変更できます。
Node-RED実行環境にインストール
~/.node-redで以下のコマンドを実行します。
npm install <モジュールの配置場所>/node-red-contrib-python
モジュールの配置場所は、node-red-contrib-pythonを配置した場所に従い適宜変更してください
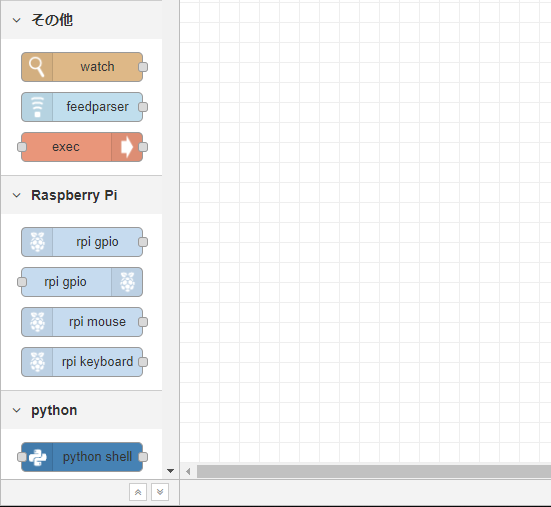
インストールに成功すると、Node-REDの左側のノード一覧にパレットが追加されます。
追加されない場合は、Node-REDを再起動してみてください。
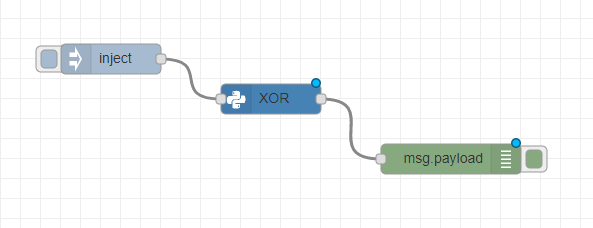
実際に動かしてみる
今回は、Deep Learningの基本であるパーセプトロンをpythonで実装し、そのXORを計算するノードを作成し、Node-REDに組み込んでみます。
injectノードを配置する
簡単のため、起動はinjectノードで行います。
左側のノード一覧から、injectノードをドラッグアンドドロップで配置します。
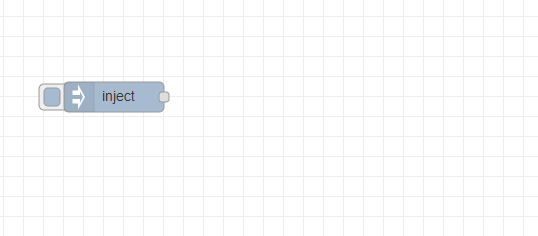
ペイロードはデフォルトでタイムスタンプになっているので、文字列に変更します。
python shellノードを配置する
同様にpython shellノードを配置し、コネクタでつなぎます。

プロパティを編集します。
pythonパスとpython-shellパスは、デフォルトだとうまく動かないかもしれませんので、その場合は、フルパスで指定してみてください。
コードには以下のpythonを入力します。
def AND(x1, x2):
    w1, w2, theta = 0.5, 0.5, 0.7
    tmp = x1*w1 + x2*w2
    if tmp <= theta:
        return 0
    elif tmp > theta:
        return 1

def NAND(x1, x2):
    w1, w2, theta = -0.5, -0.5, -0.7
    tmp = x1*w1 + x2*w2
    if tmp <= theta:
        return 0
    elif tmp > theta:
        return 1

def OR(x1, x2):
    w1, w2, theta = 0.5, 0.5, 0.3
    tmp = x1*w1 + x2*w2
    if tmp <= theta:
        return 0
    elif tmp > theta:
        return 1

def XOR(x1, x2):
    s1 = NAND(x1, x2)
    s2 = OR(x1, x2)
    y = AND(s1, s2)
    return y

print('%d %d %d %d' % (XOR(0,0),XOR(0,1),XOR(1,0),XOR(1,1)))
出力確認用のデバッグノード追加
出力を確認するためのデバッグノードを同様に配置しコネクタでつなげます。
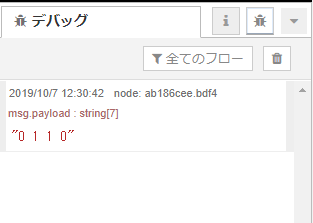
デプロイして実行する
デプロイして、injectノードを実行すると、デバッグメッセージに、XORの結果が表示されます。
やった~!!!
さいごに
これを使うとpythonで作ったPGを簡単にNode-REDをつかって公開できるようになるので、自分としてはかなり重宝しそうです。前ノードからデータを受け渡したり、pythonオブジェクトを受け渡せるようにしたりできたり、いろいろ拡張していきたいです。
ラズパイとかでNode-REDを使うときとかにも、エッジでのAIのプレディクトとかにも使ってみたいです。
参考にしたサイト
初めてのノード開発
https://nodered.jp/docs/creating-nodes/first-node
【Node.js入門】python-shellによるNode.jsとPythonのデータ連携方法まとめ
https://www.sejuku.net/blog/84736