概要
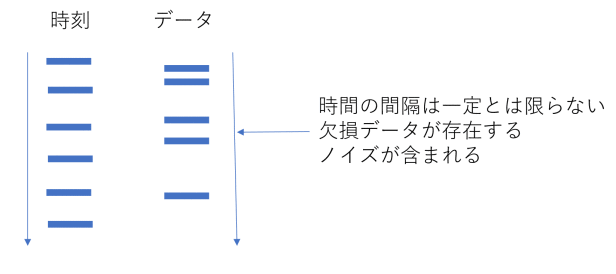
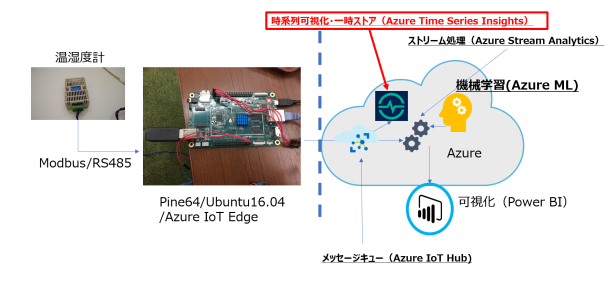
Azure Time Series Insightsは、時系列データのための一時ストアの役割を行います。IoTではデータは時系列であることが多く、センサーからのデータであるか故に可視化や、分析の前にデータを処理する必要がでます。特に時系列データはデータの欠損や、時間間隔の不均一さ、ノイズ等に対して処理を行う必要が多く発生します。一定の時間間隔で、処理されたデータが出力できれば、一時ストアとしてもかなり有用になると考えられます。
Azure Time Series Insightsでは、APIとJSONベースのクエリ言語で色々な集計処理を行うことが可能になります。API呼び出しをPythonから行ってみたいと思います。
以前の記事で作成した環境を使用します。
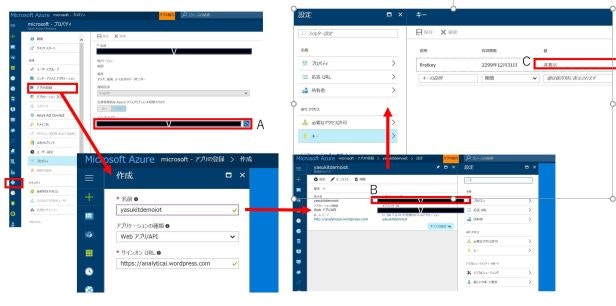
AzureのAPIは認証としてOauth2.0を認証として使用します。処理は下記の順序で行います。
ディレクトリに登録し、キー発行する
アプリケーションの登録を行い、下記の3つの項目をメモします。
A:ディレクトリID
B:アプリケーションID
C:キー
リソース(サービス)に登録したアプリケーションに対してアクセス権を設定する。Time Series Insightsのポータルページにアクセスして設定を行います。
APIによりアクセストークンを発行する
前の手順ででメモした内容をメッセージの本文にURLENCODEしてhttpsでAPIのURLにPOSTします。
AUTH_API_URL = "https://login.windows.net/AのディレクトリID/oauth2/token?api-version=1.0"
 token_query = {
      'grant_type': 'client_credentials',
      'resource': 'https://api.timeseries.azure.com/',
      'client_id':’BのアプリケーションID',
      'client_secret':'Cのキー'
 }
 token_request = urllib2.Request(AUTH_API_URL,urllib.urlencode(token_query))
 token_request.add_header('Content-Type','application/x-www-form-urlencoded')
 response = urllib2.urlopen(token_request)
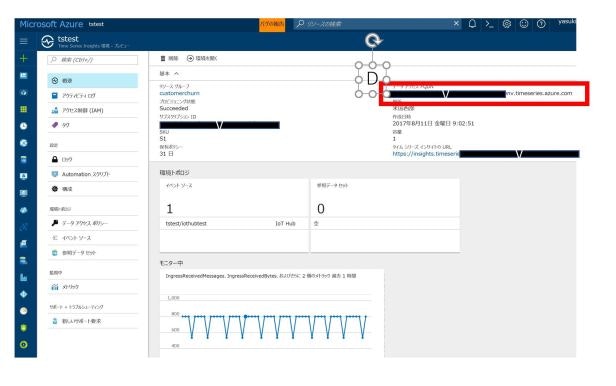
Time Series Insightsを作成し、FQDNを記録する
作成方法はこちらを参照ください。DのFQDNを記録しておきます。
アクセストークンを利用してサービスを利用する
上記が成功するとアクセスするためのトークンが返されます。そのトークンを使いTime Series Insightsの集計機能のアクセスします。
集計には、JSON形式でクエリを定義しWebsocketのAPIに送信することにより集計を実行します。APIのリファレンスはこちらになります。
クエリはJSONで記述します。リファレンスはこちらになります。
下記は温度(temperature)湿度(humidity)を集計するクエリ例です。1分単位に集計しています。この処理により、時間間隔を一定にしています(平均をとっています)
{
  "content": {
    "searchSpan": {
      "from": "2017-08-08T00:00:00.000Z",
      "to": "2017-08-08T02:00:00.000Z"
    },
    "aggregates": [
      {
        "dimension": {
          "dateHistogram": {
            "input": {
              "builtInProperty": "$ts"
            },
            "breaks": { "size": "1m" }
          }
        },
        "measures": [
          {
            "avg": {
              "input": {
                "property": "temperature",
                "type": "Double"
              }
            }
          },
          {
            "avg": {
              "input": {
                "property": "humidity",
                "type": "Double"
              }
            }
          },
          {
            "count": { }
          }
        ]
      }
    ]
  },
  "headers": {
    "Authorization": "アクセストークンをセットする"
  }
}
クエリを送信して結果をCSVで表示するPythonのコードになります。
AUTH_API_URL = "https://login.windows.net/AのディレクトリID/oauth2/token?api-version=1.0"
REST_API_URL = "wss://DのFQDN.env.timeseries.azure.com/aggregates?api-version=2016-12-12"
import urllib2
import urllib
import json
import websocket
import ssl
try:
        token_query = {
                'grant_type': 'client_credentials',
                'resource': 'https://api.timeseries.azure.com/',
      'client_id':'BのアプリケーションID',
      'client_secret':'Cのキー'
        }
         token_request = urllib2.Request(AUTH_API_URL,urllib.urlencode(token_query))
         token_request.add_header('Content-Type','application/x-www-form-urlencoded')
         response = urllib2.urlopen(token_request)
         result_token=response.read()
         token=json.loads(result_token)
         query_file = open('c:\\local\query4.json') -- JSONクエリをファイルから読み込んでいる
          request_query=json.load(query_file)
          request_query['headers']['Authorization']="Bearer "+token['access_token']--アクセストークンをクエリにセット

          wSocket = websocket.create_connection(REST_API_URL,sslopt={"cert_reqs": ssl.CERT_NONE})
          wSocket.send(json.dumps(request_query))
          result_wSocket =  wSocket.recv()
         dataset=json.loads(result_wSocket)--受信したJSONをPythonオブジェクトに変換
          index=0
          print "timestamp,","temperature,","humidity"
          for dimension in dataset['content'][0]['dimension']:
                         print dimension,",",dataset['content'][0]['measures'][index][0],",",dataset['content'][0]['measures'][index][1]
                         index=index+1
        wSocket.close()
except urllib2.HTTPError as e:
        print("HTTP Error: {0} - {1}".format(e.code, e.reason))
except urllib2.URLError as e:
        print("URL Error: {0}".format(e.reason))
except Exception as e:
        print("General Exception: {0}".format(e))