PythonでTwitterをやったのでメモ
OS:Ubuntu16.04LTS
Python3.5.2+requests2.9.1+requests-oauthlib0.8.0
認証キーの作成
[TwitterApps]
(https://developer.twitter.com/en/apply/user)
※携帯番号で認証されたアカウントが必要
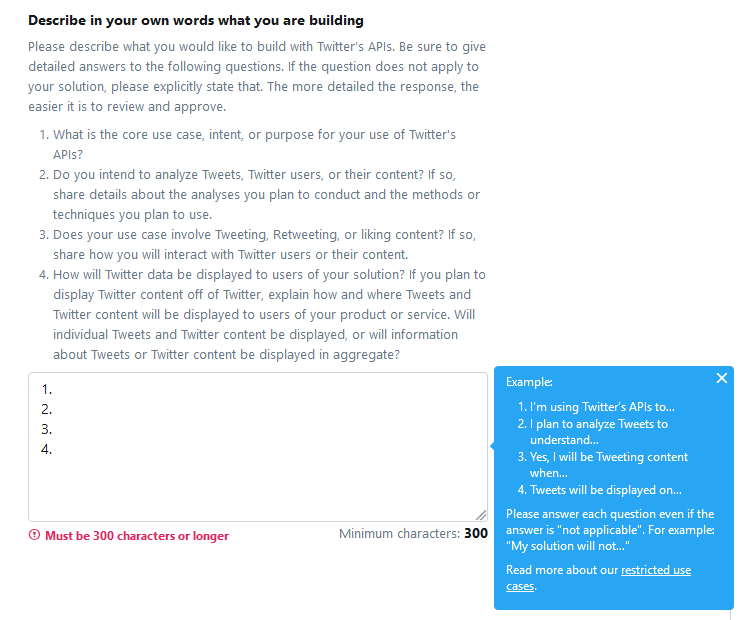
TwitterAPIを使う目的を300語以上で説明しないといけなくなりました。
1.TwitterAPIは何の目的のために使うの?
2.TwitterAPIを使う技術的な説明をしてね
Pythonライブラリのインストール
pip3 install requests requests_oauthlib
twythonやtweepyなどもあるが今回はrequests-oauthlibを使います。
(tweepyはメンテナンスされなくなったので非推奨です)
コードを書いていきます
ひな形はこんな感じです。
# coding: UTF-8
import json
from requests_oauthlib import OAuth1Session

CONSUMER_KEY = ''
CONSUMER_SECRET = ''
ACCESS_KEY = ''
ACCESS_SECRET = ''

twitter = OAuth1Session(CONSUMER_KEY,CONSUMER_SECRET,ACCESS_KEY,ACCESS_SECRET)

url = ''
params = {}
req = twitter.post(url, params = params)
このコードのurl,paramsとreq = twitter.の後の部分(postかgetになる)を変更するだけ
1.[API reference index]
(https://developer.twitter.com/en/docs/api-reference-index)を見て面白そうなものを見つける
2.API Referenceを見てParameters,Resource URLを探す
3.上のひな形のurl,paramsにResource URL,Parametersをそれぞれ入れる
ちなみにこんなのができたりします
ヘッダーの画像を変更する
# coding: utf-8
import json
from requests_oauthlib import OAuth1Session
import base64


CONSUMER_KEY = ''
CONSUMER_SECRET = ''
ACCESS_KEY = ''
ACCESS_SECRET = ''

twitter = OAuth1Session(CONSUMER_KEY,CONSUMER_SECRET,ACCESS_KEY,ACCESS_SECRET)
url = "https://api.twitter.com/1.1/account/update_profile_banner.json"

img_file = '/home/yasudaak/Twitter/Hedder/login.jpg'
# ファイルの指定
data = base64.encodestring(open(img_file, 'rb').read())
# base64でエンコード
params = {'banner': data}
req = twitter.post(url, data = params)
# ファイルサイズが大きいのでparams= ではなくdata=
# https://developer.twitter.com/en/docs/accounts-and-users/manage-account-settings/api-reference/post-account-update_profile_bannerのサイトを見るとPOST account/update_profile_bannerとなっているのでreq = twitter.の後はpost
print(req.status_code)
# ステータスコードの表示
# https://developer.twitter.com/en/docs/basics/response-codes.html
名前を変更する
# coding: utf-8
import json
from requests_oauthlib import OAuth1Session

CONSUMER_KEY = ''
CONSUMER_SECRET = ''
ACCESS_KEY = ''
ACCESS_SECRET = ''


twitter = OAuth1Session(CONSUMER_KEY,CONSUMER_SECRET,ACCESS_KEY,ACCESS_SECRET)
url = "https://api.twitter.com/1.1/account/update_profile.json"
username = '妹かわいい'
# 変更したい名前の指定
params = {"name": username}
req = twitter.post(url, params = params)
特定のアカウントのツイートを10件所得
# coding: utf-8
import requests
import json
from requests_oauthlib import OAuth1Session
import os


CONSUMER_KEY = os.environ['CONSUMER_KEY']
CONSUMER_SECRET = os.environ['CONSUMER_SECRET']
ACCESS_KEY = os.environ['ACCESS_KEY']
ACCESS_SECRET = os.environ['ACCESS_SECRET']
twitter = OAuth1Session(CONSUMER_KEY,CONSUMER_SECRET,ACCESS_KEY,ACCESS_SECRET)

url = "https://api.twitter.com/1.1/statuses/user_timeline.json"

params = {'screen_name':'anzu_ouenn_bot',
'exclude_replies':True,
'include_rts':False,'count':10}
# screen_nameに所得したいアカウントのIDを@なしで書く

res = twitter.get(url, params = params)
timeline = json.loads(res.text)

if res.status_code == 200:
    for tweet in timeline:
        print(tweet["text"])
else:
        print("error")
APIキーはコードに書かないほうがいいよ
Githubとかに公開するときに気づかずに…ということになりかねないのでAPIキーは直接コードに書かないほうがいいです。
1.
foregoのインストール(Ubuntuの場合)
sudo wget https://bin.equinox.io/c/ekMN3bCZFUn/forego-stable-linux-amd64.deb
sudo dpkg -i forego-stable-linux-amd64.deb
CONSUMER_KEY=
CONSUMER_SECRET=
ACCESS_KEY=
ACCESS_SECRET=
.envをホームディレクトリに作り上のような形でAPIキーを書く
3.
import os

CONSUMER_KEY = os.environ['CONSUMER_KEY']
CONSUMER_SECRET = os.environ['CONSUMER_SECRET']
ACCESS_KEY = os.environ['ACCESS_KEY']
ACCESS_SECRET = os.environ['ACCESS_SECRET']
上記をコードの中のAPIキーの代わりに書く
4.
プログラムを実行するときに
forego run python3 test.py
のようにforego runをコマンドの前につける
いまさらだけどPython3では#coding: utf-8不要ですね。
僕は、TwitterAPIの規制が強くなったのでMastodonに移りました。。
