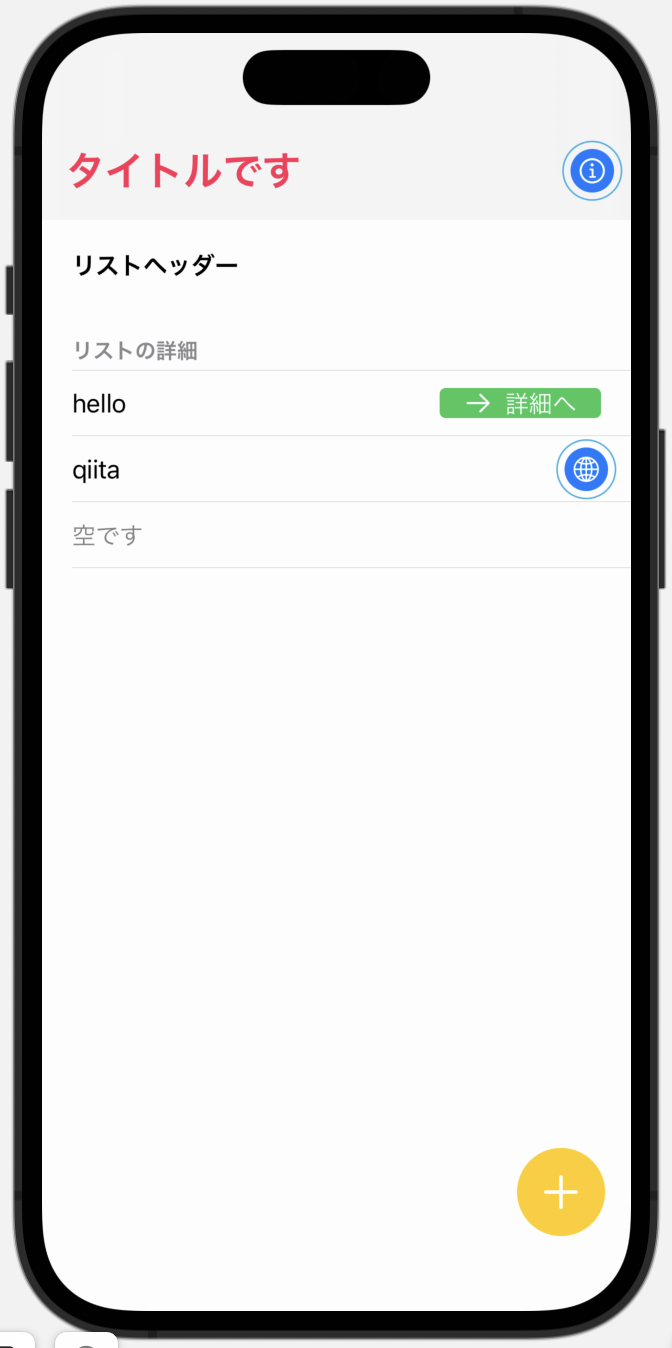
タイトルの通りです。
SwiftUIは何かとネストが深くなりがちなので、できるだけ浅くするテクニックをまとめます。
他にも何かありましたら教えていただけるとうれしいです。
随時更新予定。
修正前
以下のようなビューを作りたいとします。(内容は適当)
内部で[String]型のitemsを持ち、それをリストで表示するというものです。
itemsの要素が
- "hello" のときは詳細を見るボタン
- "qiita"のときはまた別のボタン
- "empty"のときは空だと伝えるViewを表示
とします。

こんな感じで書けばいいかな…?
struct ContentView: View {
  @State var showTitle = true
  @State var showItemList = true

  let items = ["hello", "qiita", "empty"]

  var body: some View {
    ZStack {
      Color.gray
        .opacity(0.02)
        .ignoresSafeArea()

      VStack {
        if showTitle {
          HStack {
            Text("タイトルです")
              .bold()
              .font(.title)
              .foregroundColor(.pink)
            Spacer()
            Button(
              action: {
                // 何かしら処理
              },
              label: {
                HStack {
                  Image(systemName: "info.circle")
                    .foregroundColor(.white)
                    .background(
                      ZStack {
                        Circle()
                          .foregroundColor(.blue)
                          .padding(-5)
                        Circle()
                          .stroke()
                          .foregroundColor(.cyan)
                          .padding(-10)
                      })
                }
              })
          }
          .padding()
          .background(.thinMaterial)
        }

        List {
          Group {
            Text("リストヘッダー")
              .bold()
              .listRowSeparator(.hidden)

            Section {
              if showItemList {
                ForEach(items, id: \.self) { item in
                  if item != "empty" {
                    VStack {
                      HStack {
                        Text(item)

                        if item == "hello" {
                          Spacer()
                          Button(
                            action: {},
                            label: {
                              HStack {
                                Image(systemName: "arrow.right")
                                Text("詳細へ")
                              }
                              .foregroundColor(.white)
                              .padding(.horizontal)
                              .background(
                                RoundedRectangle(cornerRadius: 4)
                                  .foregroundColor(.green))
                            })
                        } else if item == "qiita" {
                          Spacer()
                          Button(
                            action: {},
                            label: {
                              Image(systemName: "globe")
                                .foregroundColor(.white)
                                .background(
                                  ZStack {
                                    Circle()
                                      .foregroundColor(.blue)
                                      .padding(-5)
                                    Circle()
                                      .stroke()
/* Indentation so deeeeeeeeeeeeep!!*/ .foregroundColor(.cyan)
                                      .padding(-10)
                                  })
                            })
                        }
                      }
                    }
                  } else {
                    Text("空です")
                      .opacity(0.5)
                  }
                }
              }
            } header: {
              Text("リストの詳細")
            }
          }
          .listRowBackground(Color.clear)
        }
        .scrollContentBackground(.hidden)
        .listStyle(.plain)
      }

      VStack {
        Spacer()
        HStack {
          Spacer()
          Button(
            action: {},
            label: {
              Image(systemName: "plus")
                .font(.title)
                .foregroundColor(.white)
                .padding()
                .background(
                  Circle()
                    .foregroundColor(.yellow))
            })
        }
      }
      .padding()
    }
  }
}
気になるところ
- ネストが深すぎる
- 何がどこに書いてあるかわかりにくい
- どんな状態でボタン等の部品が表示されるのかわかりにくい(if節が長い)
- 同じ内容を何度か書いている
では、気になるところを除いていきましょう。
積極的に部品をvarやfuncにする
メリット
- 部品に名前がつく
- インデントが浅くなる
デメリット
- 特になし?
- 多く作りすぎると逆にわかりにくくなるかも
例(var)
struct ContentView: View {

  var body: some View {
    // 略
        title  // ☆ タイトルということが一目でわかる
          .padding()
          .background(.thinMaterial)
    // 略
  }

  // タイトル部分
  var title: some View {
    HStack {
      Text("タイトルです")
        .bold()
        .font(.title)
        .foregroundColor(.pink)
      Spacer()
      infoButton // ☆ これもvarで宣言
    }
  }

  // タイトル部分に配置されているinfoボタン
  var infoButton: some View {
    Button(
      action: {
        // 何かしら処理
      },
      label: {
        HStack {
          Image(systemName: "info.circle")
            .foregroundColor(.white)
            .infoButtonModifier()  // 後述
        }
      })
  }
// 略
}
例(func)
struct ContentView: View {
  // 略
  var body: some View {
            // 略
            Section {
              ForEach(items, id: \.self) { item in
                itemRow(item: item)  // ☆ 引数が必要な場合はfuncを使う
              }
              .show(if: showItemList)  // 後述
            } header: {
              Text("リストの詳細")
            }
            // 略
  }

  // 行の要素
  func itemRow(item: String) -> some View {
    VStack {
      HStack {
        Text(item)
        Spacer()
        functionButton(item: item)  // ☆ これもfuncで宣言
      }
    }
  }

  // 複数のViewを返す可能性がある場合は、@ViewBuilderが必要
  @ViewBuilder
  func functionButton(item: String) -> some View {
    switch item {
    case "hello":
      Button(
        // 略
        })

    case "qiita":
      Button(
        // 略
        })

    default:
      EmptyView()
    }
  }
}
積極的にモディファイア化する
よく使うモディファイアはViewのextensionとして切り出しておけば、再利用性が高まり、間違いも減ります。
メリット
- 再利用性が高まる
- 修正が必要になったときに変更箇所が少なくなる
- モディファイアに名前がつくため、何をするものなのかわかりやすくなる
- ネストが浅くなる(こともある)
デメリット
- 特になし?
例
例えばこの.background()は2回ほど登場しています。
Image(systemName: "globe")
  .foregroundColor(.white)
  .background(
    ZStack {
      Circle()
        .foregroundColor(.blue)
        .padding(-5)
      Circle()
        .stroke()
        .foregroundColor(.cyan)
        .padding(-10)
    })
モディファイアとして切り出しましょう。
extension View {
  func infoButtonModifier() -> some View {
    self
      .background(
        ZStack {
          Circle()
            .foregroundColor(.blue)
            .padding(-5)
          Circle()
            .stroke()
            .foregroundColor(.cyan)
            .padding(-10)
        })
  }
}

// こんな感じで書ける
Image(systemName: "globe")
  .foregroundColor(.white)
  .infoButtonModifier()
Spacer()で位置調整するのをやめる
右下にあるプラスボタンはSpacer()で位置調整を行っています。
.frame(maxWidth:maxHeight:alignment:)でも同じことができます
メリット
- ネストが浅くなる
デメリット
- なし
例
HogeView
  .frame(
    maxWidth: .infinity,
    maxHeight: .infinity,
    alignment: .bottomTrailing)  // これで右下に配置されます
表示/非表示を切り替えるモディファイアを作る
紹介したかったのはこれです。
if節は何かと長くなりがちで、条件とViewを追うのがめんどくさくなりやすい…。
なので、以下のようなモディファイアを考えました。
extension View {
  @ViewBuilder
  func viewSwitch(if switched: Bool, @ViewBuilder to view: () -> some View) -> some View {
    if switched {
      view()
    } else {
      self
    }
  }

  @ViewBuilder
  func show(if show: Bool) -> some View {
    self
      .viewSwitch(if: !show) {
        EmptyView()
      }
  }

  @ViewBuilder
  func hide(if hide: Bool) -> some View {
    self.show(if: !hide)
  }
}
viewSwitch(if:, to:)
これを使うことで、特定の条件のときだけビューを切り替えることができます。
メリット
- インデントが下がる
- 特に
if文のelse節に大したことを書かない場合に重宝します
デメリット
- 切り替え元のビューと、切り替え先のビューのインデントが揃わない
show(if:)とhide(if:)
これを使うことで、特定の条件のときだけ表示/非表示を切り替えられます
メリット
- インデントが下がる
- 他のビューと階層が揃う
- わかりやすい?
デメリット
- モディファイアが多いと埋もれてしまう?
- if文で囲むときほど目立たない?
- 条件が増えた場合にわかりにくいかも
例
title
  .viewSwitch(if: switched) {
    Text("タイトルではないよ")  // switchedがTrueのときにこのViewに切り替わる
  }

title
  .show(if: showTitle)  // showTitleがTrueのときのみ表示

title
  .hide(if: hideTitle)  // hideTitleがTrueのときに非表示
結果
上記を冒頭のプログラムに適用したものを最後に載せます。
このコードでも、冒頭に貼ったスクショと同じものが作れます。
ネストが浅くなったし、bodyを見ればどんなViewになるのか想像がつきやすくなりました。
struct ShallowNest: View {
  @State var showTitle = true
  @State var showItemList = true

  let items = ["hello", "qiita", "empty"]

  var body: some View {
    ZStack {
      Color.gray
        .opacity(0.02)
        .ignoresSafeArea()

      VStack {
        title
          .padding()
          .background(.thinMaterial)
          .show(if: showTitle)

        List {
          Group {
            Text("リストヘッダー")
              .bold()
              .listRowSeparator(.hidden)

            Section {
              ForEach(items, id: \.self) { item in
                itemRow(item: item)
              }
              .show(if: showItemList)
            } header: {
              Text("リストの詳細")
            }
          }
          .listRowBackground(Color.clear)
        }
        .scrollContentBackground(.hidden)
        .listStyle(.plain)
      }

      addButton
        .frame(
          maxWidth: .infinity,
          maxHeight: .infinity,
          alignment: .bottomTrailing)
    }
  }

  var title: some View {
    HStack {
      Text("タイトルです")
        .bold()
        .font(.title)
        .foregroundColor(.pink)
      Spacer()
      infoButton
    }
  }

  var infoButton: some View {
    Button(
      action: {
        // 何かしら処理
      },
      label: {
        HStack {
          Image(systemName: "info.circle")
            .foregroundColor(.white)
            .infoButtonModifier()
        }
      })
  }

  func itemRow(item: String) -> some View {
    HStack {
      Text(item)
      Spacer()
      functionButton(item: item)
    }
    .viewSwitch(if: item == "empty") {
      Text("空です")
        .opacity(0.5)
    }
  }

  @ViewBuilder
  func functionButton(item: String) -> some View {
    switch item {
    case "hello":
      Button(
        action: {},
        label: {
          HStack {
            Image(systemName: "arrow.right")
            Text("詳細へ")
          }
          .foregroundColor(.white)
          .padding(.horizontal)
          .background(
            RoundedRectangle(cornerRadius: 4)
              .foregroundColor(.green))
        })

    case "qiita":
      Button(
        action: {},
        label: {
          Image(systemName: "globe")
            .foregroundColor(.white)
            .infoButtonModifier()
        })

    default:
      EmptyView()
    }
  }

  var addButton: some View {
    Button(
      action: {},
      label: {
        Image(systemName: "plus")
          .font(.title)
          .foregroundColor(.white)
          .padding()
          .background(
            Circle()
              .foregroundColor(.yellow))
      })
    .padding()
  }
}