概要
Sphinx は Python で作成されたドキュメント生成ツール。
コード内コメントや .rst でかかれたファイル等を元に HTML/epub/PDF などのフォーマットのドキュメントを生成出来る。
この記事では .rst を用いたドキュメント生成方法をまとめている。
セットアップ
HTMLでの出力をするまでの設定。
まずPython環境を用意する。virtualenv等で環境を切っておくと良い。
pip で sphinx インストール後、新しいディレクトリ内で sphinx-quickstart を使ってプロジェクト作成を行う。
$ pip install sphinx sphinx-rtd-theme
$ mkdir newdocument
$ cd newdocument
$ sphinx-quickstart
対話形式が設問がでるので答えていく。
> Root path for the documentation [.]:
ドキュメントの生成ディレクトリの指定。
すでにカレントディレクトリに入っているはずなのでデフォルト。
> Separate source and build directories (y/n) [n]: y
ドキュメントの元になる .rst ファイルや設定ファイル conf.py などと、生成物の html 等を別のディレクトリに分けるか。
分離していた方が管理しやすいため y を選択。
> Name prefix for templates and static dir [_]:
静的ファイルとテンプレートファイルの接頭子指定。デフォルトで問題ない。
> Project name: NewDocument
> Author name(s): Your Name.
> Project version: 0.0.1
> Project release [0.0.1]:
プロジェクト名と著作者、バージョンの指定。主に Copyright 表記に使われる。
後で簡単に変更可能。
> Project language [en]: ja
プロジェクトで使用する言語。
> Source file suffix [.rst]:
> Name of your master document (without suffix) [index]:
ドキュメントに使う拡張子と、初期ファイル名。
デフォルトで問題ない。
> Do you want to use the epub builder (y/n) [n]:
> autodoc: automatically insert docstrings from modules (y/n) [n]:
> doctest: automatically test code snippets in doctest blocks (y/n) [n]:
> intersphinx: link between Sphinx documentation of different projects (y/n) [n]:
> todo: write "todo" entries that can be shown or hidden on build (y/n) [n]:
> coverage: checks for documentation coverage (y/n) [n]:
> pngmath: include math, rendered as PNG images (y/n) [n]:
> mathjax: include math, rendered in the browser by MathJax (y/n) [n]:
> ifconfig: conditional inclusion of content based on config values (y/n) [n]:
> viewcode: include links to the source code of documented Python objects (y/n) [n]:
各プラグインや拡張機能を使用するかの文面だが後で追加可能なのでここで追加する必要は無い。
> Create Makefile? (y/n) [y]:
> Create Windows command file? (y/n) [y]: n
ドキュメント生成コマンドを用意するか。
Makefile は Windows 以外で使用するので必ず y にする事。
Windows 用は必要でなければ n にすると余計なファイルが省かれる。
ここまで答えると、必要な build source の2ディレクトリが生成される。
以下のコマンドで html を生成できる。
$ make html
HTMLは build/html 以下に生成される。
build/html/index.html を開くとドキュメントを参照できる。
標準のHTMLテンプレートは少々使いづらいので、便利なRTDテーマを使用する設定を追加する。
- html_theme = 'alabaster'
+ import sphinx_rtd_theme
+ html_theme = "sphinx_rtd_theme"
+ html_theme_path = phinx_rtd_theme.get_html_theme_path()]
複数ファイル
セットアップが終わったら source/index.rst を起点にドキュメントを書いていける。
とはいえ、よほど短いドキュメントでない限り index.rst には目次と概要だけで問題ない。
新規に source/start.rst を生成し、ドキュメントを書くには以下のように用意する。
###########################
Section Title
###########################

SubTitle
=================

Lorem ipsum dolor sit amet, consectetur adipiscing elit, sed do eiusmod tempor incididunt ut labore et dolore magna aliqua.
このファイル(start.rst)を index.rst の目次(toctree)に追加する。
以下は章のナンバリングをする場合のサンプル。
.. toctree::
   :maxdepth: 2
   :numbered:

   start
空行のあとに追加しないと認識しないので注意。
基本的な使用方法はここまで。
詳しい文法などは http://docs.sphinx-users.jp/rest.html などの Sphinx ドキュメントが詳しい。
blockdiag の導入
ブロック図やシーケンス図を書くのには blockdiag や seqdiag を使用すると良い。
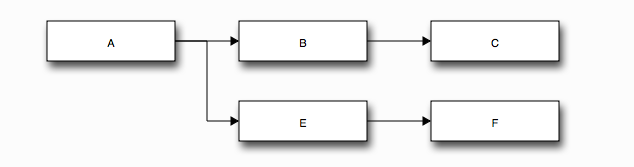
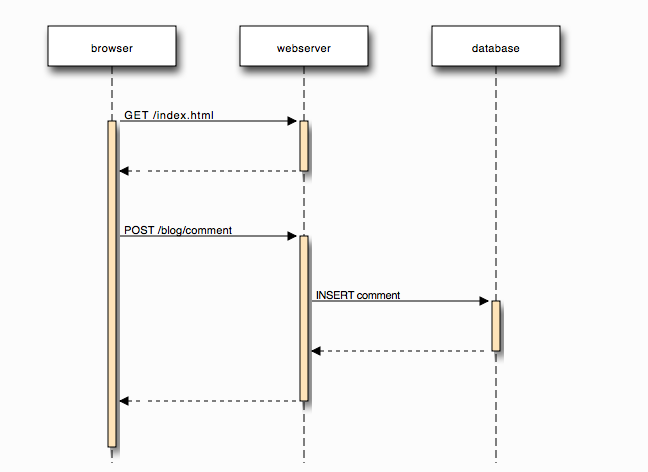
テキストで書くだけで以下のようなブロック図等が生成できる
blockdiag {
   A -> B -> C;
   A -> E -> F;
}
seqdiag {
    browser  -> webserver [label = "GET /index.html"];
    browser <-- webserver;
    browser  -> webserver [label = "POST /blog/comment"];
                webserver  -> database [label = "INSERT comment"];
                webserver <-- database;
    browser <-- webserver;
}
conf
pip でインストールを行う。
ここでは blockdiag系 を一括でインストールする。
$ pip install sphinxcontrib-actdiag sphinxcontrib-blockdiag sphinxcontrib-nwdiag sphinxcontrib-seqdiag
extensions への追加。
extensions = [
    'sphinxcontrib.blockdiag',
    'sphinxcontrib.seqdiag',
    'sphinxcontrib.actdiag',
    'sphinxcontrib.nwdiag',
    'sphinxcontrib.rackdiag',
    'sphinxcontrib.packetdiag',
]
blockdiag の設定を追加。
blockdiag_html_image_format = 'SVG'
seqdiag_html_image_format = 'SVG'
actdiag_html_image_format = 'SVG'
nwdiag_html_image_format = 'SVG'
rackiag_html_image_format = 'SVG'
packetdiag_html_image_format = 'SVG'
画像だと日本語を仕様する時にフォントの設定等が面倒なのでSVGがオススメ。
これで使用可能になる。
記述方法
実際のドキュメントでは以下のように直接書く。
.. blockdiag::

    blockdiag {
       A -> B -> C;
       A -> E -> F;
    }
以下のように別ファイルに書いて呼び出す事も可能
.. blockdiag:: diagrams/simple.diag
blockdiag {
   A -> B -> C;
   A -> E -> F;
}
詳細な記述方法については以下を参照すること。