目次
- はじめに
- Vertex AI Pipelinesとは
- Vertex AI Pipelinesのサンプル構成
- imageのtagを動的に指定する
- まとめ
はじめに
yamayafumiteru です。
同じチームのsasanoさんがVertexAI Pipelinesの構築記事を書きました。
複数人で作業している際に、Vertex AI Pipelinesでtest環境と本番環境で使うimageを切り分けたいユースケースに遭遇しました。
今回は動的にimageのtagを切り替える方法を書いていこうと思います。
この記事で触れないこと
- Vertex AI Pipelinesへ構成ファイルのsubmit
- Kubeflow Pipelines SDK の解説
Vertex AI Pipelinesとは
Vertex AI Pipelines は、Google Cloud Platform で提供されるマシン ラーニング パイプライン サービスです。
データの準備、モデルのトレーニング、モデルの評価、モデルのデプロイ、モデルの監視などのタスクを自動化できるパイプラインを作成できます。Kubernetes 上で実行されるため、スケーラブルで堅牢なパイプラインを作成できます。
公式から引用)
Kubeflow Pipelines SDK v1.8.9 以降または TensorFlow Extended v0.30.0 以降を使用して構築されたパイプラインを実行できます。
Vertex AI Pipelinesのサンプル構成
ファイル構成のイメージを記載します。
vertex-ai-pipelines
├── components
│   ├── get_data.yaml
│   ├── preprocess.yaml
│   ├── train.yaml
│   ├── evaluate.yaml
│   └── upload_model.yaml
├── Dockerfile
├── submit.py
└── pipeline.py
以下にサンプルコードを記載します。
# pipeline.py
import os
from kfp import components
from kfp.v2 import compiler, dsl

@dsl.pipeline(
    name="vertexai-pipeline-image-version-switch",
    description="An example pipeline using Vertex AI Pipelines",
)
def pipeline():
    get_data_op = components.load_component_from_file("./components/get_data.yml")
    get_data_task = get_data_op()

    preprocess_op = components.load_component_from_file("./components/preprocess.yml")
    preprocess_task = preprocess_op(dataset=get_data_task.outputs["dataset"])

    train_op = components.load_component_from_file("./components/train.yml")
    train_task = train_op(dataset=preprocess_task.outputs["preprocess_dataset"])

    evaluate...

if __name__ == "__main__":
    compiler.Compiler().compile(
        pipeline_func=pipeline,
        package_path="vertexai-pipeline-image-version-switch.json",
    )
# get_data.yml
name: get_data
description: Get raw data
outputs:
  - {name: dataset, type: Dataset}
implementation:
  container:
    image: gcr.io/hogehoge/vertexai-pipeline-image-version-switch
    # get_data.pyにデータ取得する任意の処理を追加する。
    command: ["python", "get_data.py"]
imageのtagを動的に指定する
pipeline_image_tagとして環境変数を設定します。
(本来であればconfig等に切り出してますが、今回の記事では直接記述してますmm)
# pipeline.py
import os
from kfp import components
from kfp.v2 import compiler, dsl

pipeline_image_tag = os.environ.get("PIPELINE_IMAGE_TAG", "test")

@dsl.pipeline(
    name="vertexai-pipeline-image-version-switch",
    description="An example pipeline using Vertex AI Pipelines",
)
def pipeline():
    get_data_op = components.load_component_from_file("./components/get_data.yml")
    get_data_op.component_spec.implementation.container.image += (
        ":" + pipeline_image_tag
    )
    get_data_task = get_data_op()
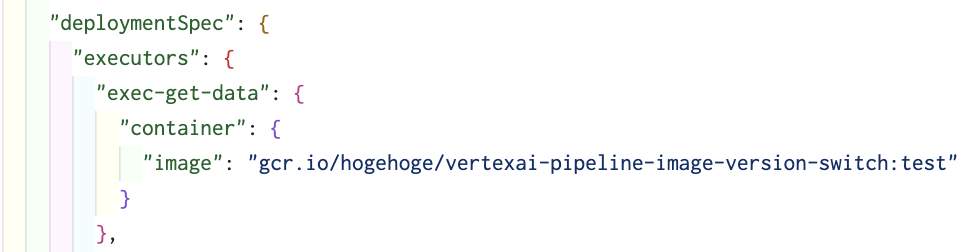
pipeline.pyを実行してcompileするとjsonのimage_tagにデフォルト引数で設定したtestが指定されていることがわかります。
Github Actionsを使用する場合は、${{ github.sha }}でcommit hashをtagとして指定してます。
name: Vertex AI Pipeline Image Version Switch

on:
  push:
    branches:
      - main

jobs:
  build:
    runs-on: ubuntu-latest

    steps:
      - name: Checkout repository
        uses: actions/checkout@v3

      - name: Set up Python
        uses: actions/setup-python@v2
        with:
          python-version: 3.x

      - name: Install dependencies
        run: |
          python -m pip install --upgrade pip
          pip install poetry
          poetry install

      - name: make JSON file
        run: |
          poetry run python pipeline.py
          cat ./vertexai-pipeline-image-version-switch.json
        env:
          PIPELINE_IMAGE_TAG: ${{ github.sha }}
まとめ
Vertex AI Pipelinesを用いて、テスト環境と本番環境で使用するimageを動的に切り分ける手法について説明しました。imageを切り替えたいというニーズがある方のご参考になれば幸いです。
本記事よりもより良い方法がありましたら、是非コメントください。