riverpodに挑戦
Flutterは少し勉強して、アプリを1つ出したレベルです。最近はPM業が忙しくFlutterを自分でコーディングすることがなかったので、公開したアプリもなにもしてませんでした。
そこでriverpodを使った内容でバージョンアップをしてみようと思い、サンプルを作成しました。
わかりやすいように、1ファイルで作ったので、ちゃんとやる時は、モデルは別ファイルにしましょう。
作成するアプリ
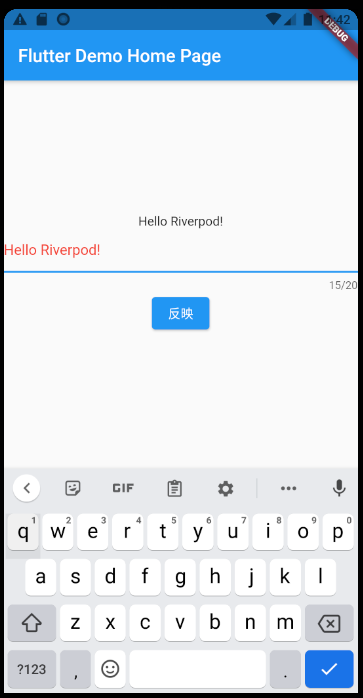
テキストとテキストの入力フィールド、ボタンが有るだけです。
入力フィールドになにかテキストを入力して、ボタンを押すとテキストに反映されます。
入力文字数は、20文字に制限していますが、特に意味はないです。

pubspec.yaml
dependencies:
  flutter:
    sdk: flutter
  flutter_riverpod: ^0.14.0+3
flutter_riverpod: ^0.14.0+3を追記してください。
main.dart
import 'dart:developer';

import 'package:flutter/material.dart';
import 'package:flutter/services.dart';
import 'package:flutter_riverpod/flutter_riverpod.dart';

final inputTextProvider = StateNotifierProvider<DisplayTextViewModel, String>(
  (ref) => DisplayTextViewModel("Hello"),
);

void main() {
  runApp(
    ProviderScope(
      child: MyApp(),
    ),
  );
}

class MyApp extends StatelessWidget {
  // This widget is the root of your application.
  @override
  Widget build(BuildContext context) {
    return MaterialApp(
      title: 'Flutter Demo',
      theme: ThemeData(
        primarySwatch: Colors.blue,
      ),
      home: MyHomePage(title: 'Flutter Demo Home Page'),
    );
  }
}

class MyHomePage extends StatelessWidget {
  MyHomePage({Key? key, required this.title}) : super(key: key);

  final String title;
  var _userController = TextEditingController();

  @override
  Widget build(BuildContext context) {
    // final inputText = watch(inputTextProvider);
    return Scaffold(
      appBar: AppBar(
        title: Text(title),
      ),
      body: Center(
        child: Column(
          mainAxisAlignment: MainAxisAlignment.center,
          children: <Widget>[
            Consumer(
              builder: (context, watch, child) {
                final inputText = watch(inputTextProvider);
                return Text(inputText);
              },
            ),
            new TextField(
              maxLengthEnforcement: MaxLengthEnforcement.enforced,
              enabled: true,
              maxLength: 10,
              style: TextStyle(color: Colors.red),
              obscureText: false,
              maxLines: 1,
              controller: _userController,
            ),
            ElevatedButton(
              onPressed: () {
                context
                    .read(inputTextProvider.notifier)
                    .updateDisplayText(_userController.text);
              },
              child: Text(
                "反映",
              ),
            ),
          ],
        ),
      ),
    );
  }
}

class DisplayTextViewModel extends StateNotifier<String> {
  DisplayTextViewModel(String state) : super(state);

  void updateDisplayText(String displayText) {
    state = displayText;
  }
}
解説
import
import 'package:flutter_riverpod/flutter_riverpod.dart';
今回使うriverpodのライブラリは、Flutter用のものを使用するので、flutter_riverpod.dartをimportします。
StateNotifierProvider
final inputTextProvider = StateNotifierProvider<DisplayTextViewModel, String>(
  (ref) => DisplayTextViewModel("Hello"),
);
グローバルとして、StateNotifierProviderを宣言します。
inputTextProviderという変数に、StateNotifierProviderをセットします。
StateNotifierProviderの型は、としています。1つ目はモデル、2つ目は今回はStringとしています。
2つ目は本当は、stateが良いのですが、freezedを使うので、今回は簡単にするためにStringとしてます。
ProviderScope
void main() {
  runApp(
    ProviderScope(
      child: MyApp(),
    ),
  );
}
Providerのスコープを定義します。
ここでは全体を範囲としています。
Consumer
            Consumer(
              builder: (context, watch, child) {
                final inputText = watch(inputTextProvider);
                return Text(inputText);
              },
            ),
値が変更される箇所をComsumerで囲みます。
watch(inputTextProvider)とすることで、inputTextProviderを監視します。
Stringで定義したので、inputTextには、Stringが入ります。
read(inputTextProvider.notifier)
            ElevatedButton(
              onPressed: () {
                context
                    .read(inputTextProvider.notifier)
                    .updateDisplayText(_userController.text);
              },
.read(inputTextProvider.notifier)は、呪文として覚えましょう。
inputTextProviderのupdateDisplayTextを実行します。
ここでは、テキストフィールドに入力されたテキストを、引数で渡しています。
モデル
class DisplayTextViewModel extends StateNotifier<String> {
  DisplayTextViewModel(String state) : super(state);

  void updateDisplayText(String displayText) {
    state = displayText;
  }
}
StateNotifierを使って、モデルクラスを作成しています。
updateDisplayTextを呼ばれたら、引数の値でstateを更新します。
stateの更新があると、画面に更新が通知されて、Consumerで囲った部分がリビルドされて、値が更新されます。
あとがき
stateを更新するというところに気づかず、うまく行かなかったです。
あくまでも監視しているStateNotifierのstateが更新されるかがポイントでした。
分かる人からすると、きれいなサンプルではないですが、ネットで調べて良いのが見つからなかったので、誰かの足しになればと思って投稿しました。
main.dartとpubspec.yamlだけでできるサンプルなので、riverpodの取っ掛かりになればと思います。
100%理解しているわけではないですし、プログラマーでもないので、間違っていたらごめんなさい。