PyQtでwidgetを作成してそれをQt designer上で利用する方法のメモです。機能としてsignal,slotの実装も含みます。例ではQt4を使用していますがQt5でも基本的には同じです(いくつかの改変は必要ですが)。ネット上で検索したのですがなかなかヒットしませんでしたので、いくらかは参考になると思います。用語については、私が勝手に命名したものもありますので、Qtの規則から外れているものについてはご指摘があれば有り難いです。
準備するもの
1.PyQtで動作するwidget.
2.プラグインを定義するためのpythonファイル
この2つだけです。
widgetの作製
まずPyQtで動作するテスト用widgetをdesignerで作成します。
外観は

のようになります。
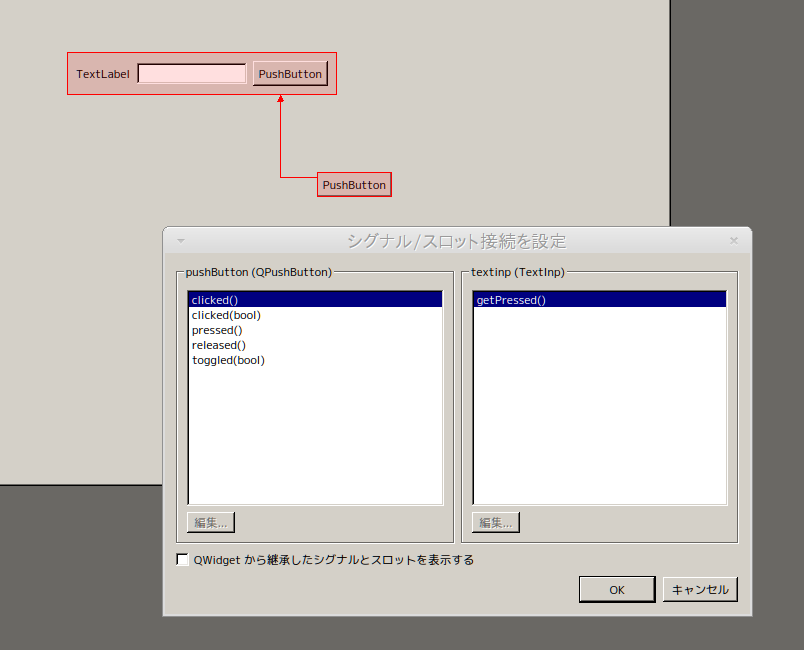
QLavel,QTextInput,QPushbuttonがQHBoxLayoutでレイアウトされています。object nameはTextInpとしました。QPushButtonのclicked signalはQTextInputのclearとFormのgetPressed slotにコネクトしました。getPressed slotはdesigner上で作製しました。これをui_textinp.uiファイルにセーブします。
<?xml version="1.0" encoding="UTF-8"?>
<ui version="4.0">
 <class>TextInp</class>
 <widget class="QWidget" name="TextInp">
  <property name="geometry">
   <rect>
    <x>0</x>
    <y>0</y>
    <width>400</width>
    <height>62</height>
   </rect>
  </property>
  <property name="windowTitle">
   <string>Form</string>
  </property>
  <widget class="QWidget" name="horizontalLayoutWidget">
   <property name="geometry">
    <rect>
     <x>0</x>
     <y>0</y>
     <width>391</width>
     <height>61</height>
    </rect>
   </property>
   <layout class="QHBoxLayout" name="horizontalLayout">
    <item>
     <widget class="QLabel" name="label">
      <property name="text">
       <string>TextLabel</string>
      </property>
     </widget>
    </item>
    <item>
     <widget class="QLineEdit" name="lineEdit"/>
    </item>
    <item>
     <widget class="QPushButton" name="pushButton">
      <property name="text">
       <string>PushButton</string>
      </property>
     </widget>
    </item>
   </layout>
  </widget>
 </widget>
 <resources/>
 <connections>
  <connection>
   <sender>pushButton</sender>
   <signal>clicked()</signal>
   <receiver>lineEdit</receiver>
   <slot>clear()</slot>
   <hints>
    <hint type="sourcelabel">
     <x>358</x>
     <y>31</y>
    </hint>
    <hint type="destinationlabel">
     <x>238</x>
     <y>32</y>
    </hint>
   </hints>
  </connection>
  <connection>
   <sender>pushButton</sender>
   <signal>clicked()</signal>
   <receiver>TextInp</receiver>
   <slot>getPressed()</slot>
   <hints>
    <hint type="sourcelabel">
     <x>383</x>
     <y>31</y>
    </hint>
    <hint type="destinationlabel">
     <x>394</x>
     <y>51</y>
    </hint>
   </hints>
  </connection>
 </connections>
 <slots>
  <slot>getPressed()</slot>
 </slots>
</ui>
このuiファイルをpyuic4を使って
$ pyuic4 ui_textinp.ui > ui_textinp.py
に変換します。生成されたpythonファイルには Ui_TextInpという名前のクラスが生成されます。この名前は先程のオブジェクト名のTextInpに由来します。
次にこのwidgetが単独で動作するアプリケーションを作製します。 textinp.pyという名前で
# !/usr/bin/env python

import PyQt4
from PyQt4 import QtCore,QtGui
from PyQt4.QtGui import QApplication,QWidget,QVBoxLayout

__version__ = '0.0.1'

from ui_textinp import Ui_TextInp
try:
    _fromUtf8 = QtCore.QString.fromUtf8
except AttributeError:
    _fromUtf8 = lambda s: s

class TextInp(QWidget, Ui_TextInp):
    def __init__(self, parent=None):
        super(TextInp, self).__init__(parent)
        self.setupUi(self)
        vBox = QVBoxLayout()
        vBox.addWidget(self.horizontalLayoutWidget)
        self.setLayout(vBox)
    @QtCore.pyqtSlot()
    def getPressed(self):
        print "PRESSED"
if __name__ == '__main__':
    app = QApplication(sys.argv)
    textinp = TextInp()
    textinp.show()
    sys.exit(app.exec_())
解説はあまり要らないと思います。TextInp クラスではUi_TextInpを継承します。vBoxが無いとウィンドウサイズを変えたときにサイズが追従しません。slotの実装も見たとうりです。QPushButtonがクリックされるとgetPressed関数が呼ばれて標準出力にPRSSEDの文字列が表示されます。
実行すると
$ python textinp.py
で上図のようなwidgetが表示され、textに入力された文字列はボタンを押すとクリアされ、標準出力にPRESSEDが表示されると思います。
plugin定義ファイルの作製
さて、これでPyQtで実行できるwidgetは作製されました。これをdesignerの部品として取り込むためにはもう一つのpython fileが必要です。これをtextinpplugin.pyとします。 以下のようなファイルです。
# !/usr/bin/env python

"""
polygonwidgetplugin.py

A polygon widget custom widget plugin for Qt Designer.

Copyright (C) 2006 David Boddie <david@boddie.org.uk>
Copyright (C) 2005-2006 Trolltech ASA. All rights reserved.

This program is free software; you can redistribute it and/or modify
it under the terms of the GNU General Public License as published by
the Free Software Foundation; either version 2 of the License, or
(at your option) any later version.

This program is distributed in the hope that it will be useful,
but WITHOUT ANY WARRANTY; without even the implied warranty of
MERCHANTABILITY or FITNESS FOR A PARTICULAR PURPOSE.  See the
GNU General Public License for more details.

You should have received a copy of the GNU General Public License
along with this program; if not, write to the Free Software
Foundation, Inc., 51 Franklin St, Fifth Floor, Boston, MA  02110-1301  USA
"""

from PyQt4 import QtGui, QtDesigner
from textinp import TextInp


class TextInpPlugin(QtDesigner.QPyDesignerCustomWidgetPlugin):

    """TextInpPlugin(QtDesigner.QPyDesignerCustomWidgetPlugin)
    Provides a Python custom plugin for Qt Designer by implementing the
    QDesignerCustomWidgetPlugin via a PyQt-specific custom plugin class.
    """

    # The __init__() method is only used to set up the plugin and define its
    # initialized variable.
    def __init__(self, parent=None):

        super(TextInpPlugin, self).__init__(parent)

        self.initialized = False

    # The initialize() and isInitialized() methods allow the plugin to set up
    # any required resources, ensuring that this can only happen once for each
    # plugin.
    def initialize(self, core):

        if self.initialized:
            return

        self.initialized = True

    def isInitialized(self):

        return self.initialized

    # This factory method creates new instances of our custom widget with the
    # appropriate parent.
    def createWidget(self, parent):
        return TextInp(parent)

    # This method returns the name of the custom widget class that is provided
    # by this plugin.
    def name(self):
        return "TextInp"

    # Returns the name of the group in Qt Designer's widget box that this
    # widget belongs to.
    def group(self):
        return "Example for Qiita"

    # Returns the icon used to represent the custom widget in Qt Designer's
    # widget box.
    def icon(self):
        return QtGui.QIcon(_logo_pixmap)

    # Returns a short description of the custom widget for use in a tool tip.
    def toolTip(self):
        return ""

    # Returns a short description of the custom widget for use in a "What's
    # This?" help message for the widget.
    def whatsThis(self):
        return ""

    # Returns True if the custom widget acts as a container for other widgets;
    # otherwise returns False. Note that plugins for custom containers also
    # need to provide an implementation of the QDesignerContainerExtension
    # interface if they need to add custom editing support to Qt Designer.
    def isContainer(self):
        return False

    # Returns an XML description of a custom widget instance that describes
    # default values for its properties. Each custom widget created by this
    # plugin will be configured using this description.
    def domXml(self):
        return '<widget class="TextInp" name="textinp" />\n'

    # Returns the module containing the custom widget class. It may include
    # a module path.
    def includeFile(self):
        return "textinp"


# Define the image used for the icon.
_logo_16x16_xpm = [
"16 16 3 1",
"a c #008000",
"# c #0080ff",
". c #ffffff",
"................",
"................",
"..#############.",
"..#############.",
"..#############.",
"..#############.",
"..#############.",
"..#############.",
"................",
"................",
"..aaaaaaaaaaaaa.",
"..aaaaaaaaaaaaa.",
"..aaaaaaaaaaaaa.",
"..aaaaaaaaaaaaa.",
"..aaaaaaaaaaaaa.",
"................"]

_logo_pixmap = QtGui.QPixmap(_logo_16x16_xpm)
textinpやTextInpのところを書き換えれば、応用できると思います。def groupで返される文字列はdesignerのwidgetグループになります。また最後の_logo_16x16_xpmはxpm形式のアイコンです。
これまでに、
textinp.py
ui_textinp.py
textinpplugin.py
の3つのファイルができました。
designerの起動
これらのうちwidget関係のファイルをwidgets,plugin関係のファイルをpythonというサブディレクトリに移動し、環境変数 PYQTDESIGNERPATH,PYTHONPATHを定義して、designerを起動します。
$ mv  textinp.py ui_textinp.py widgets
$ mv  textinpplugin.py python
$ export PYQTDESIGNERPATH=python
$ export PYTHONPATH=widgets
$ designer
designerのウィジェットボックスに下図のようなウィジェットが見えるはずです。
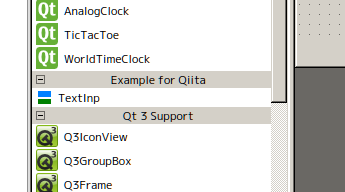
おめでとうございます。これで、あなたが製作したウィジェットはdesigner上で他のウィジェット同様にdesigner上で使用できるようになりました。
また、上で定義したgetPressedスロットもそのままdesigner上のsignal/slotエディタでも有効です。
signal, property
signalの実装
おっと、slotの実装はしましたが、signalがまだでしたね。先程のtextinp.pyに加えます。getPressedが呼ばれたときにsignalを生成(emit)するように書きます。 class定義の最初にQtCore.pyqtSignalを書いて、呼び出したいときにoutText.emit("TXT")を呼びます。
class TextInp(QWidget, Ui_TextInp):
    outText=QtCore.pyqtSignal(str)
    def __init__(self, parent=None):
        super(TextInp, self).__init__(parent)
        self.setupUi(self)
        vBox = QVBoxLayout()
        vBox.addWidget(self.horizontalLayoutWidget)
        self.setLayout(vBox)
        self._label_text="Label text"
        self.label.setText(self._label_text)
    @QtCore.pyqtSlot()
    def getPressed(self):
        self.outText.emit(self.lineEdit.text())
        print self.lineEdit.text()
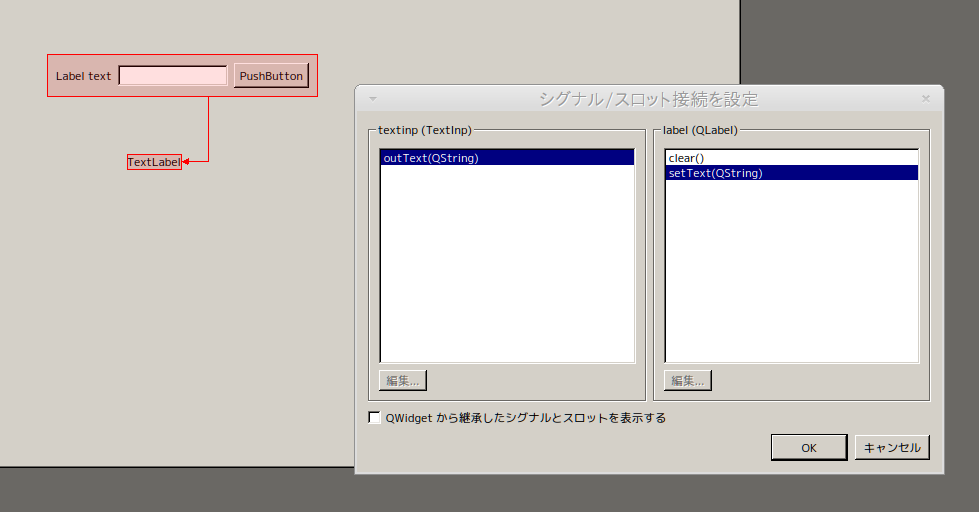
designerでsignalが実装されていることが確認できます。
propertyの実装
propertyを実装したtextinp.pyです。
class TextInp(QWidget, Ui_TextInp):
    outText=QtCore.pyqtSignal(str)
    def __init__(self, parent=None):
        super(TextInp, self).__init__(parent)
        self.setupUi(self)
        vBox = QVBoxLayout()
        vBox.addWidget(self.horizontalLayoutWidget)
        self.setLayout(vBox)
        self._label_text="Label text"
        self.label.setText(self._label_text)
    @QtCore.pyqtSlot()
    def getPressed(self):
        self.outText.emit(self.lineEdit.text())
        print self.lineEdit.text()
    def setLabelText(self,inptxt):
        self._label_text=inptxt
        self.label.setText(self._label_text)
    def getLabelText(self):
        return self._label_text
    label_text=QtCore.pyqtProperty(str, getLabelText, setLabelText)
setLabelTextとgetLabelText関数をQtCore.pyqtPropertyで定義します。designer上では
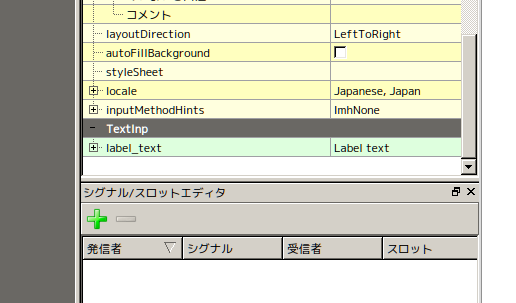
のようにlabel_textが指定できるようになります。