kintone と Amazon Polly の連携
今週は、AWSディベロッパーの祭典**「AWS re:Invent 2016」**が開催されています。今年はkintoneもブース出展がありますが、現地時間の11/30と12/1はそれぞれKeynoteが行われ、AWSの新サービスが色々と発表される非常にエキサイティングなイベントです。
今朝のKeynoteでも幾つかの新サービスの発表がありました。ということで、「kintone Advent Calendar 2016」の初日は、そんなホットなAWSの新サービスの連携をお届けしたいと思います。
kintoneと相性が良さそうなサービスが幾つかリリースされましたが、今回はまず「Amazon Polly」と呼ばれる**「文章から音声を作り出す」**サービスとの連携をやってみました。Amazon Pollyに関する詳細はこちらのブログ等をご覧頂くのが良いと思います。
kintone と Amazon Polly の連携
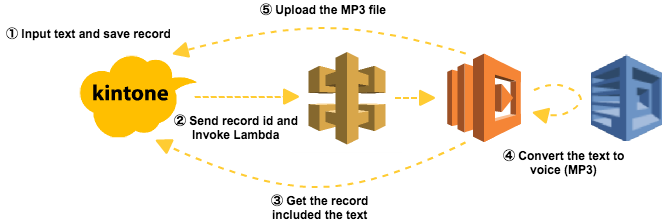
様々なユースケースが想定されていますが、今回はシンプルにMP3ファイルを生成するkintoneアプリをAmazon Pollyを使って作成したいと思います。構成は次のようになります。
Amazon Pollyとkintone連携の設定
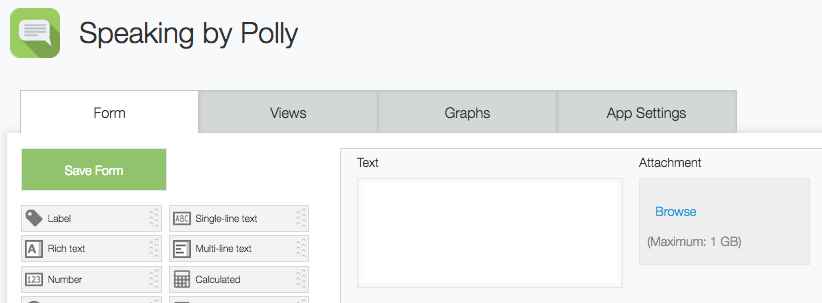
kintoneアプリ - 「Speak by Polly」(読み上げアプリ)
次のようなフィールドのkintoneアプリを準備します。
| 項目名・フィールドコード | 内容 | フィールドタイプ |
|---|---|---|
| Text | 音声に変換したい文字列(文章)を入力するためのフィールドです。 | 文字列1行 |
| Attachment | 文字列から変換された音声(MP3)ファイルを保存するためのフィールドです。 | 添付ファイル |
AWS Lambda
こちらが今回のメインになりますが、大まかには次のような内容です。
- Amazon API Gateway経由で受け取ったkintoneのレコードIDから音声に変換したい文字列(Text)を取得する
- 取得したレコードIDから音声に変換したい文字列(Text)を取得する
- 取得した文字列をAmazon PollyのAPIにかけて、音声(MP3)ファイルを生成する
- 生成したMP3ファイルをkintoneにアップロードする
これらの動きをAPI Gateway経由で実行できるようにします。
Lambda関数コーディング前準備
- 今回、kintoneへのREST APIアクセス用にrequestsモジュールを利用しますので、事前にインストールしておいてください。
- また、作業フォルダを今回次のように決めて作業を進めていきます。
$ mkdir workspace
$ cd workspace
Lambda関数のPythonコード
{domain}、{app. id}、{api token}、{access key}、{secret key} は適宜書き換えてください。今回はLambdaからAmazon PollyへのアクセスについてはAmazon Pollyが利用可能なアクセスキー、シークレットキーを持つユーザーの認証情報を使うことにします(本当はIAMポリシーやLambda環境変数でしっかり対応すべきところですが、手抜きです)。
こちらをlambda_function.pyというファイル名でworkspaceフォルダに保存します。
from __future__ import print_function

import json
from boto3 import Session
from botocore.exceptions import BotoCoreError, ClientError
from contextlib import closing
import os
import sys
import subprocess
from tempfile import gettempdir
import requests, urllib2

# parameters of kintone
KINTONE_DOMAIN = "{domain}"
BASE_URL = "https://"+ KINTONE_DOMAIN
APP_ID = "{app. id}"
API_TOKEN = "{api token}"

# parameters of AWS
ACCESS_KEY = '{access key}'
SECRET_KEY = '{secret key}'
REGION = 'us-east-1'

# file name attaced to kintone
MP3_FILE_NAME = 'speech.mp3'

print('Loading function')

# get a kintone record
def getRecord(id):
    query = 'app='+APP_ID+'&id='+id
    url = BASE_URL + "/k/v1/record.json?" + query
    headers = {"X-Cybozu-API-Token": API_TOKEN}
    # http request with requests
    res = requests.get(url, headers=headers, data={})
    print(res.text, res.status_code)
    return {"res":json.loads(res.text), "code":res.status_code}

# upload the MP3 file to kintone
def uploadMP3File(file):
    fileUrl = BASE_URL + "/k/v1/file.json"
    fileHeaders = {"X-Cybozu-API-Token": API_TOKEN}
    files = {'file': (MP3_FILE_NAME, open(file, 'rb'), 'audio/mp3', {'Expires': '0'})}
    res = requests.post(fileUrl, headers=fileHeaders, files=files)
    print(res.text, res.status_code)
    fileKey = json.loads(res.text)['fileKey']
    return fileKey

# update the kintone record by a fileKey
def updateRecordForFile(recordId, fileKey):
    fileKeys = [{"fileKey":fileKey}]
    record = {'Attachment':{'value':fileKeys}}
    request = {'app':APP_ID,'id': recordId,'record':record}
    requestJson = json.dumps(request)
    url = BASE_URL + "/k/v1/record.json"
    headers = {"X-Cybozu-API-Token": API_TOKEN, "Content-Type" : "application/json"}
    res = requests.put(url, headers=headers, data=requestJson)
    print(res.text, res.status_code)
    return {"res":json.loads(res.text), "code":res.status_code}

# build the MP3 file from text with Amazon Polly API
def buildMP3File(text):
    # Create a client using the credentials and region defined in the [adminuser]
    # section of the AWS credentials file (~/.aws/credentials).
    #session = Session(profile_name="adminuser")
    session = Session(aws_access_key_id=ACCESS_KEY,
                      aws_secret_access_key=SECRET_KEY,
                      region_name=REGION)
    polly = session.client("polly")

    try:
        # Request speech synthesis
        response = polly.synthesize_speech(Text=text, OutputFormat="mp3",
                                            VoiceId="Joey")
    except (BotoCoreError, ClientError) as error:
        # The service returned an error, exit gracefully
        print(error)
        sys.exit(-1)

    # Access the audio stream from the response
    if "AudioStream" in response:
        # Note: Closing the stream is important as the service throttles on the
        # number of parallel connections. Here we are using contextlib.closing to
        # ensure the close method of the stream object will be called automatically
        # at the end of the with statement's scope.
        with closing(response["AudioStream"]) as stream:
            output = os.path.join(gettempdir(), MP3_FILE_NAME)
            try:
                # Open a file for writing the output as a binary stream
                with open(output, "wb") as file:
                    file.write(stream.read())
            except IOError as error:
                # Could not write to file, exit gracefully
                print(error)
                sys.exit(-1)

    else:
        # The response didn't contain audio data, exit gracefully
        print("Could not stream audio")
        sys.exit(-1)
    return output

# Lambda function
def lambda_handler(event, context):
    recordId = event['params']['querystring']['id'] # obtain the record id of kintone via Amazon API Gateway
    obj = getRecord(recordId)
    text = obj['res']['record']['Text']['value'] # obtain the text to convert
    if(len(text) is 0):
        text = 'Text field is empty.'
    mp3 = buildMP3File(text) # convert text to MP3-voice
    fileKey = uploadMP3File(mp3) # upload the MP3 file to kintone and obtain the fileKey
    updateRecordForFile(recordId, fileKey) # update the kintone record with attachment of the MP3 file
    return 'Process is completed.'
ファイルを保存したら、workspaceフォルダにboto3とrequestsをインストールし、zipコマンドを使ってworkspace内のすべてのファイルを圧縮します。圧縮後のファイル名は今回upload.zipとしておきます。
$ pip install boto3 -t .
$ pip install requests -t .
$ zip -r upload.zip *
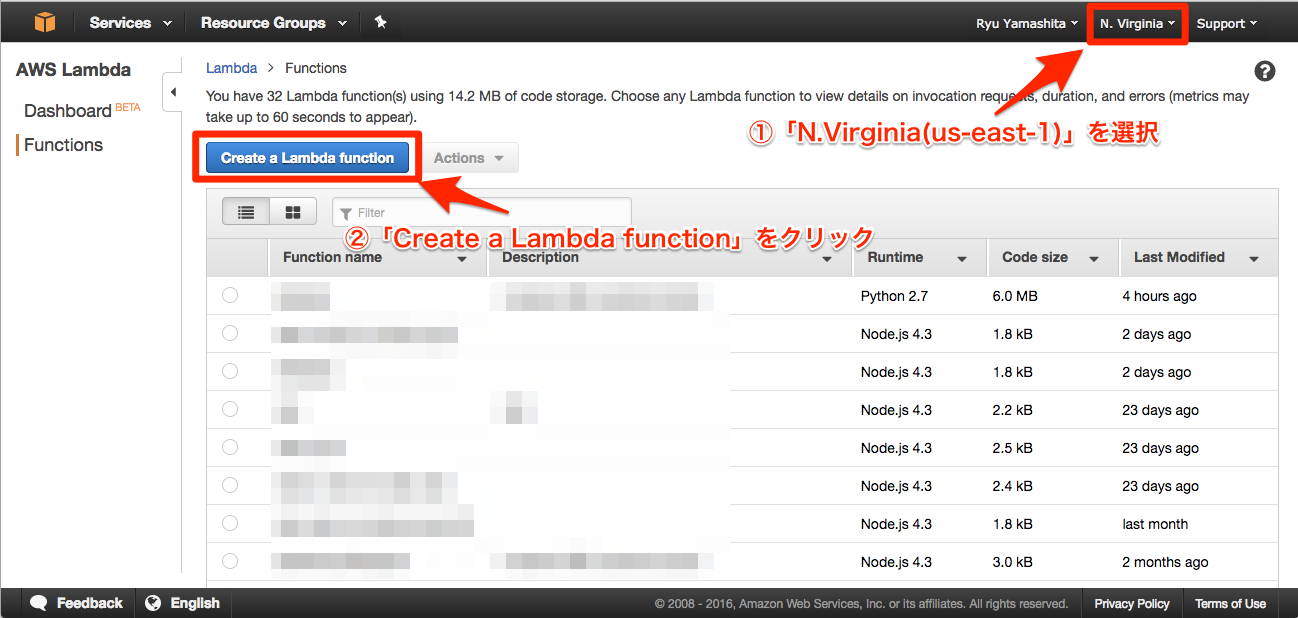
Lambda関数のコンソール設定(コード以外)
「Lambda > Functions」から「Create a Lambda function」をクリックして設定開始です。AWSのリージョンは**「バージニア(us-east-1)」**で進めていきます。
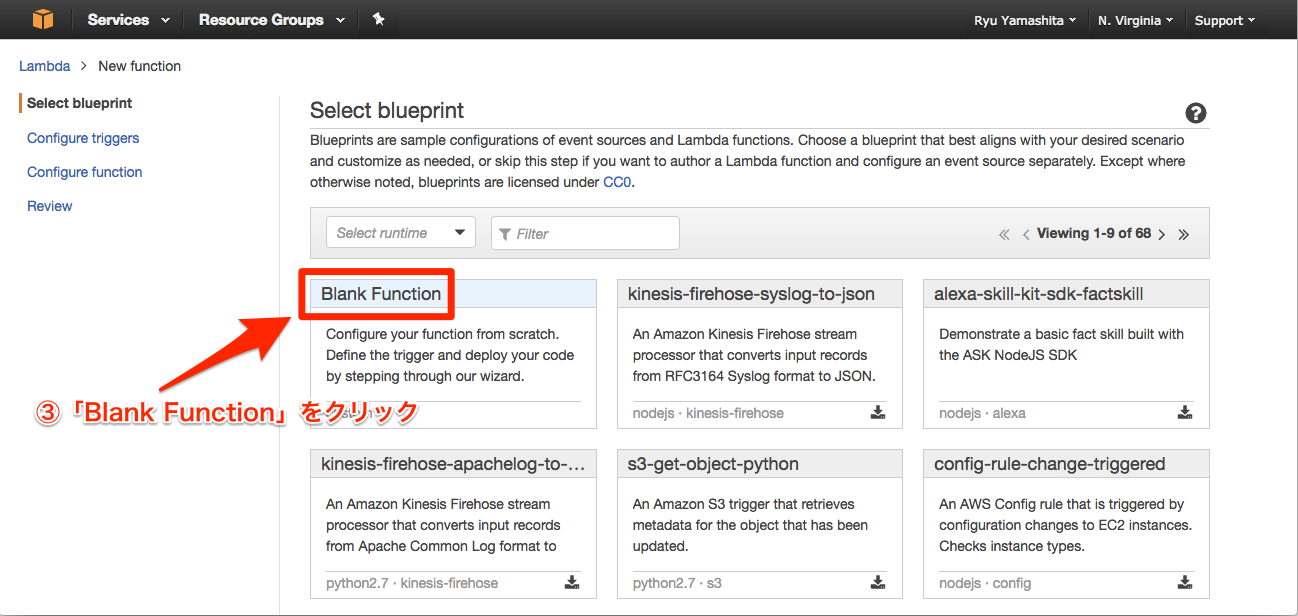
今回のLambda関数は先程のパッケージングしたものを使うので、「Blank Function」を選択して、設定を進めます。
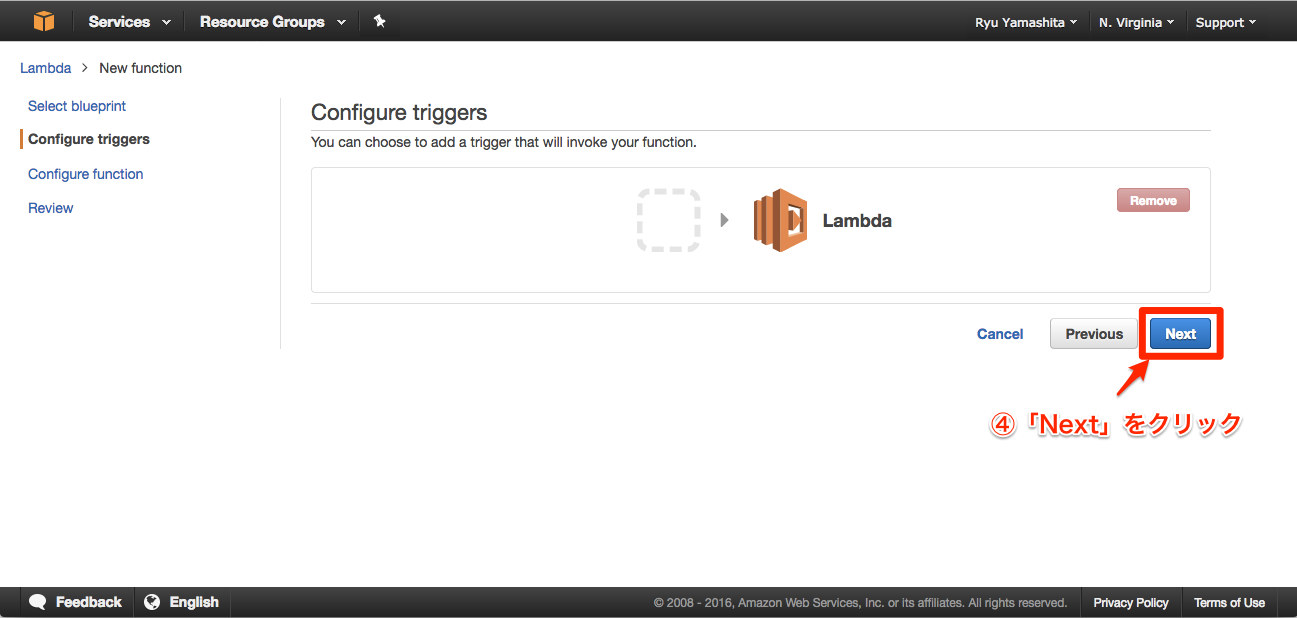
ここはそのまま「Next」をクリックして先に進みます。
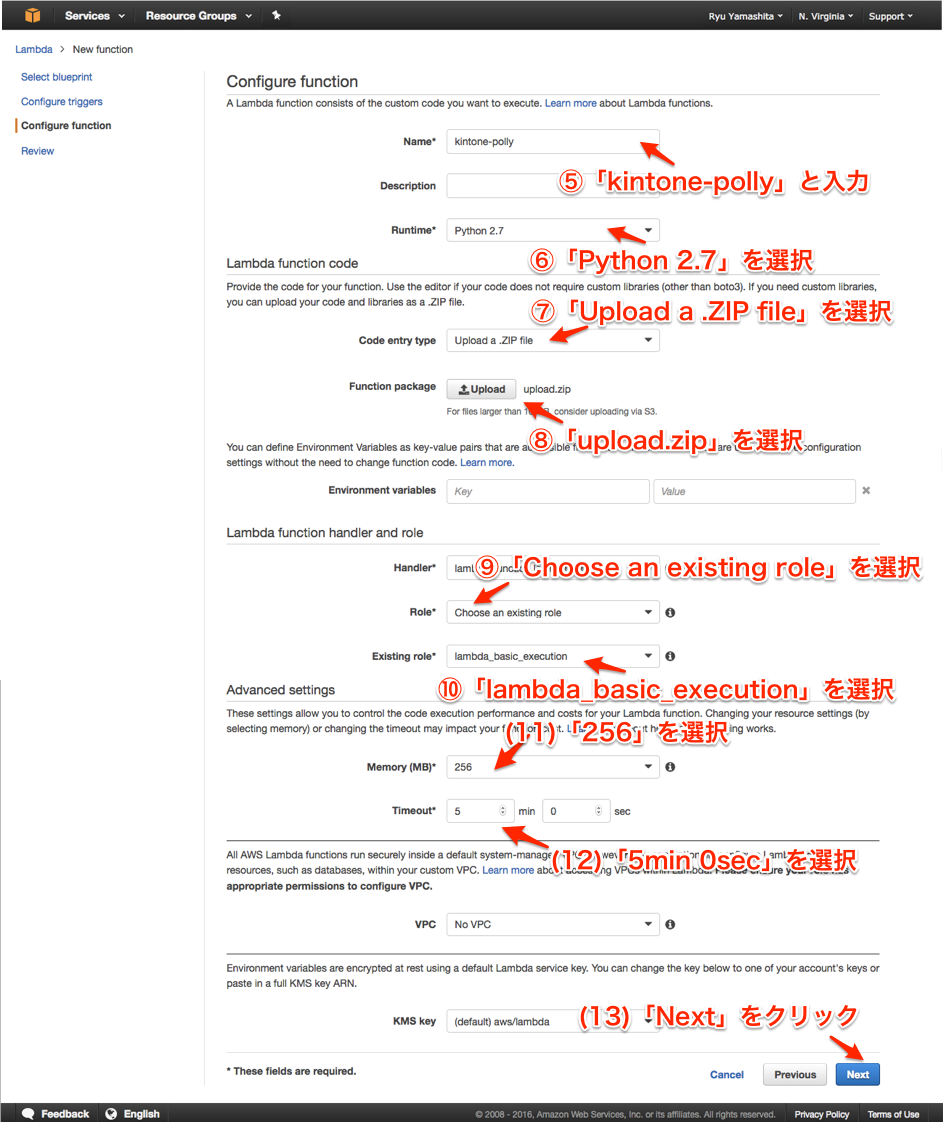
ここでメインの設定画面ですが、次のように設定します。設定が一通り出来たら、「Next」で先に進みましょう。
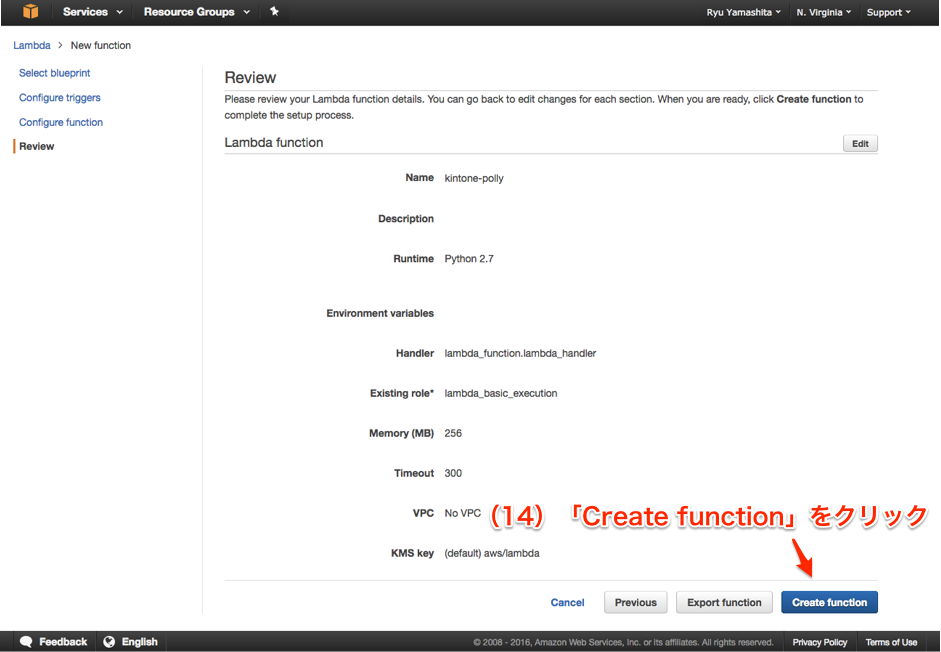
「Next」をクリックして進んでくると、設定のレビュー画面が出てきますので、「Create function」をクリックして設定を終えます。
Amazon API Gateway
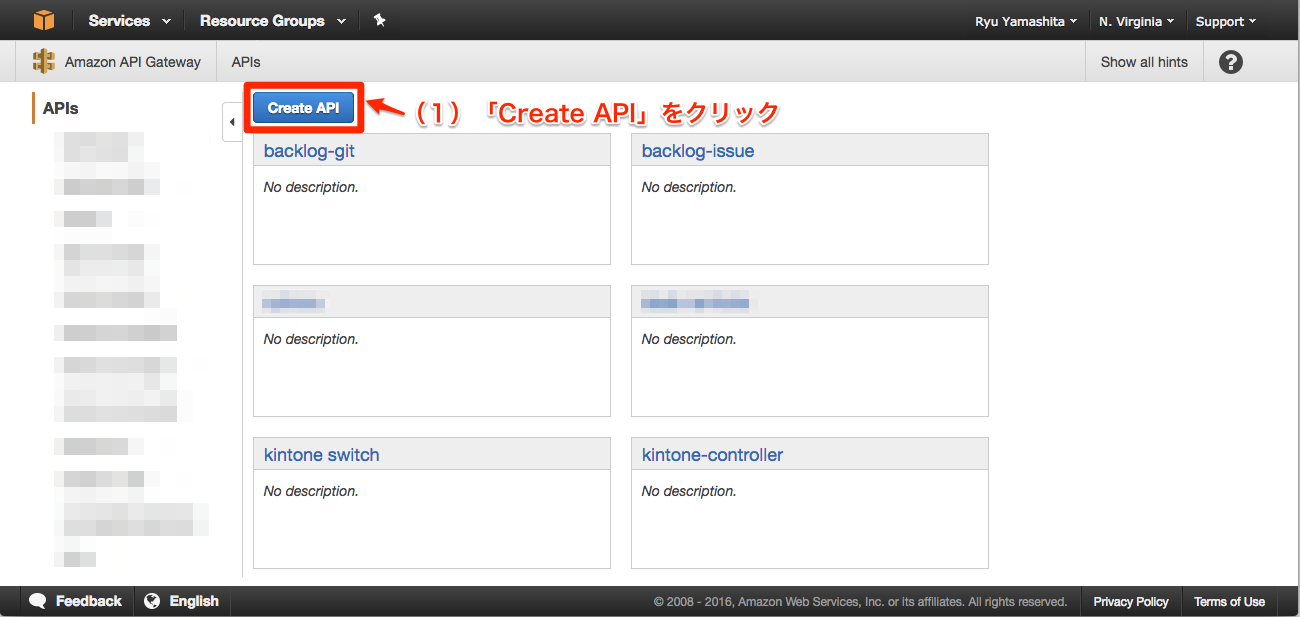
kintoneのレコードIDを流し込みつつ、先に設定したLambda関数を起動するAPI Gatewayの設定を行います。APIセットを新しく「Create API」から作成していきます。
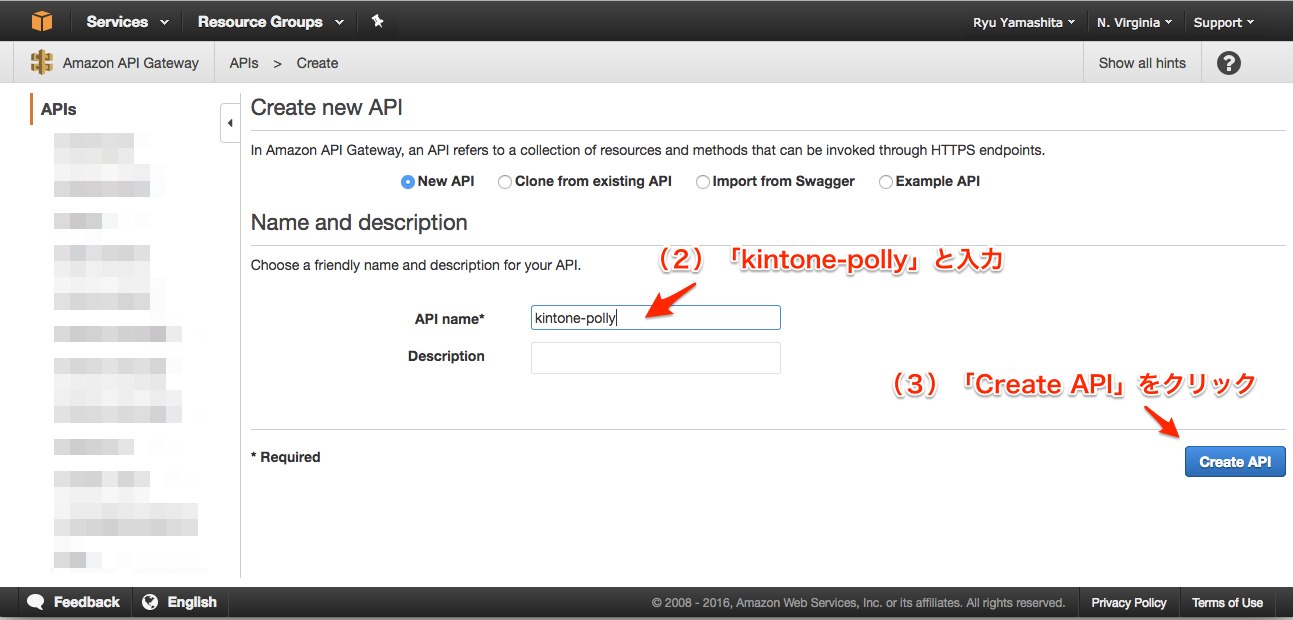
今回はAPI名を「kintone-polly」として、「Create API」をクリックしてAPIを作成していきます。
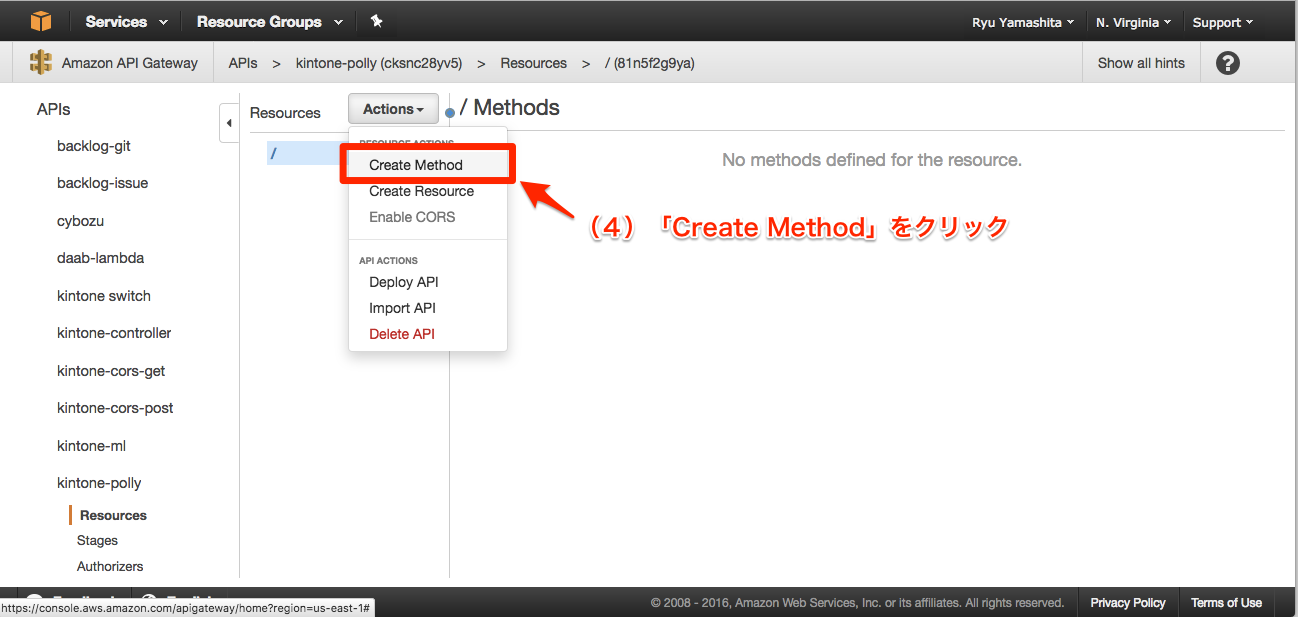
「Resources」の「Actions」から「Create Method」をクリックしてリクエストメソッドを作成します。リソース・パスは今回1つなので、「/」の直下にそのまま作成します。
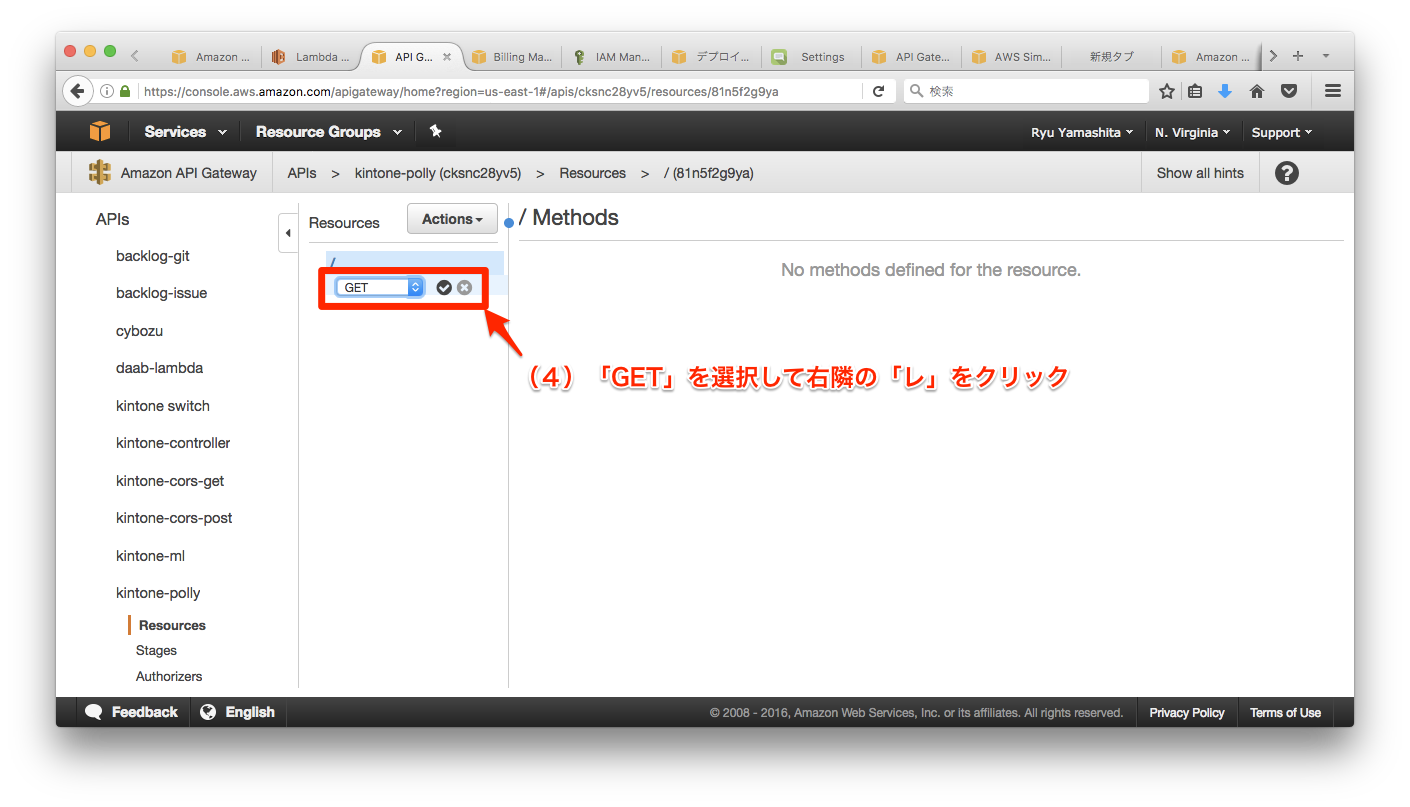
今回のリクエストは、GETメソッドとすることとして、「GET」を選択します。
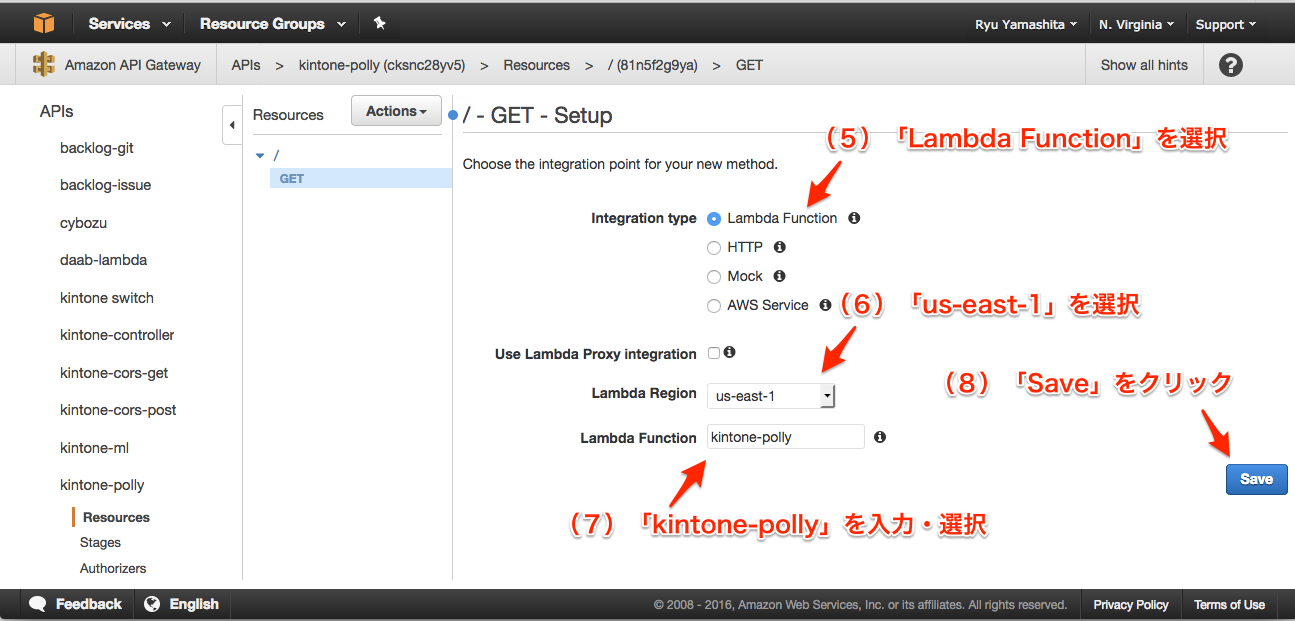
そうすると、「GET」メソッドの詳細設定に進んでいきます。次のように進めますが、先ほど作成したLambda関数に紐つけをここでやっているということです。選択・入力が終わったら「Save」をクリックします。
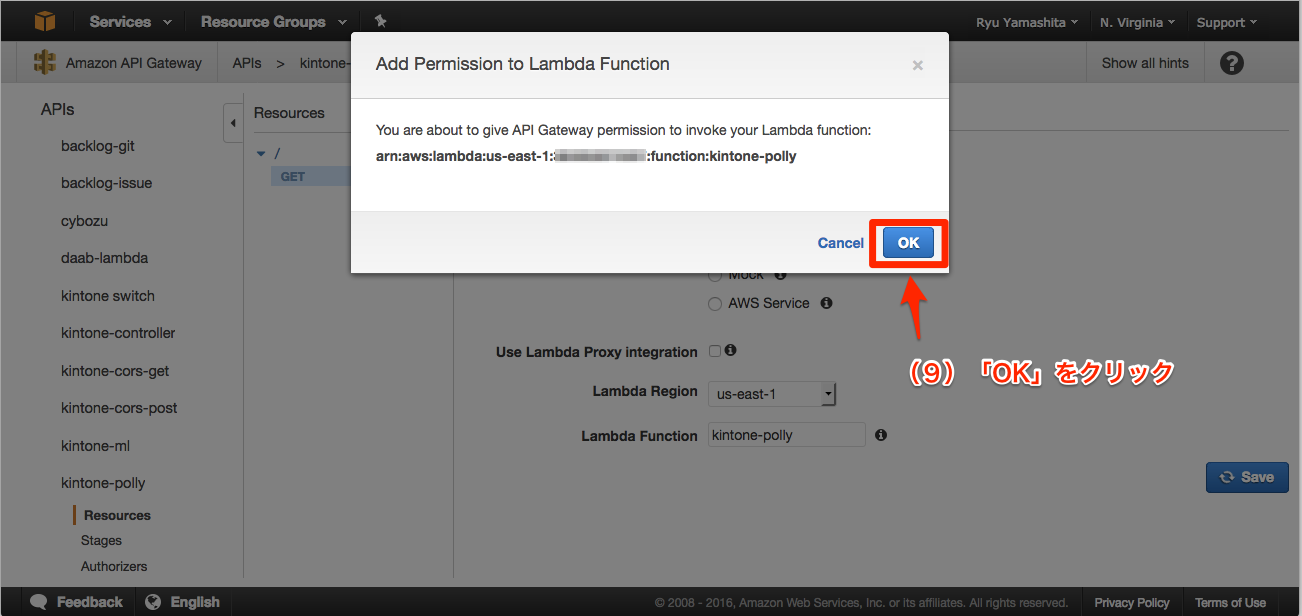
これで「OK」をクリックすれば、紐つけの完了です。
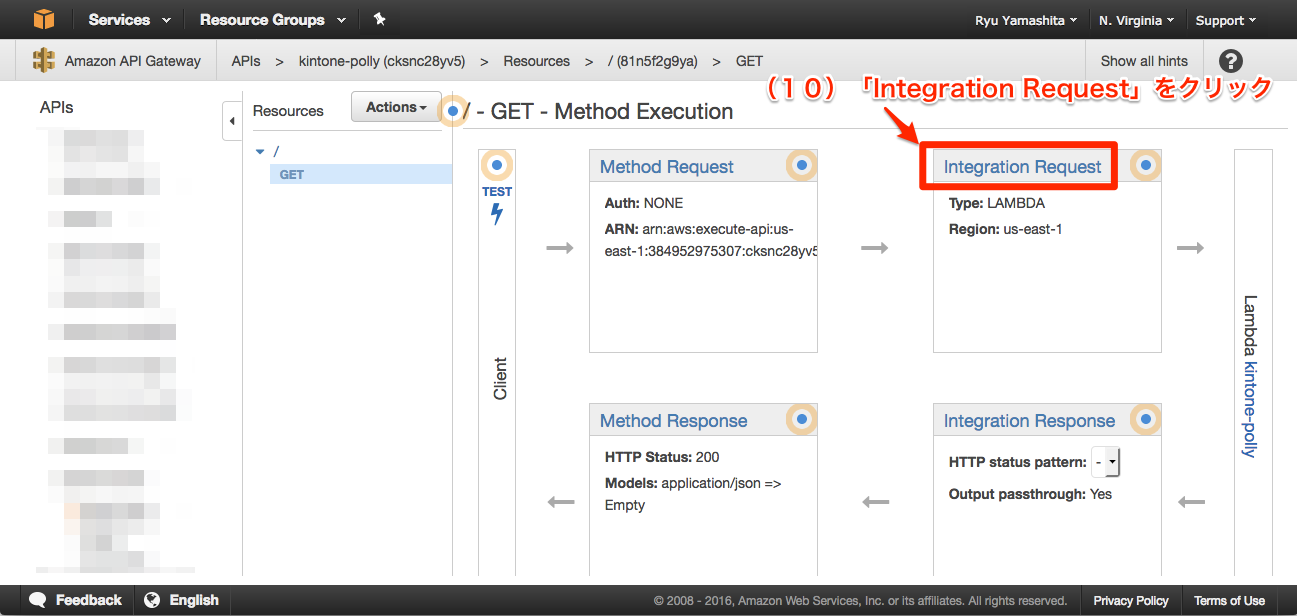
まだまだ続きます。本来はこの4パート丁寧に設定していく必要がありますが、今回は「Integration Request」だけを設定して成功ケースだけ通るようにします。
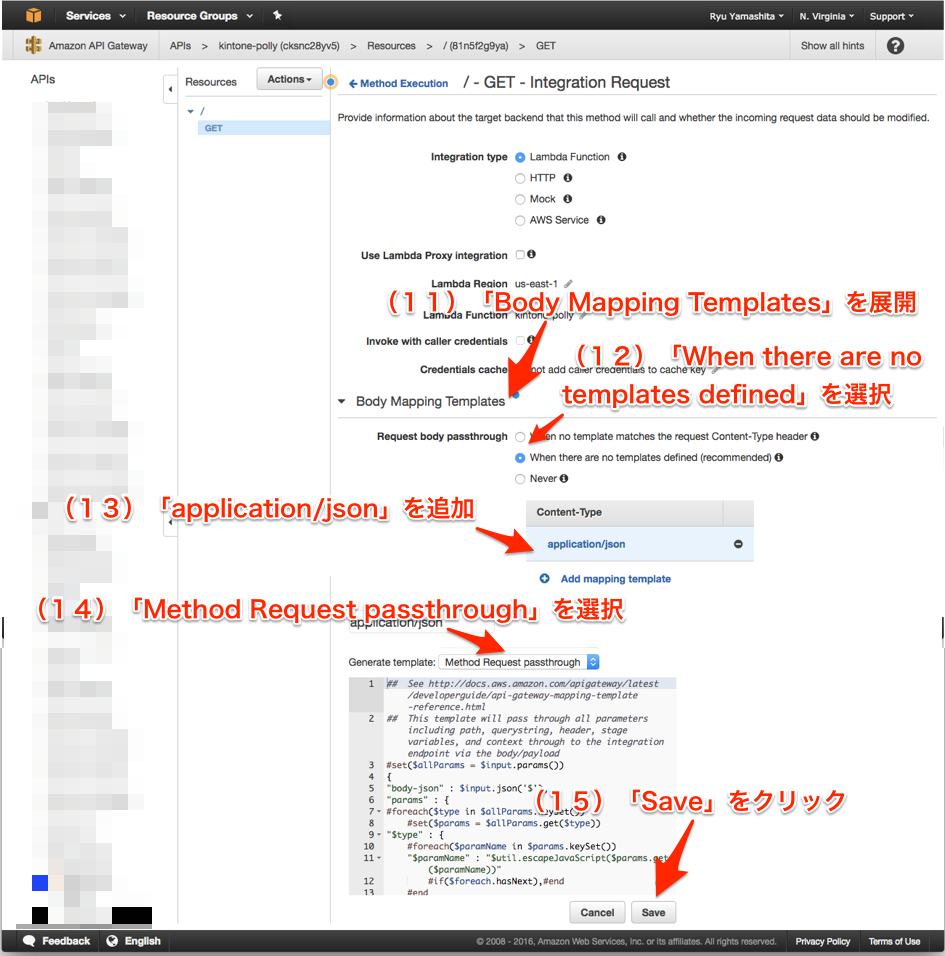
ここでは、APIリクエストのボディやクエリをどのようにLambda(のevent)に渡すかを設定します。次のように進めましょう。
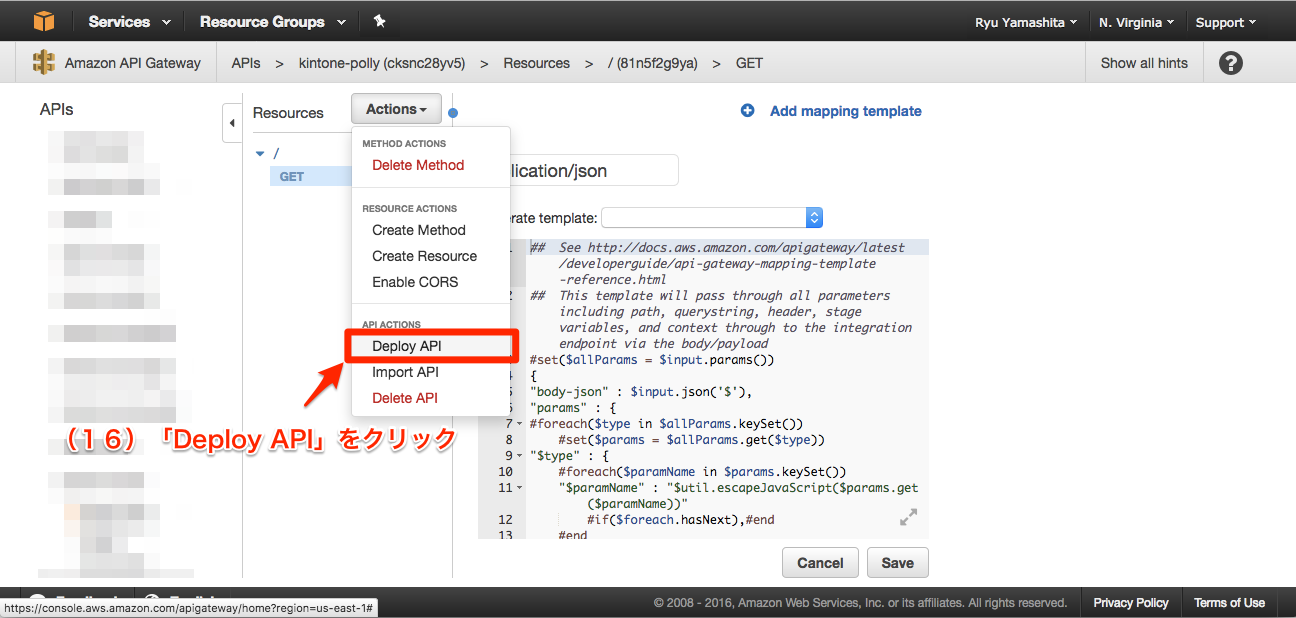
「Save」を押したら、「Actions」から「Deploy API」をクリックして、いよいよAPIの設定は終盤です。
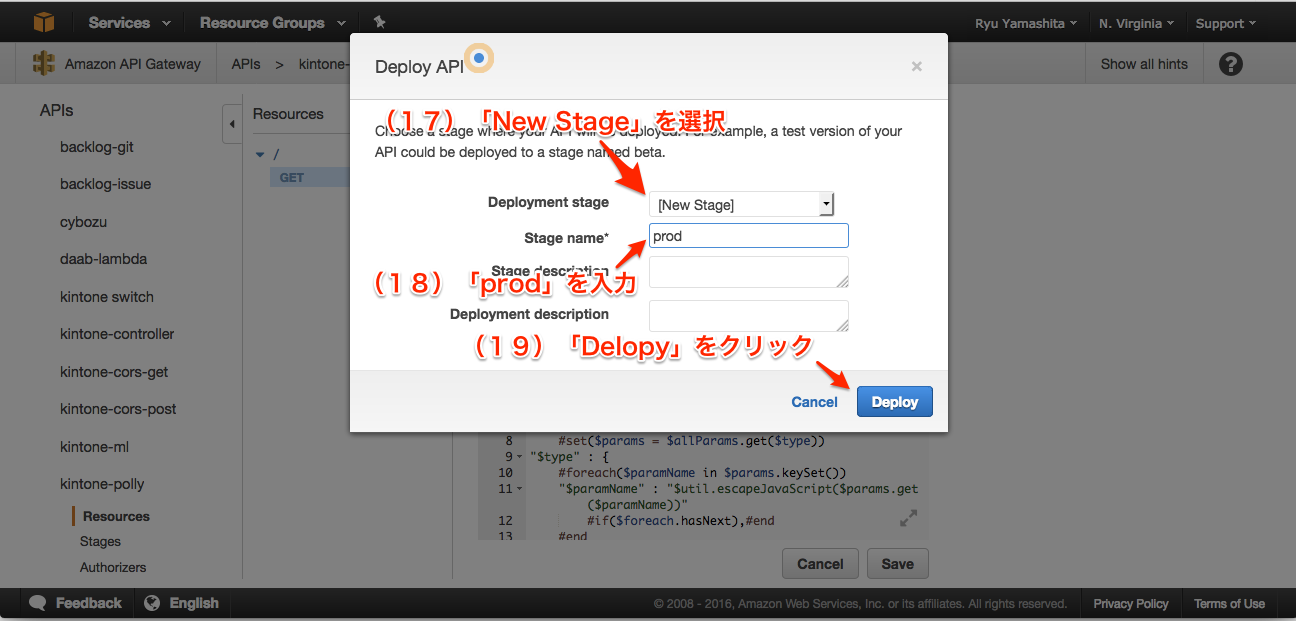
デプロイに際して、最後にステージを選択できますが、今回は既存選択肢がないので「New Stage」で「prod」と入力して、「Deploy」をクリックしてください。
これでAPI Gatewayの設定も完了ですので、ここまで設定したAPIをkintoneからコールできるようにすればkintoneアプリ完成です。
kintone JavaScriptカスタマイズ
最後の設定はkintoneアプリへのJavaScriptカスタマイズです。大きく2つの機能を入れます。
- API GatewayのURLにGETメソッドでリクエストし、文字列から変換されたMP3音声ファイルをkintoneレコードに添付する(保存成功後イベント)
- 添付のMP3音声ファイルを再生する(レコード詳細画面表示イベント)
これらの機能を有するJavaScriptは次のようになります。なお、{api gw url}は、API Gatewayで設定したリクエストURLに置き換えてください。
jQuery.noConflict();
(function($) {
  'use strict';

  // API to convert text to speech, and to upload the converted MP3 file to kintone with Amazon Polly
  var POLLY_URL = '{api gw url}';

  // show spinner
  var showSpinner = function() {
    // initialization
    if ($('.kintone-spinner').length == 0) {
      // create elements for spinner and background
      var spin_div = $('<div id ="kintone-spin" class="kintone-spinner"></div>');
      var spin_bg_div = $('<div id ="kintone-spin-bg" class="kintone-spinner"></div>');

      // append spinner element to "body"
      $(document.body).append(spin_div, spin_bg_div);

      // style for spinner
      $(spin_div).css({
        'position': 'fixed',
        'top': '50%',
        'left': '50%',
        'z-index': '510',
        'background-color': '#fff',
        'padding': '26px',
        '-moz-border-radius': '4px',
        '-webkit-border-radius': '4px',
        'border-radius': '4px'
      });
      $(spin_bg_div).css({
        'position': 'absolute',
        'top': '0px',
        'z-index': '500',
        'width': '150%',
        'height': '150%',
        'background-color': '#000',
        'opacity': '0.5',
        'filter': 'alpha(opacity=50)',
        '-ms-filter': "alpha(opacity=50)"
      });

      // options for spinner
      var opts = {
        'color': '#000'
      };

      // invoke spinner
      new Spinner(opts).spin(document.getElementById('kintone-spin'));
    }

    // start(show) spinner
    $('.kintone-spinner').show();
  };

  // stop(hide) spinner
  var hideSpinner = function() {
    // hide spinner element
    $('.kintone-spinner').hide();
  };

  // download file from kintone
  var downloadFile = function(fileKey, callback, errback) {
    var url = kintone.api.url('/k/v1/file', false) + '?fileKey=' + fileKey;
    var xhr = new XMLHttpRequest();
    xhr.open('GET', url);
    xhr.setRequestHeader('X-Requested-With', 'XMLHttpRequest');
    xhr.responseType = 'blob';
    xhr.onload = function() {
      if (xhr.status === 200) {
        // success
        var blob = new Blob([xhr.response]);
        return callback(blob);
      } else {
        // error
        var err = JSON.parse(xhr.responseText);
        if (errback) {
          return errback(err);
        }
      }
    };
    xhr.onerror = function(err) {
      // error
      if (errback) {
        return errback(err);
      }
    };
    xhr.send();
  };

  // convert Blob to Base64
  var convertBlobToBase64 = function(blob, callback, errback) {
    var reader = new window.FileReader();
    reader.readAsDataURL(blob);
    reader.onload = function() {
      // success
      var base64data = reader.result;
      return callback(base64data.split(',', 2)[1]);
    };
    reader.onerror = function(err) {
      // error
      if (errback) {
        return errback(err);
      }
    };
  };

  // submit success events
  kintone.events.on([
    'app.record.create.submit.success',
    'app.record.edit.submit.success',
  ], function(event) {
    // show spinner
    showSpinner();
    // call API with Amazon Polly
    var id = event.recordId;
    var query = 'id=' + id;
    var url = POLLY_URL + '?' + query;
    return kintone.proxy(url, 'GET', {}, {}).then(function(r){
      // hide spinner
      hideSpinner();
      return event;
    }).catch(function(e){
      // hide spinner
      hideSpinner();
      event.error = 'Error occurred.'
      return event;
    });
  });

  // after showing record details
  kintone.events.on(['app.record.detail.show'], function(event) {
    // show spinner
    showSpinner();
    var record = event.record;
    new kintone.Promise(function(resolve, reject) {
      // download the MP3 file
      var file = record['Attachment'].value[0];
      var fileKey = file.fileKey;
      downloadFile(fileKey, function(r) {
        return resolve(r);
      }, function(e) {
        return reject(e);
      });
    }).then(function(blob) {
      // convert the MP3 blob file to Base64 style
      return new kintone.Promise(function(resolve, reject) {
        convertBlobToBase64(blob, function(r) {
          return resolve(r);
        }, function(e) {
          return reject(e);
        });
      });
    }).then(function(base64data) {
      // hide spinner
      hideSpinner();
      // append the Base64-encoded MP3 file to "audio" element
      var audioUrl = 'data:audio/mp3;base64,' + base64data;
      $(document.body).append(
        $('<audio>').prop({
          'id': "voice",
          'preload': "auto"
        }).append(
          $('<source>').prop({
            'src': audioUrl,
            'type': "audio/mp3"
          })
        )
      );

      // append the button that starts to play the MP3 file
      var elAttachment = kintone.app.record.getFieldElement('Attachment');
      $(elAttachment).append(
        $('<button>').prop({
          id: 'speak'
        }).addClass('kintoneplugin-button-dialog-ok').text('Speak')
      );

      // attach click event to the "#speak" button for playing
      $('#speak').click(function() {
        var voice = $('#voice');
        voice[0].currentTime = 0;
        voice[0].play();
      });
      return;
    }).catch(function(e) {
      hideSpinner();
      console.log(e);
    });
  });
})(jQuery);
kintone JavaScriptカスタマイズの設定
先の polly.js を作成したら、kintoneへ設定していきます。
「アプリの設定を変更」から「設定」 - 「カスタマイズ」 - 「JavaScript/CSSでカスタマイズ」を選択します。そして、次のように設定します。
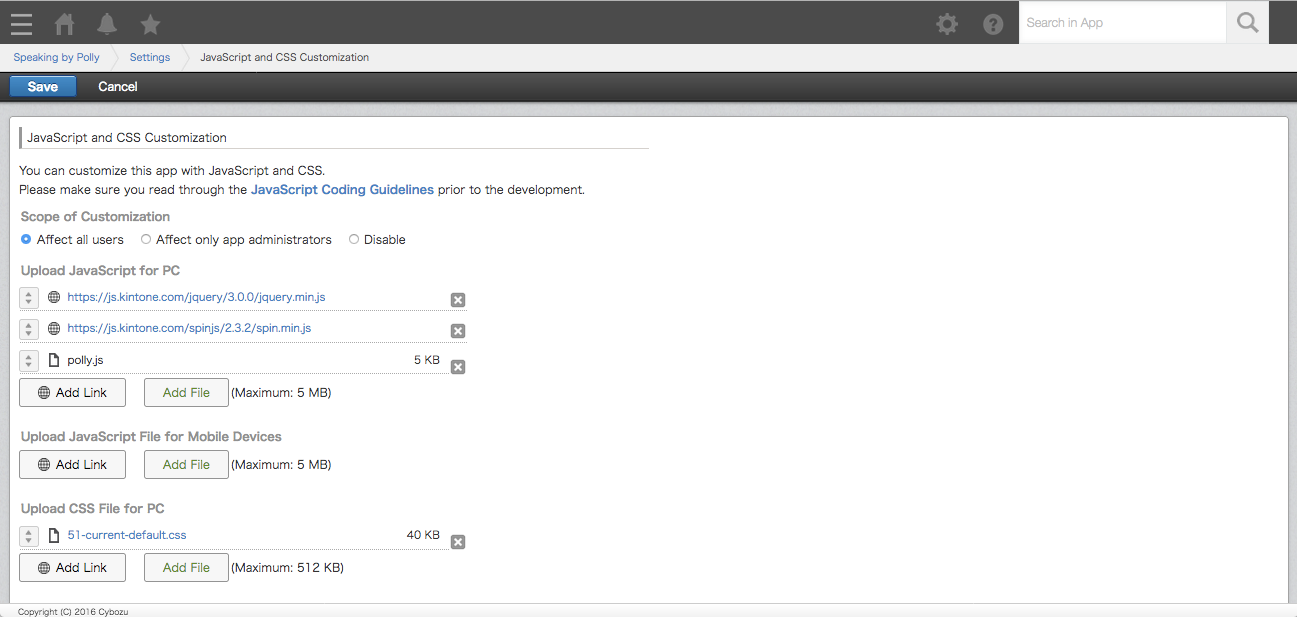
- PC用のJavaScriptファイル
- PC用のCSSファイル
- 51-current-default.css
ここで、 51-current-default.css は kintone Plug-in SDKのページから取得できます。このスタイルシートを使うことで、kintoneにあったスタイルを当てることができます。
カスタマイズファイルが出来たら、「保存」を押して、更に「アプリの更新」をクリックすると、これで全行程終了です!
「Speak by Polly」(読み上げアプリ)を試してみる
レコード新規登録画面で、「Text」フィールドに音声ファイル化したい文字列(文章)を入力して、レコードを保存します。

保存成功後イベントで、MP3音声ファイルを作成して、添付しています。そして、リロードがかかると次のように添付されている様子が確認でき、「Speak」というボタンが現れます。
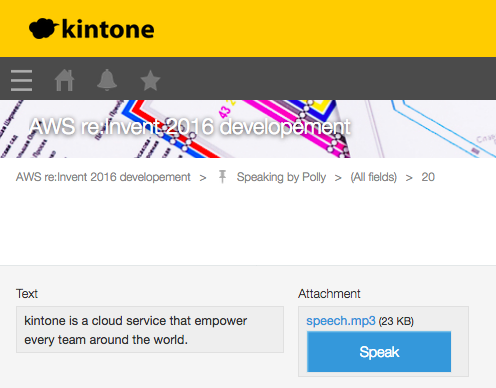
これを押すと、Amazon Pollyによって文字列から変換された音声を実際に読み上げてくれます。
所感
記事自体のボリューム感はなかなかで、私は発表後SDKのドキュメントはまだアップデートされてなかったり、Lambdaのboto3には新サービス対応版が入ってなかったりと少しハマりましたが、実際設定してみると意外と時間はかからないと思います。
外部のクラウドの力を借りることでkintoneの可能性が広がることをまた実感できました。
機械学習・AIをゼロから学ぶには敷居が高すぎるけど、やってみたいという方にもオススメできるかなぁと思います。是非お試し頂ければと思います。