目次
0.結論
1.はじめに
2.スクリプトの説明
2-1.ライブラリのインポート
2-2.RoutePlannerクラス
2-3.経路検索の処理 (search_routeメソッド)
3.GUIの説明
4.おわりに
0. 結論
Python(Google Maps API)を用い、目的の訪問先を巡回する際の最短時間となる経路の提案可能。
検索の際にはGUIにて出発地や訪問先を入力可能。
Google Maps API取得し、本内容をコピペすることで誰でも活用可能。
▼作成したスクリプト
import googlemaps
from math import dist
import tkinter as tk
from tkinter import ttk #プログレスバー表示用
import webbrowser

class RoutePlanner(tk.Tk):
    def __init__(self):
        super().__init__()
        self.title('経路提案アプリ')

        # Google Maps APIのキー
        self.gmaps = googlemaps.Client(key='YOUR_API_KEY')

        # 処理用のグローバル変数
        self.row_count = 0

        # 出発地入力欄
        self.start_label = tk.Label(self, text='出発&帰着地:')
        self.start_label.pack()
        self.start_entry = tk.Entry(self)
        self.start_entry.pack()

        # 訪問先追加ボタン
        self.add_button = tk.Button(self, text='訪問先を追加', command=self.add_dest_field)
        self.add_button.pack()

        # 訪問先入力欄のフレーム
        self.dest_label = tk.Label(self, text='訪問先:')
        self.dest_label.pack()
        self.dest_frame = tk.Frame(self)
        self.dest_frame.pack()

        # 初期状態の訪問先入力欄
        self.add_dest_field()

        # 検索ボタン
        self.search_button = tk.Button(self, text='検索', command=self.search_route)
        self.search_button.pack()

        # 地図表示ボタン(検索ボタンクリック後に登場する)
        self.button_frame = tk.Frame(self)
        self.button_frame.pack()

        # 結果表示エリア
        self.result_text = tk.Text(self, height=30, width=80)
        self.result_text.pack()

        # クリアボタン
        self.clear_button = tk.Button(self, text='クリア', command=self.clear_form)
        self.clear_button.pack()

    def clear_form(self):
        self.start_entry.delete(0, tk.END)
        # 訪問先入力欄を全て削除
        for child in self.dest_frame.winfo_children():
            child.destroy()
        # 初期状態の訪問先入力欄を1つ作成
        self.add_dest_field()
        self.result_text.delete(1.0, tk.END)

    def add_dest_field(self):
        self.row_count += 1
        # 新しい訪問先入力欄を作成
        new_dest_entry = tk.Entry(self.dest_frame)
        new_dest_entry.grid(row=self.row_count, column=0, sticky='w')
        # 削除ボタンを作成
        delete_button = tk.Button(self.dest_frame, text='削除', command=lambda: self.delete_dest_field(new_dest_entry,delete_button))
        delete_button.grid(row=self.row_count, column=1, sticky='e')

    def delete_dest_field(self, entry, delete_button):
        entry.destroy()  # 指定された入力欄を削除
        delete_button.destroy()  # 指定された入力欄を削除
        self.row_count -= 1

    def search_route(self):
        # 入力された出発地と訪問先を取得
        start = self.start_entry.get()
        entrys = [child for child in self.dest_frame.winfo_children() if isinstance(child, tk.Entry)]
        destinations = [entry.get() for entry in entrys]
        destinations = [a for a in destinations if a != ''] #訪問先欄に空欄入力されても動く用

        '''
        #プログレスバーの実行
        progress_bar = ttk.Progressbar(self, orient=tk.HORIZONTAL, length=100, mode='indeterminate')
        progress_bar.pack()
        progress_bar.start()
        '''

        # 緯度経度の取得
        geo_destinations = destinations.copy()
        geo_destinations.append(start)
        geo = []
        for geo_destination in geo_destinations:
            result = self.gmaps.geocode(geo_destination)
            try:
                geo.append(result[0]['geometry']['location'])
            except IndexError:
                self.result_text.insert(tk.END, '住所が見つからない訪問先があります')
            except googlemaps.exceptions.HTTPError:
                self.result_text.insert(tk.END, '空欄の訪問先欄を削除してください')
        d_geo_destinations = dict(zip(geo_destinations, geo))

        # 経路検索の実行
        directions_result = self.gmaps.directions(
            origin=start,
            destination=start,
            waypoints=destinations,
            optimize_waypoints=True
        )

        # 訪問先名称を入力した値に補正(緯度経度からユークリッド距離を計算して一番近い名称を取得)
        # 出力はlocations = [出発地、訪問先1、訪問先2、...、着着地]となる
        locations = [start]
        for leg in directions_result[0]['legs'][1:]:
            euclidean_distance = 1000
            true_destination = ''
            for destination, geo in d_geo_destinations.items():
                true_euclidean_distance = dist(list(leg['start_location'].values()), list(geo.values()))
                if true_euclidean_distance < euclidean_distance:
                    euclidean_distance = true_euclidean_distance
                    true_destination = destination
            locations.append(true_destination)
        locations.append(start)

        # 結果を表示する地図URLの取得
        URL_gmad = 'https://www.google.com/maps/dir/'
        for location in locations:
            URL_gmad += str(list(d_geo_destinations[location].values())).replace('[', '').replace(']', '') + '/'

        '''
        #プログレスバーの表示
        progress_bar.stop()
        progress_bar.destroy()
        '''

        # 既存のテキストをクリア
        self.result_text.delete(1.0, tk.END)
        # 経路検索の結果を表示(概要版)
        self.result_text.insert(tk.END, '▼訪問順序\n')
        self.result_text.insert(tk.END, f'出発地: {locations[0]}\n')
        for i, leg in enumerate(directions_result[0]['legs']):
            if i == (len(directions_result[0]['legs'])-1):self.result_text.insert(tk.END, f'着着地: {locations[-1]}\n')
            else:self.result_text.insert(tk.END, f'{i + 1}番目訪問先: {locations[i + 1]}\n')
        self.result_text.insert(tk.END, '\n\n')

        # 経路検索の結果を表示(詳細版)
        self.result_text.insert(tk.END, '▼ルート詳細\n')
        for i, leg in enumerate(directions_result[0]['legs']):
            self.result_text.insert(tk.END, f'出発地: {locations[i]}\n')
            self.result_text.insert(tk.END, f'訪問先: {locations[i + 1]}\n')
            self.result_text.insert(tk.END, f'距離: {leg['distance']['text']}\n')
            self.result_text.insert(tk.END, f'所要時間: {leg['duration']['text']}\n\n')

        # 経路検索のURLを表示
        self.result_text.insert(tk.END, f'\n▼地図URL\n{URL_gmad}')

        # 地図を表示するボタンを追加
        for child in self.button_frame.winfo_children():
            if isinstance(child, tk.Button) and child['text'] == '地図を表示':
                child.config(command=lambda: webbrowser.open(URL_gmad))
                return
        show_map_button = tk.Button(self.button_frame, text='地図を表示', command=lambda: webbrowser.open(URL_gmad))
        show_map_button.pack()

if __name__ == '__main__':
    app = RoutePlanner()
    app.mainloop()
1. はじめに
今回の記事では、Pythonを使ってGoogle Maps APIを活用した経路計画アプリを作っていきます。
このアプリでは、複数の訪問先を指定し、最適な経路を検索することができます。
注意点としてはGoogle Cloud Platformでプロジェクトを作成し、DirectionsAPI、GeocodeAPIを有効にして、APIキーを事前に取得する必要があります。
プログラムの全体像
このプログラムは大きく分けて以下の機能を持っています。
1.出発地と訪問先の入力: GUIで出発地と複数の訪問先を入力します。
2.経路検索: Google Maps APIを使って、入力された情報に基づいて最適な経路を検索します。
3.結果表示: 経路の順序、各区間間の距離と所要時間、そしてGoogle MapsのURLを表示します。
4.地図表示: 表示されたURLをクリックすると、Google Mapsで経路が確認できます。
2. スクリプトの説明
2-1. ライブラリのインポート
googlemaps: Google Maps APIを使うためのライブラリです。
math: 距離計算に使うライブラリです。
tkinter: GUIを作成するためのライブラリです。
webbrowser: Webブラウザを操作するためのライブラリです。
2-2. RoutePlannerクラス
RoutePlannerクラスは、この経路計画アプリの中核となるクラスです。
このクラスが、ユーザーインターフェースの管理、Google Maps APIとの連携、そして経路検索の結果の表示など、アプリの主要な機能を担っています。
主なメソッドと役割:
__init__メソッド:
アプリケーションの初期化を行います。
tkinterを使ってGUIのウィンドウを作成し、各種ウィジェット(ラベル、エントリー、ボタンなど)を配置します。
Google Maps APIのクライアントを作成し、APIキーを設定します。
clear_formメソッド:
入力フォームをクリアします。
出発地、訪問先の入力欄を空欄にし、結果表示エリアのテキストを削除します。
add_dest_fieldメソッド:
訪問先入力欄を動的に追加します。
ユーザーが「訪問先を追加」ボタンをクリックするたびに、新しい入力欄が作成されます。
delete_dest_fieldメソッド:
訪問先入力欄を削除します。
ユーザーが「削除」ボタンをクリックすると、対応する入力欄が削除されます。
search_routeメソッド:
経路検索のメイン処理を行います。
入力された出発地と訪問先を取得し、Google Maps APIを使って経路を検索します。
検索結果を解析し、分かりやすい形式で表示します。
2-3. 経路検索の処理 (search_routeメソッド)
search_routeメソッドは、アプリの最も重要な部分であり、以下の処理を行います。
入力データの取得:
GUIから出発地と複数の訪問先を取得します。
ジオコーディング:
Google Maps Geocoding APIを使って、取得した住所を緯度経度に変換します。
緯度経度は、経路検索や地図表示に必要です。
経路検索:
Google Maps Directions APIを使って、出発地、訪問先、そして最適化オプションを指定して経路を検索します。
Directions APIは、複数の経路候補を返すこともできますが、このプログラムでは最適化オプションを指定することで、最短経路を検索します。
結果の解析:
Directions APIから返されたJSON形式のデータを解析し、必要な情報を抽出して表示用の文字列に変換します。
表示する情報は、各区間の距離、所要時間、そして全体の経路などです。
地図URLの作成:
Google Mapsの静止画URLを作成します。
このURLをブラウザで開くと、検索された経路が地図上に表示されます。
結果の表示:
解析した結果と地図URLを、GUIのテキストエリアに表示します。
3. GUIの説明
実行時のGUI説明
以下の「出発&帰着地」欄と「訪問先」欄に住所を入力します。
「訪問先」が複数ある場合は「訪問先を追加」ボタンを押すことで「訪問先」欄を追加することができます。
「出発&帰着地」と全ての「訪問先」を入力し終わったら「検索」ボタンを押すことで、最短経路を検索します。

以下はサンプルです。
出発&帰着地:東京駅、訪問先:横浜駅、新宿駅、千葉駅、池袋駅にて検索を実行しています。
検索結果は下の枠内に表示され、東京駅→池袋駅→新宿駅→横浜駅→千葉駅→東京駅の順序で訪問すれば効率的と分かります。
訪問先の入力順序に関わらず、最短経路となる経路を示してくれます。
検索後は「地図を表示」ボタンが表示され、クリックすると、提案経路でのGoogleMapを開きます。

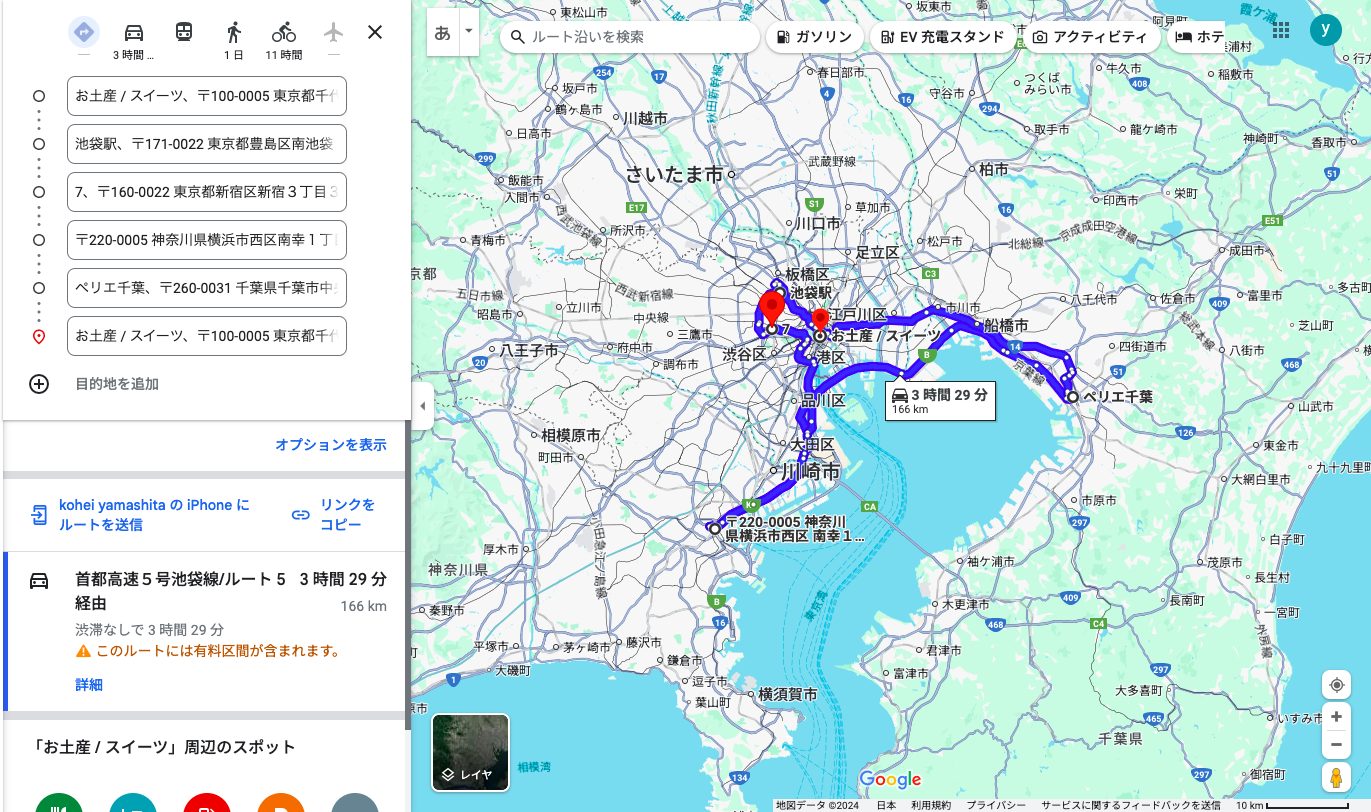
以下が「地図を表示」クリックすると表示されるGoogleMapでの提案経路です。
通常のGoogleMapでの複数経路検索と同様の画面となっており、ここで経路の順序を変更することも可能です。
4. おわりに
初めてGoogle Maps APIを活用して地図情報を取り扱うアプリを開発してみましたが、自分の思った通りの動作ができてよかったです。
このプログラムをベースに、様々な機能を追加していくことで、より高度なアプリを作成していきたいです。
長い文章を最後までお読みいただき、ありがとうございました!!