はじめに
この記事は「ConoHa Advent Calendar 2024」の5日目の記事です。
2017年のカレンダーから毎年参加している、この時期にだけ記事を書く私です。
気づけば学生から新卒社会人になりました。年月って経つのが早いですね。。。
さて、この記事ではConoHaVPSでWordPress(以下、「wp」)を入れるだけの記事です。
正直、WingとかかんたんKUSANAGIとかLAMP(PHP)とかあるので、素のVPSから構築するメリットは薄いっていうかほぼないんですが、ただのロマンとして御覧ください。
環境について
今回は、Ver3.0でDebian12.05を使用します。
筆者のPCはWindows11です。Macでもやることはやることは変わらないはずです。
サーバーの準備
チャージが54円しか入ってないので、チャージしておきます。
クレジットカードが登録されていたり、十分なチャージがある場合は、この手順は不要です。

ということで、サーバーを追加していきます。
上で書いた通り、Debian12.05をOSにします。
スペックは 2Core、1GBメモリです。
Rootパスワードを設定し、SSHKeyを忘れずに設定しておきます。
構築が完了したら、表示されてるIPアドレスと先ほど設定したSSHKeyを使って、サーバーに接続します。
接続したら、日本語化しておきます。
# apt -y install task-japanese locales-all
# localectl set-locale LANG=ja_JP.UTF-8 LANGUAGE="ja_JP:ja"
# source /etc/default/locale

# echo $LANG
ja_JP.UTF-8

# a
-bash: a: コマンドが見つかりません
次にパッケージなどを最新に更新します。
# apt update
# apt upgrade
>なんのため再起動
# reboot -i
再起動が完了したら、vimをインストールします。
普段使いがnanoとかの方は不要だと思います。
apt install vim
vimがインストールできたら、sshの設定を変更します。
22ポートから別のポートに変更することで、ブルートフォース攻撃(総当たり攻撃)を受ける確率(?)を大幅に減らすことができます。
※筆者は過去に、サーバ構築1時間しないうちに海外IPをfail2banが10数件BANしてました
# vim /etc/ssh/sshd_config


# This is the sshd server system-wide configuration file.  See
# sshd_config(5) for more information.

# This sshd was compiled with PATH=/usr/local/bin:/usr/bin:/bin:/usr/games

# The strategy used for options in the default sshd_config shipped with
# OpenSSH is to specify options with their default value where
# possible, but leave them commented.  Uncommented options override the
# default value.

Include /etc/ssh/sshd_config.d/*.conf

#Port 22 > #を外して22を
Port 10022 > 適当なポートにする(ここでは10022にする)
#AddressFamily any
#ListenAddress 0.0.0.0
#ListenAddress ::

#HostKey /etc/ssh/ssh_host_rsa_key
#HostKey /etc/ssh/ssh_host_ecdsa_key
#HostKey /etc/ssh/ssh_host_ed25519_key
編集ができたら、sshdを再起動します。
# systemctl restart sshd
>必要ないと思いますが
# systemctl restart ssh
これで、ポート変更完了です。
あとはクライアントのssh接続のポートを22から先ほどのポート(10022)に変更して接続するだけです。
LiteSpeedを入れる
今までApacheとかNginxしか使ってこなかったので、超高速らしいLiteSpeedを使います。
# wget -O - https://rpms.litespeedtech.com/debian/enable_lst_debian_repo.sh | bash
# apt update
# apt install openlitespeed
パッケージリストを読み込んでいます... 完了
依存関係ツリーを作成しています... 完了
状態情報を読み取っています... 完了
E: パッケージ openlitespeed が見つかりません
おっと...
自分でリポジトリを追加します。
# vim etc/apt/sources.list.d/lst_debian_repo.list
> 行追加
deb http://rpms.litespeedtech.com/debian/ bookworm main

# apt update
> PGP署名はさっきのスクリプトで入ってると信じて
# apt install openlitespeed
22.6 MB のアーカイブを取得する必要があります。
この操作後に追加で 105 MB のディスク容量が消費されます。
続行しますか? [Y/n]
> 成功!!
ちゃんと起動しています。
# systemctl status lsws
● lsws.service - LSB: lshttpd
     Loaded: loaded (/etc/init.d/lsws; generated)
     Active: active (running) since Sun 2024-12-01 20:48:49 JST; 2min 37s ago
       Docs: man:systemd-sysv-generator(8)
    Process: 9769 ExecStart=/etc/init.d/lsws start (code=exited, status=0/SUCCESS)
      Tasks: 4 (limit: 1095)
     Memory: 9.4M
        CPU: 3.480s
     CGroup: /system.slice/lsws.service
             ├─9798 "openlitespeed (lshttpd - main)"
             ├─9808 "openlitespeed (lscgid)"
             ├─9837 "openlitespeed (lshttpd - #01)"
             └─9838 "openlitespeed (lshttpd - #02)"

12月 01 20:48:46 vm-9d493636-1b systemd[1]: Starting lsws.service - LSB: lshttpd...
12月 01 20:48:49 vm-9d493636-1b systemd[1]: Started lsws.service - LSB: lshttpd.
管理画面に行きたいですが、ポートを開けたい。
# ufw status
-bash: ufw: コマンドが見つかりません
なんとufwは入っていないっぽい。
というわけでインストール。
# apt install ufw
# ufw status
Status: inactive
ufwを有効にするとSSHのポートが塞がってしまう可能性があるので、先にポートを開けておきます。
# ufw allow 10022/tcp
Rules updated
Rules updated (v6)
筆者環境にはIPv6がないですが、両方開けてます。
ufwを有効にします。
# ufw enable
Command may disrupt existing ssh connections. Proceed with operation (y|n)?
> コマンドにより既存の SSH 接続が中断される可能性があります。操作を続行してください。
Firewall is active and enabled on system startup
> ファイアウォールはアクティブで、システム起動時に有効になります
有効になりました。
# ufw status
Status: active

To                         Action      From
--                         ------      ----
10022/tcp                  ALLOW       Anywhere
10022/tcp (v6)             ALLOW       Anywhere (v6)
管理画面のポートを開けます。
# ufw allow 7080/tcp
Rule added
Rule added (v6)
# ufw status
Status: active

To                         Action      From
--                         ------      ----
10022/tcp                  ALLOW       Anywhere
7080/tcp                   ALLOW       Anywhere
10022/tcp (v6)             ALLOW       Anywhere (v6)
7080/tcp (v6)              ALLOW       Anywhere (v6)
ブラウザでhttp://<conohaのIP>:7080にアクセスします。
詳細設定をクリックして「 にアクセスする(安全ではありません)」をクリックします。
ユーザー名もパスワードもわかりません...
どうやら管理者カウントを作る必要があるみたいです。
/usr/local/lsws/admin/misc/admpass.shを実行すると作れるらしい...
# /usr/local/lsws/admin/misc/admpass.sh

Please specify the user name of administrator.
This is the user name required to login the administration Web interface.

User name [admin]: <ユーザー名>

Please specify the administrator's password.
This is the password required to login the administration Web interface.

Password: <パスワード。入力は見えない>
Retype password: <パスワード再入力。入力は見えない>
Administrator's username/password is updated successfully!
管理者アカウントが作られたので、先程の管理画面にログインします。

できた!!
右上に言語設定があるので日本語にします。
そういえば、80と443ポートを開けてないので開けておきます。
# ufw allow http
Rule added
Rule added (v6)
# ufw allow https
Rule added
Rule added (v6)
# ufw status

Status: active

To                         Action      From
--                         ------      ----
10022/tcp                  ALLOW       Anywhere
7080/tcp                   ALLOW       Anywhere
80/tcp                     ALLOW       Anywhere
443                        ALLOW       Anywhere
10022/tcp (v6)             ALLOW       Anywhere (v6)
7080/tcp (v6)              ALLOW       Anywhere (v6)
80/tcp (v6)                ALLOW       Anywhere (v6)
443 (v6)                   ALLOW       Anywhere (v6)
とりあえず、これでOKでしょう。
mariadbインストール
MySQLとMariaDB、悩みましたが、正直使えればどちらでもいいので、今回はMariaDBをインストールします。
# apt -y install mariadb-server mariadb-client
# mariadb
Welcome to the MariaDB monitor.  Commands end with ; or \g.
Your MariaDB connection id is 31
Server version: 10.11.6-MariaDB-0+deb12u1 Debian 12

Copyright (c) 2000, 2018, Oracle, MariaDB Corporation Ab and others.

Type 'help;' or '\h' for help. Type '\c' to clear the current input statement.

MariaDB [(none)]>
wp用にデータベースを作成します。
MariaDB [(none)]> CREATE DATABASE wpDB DEFAULT CHARACTER SET utf8;
Query OK, 1 row affected (0.020 sec)
wp用にユーザーも作成します。
MariaDB [(none)]> GRANT ALL ON wpDB.* TO wp@localhost IDENTIFIED BY '!!PassWord!!';
Query OK, 0 rows affected (0.035 sec)

MariaDB [(none)]> FLUSH PRIVILEGES;
Query OK, 0 rows affected (0.025 sec)
litespeed設定
ここから本番です。
バーチャルホスト
左側のメニューにあるバーチャルホストをクリックします。
「バーチャルホストリスト」の右側にある+をクリックします。

バーチャルホスト名などは以下の画像のようにしました。
必要に応じて変更してください。

右上の保存マークをクリックして保存します。
設定ファイルの部分が赤くなるので「CLICK CTO CREATE」をクリックします。

再度保存ボタンをクリックすると、バーチャルホストの一覧ページに戻るので、先程作ったホスト(wp)をクリックします。
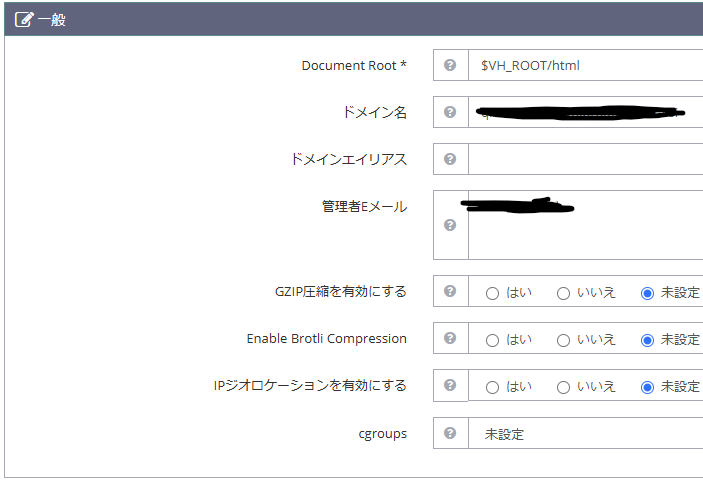
上の「一般」タブに開いて設定していきます。

※上ではドメインを設定していますが、このあと削除しました※
「Rewrite」タブに移動して、「Auto Load from .htaccess」を有効にします。

リスナー
左側のメニューのリスナーをクリックします。
デフォルトのリスナーがあるので、クリックします。
ポートを80にして、バーチャルホストマップにwpを追加します。

wp構築
wpをインストールしていきます。
> 設定したバーチャルホストRootへ移動します。
# cd /var/www/litespeed/wp
> 最新版wpダウンロード
# curl -o - https://ja.wordpress.org/latest-ja.tar.gz | sudo tar xzvf -
> htmlにリネーム
# mv wordpress html
DBの設定とか色々しました(割愛します)
wp-config.phpに書き込めないので、PCに一度保存してアップロードします。
FTPをインストールしていないので、SFTPでアップロードしましょう。
アップロードしてから、次に進み、サイト名などを設定してインストールします。
最後に
PHPのインストールを省ける、LiteSpeedは魅力かもしれません。
超高速らしいので、気になった方はぜひ。
スペシャルサンクス
超高速Webサーバー「LiteSpeed」をDebianにインストールする @ tomoakinagahara(zenn.dev)
OpenLiteSpeedの初期設定 @ kthksgy(kthksgy.com)


