はじめに
GitHubの機能だけでWebサイトの死活監視ができる「Upptime」というものを紹介ついでに使い方を説明します。
Upptimeとは?
オープンソースで開発されている、稼働時間モニターとステータスページです。
GitHubのAction、Issues、Pagesを使うだけなので、無料で使うことが出来ます。
GitHubのActionは稼働時間モニターとして使用しています。
- 5分ごとにworkflowがWebサイトにアクセスして、Webサイトが稼働しているか確認します。
- 応答時間は6時間ごとに記録され、gitにコミットされます。
- 応答時間のグラフは毎日生成されます。
GitHubのissuesはインシデントレポートに使用されます。
- エンドポイントがダウンしている場合、issuesが立ち上がります。
- チームのメンバーがissuesに割り当てられます。
- インシデントレポートはissuesのコメントとして投稿されます。
- issuesはロックされているため、メンバー以外はコメントできません。
- サイトが復旧すると、問題は自動でクローズされます。
- 更新時はSlackに通知が送信されます。
GitHubPagesはステータスWebサイトに使用されます。
- シンプルで美しく、アクセスしやすいPWAが生成されます。
- SvelteとSapperで構築
- GitHubAPIを使用してこのリポジトリからデータを取得します
(機械翻訳片手に書いています。)
すべてがGitHubだけで完結しているので、別でサーバが必要だったりお金がかかったりはない(はず)です。
Upptimeを使う
準備編
GitHubのアカウントが必要ですので、アカウントを作成しメールアドレスの認証を完了させてください。
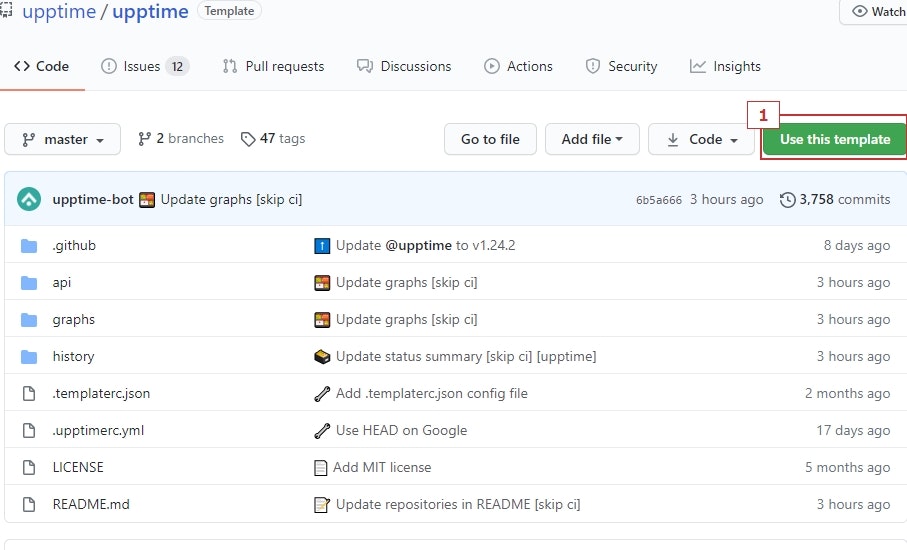
UpptimeのRepositoryに移動し、緑の「Use this template」をクリックします。
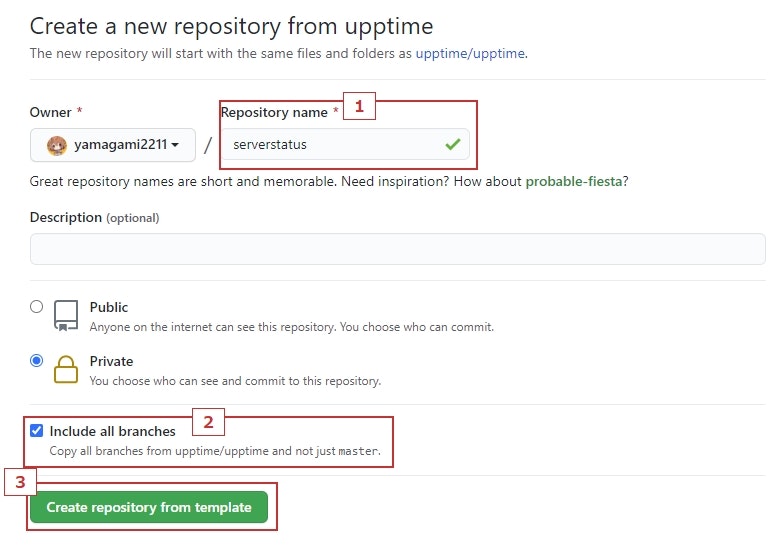
「Create a new repository form upptime」というページが出るので、「Repository name」を適当に入力し、下の「Include all branches」にチェックを入れて緑のボタンの「Create repository form template」をクリックします。
今回はPrivateにしますが、Publicにすることをおすすめします。
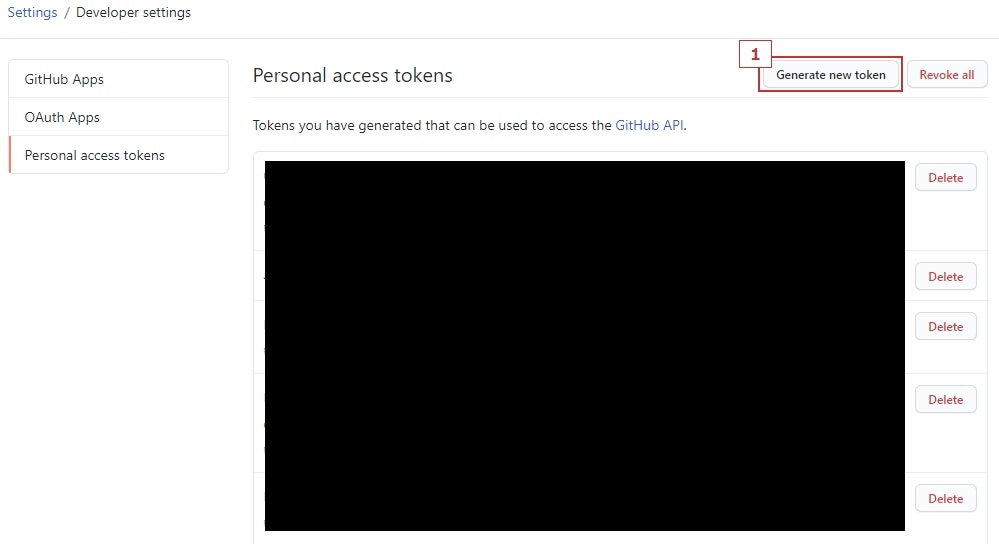
リポジトリが出来たら、GitHubのアカウント設定に移動します。
アカウント設定(Settings)->開発者設定(Developer settings)->パーソナルアクセストークン(Personal access tokens)を開きます。
右上の「Generate new token」をクリックします。
「Note」は適当に入力し、Select scopesは全てにチェックを入れます。
本来は repoとworkflowだけのはずですが、なぜがエラーが出てビルド出来ないので、特権を与えます。
もしかしたら設定とかが悪いのかもしれませんが、これで動くので今回はこれで行きます。
Noteに適当に入力して全てにチェックを入れたら、「Generate token」をクリックします。
トークンが発行されるのでコピーします。
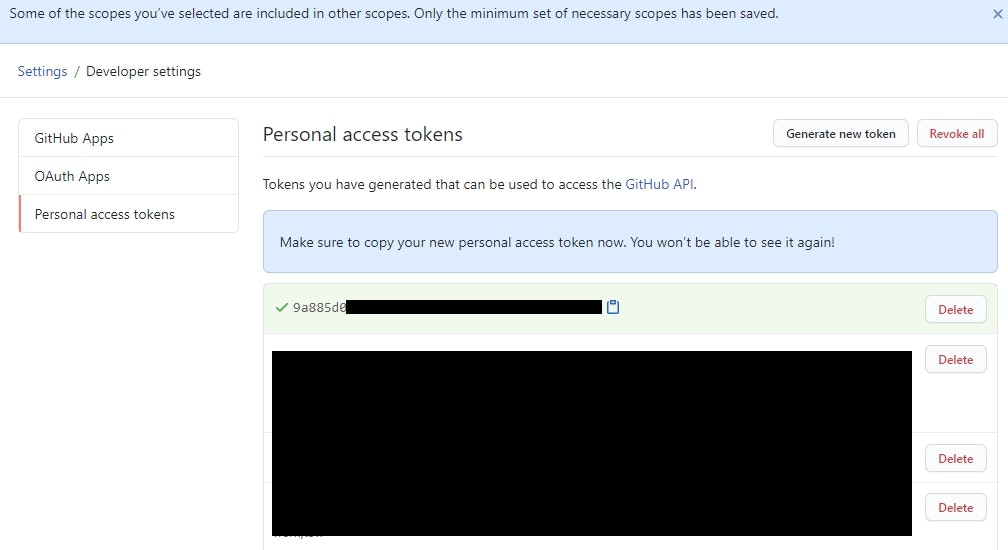
(画像の場合「9a995d0~~」です。)
先程作ったリポジトリの設定を開きます。
一番下のSecretsを開きます。
Action secretsが出るので、「New repository secret」をクリックします。
Nameに 「GH_PAT」、Valueに先程コピーしたトークンを貼り付けます。
ブランチをgh-pagesに切り替えて、CNAMEを削除します。
これで準備編は完了です。
設定編
.upptimerc.ymlを設定していきます。
ownerを自分のgithubユーザー名にし、repoをこのrepositoryの名前にします。
# Change these first
owner: yamagami2211 # Your GitHub username
repo: serverstatus # Your GitHub repository name
サイトを追加します。
すでにあるGoogleやWikipediaを参考に編集すると楽です。
$SECRET_SITEは準備編で追加したトークンと同じ感じだと思います。
そこら辺は公式のドキュメントを確認してください。
# Add your sites here
sites:
  - name: Google
    url: https://www.google.com
  - name: Wikipedia
    url: https://en.wikipedia.org
  - name: Hacker News
    url: https://news.ycombinator.com
  - name: Broken Site
    url: https://thissitedoesnotexist.com
  - name: Test for HEAD
    method: HEAD
    url: https://www.google.com
  - name: Secret Site
    url: $SECRET_SITE
GitHubのpagesの設定をします。
status-websiteの部分のcnameをコメントアウトします。
独自ドメインで使う場合は、そのドメインに設定してGithubで使えるようにレコードを設定してください。
baseUrlをこのrepositoryの名前にします。
status-website:
  # Add your custom domain below, or remove the next line if you don't have a domain
  #cname: demo.upptime.js.org
  # Uncomment the following line if you don't have a custom domain and add your repo name
  baseUrl: /serverstatus
  logoUrl: https://raw.githubusercontent.com/upptime/upptime.js.org/master/static/img/icon.svg
  name: Upptime
  introTitle: "**Upptime** is the open-source uptime monitor and status page, powered entirely by GitHub."
  introMessage: This is a sample status page which uses **real-time** data from our [GitHub repository](https://github.com/upptime/upptime). No server required — just GitHub Actions, Issues, and Pages. [**Get your own for free**](https://github.com/upptime/upptime)
  navbar:
    - title: Status
      href: /
    - title: GitHub
      href: https://github.com/$OWNER/$REPO
.upptimerc.ymlをコミットすると、Actionでビルドが行われます。
これで設定は完了です。
ビルドが走る
設定が正しく出来ていると、Actionsでビルドが走ります。
このビルドでは、masterブランチのreadme.mdやgh-pagesのページ、死活監視やグラフなどが行われます。
PrivateリポジトリではPageが表示されないみたいですね。
設定おまけ編
コミットするユーザーを変える
commitMessages:
  commitAuthorName: "名前"
  commitAuthorEmail: "メールアドレス"
日本語化する
ここに日本語にするi18nキーを置いておきますので、ご自由にお使いください。
i18n:
  activeIncidents: "有効なインシデント"
  incidentReport: "インシデントレポート #$NUMBER→"
  activeIncidentSummary: "$DATE にオープン 投稿数 $POSTS"
# ...
のように追加すると日本語にできます。
readme.mdも日本語にできます。
機械翻訳片手に翻訳しているので、必要に応じて再翻訳してください。
公式ドキュメント
試しに作ったのがこちらです
https://github.com/yamagami2211/site-kanshi
https://status.yama2211.jp/
解説用で作ったものではありませんが、作ったものを置いてきます。