Cloud RunでAPIキー認証
概要
APIキーを使用した認証がCloud Runのデフォルトで対応していなかった。
そこでGCPのゲートウェイサービスであるCloud Endpointsを使用して、APIキー認証を実装する。
Cloud Endpointsの公式ドキュメントを参考にして、躓いたので記事に残す。
※APIに使用するCloudRunは、事前に作成済みとする
Cloud Endpointsとは
APIのリクエストやレスポンスの仕様を設定ファイルに定義し、CloudEndpointsにデプロイすることでその仕様を実際のAPIに適用することができる。
リクエストがAPIに届く前にCloud Endpointsがデプロイした仕様を元にリクエストを通すかどうかを判断する。
環境
-
以下のService APIが有効化済み
- Cloud Run API
- Cloud Enpoints API
-
Cloud SDKがインストール済み
-
コマンドプロンプトでGCPにログインした状態である
- ログインしていない場合、以下のコマンドでログインする
gcloud auth login
- ログインしていない場合、以下のコマンドでログインする
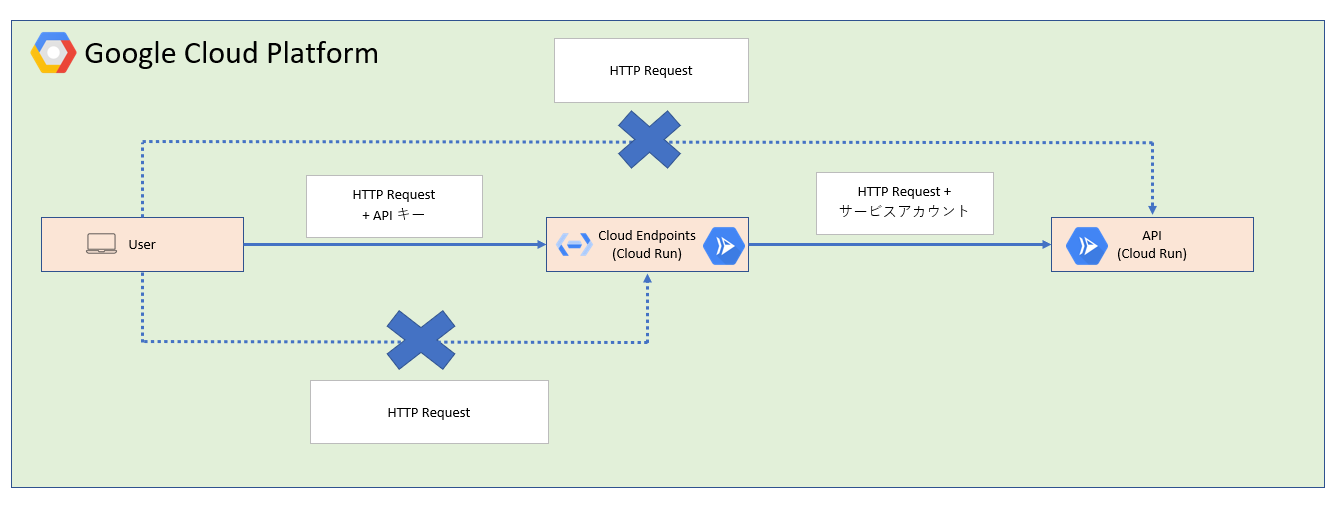
構成図
構成図は以下の通りである。
実装
APIキーの発行
1. 認証情報で[認証情報を作成] -> [APIキー]を押下し、APIキーを発行する
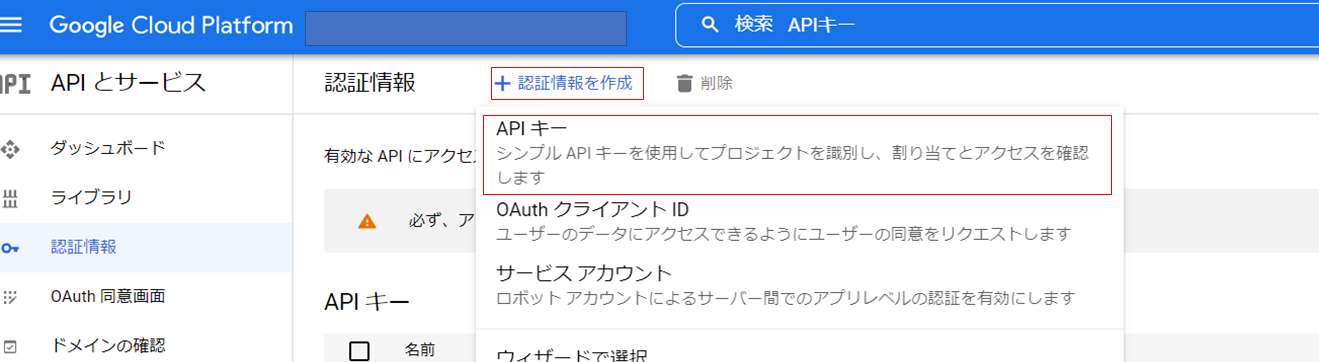
2.必要があればキーの制限を行う
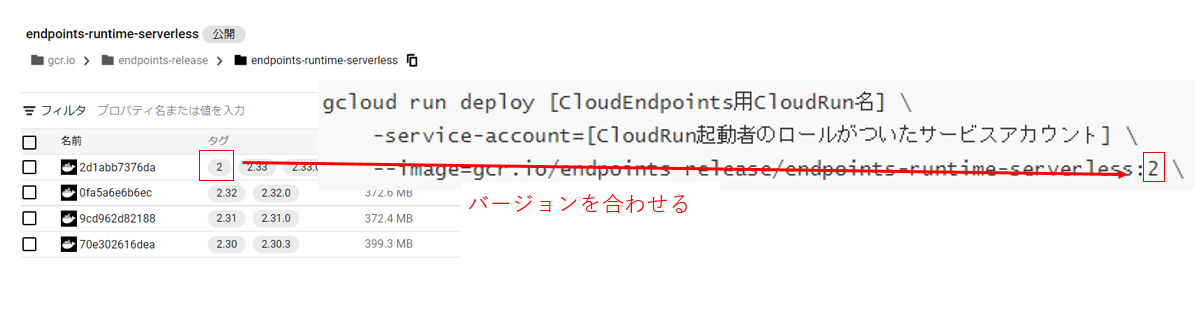
Cloud Endpoints用CloudRunの作成
以下のコマンドでCloud Endpoints用CloudRunを作成する
※初回だとENDPOINTS_SERVICE_NAMEを指定できないので、2回デプロイする
gcloud run deploy [CloudEndpoints用CloudRun名] \
    --image=gcr.io/endpoints-release/endpoints-runtime-serverless:2 \
    --allow-unauthenticated \
    --platform managed \
    --project=[プロジェクトID]

gcloud run deploy [CloudEndpoints用CloudRun名] \
    --service-account=[CloudRun起動者のロールがついたサービスアカウント] \
    --image=gcr.io/endpoints-release/endpoints-runtime-serverless:2 \
    --set-env-vars=ESPv2_ARGS=--cors_preset=basic,ENDPOINTS_SERVICE_NAME=[CloudRunサービス名]
    --allow-unauthenticated \
    --platform managed \
    --region=asia-northeast1 \
    --project=[プロジェクトID]
※使用するContainer ImageはCloud Endpoints Container Registryから選択する
Cloud EndPointsの設定
-
Cloud EndPoints設定ファイルを作成する
ファイル名:openapi-run.yamlswagger: "2.0" info: title: [Cloud Endpoints上に表示される値] version: 1.0.0 # CLOUD_RUN_HOSTNAME を指定する host: [CloudEndpoints ホスト名 https://[ホスト名]] schemes: - https produces: - application/json # バックエンド構成のURLを記載 x-google-backend: address: [CloudRun API URL] protocol: h2 # バックエンド側に定義したPathは全て書く paths: # /postの設定を書く /post: post: operationId: post ## 実際にAPIに設定したパラメータを書く parameters: - name: model in: body schema: type: object properties: parameter1: type: string parameter2: type: string responses: "200": description: success schema: type: string security: - api_key: [] # /get/{query}の設定を書く /get/{query}: get: operationId: /get/{type} # パスに設定したパラメータを記載する parameters: - name: query required: true in: path type: string responses: "200": description: success schema: type: object security: - api_key: [] #下記がトークンを使用するための設定。 # apiキーをクエリに入れて使う想定 securityDefinitions: api_key: type: apiKey name: key in: query -
Cloud Endpointsを作成する
gcloud endpoints services deploy openapi-run.yaml \ --project [プロジェクトID] -
Cloud Endpointsで設定ファイルで指定したタイトルのサービスが作成されていることを確認する
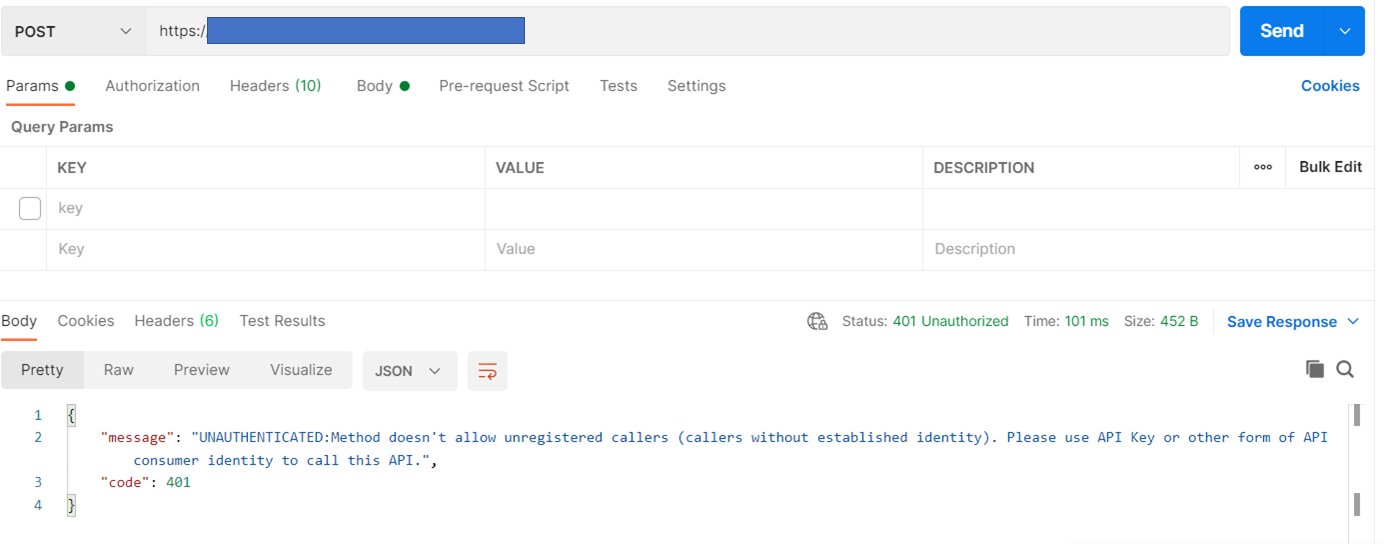
Postmanで動作確認
-
APIキーを入力しないでEndpointを叩いてみると401 Unauthorizedが返ってきている
-
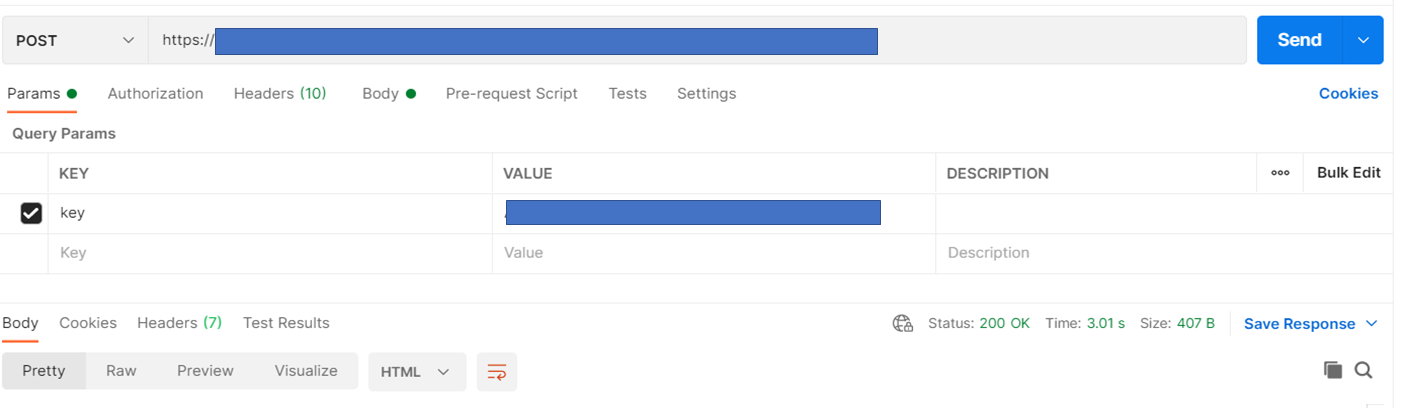
Query ParamsにAPIキーを設定してEndpointsを叩いてみると200 OKが返ってきており、正常に動作していることがわかる
感想
- yamlファイル作成する時にインデントや構文などでかなり怒られるのでSwagger作成補助ツールを使うと楽です。
- APIの仕様を変更するたびに、CloudEndpointsを再デプロイしなければならないのが少し手間だけど、作り方がわかれば楽にAPIキー認証が実装できる。