2024年10月頃に Power Apps Studio の画面が変わったんですよね。新旧比較の情報を歴史の断片として記録する記事です。
この記事は Microsoft Power Apps Advent Calendar 2024 に参加しています。
シリーズ3 12月5日 担当分の記事です。
気づき
ほぼ毎週金曜日 21時30分から YouTube Live でお届けしている Power Apps Weekly News。
#90 の配信中に確認した「What’s new in Power Apps: November 2024 Feature Update」で登場してるんですよ。
「Power Apps Studio を新しくしたぜウェーイ」という情報を。
Feature Update の Blog記事 からリンクされている Learn(Docs)を英語(en-us)と日本語(ja-jp)切り替えてみたら・・・「あらあら、ja-jp は古い画面レイアウトのまま説明が残っている!!」っていうのに気づいたんですよ。なので、せめて Power Apps Studio 全体像だけでも保存しておこうかな、となったのでした。
2024年10月より前の Power Apps Studio 画面
もしかすると、更新されて最新の画面になっているかもしれませんが・・・。この記事投稿時点(2024/12/21)は日本語ページは古い画面のままでした。

- Power Apps Studio モダン コマンド バー: 選択したコントロールに基づいて異なるコマンド セットを表示する動的コマンド バー。
- アプリ操作: プロパティの表示、コメントの追加、アプリ チェッカーの実行、アプリの共有、プレビュー、保存、公開を行うオプションです。
- プロパティ リスト : 選択したオブジェクトのプロパティのリスト (塗りつぶし または 高さなど)。
- 数式バー: 1 つ以上の関数を使用して、選択したプロパティの式を作成または編集します。
- アプリ作成メニュー: 選択ペインでデータソースを切り替え、オプションを挿入できます。
- アプリ作成のオプション: このペインでは、アプリの作成メニューから機能を選択すると、関連する作成機能が表示されます。
- キャンバス/スクリーン: アプリ構造を構成するためのプライマリ キャンバス。
- プロパティ ペイン - ツリー ビューで選択されたオブジェクトのプロパティ リスト。
- 設定と仮想オペレーター: 設定からアプリを構成したり、仮想オペレーターからアプリ構築のサポートを受けることができます。
- スクリーン セレクター: アプリ内の異なるスクリーンを切り替えます。 ツリー ビューの選択がここに表示されます。
- キャンバスのスクリーン サイズを変更する: アプリの作成に合わせてキャンバスの表示サイズを変更します。
2024年10月 Update 後の Power Apps Studio 画面
英語(en-us)は最新になってます。
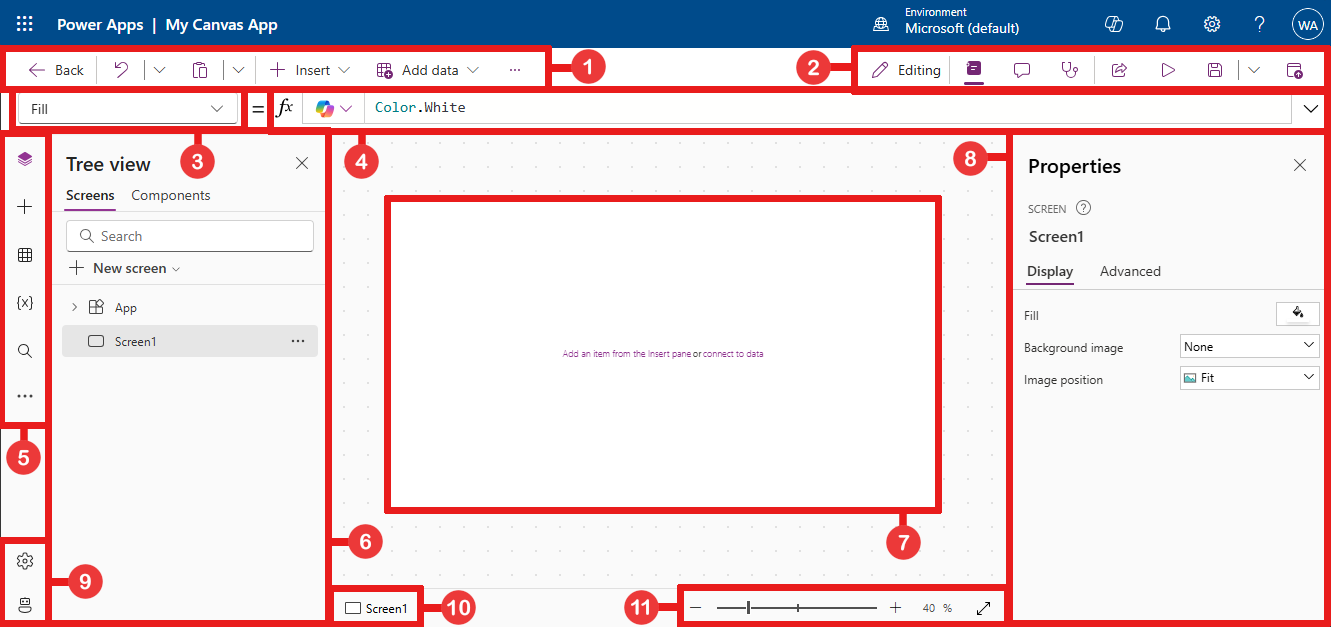
- Power Apps Studio modern command bar: Dynamic command bar that shows a different set of commands based on the control selected.
- App actions: Options to view properties, add comments, run the app checker, share, preview, save, or publish the app.
- Properties list: List of properties for the selected object, such as fill or height.
- Formula bar: Compose or edit a formula for the selected property with one or more functions.
- App authoring menu: Selection pane to switch between data sources and allows you to insert options.
- App authoring options: This pane reveals the corresonding authoring feature when a feature is selected from the app authoring menu.
- Canvas/screen: Primary canvas for composing the app structure.
- Properties pane: Properties list for the selected object in Tree view.
- Settings and virtual agent: Configure your app in settings or get help building your app with a virtual agent.
- Screen selector: Switch between different screens in your app. Tree view selections display here.
- Change canvas screen size: Change the display size of the canvas as you author your app.
個人的な感想
新しい画面ですが、アプリ作成メニューを「・・・」で省略した意味が不明ですよね。まだ縦方向に領域たくさんあるのに、なぜひと手間増やしたの?ってなります。また右側に表示されるプロパティペインの表示・非表示方法が変更になったのも、ひと手間増えてしまっているので、正直使い勝手が悪くなった、と感じています。
Power Automate のアイコンもなんか製品ロゴじゃないし、データソースも表じゃなくて DB アイコン(ドラム缶)のがわかりやすかったんじゃないのかなぁ、などと思ってしまいます。
慣れなのかなぁ?しばらく経つけど、慣れないですね汗
結び
「この画面変更 Before・After を記録しておくのぢゃ!」と神からのお告げがあった気がしたので、ササっと記事にまとめてみました。来年にでも「あー、この時はこんな画面だったねぇ」みたいな Power Apps 老人会にでも利用できたら良いな、と思っていますw
それでは、皆さま、素晴らしい Power Platform Life を!