pokeAPI
現場でAPIについて調べていた時に、見つけてしまいました。
「PokeAPI」という心躍るものをッッ!!
どんなAPIかといえば、ポケモンのあらゆる情報をJSON形式で取得できる夢のようなAPIです。
リクエストURLはこんな感じ
GET https://pokeapi.co/api/v2/pokemon/{id}or{name}
最後には「ポケモンの図鑑番号」か「ポケモンの英語名」を指定します。
※2023/1/3現在は図鑑番号905(ヒスイ地方まで)のポケモンまで取得可能
[追記]
現在は図鑑番号1008までの全てのポケモンを習得できるようになりました。
取得できる情報は
・名前
・タイプ
・特性
・覚えるわざ
・種族値
・登場ゲームバージョン
etc
公式サイトで実際に流して試す事ができるので覗いてみてください。
ポケモンのあらゆる付加情報を取得できますし、DBの代わりとして活用できます!
これを使ってポケモンのアプリを開発できそうだと思いました!
今絶賛ポケモンのAndroidアプリを開発中です!
作成過程もこれから記事に書こうかなと考えています
今回は簡単にPokeAPIを使ってKotlinで画面からポケモンの図鑑番号を受け取り、名前と画像を表示させてみたいと思います。
つらつらと長くなってしまいますがご容赦ください。。
環境
・macOS Monterey 12.6
・Andoroid Studio Dolphin | 2021.3.1 Patch 1
・Android SDK Android11.0(R)
・API Level 30
・Android SDK Build-Tools 33.0.1
・Gradle JDK 11.0.3(default)
依存関係
まずは依存関係を整理します。
今回はHttp通信にOkHttp3
取得したJSON文字列をオブジェクトにパースするためにserializationを使用します
今回、通信処理を行うため、まずAndroidManifest.xmlにインターネットへの接続許可を追加する必要があります。
<uses-permission android:name="android.permission.INTERNET" />
プロジェクトの方に以下を追記します。
plugins {
    //JSONパース用
    id 'org.jetbrains.kotlin.plugin.serialization' version '1.6.20' apply false
}
モジュールの方には以下を追記します。
plugins {
    //JSONパース用
    id 'org.jetbrains.kotlin.plugin.serialization'
}

android {

    //ビューオブジェクト取得用
    buildFeatures {
        viewBinding = true
    }
}
dependencies {

    //HTTP通信用(OkHttp3)
    implementation 'com.squareup.okhttp3:okhttp:4.9.0'
    //JSONパース用(serialization)
    implementation "org.jetbrains.kotlinx:kotlinx-serialization-json:1.3.2"
    //URL画像表示用
    implementation 'org.jetbrains.kotlinx:kotlinx-coroutines-core:1.3.8'
    implementation 'org.jetbrains.kotlinx:kotlinx-coroutines-android:1.5.2'
}
この追記でKotlinでAPIの送信とJSONをオブジェクトに変換して取り扱えます。
データクラスの作成
JSONデータをオブジェクトとして管理するために、データ構造に合わせてそれ用のクラスデータを作成します。
@Serializable
data class Pokemon(
    val abilities: List<PokemonAbility>?,
    @SerialName("base_experience") val baseExperience: Int?,
    val forms: List<PokemonForm>?,
    @SerialName("game_indices") val gameIndices: List<VersionGameIndex>?,
    val height: Int?,
    @SerialName("held_items") val heldItems: List<PokemonHeldItem>?,
    val id: Int?,
    @SerialName("is_default") val isDefault: Boolean?,
    @SerialName("location_area_encounters") val locationAreaEncounters: String?,
    val moves: List<PokemonMove>?,
    val name: String,
    val order: Int?,
    @SerialName("past_types") val pastTypes: List<PastType>?,
    val species: Species?,
    val sprites: PokemonSprites?,
    val stats: List<PokemonStat>?,
    val types: List<PokemonType>?,
    val weight: Int?,
)

@Serializable
data class PokemonAbility(
    val ability: Ability?,
    val slot: Int?,
    @SerialName("is_hidden")val isHidden: Boolean?
)
各データクラスに@SerializableをつけることでJSONから変換する対象に入れる事ができます。
上のデータクラスはほんの一部ですが、Pokemonというデータクラスがベースになります。
JSONのキーを変数にして型は値の型と合わせて作成していきます。
abilitiesはPokemonAbilityというオブジェクトのList型として帰ってきます。
よってPokemonの中に
val abilities List<PokemonAbility>を記述します。
PokemonAbilityというオブジェクトもデータクラスとして作成します。
ここでは省略していますが、PokemonFormというデータクラスも作成する必要があります。
JSONのキーの名前とデータクラスの変数名は一致させる必要がありますが
@SerialNameをつけると扱いやすい任意の変数の名前に変えて変換することもできます。
画面レイアウト
<?xml version="1.0" encoding="utf-8"?>
<androidx.constraintlayout.widget.ConstraintLayout xmlns:android="http://schemas.android.com/apk/res/android"
    xmlns:app="http://schemas.android.com/apk/res-auto"
    xmlns:tools="http://schemas.android.com/tools"
    android:layout_width="match_parent"
    android:layout_height="match_parent"
    tools:context=".MainActivity">

    <TextView
        android:id="@+id/textView"
        android:layout_width="wrap_content"
        android:layout_height="wrap_content"
        android:layout_marginTop="250dp"
        android:text="@string/pokemon"
        app:layout_constraintBottom_toTopOf="@+id/imageView"
        app:layout_constraintEnd_toEndOf="parent"
        app:layout_constraintHorizontal_bias="0.498"
        app:layout_constraintStart_toStartOf="parent"
        app:layout_constraintTop_toTopOf="parent"
        app:layout_constraintVertical_bias="0.696" />

    <Button
        android:id="@+id/button"
        android:layout_width="wrap_content"
        android:layout_height="wrap_content"
        android:layout_marginBottom="200dp"
        android:text="@string/swich"
        app:layout_constraintBottom_toBottomOf="parent"
        app:layout_constraintEnd_toEndOf="parent"
        app:layout_constraintStart_toStartOf="parent"
        app:layout_constraintTop_toBottomOf="@+id/imageView"
        app:layout_constraintVertical_bias="1.0" />

    <EditText
        android:id="@+id/editTextNumber"
        android:layout_width="355dp"
        android:layout_height="51dp"
        android:ems="10"
        android:hint="図鑑番号"
        android:inputType="number"
        app:layout_constraintBottom_toBottomOf="parent"
        app:layout_constraintEnd_toEndOf="parent"
        app:layout_constraintStart_toStartOf="parent"
        app:layout_constraintTop_toBottomOf="@+id/button" />

    <ImageView
        android:id="@+id/imageView"
        android:layout_width="193dp"
        android:layout_height="203dp"
        android:layout_marginTop="30dp"
        android:layout_marginBottom="150dp"
        app:layout_constraintBottom_toTopOf="@+id/button"
        app:layout_constraintEnd_toEndOf="parent"
        app:layout_constraintHorizontal_bias="0.498"
        app:layout_constraintStart_toStartOf="parent"
        app:layout_constraintTop_toBottomOf="@+id/textView"
        app:srcCompat="@color/white" />

    <ProgressBar
        android:id="@+id/progressBar"
        style="?android:attr/progressBarStyle"
        android:layout_width="wrap_content"
        android:layout_height="wrap_content"
        app:layout_constraintBottom_toBottomOf="parent"
        app:layout_constraintEnd_toEndOf="parent"
        app:layout_constraintHorizontal_bias="0.498"
        app:layout_constraintStart_toStartOf="parent"
        app:layout_constraintTop_toTopOf="parent"
        app:layout_constraintVertical_bias="0.433" />

</androidx.constraintlayout.widget.ConstraintLayout>
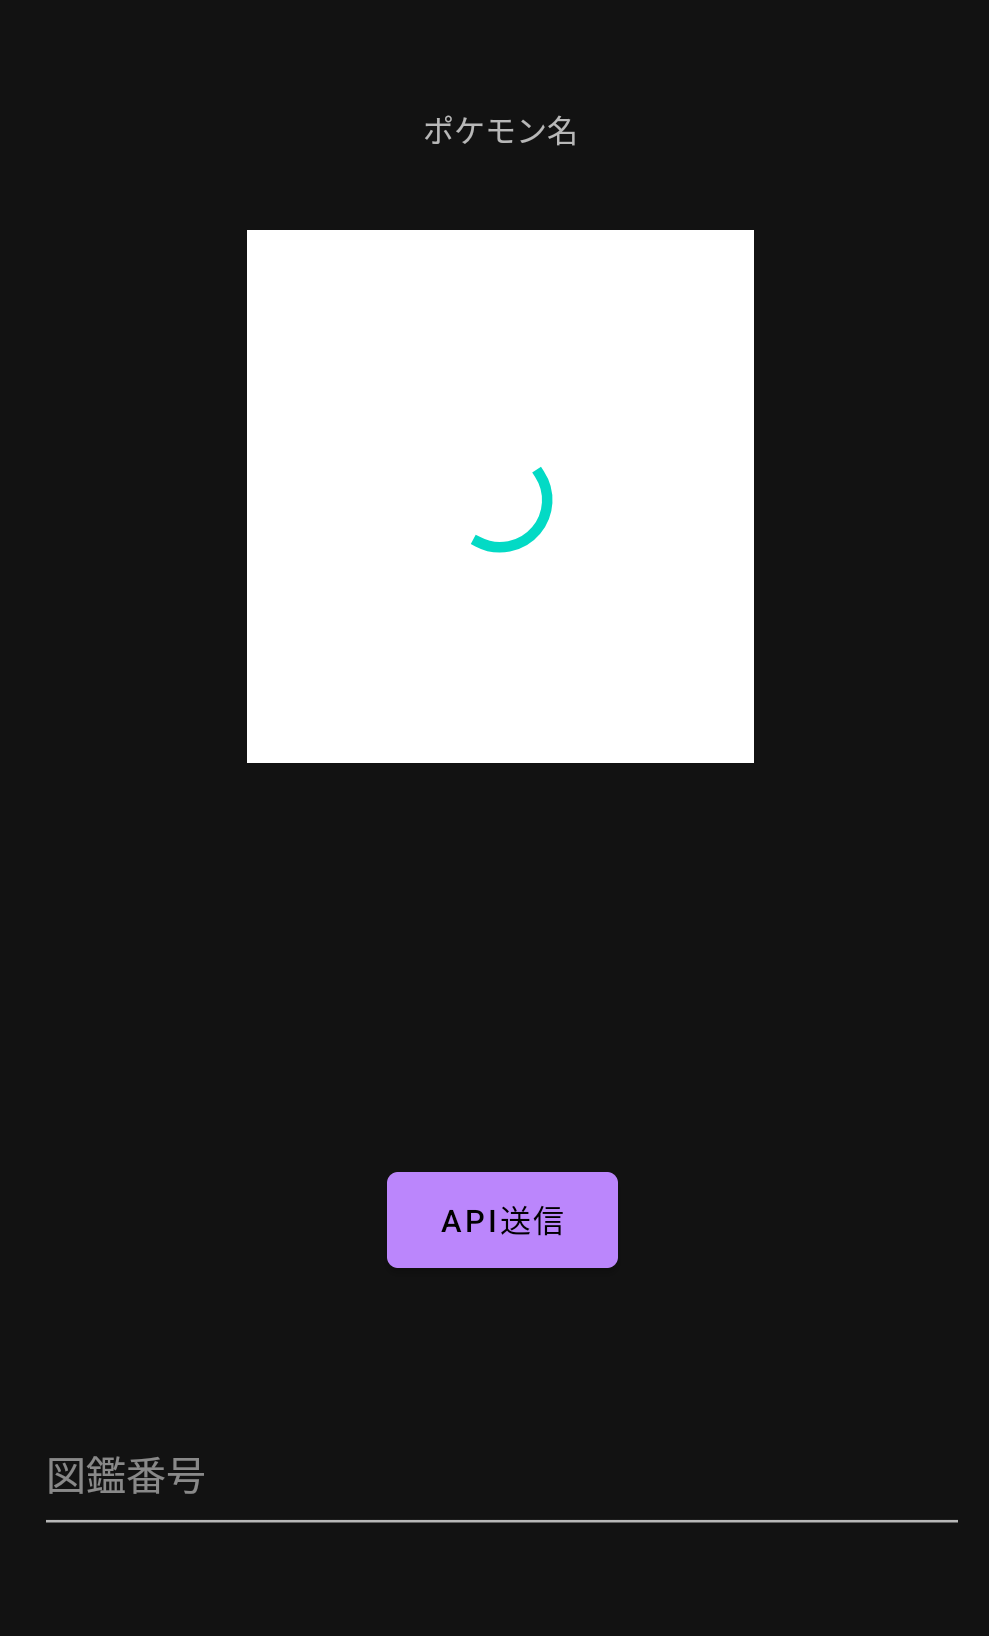
非常に簡単な画面ですが、
・図鑑番号を入力するフォーム
・API送信ボタン
・ポケモン名表示テキスト
・ポケモン画像表示
を作成します。
※ポケモン画像が表示されるまではローディングマークがくるくる回るようにしています。
ビューオブジェクトの操作設定
今回は図鑑番号を入力して「API送信」ボタンを押下するとリクエストが送信されて図鑑番号のポケモンの情報が取得できるようにします。
画面から情報を受け渡しするためにベースになる記述をしていきます。
class MainActivity : AppCompatActivity() {
    private lateinit var  binding: ActivityMainBinding

    override fun onCreate(savedInstanceState: Bundle?) {
        super.onCreate(savedInstanceState)
        binding = ActivityMainBinding.inflate(layoutInflater)
        val view = binding.root
        setContentView(view)

        binding.button.setOnClickListener {
            //ここにボタンを押した後の処理を記述
        }
}
自動生成されるコードにビューバインディングの設定を追記して、ビューオブジェクトの参照を取得出来るようにします。
ビューバインディングの設定が有効になればsetOnClickListenerの中でbuttonというidを持つボタン(「API送信」)がクリックされた後の処理を書いていきます。
今回はここにAPIを叩いて画面の表示を変更する処理をまとめて書いていきます!
いざAPI送信!
ではKotlinでAPIを送信していきましょう。
OkHttp3を使ってリクエストを送信してレスポンスを取得するだけなんですが
個人的にここの開発が一番時間を要してしまいました。
// OkHttpClientを作成
private val client = OkHttpClient.Builder()
    .connectTimeout(100000, TimeUnit.MILLISECONDS)
    .readTimeout(100000.toLong(), TimeUnit.MILLISECONDS)
    .build()


var responseBody = startGetRequest("https://pokeapi.co/api/v2/pokemon/246")

private fun startGetRequest(url:String): String? {
    // Requestを作成
    val request: Request = Request.Builder()
        .url(url)
        .build()

     client.newCall(request).execute().use { response ->
         return response.body?.string()
     }
}
結果的にはこんな簡単な記述でAPIを叩く事ができました。
これでresponseBodyにはJSONデータが文字列で代入されます。
JSONデータをパースする
このままではせっかく取得できたresponseBodyは文字列なので、中身のポケモン情報を取り扱う事ができません。
ということでJSONデータを用意したオブジェクト(Pokemon)に変換して、それぞれのデータを変数やオブジェクトとして使えるようにパースします。
var pokemon = Json.decodeFromString<Pokemon>(responseBody)
先ほど作成したPokemonというクラスデータを指定してresponseBodyという文字列をデコードする形で変換できます。
なのでこのpokemonという変数の型はPokemonになり、ここにポケモンの付加情報が入っているので以下のように任意の値を取り出す事ができます。
println(pokmeon.name)
println(pokmeon.id)

//結果
larvitar
246
※larvitarは日本名でヨーギラスです。
ポケモン情報を画面に出力
APIで取得したポケモンの情報を画面に出力します。
ただ画面に出力するだけなので詳細は割愛します。
ソース全文はざっとこんな感じ。
class MainActivity : AppCompatActivity() {
    private lateinit var  binding: ActivityMainBinding

    // OkHttpClientを作成
    private val client = OkHttpClient.Builder()
        .connectTimeout(100000, TimeUnit.MILLISECONDS)
        .readTimeout(100000.toLong(), TimeUnit.MILLISECONDS)
        .build()

    private val coroutineScope = CoroutineScope(Dispatchers.Main)

    override fun onCreate(savedInstanceState: Bundle?) {
        super.onCreate(savedInstanceState)
        binding = ActivityMainBinding.inflate(layoutInflater)
        val view = binding.root
        setContentView(view)

        //APIボタンが送信されると流れる処理
        binding.button.setOnClickListener {

            //画面から図鑑番号を受け取り
            var pokemonNumber = binding.editTextNumber.text
            //リクエストURLを作成
            var requestUrl = "https://pokeapi.co/api/v2/pokemon/" + pokemonNumber

            //別スレッドでAPIを処理
            Thread {
                //ハンドラーを生成(別スレッドで画面を操作するために必要)
                val handler : Handler = Handler(Looper.getMainLooper())

                //pokeAPIを叩く(レスポンスボディの取得)
                var responseBody = startGetRequest(requestUrl)

                if (responseBody != null) {
                    //JSONをPokemonクラスに変換
                    var pokemon = Json.decodeFromString<Pokemon>(responseBody)

                    //ポケモン名を取得
                    var pokemonName = pokemon.name

                    //ポケモンの画像を取得
                    var pokemonImage = pokemon.sprites?.frontDefault

                    //ポケモンのURL画像を画面に表示させる
                    coroutineScope.launch {
                        val originalDeferred = coroutineScope.async(Dispatchers.IO) {
                            getOriginalBitmap(pokemonImage)
                        }

                        val originalBitmap = originalDeferred.await()
                        loadImage(originalBitmap)
                    }

                    //メインスレッド意外ではこの処理が必要
                    handler.post {
                        //ポケモンの名前を表示
                        binding.textView.text = pokemonName
                    }
                } else {
                    //TODO:存在しないポケモンが入力されたらエラー処理
                }
            }.start()
        }
    }
    @Throws(IOException::class)
    private fun startGetRequest(url:String): String? {
        // リクエストを作成
        val request: Request = Request.Builder()
            .url(url)
            .build()

        //レスポンスの取得
        client.newCall(request).execute().use { response ->
            return response.body?.string()
        }
    }

    private fun getOriginalBitmap(imageUrl: String?): Bitmap =
        URL(imageUrl).openStream().use {
            BitmapFactory.decodeStream(it)
        }

    private fun loadImage(bmp: Bitmap) {
        val progressBar = binding.progressBar
        val imageView = binding.imageView
        progressBar.visibility = View.GONE
        imageView.setImageBitmap(bmp)
        imageView.visibility = View.VISIBLE
    }
}
実際の画面
2.図鑑番号入力欄に任意の図鑑番号(1~905)を入力して、API送信ボタンを押下

2.図鑑番号に対応したポケモンの名前と画像が表示される

まとめ
現在はヒスイ地方までのポケモンまでしか取得できませんが、新作(第9世代)のポケモンの情報も取得できれば、対戦補助アプリとか作れそうだなと思いました。
個人的にAPIを叩くところとクラスデータを作成するところが難航しましたが。。。
クラスデータはAndroid StudioでJSONから自動的に作成してくれるものもありますが思ったものが作成されなかったので自力で作成しました。