はじめに
皆さん、こんにちは!
AIチャットボット、どんどん進化してますね。
今回は、Go言語を使って、自分だけのAIチャットボットを作成・管理できるWebアプリを作ってみました。
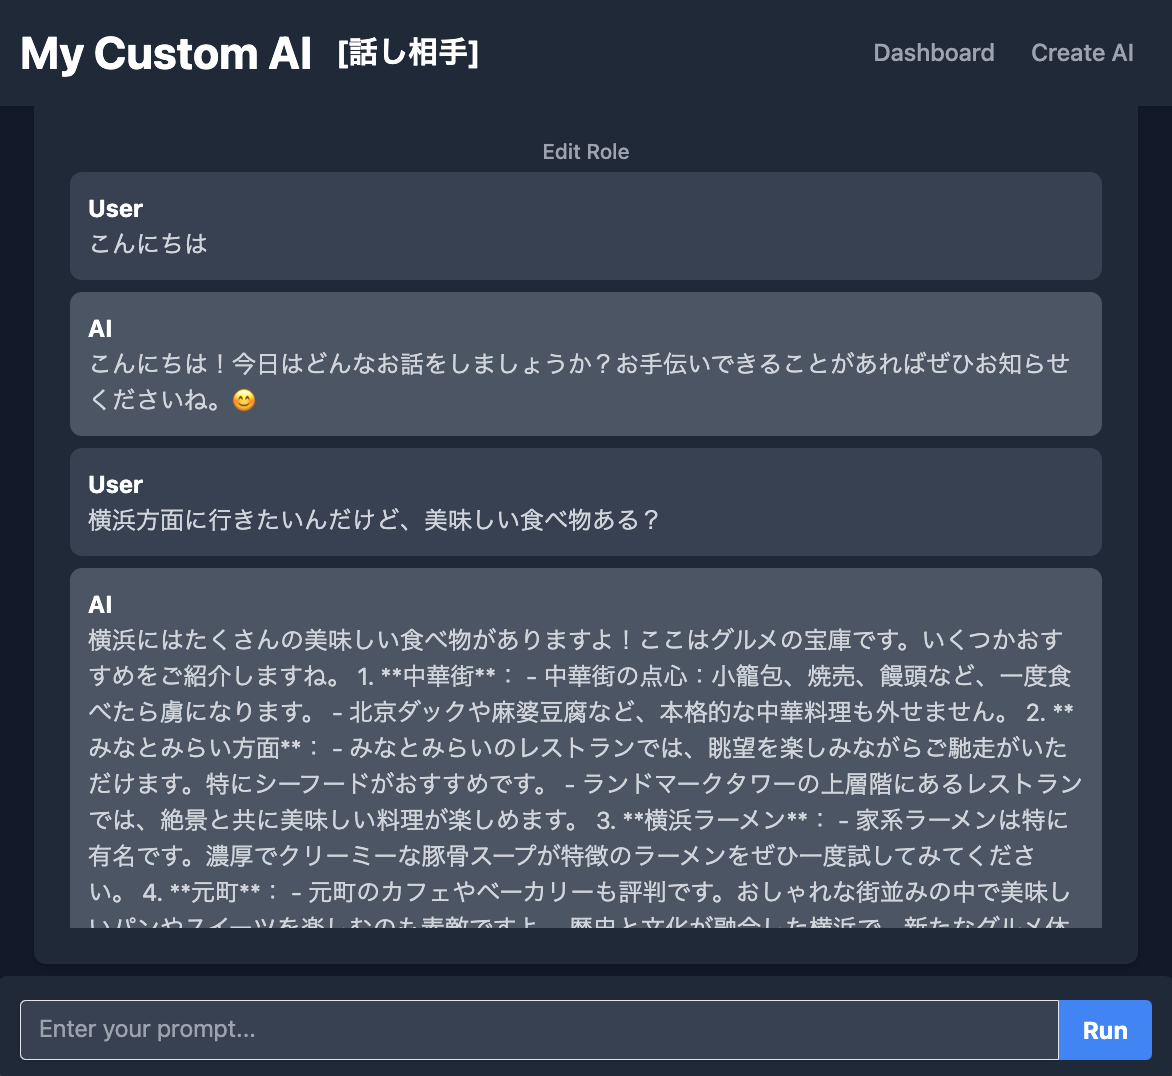
完成イメージ
最初に完成イメージを載せてた方が分かりやすいですよね。
(今度からそうしよう)
要件
- 役割を設定したAIを複数作ることができる
- 入力欄にプロンプトを入力して「Run」ボタンをクリックすると、AIが回答を生成する
- 履歴は画面中央に表示され、スクロールする
技術スタック
- Go: 軽量かつ高速なプログラミング言語
- Gin: GoのWebアプリケーションフレームワーク / 今回はテンプレートを使います
- Tailwind CSS: utilityファーストなCSSフレームワーク
- OpenAI API: AIチャットボット機能を実装するために、OpenAIのAPIを利用
- DB: 今回は簡易的に、JSONで管理
フロントはReact等を使っても良かったのですが、久々にテンプレートを使うことにしました。
プロジェクトの始め方
以下のようなコマンドを実行します。
mkdir go-may-ai
cd go-may-ai
go mod init go-may-ai
あとはVSCodeなどで実装しましょう!
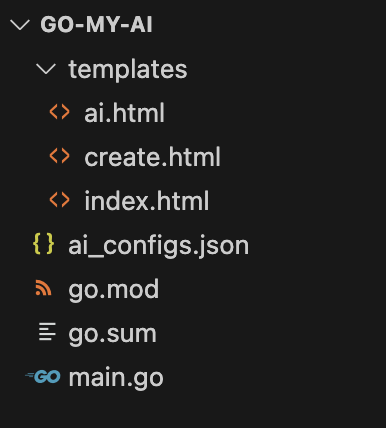
ディレクトリ構成
ai_configs.json が DB の代わりです。
実装
main.go
package main

import (
	"encoding/json"
	"fmt"
	"html/template"
	"io/ioutil"
	"net/http"
	"os"
	"strconv"

	"github.com/gin-gonic/gin"
	"github.com/sashabaranov/go-openai"
)

// AIの設定を保持する構造体
type AIConfig struct {
	ID      int               `json:"id"`
	Name    string            `json:"name"`
	Type    string            `json:"type"`
	Options map[string]string `json:"options"` // "Role"と"Model"を格納
	History []ChatMessage     `json:"history"`
}

// チャットメッセージ
type ChatMessage struct {
	Role    string `json:"role"`
	Content string `json:"content"`
}

// AIConfigのスライス
type AIConfigs []AIConfig

// DBファイル名
const dbFileName = "ai_configs.json"

// DBからAIの設定を読み込む
func (a *AIConfigs) LoadDB() error {
	if _, err := os.Stat(dbFileName); err == nil {
		data, err := ioutil.ReadFile(dbFileName)
		if err != nil {
			return fmt.Errorf("failed to read DB file: %w", err)
		}
		if err := json.Unmarshal(data, a); err != nil {
			return fmt.Errorf("failed to unmarshal DB data: %w", err)
		}
	}
	return nil
}

// AIの設定を保存
func (a *AIConfigs) SaveDB() error {
	data, err := json.MarshalIndent(a, "", "  ")
	if err != nil {
		return fmt.Errorf("failed to marshal DB data: %w", err)
	}
	if err := ioutil.WriteFile(dbFileName, data, 0644); err != nil {
		return fmt.Errorf("failed to write DB file: %w", err)
	}
	return nil
}

// AIの設定を取得
func (a *AIConfigs) GetByID(id int) (*AIConfig, error) {
	for _, config := range *a {
		if config.ID == id {
			return &config, nil
		}
	}
	return nil, fmt.Errorf("AI config not found for ID: %d", id)
}

// AIの設定を追加
func (a *AIConfigs) Add(newConfig *AIConfig) error {
	newConfig.ID = len(*a) + 1
	*a = append(*a, *newConfig)
	return a.SaveDB()
}

// AIの設定を更新
func (a *AIConfigs) Update(updatedConfig *AIConfig) error {
	for i, config := range *a {
		if config.ID == updatedConfig.ID {
			(*a)[i] = *updatedConfig
			return a.SaveDB()
		}
	}
	return fmt.Errorf("AI config not found for ID: %d", updatedConfig.ID)
}

var aiConfigs AIConfigs

func main() {
	// DBからAIの設定を読み込む
	err := aiConfigs.LoadDB()
	if err != nil {
		panic(err)
	}

	router := gin.Default()
	router.SetFuncMap(template.FuncMap{
		"add": func(a, b int) int { return a + b },
	})
	router.LoadHTMLGlob("templates/*.html")
	router.Static("/assets", "./assets")

	// ダッシュボード
	router.GET("/", func(c *gin.Context) {
		c.HTML(http.StatusOK, "index.html", gin.H{
			"AIConfigs": aiConfigs,
		})
	})

	// AI作成画面
	router.GET("/create", func(c *gin.Context) {
		c.HTML(http.StatusOK, "create.html", nil)
	})
	router.POST("/create", func(c *gin.Context) {
		name := c.PostForm("name")
		aitype := c.PostForm("type")
		apikey := c.PostForm("api-key")
		model := c.PostForm("model")
		newConfig := &AIConfig{
			Name: name,
			Type: aitype,
			Options: map[string]string{
				"APIKey": apikey,
				"Model":  model,
			},
			History: []ChatMessage{},
		}
		err := aiConfigs.Add(newConfig)
		if err != nil {
			c.String(http.StatusInternalServerError, fmt.Sprintf("Failed to add AI config: %v", err))
			return
		}
		c.Redirect(http.StatusSeeOther, "/")
	})

	// AI画面
	router.GET("/ai/:id", func(c *gin.Context) {
		id, err := strconv.Atoi(c.Param("id"))
		if err != nil {
			c.String(http.StatusBadRequest, "Invalid ID")
			return
		}
		config, err := aiConfigs.GetByID(id)
		if err != nil {
			c.String(http.StatusNotFound, "AI config not found")
			return
		}
		c.HTML(http.StatusOK, "ai.html", gin.H{
			"AIConfig": config,
		})
	})

	router.POST("/ai/:id/chat", func(c *gin.Context) {
		id, err := strconv.Atoi(c.Param("id"))
		if err != nil {
			c.String(http.StatusBadRequest, "Invalid ID")
			return
		}

		config, err := aiConfigs.GetByID(id)
		if err != nil {
			c.String(http.StatusNotFound, "AI config not found")
			return
		}

		input := c.PostForm("input")

		// --- OpenAI APIとのやりとり ---
		client := openai.NewClient(config.Options["APIKey"])
		resp, err := client.CreateChatCompletion(
			c,
			openai.ChatCompletionRequest{
				Model: config.Options["Model"],
				Messages: []openai.ChatCompletionMessage{
					{
						Role:    "system",
						Content: config.Options["Role"],
					},
					{
						Role:    "user",
						Content: input,
					},
				},
			},
		)

		if err != nil {
			// OpenAI APIからエラーが発生した場合、エラーを処理
			c.String(http.StatusInternalServerError, fmt.Sprintf("OpenAI API Error: %v", err))
			return
		}

		aiResponse := resp.Choices[0].Message.Content
		// --- OpenAI APIとのやりとりの終了 ---

		// チャット履歴を更新
		config.History = append(config.History, ChatMessage{Role: "user", Content: input})
		config.History = append(config.History, ChatMessage{Role: "AI", Content: aiResponse})

		err = aiConfigs.Update(config)
		if err != nil {
			c.String(http.StatusInternalServerError, fmt.Sprintf("Failed to update AI config: %v", err))
			return
		}

		// AIのレスポンスのみを返す
		c.String(http.StatusOK, aiResponse)
	})

	// Roleの更新 (POST)
	router.POST("/ai/:id/role", func(c *gin.Context) {
		id, err := strconv.Atoi(c.Param("id"))
		if err != nil {
			c.String(http.StatusBadRequest, "Invalid ID")
			return
		}

		config, err := aiConfigs.GetByID(id)
		if err != nil {
			c.String(http.StatusNotFound, "AI config not found")
			return
		}

		role := c.PostForm("role")
		config.Options["Role"] = role // Roleを更新

		err = aiConfigs.Update(config) // DBに更新を保存
		if err != nil {
			c.String(http.StatusInternalServerError, fmt.Sprintf("Failed to update AI config: %v", err))
			return
		}

		// リダイレクト (元のAI画面に戻る)
		c.Redirect(http.StatusSeeOther, fmt.Sprintf("/ai/%d", id))
	})

	// サーバーを起動
	port := os.Getenv("PORT")
	if port == "" {
		port = "8080"
	}
	router.Run(":" + port)
}
index.html
ダッシュボード
<!DOCTYPE html>
<html lang="ja">
<head>
  <meta charset="UTF-8">
  <meta name="viewport" content="width=device-width, initial-scale=1.0">
  <title>My Custom AI Dashboard</title>
	<link rel="stylesheet" href="https://cdn.jsdelivr.net/npm/tailwindcss@2.2.19/dist/tailwind.min.css">
</head>
<body class="bg-gray-900">
    <header class="bg-gray-800 py-4 fixed top-0 left-0 right-0 z-10 flex justify-between items-center px-4">
        <div class="flex items-center">
            <h1 class="text-white text-3xl font-bold"><a href="/">My Custom AI</a></h1>
        </div>
        <nav class="flex">
            <a href="/" class="text-gray-400 hover:text-white px-3 py-2 rounded-md font-medium">Dashboard</a>
            <a href="/create" class="text-gray-400 hover:text-white px-3 py-2 rounded-md font-medium">Create AI</a>
        </nav>
        </header>
      <main class="container mx-auto px-4 py-20">
    <a href="/create" class="bg-green-500 hover:bg-green-700 text-white font-bold py-2 px-4 rounded mb-4 inline-block">
      Create AI
    </a>
    <div class="grid grid-cols-1 sm:grid-cols-2 md:grid-cols-3 lg:grid-cols-4 gap-4">
      {{ range $index, $config := .AIConfigs }}
      <a href="/ai/{{ $config.ID }}" class="bg-gray-800 hover:bg-gray-700 shadow-md rounded-lg p-6">
        <h2 class="text-xl font-bold text-white">{{ $config.Name }}</h2>
        <p class="text-gray-400">{{ $config.Options.Model }}</p>
      </a>
      {{ end }}
    </div>
  </main>
</body>
</html>
create.html
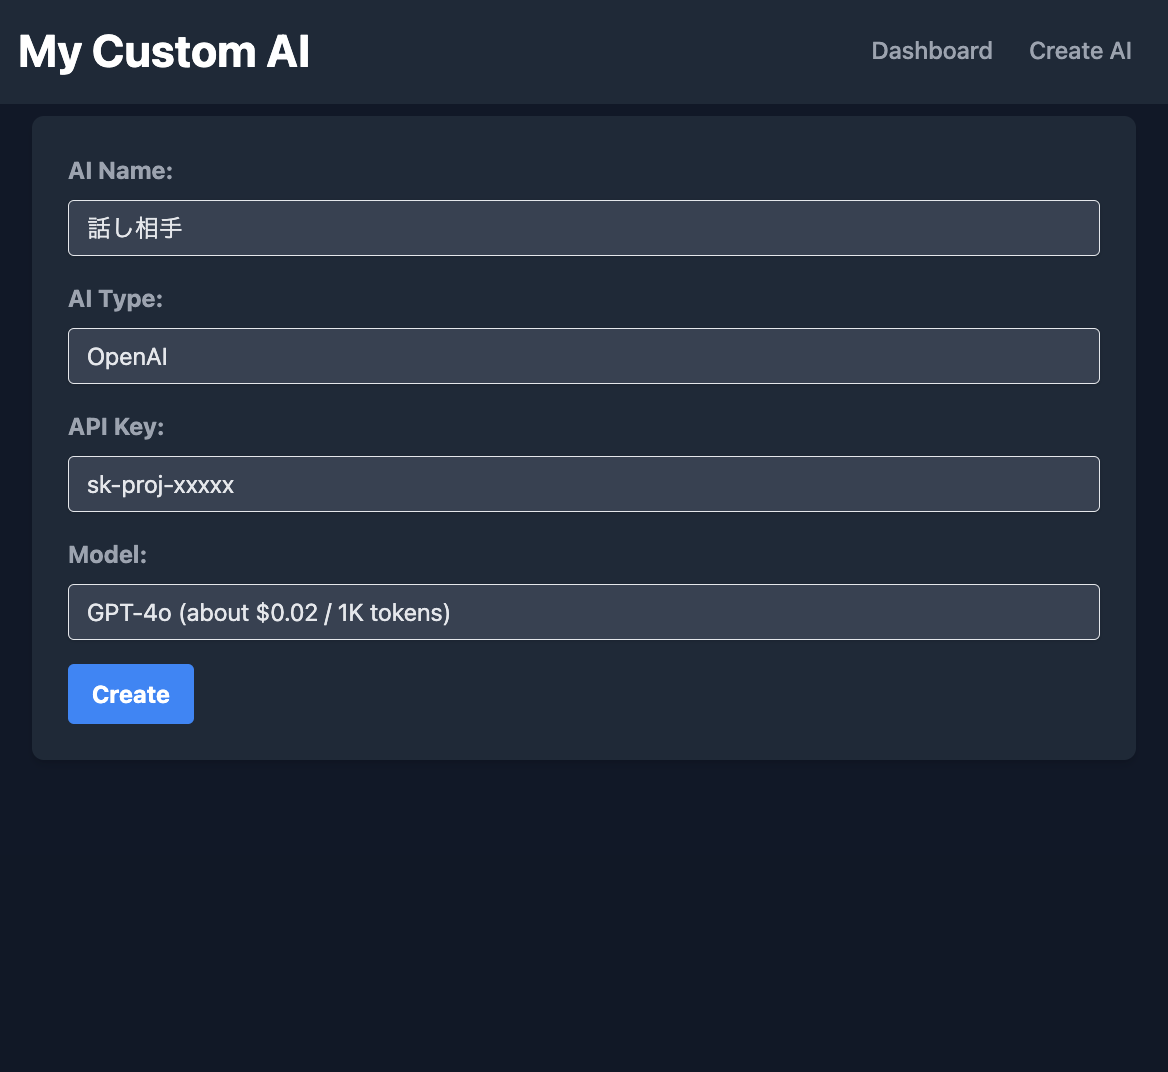
AIの作成画面。
今回は、OpenAI限定の実装です。
<!DOCTYPE html>
<html lang="ja">
  <head>
    <meta charset="UTF-8" />
    <meta name="viewport" content="width=device-width, initial-scale=1.0" />
    <title>Create AI</title>
    <link
      rel="stylesheet"
      href="https://cdn.jsdelivr.net/npm/tailwindcss@2.2.19/dist/tailwind.min.css"
    />
  </head>
  <body class="bg-gray-900">
    <header class="bg-gray-800 py-4 fixed top-0 left-0 right-0 z-10 flex justify-between items-center px-4">
        <div class="flex items-center">
            <h1 class="text-white text-3xl font-bold"><a href="/">My Custom AI</a></h1>
        </div>
        <nav class="flex">
            <a href="/" class="text-gray-400 hover:text-white px-3 py-2 rounded-md font-medium">Dashboard</a>
            <a href="/create" class="text-gray-400 hover:text-white px-3 py-2 rounded-md font-medium">Create AI</a>
        </nav>
    </header>
    <main class="container mx-auto px-4 py-8">
      <h2 class="text-2xl font-bold text-white mb-4">Create AI</h2>
      <form
        action="/create"
        method="post"
        class="bg-gray-800 shadow-md rounded-lg p-6"
      >
        <div class="mb-4">
          <label for="name" class="block text-gray-400 font-bold mb-2">AI Name:</label>
          <input
            type="text"
            id="name"
            name="name"
            required
            class="shadow appearance-none border rounded w-full py-2 px-3 text-gray-200 bg-gray-700 leading-tight focus:outline-none focus:shadow-outline"
          />
        </div>
        <div class="mb-4">
          <label for="type" class="block text-gray-400 font-bold mb-2">AI Type:</label>
          <select
            id="type"
            name="type"
            class="shadow appearance-none border rounded w-full py-2 px-3 text-gray-200 bg-gray-700 leading-tight focus:outline-none focus:shadow-outline"
          >
            <option value="OpenAI">OpenAI</option>
            </select>
        </div>
        <div id="options" class="mb-4">
          <div id="openai-options">
            <div class="mb-4">
              <label for="api-key" class="block text-gray-400 font-bold mb-2">API Key:</label>
              <input
                type="text"
                id="api-key"
                name="api-key"
                required
                class="shadow appearance-none border rounded w-full py-2 px-3 text-gray-200 bg-gray-700 leading-tight focus:outline-none focus:shadow-outline"
              />
            </div>
            <div class="mb-4">
              <label for="model" class="block text-gray-400 font-bold mb-2">Model:</label>
              <select
                id="model"
                name="model"
                class="shadow appearance-none border rounded w-full py-2 px-3 text-gray-200 bg-gray-700 leading-tight focus:outline-none focus:shadow-outline"
              >
              <option value="gpt-4o">GPT-4o (about $0.02 / 1K tokens)</option>
              <option value="gpt-4-turbo">GPT-4 (about $0.04 / 1K tokens)</option>
              <option value="gpt-3.5-turbo">GPT-3.5 Turbo (about $0.002 / 1K tokens)</option>
              </select>
            </div>
          </div>
        </div>
        <div class="flex items-center justify-between">
          <button
            type="submit"
            class="bg-blue-500 hover:bg-blue-700 text-white font-bold py-2 px-4 rounded focus:outline-none focus:shadow-outline"
          >
            Create
          </button>
        </div>
      </form>
    </main>
  </body>
</html>
ai.html
AIとのチャット画面。
役割を設定できるようになってます。
<!DOCTYPE html>
<html lang="ja">
<head>
  <meta charset="UTF-8">
  <meta name="viewport" content="width=device-width, initial-scale=1.0">
  <title>AI - {{ .AIConfig.Name }}</title>
  <link rel="stylesheet" href="https://cdn.jsdelivr.net/npm/tailwindcss@2.2.19/dist/tailwind.min.css">
  <script src="https://cdn.tailwindcss.com"></script>
  <script>
    function toggleRole() {
      var roleDiv = document.getElementById("roleDiv");
      roleDiv.style.display = roleDiv.style.display === "none" ? "block" : "none";
    }

    function scrollToBottom(elementId) {
      var element = document.getElementById(elementId);
      element.scrollTop = element.scrollHeight;
    }
  </script>
</head>
<body class="bg-gray-900">
  <header class="bg-gray-800 py-4 fixed top-0 left-0 right-0 z-10 flex justify-between items-center px-4">
    <div class="flex items-center">
        <h1 class="text-white text-3xl font-bold"><a href="/">My Custom AI</a></h1>
        <h2 class="text-white text-xl font-bold ml-4">[{{ .AIConfig.Name }}]</h2>
    </div>
    <nav class="flex">
        <a href="/" class="text-gray-400 hover:text-white px-3 py-2 rounded-md font-medium">Dashboard</a>
        <a href="/create" class="text-gray-400 hover:text-white px-3 py-2 rounded-md font-medium">Create AI</a>
    </nav>
    </header>

  <main class="container mx-auto px-4 py-16 flex flex-col h-screen">

    <div class="flex-grow flex flex-col bg-gray-800 shadow-md rounded-lg p-6 mb-4 overflow-hidden">
        <button onclick="toggleRole()"
                class="text-gray-400 hover:text-white focus:outline-none px-2 py-1 rounded-md text-sm font-medium">
          <span id="roleButtonText">
            {{ if .AIConfig.Options.Role }} Edit Role {{ else }} Set Role {{ end }}
          </span>
        </button>

      <div id="roleDiv" style="display: none;">
        <form action="/ai/{{ .AIConfig.ID }}/role" method="post" class="mb-4">
          <label for="role" class="block text-gray-400 font-bold mb-2">Role:</label>
          <input type="text" id="role" name="role" value="{{ .AIConfig.Options.Role }}"
                 placeholder="e.g., You are an excellent marketer."
                 class="shadow appearance-none border rounded w-full py-2 px-3 text-gray-200 bg-gray-700 leading-tight focus:outline-none focus:shadow-outline">
          <button type="submit" class="bg-blue-500 hover:bg-blue-700 text-white font-bold py-2 px-4 rounded focus:outline-none focus:shadow-outline mt-2">
              Update Role
          </button>
        </form>
      </div>

      <div id="chatHistory" class="chat-history overflow-y-auto flex-grow">
        {{ range .AIConfig.History }}
          <div class="chat-message {{if eq .Role "user"}}bg-gray-700{{else}}bg-gray-600{{end}} rounded-lg p-3 mb-2 break-words">
            <p class="text-white font-bold">{{.Role}}</p>
            <p class="text-gray-300">{{.Content}}</p>
          </div>
        {{ end }}
      </div>
    </div>

    <div class="bg-gray-800 shadow-md rounded-lg p-4 fixed bottom-0 left-0 right-0 flex" id="promptArea">
        <form action="/ai/{{ .AIConfig.ID }}/chat" method="post" id="promptForm" class="flex w-full">
          <textarea id="input" name="input" placeholder="Enter your prompt..."
                    class="shadow appearance-none border rounded-l w-full py-2 px-3 text-gray-200 bg-gray-700 leading-tight focus:outline-none focus:shadow-outline resize-none"
                    rows="1"></textarea>
          <input type="hidden" name="role" value="{{ .AIConfig.Options.Role }}">
          <button type="submit" class="bg-blue-500 hover:bg-blue-700 text-white font-bold py-2 px-4 rounded-r focus:outline-none focus:shadow-outline">
            Run
          </button>
        </form>
        <div id="loading" class="hidden ml-2">
          <svg class="animate-spin h-5 w-5 text-white" viewBox="0 0 24 24">
            <circle class="opacity-75" cx="12" cy="12" r="10" stroke="currentColor" stroke-width="4"/>
            <path class="opacity-25" fill="currentColor" d="M12 14l4.24-4.24L14.81 8.63 8.63 14.81 12 14z"/>
          </svg>
        </div>
    </div>

  </main>

  <script>
    document.addEventListener('DOMContentLoaded', function() {
      document.getElementById("promptForm").addEventListener('submit', function(e) {
        e.preventDefault(); // ページのリロードを防止

        var form = e.target;
        var input = document.getElementById("input").value;
        var role = document.querySelector('input[name="role"]').value;
        var chatHistory = document.getElementById("chatHistory");

        // プロンプトを履歴に追加
        var userMessage = document.createElement('div');
        userMessage.classList.add("chat-message", "bg-gray-700", "rounded-lg", "p-3", "mb-2", "break-words");
        userMessage.innerHTML = `<p class="text-white font-bold">User</p><p class="text-gray-300">${input}</p>`;
        chatHistory.appendChild(userMessage);

        // 履歴を一番下までスクロール
        scrollToBottom("chatHistory");

        // ローディングインジケーターを表示
        document.getElementById("loading").classList.remove("hidden");

        // AJAX でプロンプトを送信
        fetch(`/ai/{{ .AIConfig.ID }}/chat`, {
          method: 'POST',
          headers: { 'Content-Type': 'application/x-www-form-urlencoded' },
          body: `input=${encodeURIComponent(input)}&role=${encodeURIComponent(role)}`
        })
        .then(response => response.text())
        .then(aiResponse => {
          // レスポンスを履歴に追加
          var aiMessage = document.createElement('div');
          aiMessage.classList.add("chat-message", "bg-gray-600", "rounded-lg", "p-3", "mb-2", "break-words");
          aiMessage.innerHTML = `<p class="text-white font-bold">AI</p><p class="text-gray-300">${aiResponse}</p>`;
          chatHistory.appendChild(aiMessage);

          // ローディングインジケーターを非表示にする
          document.getElementById("loading").classList.add("hidden");

          // 入力欄をクリア
          document.getElementById("input").value = '';

          // 履歴を一番下までスクロール
          scrollToBottom("chatHistory");
        })
        .catch(error => {
          // 例外処理が必要な場合は、ここに実装
          console.error('Error:', error);
        });
      });
    });

    window.onload = function() {
      scrollToBottom("chatHistory");
    };
  </script>
</body>
</html>
実行
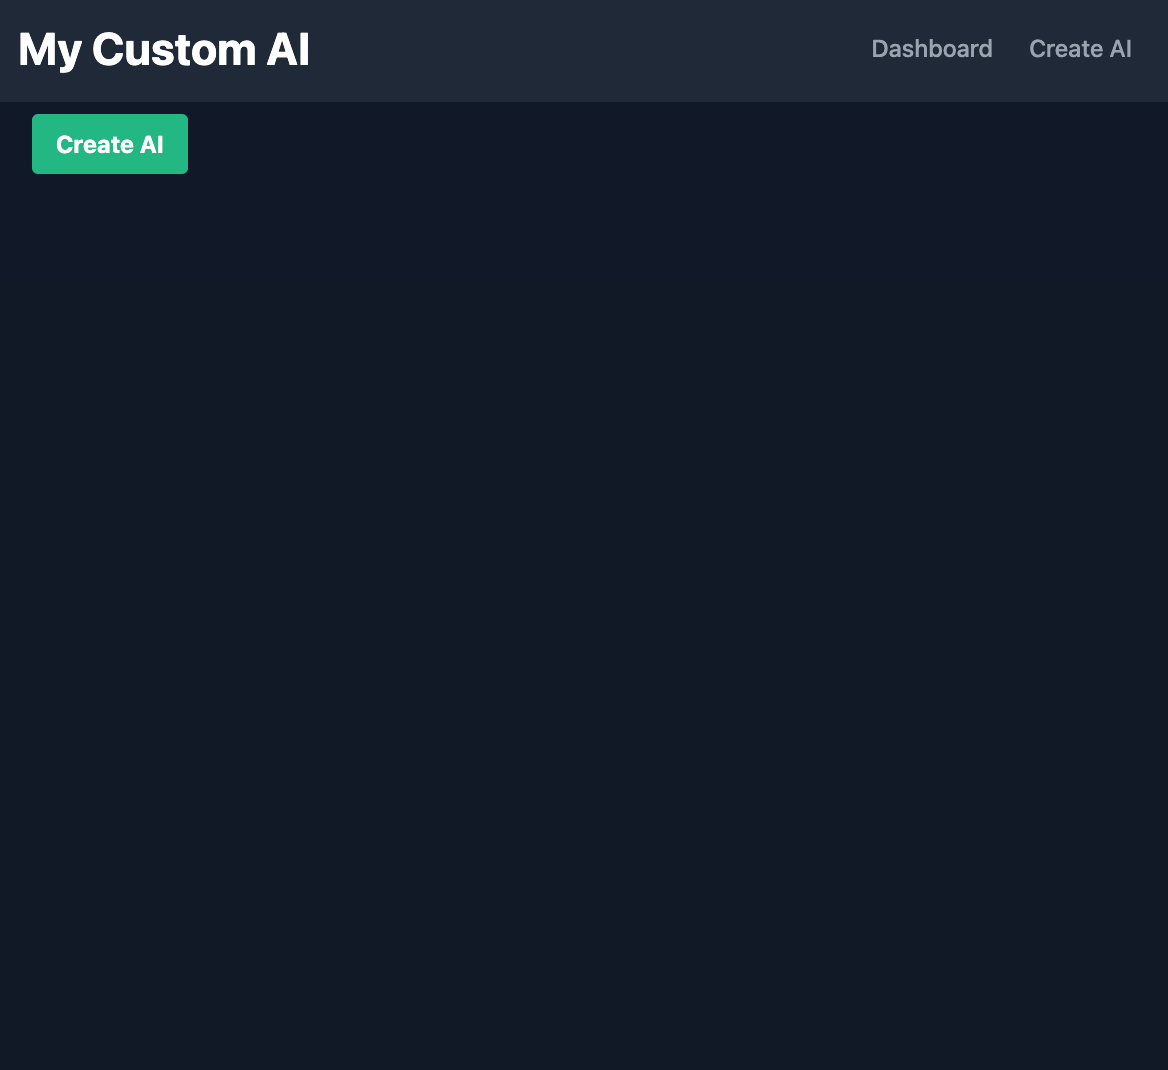
以下のコマンドでサーバーを起動し、localhost の ポート番号8080 にアクセスします。
go run main.go
起動直後の画面
AIの作成画面
API Keyをセットして作成します。
ダッシュボード
作成すると、ダッシュボードにパネルで並びます。
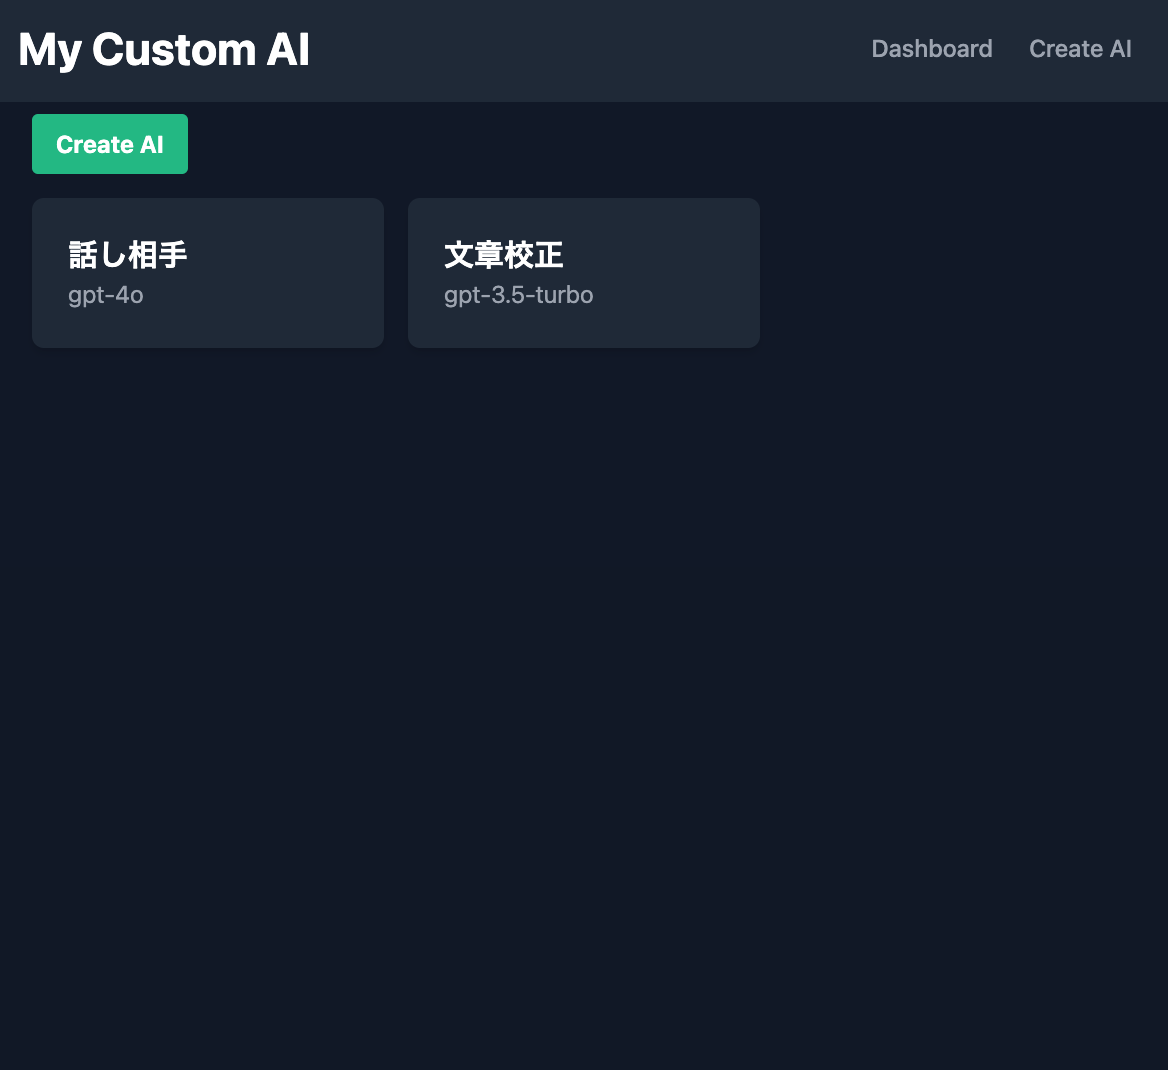
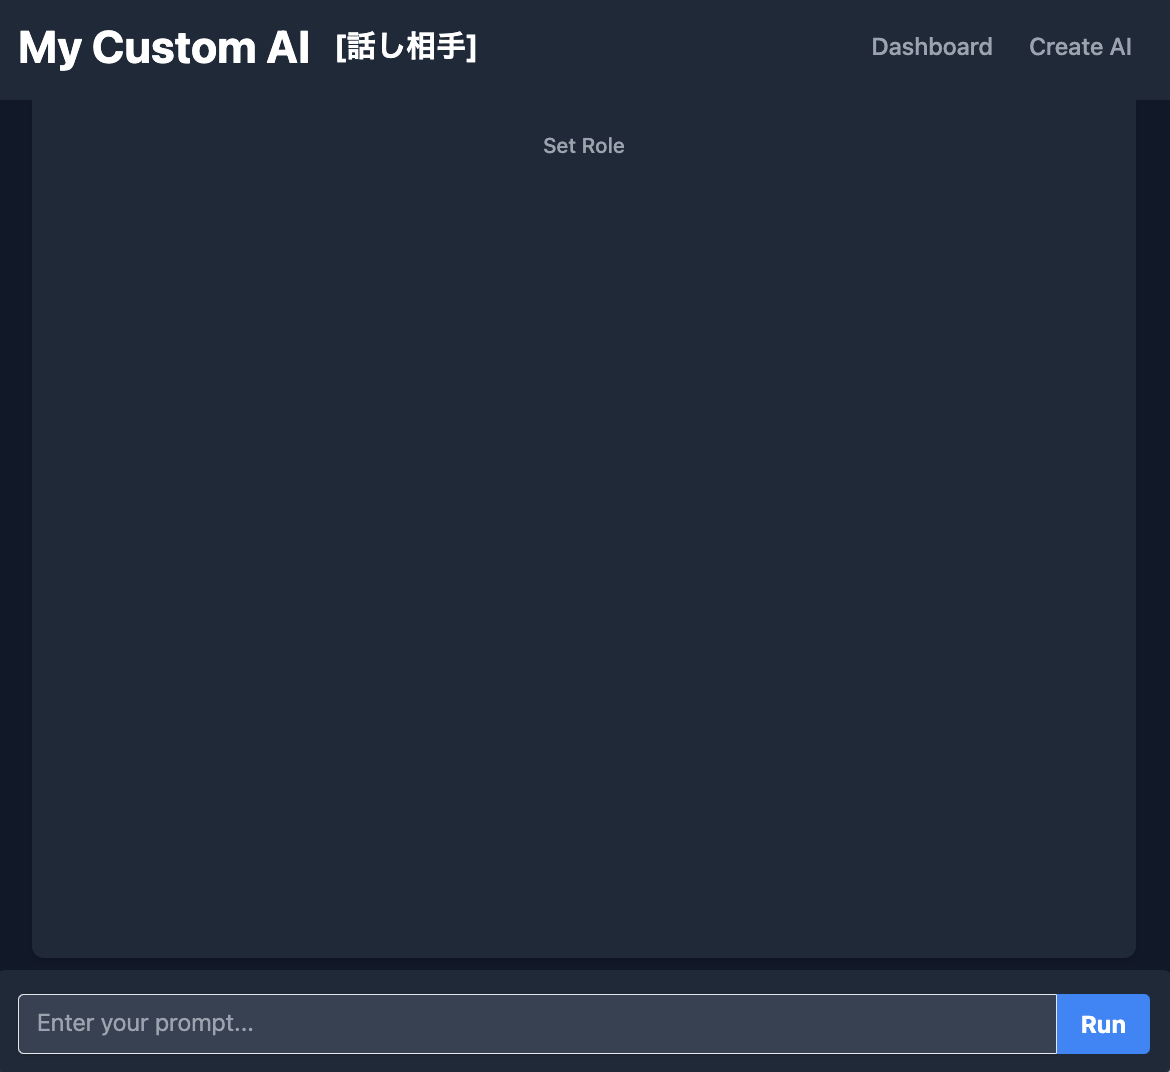
チャット画面
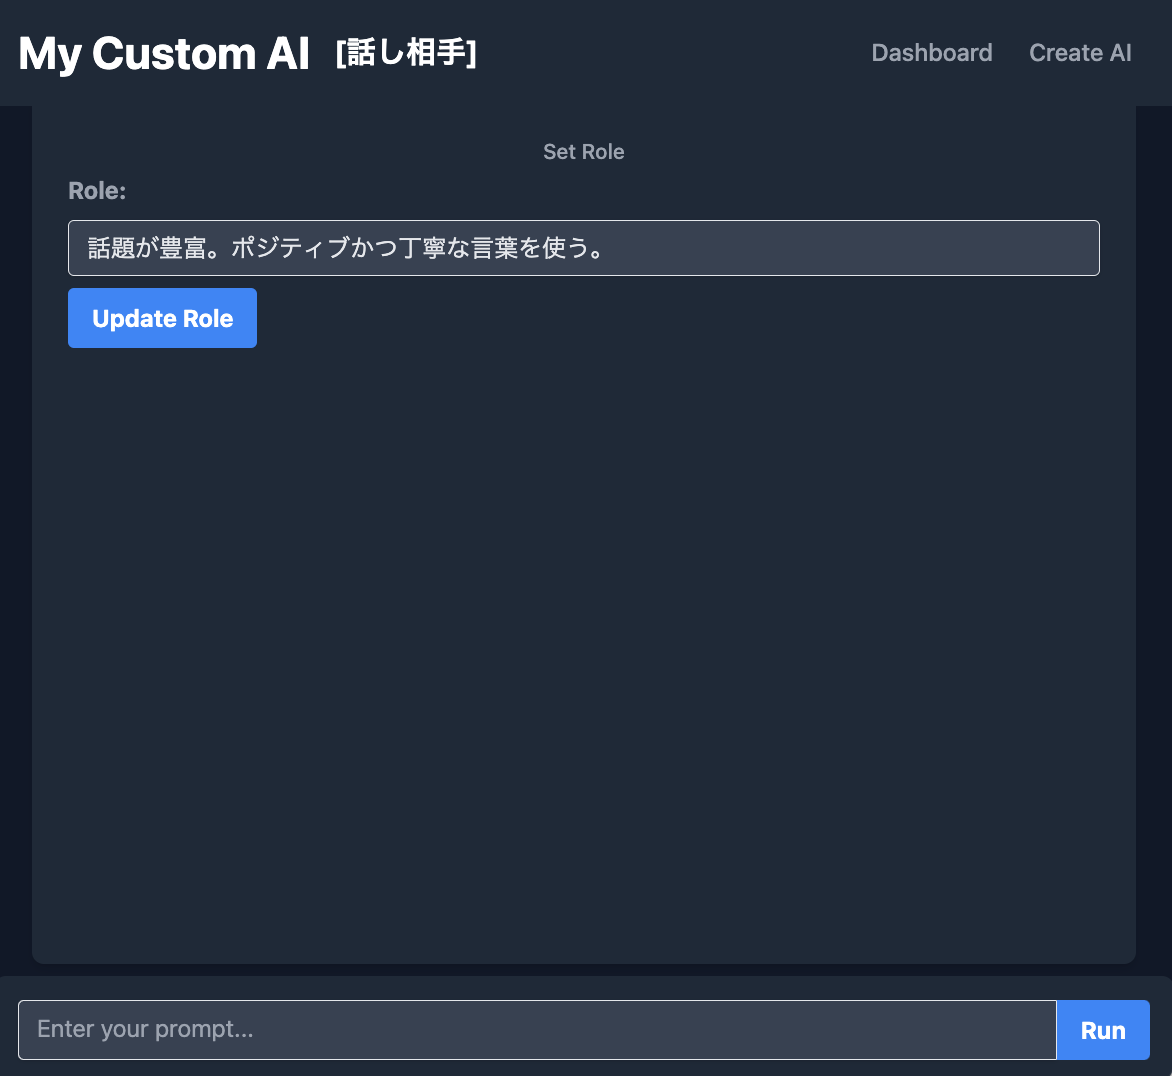
まずは Set Role をクリックして、役割を設定します。
今回は話し相手にしました。
AIとのやりとり
それでは、会話してみましょう。
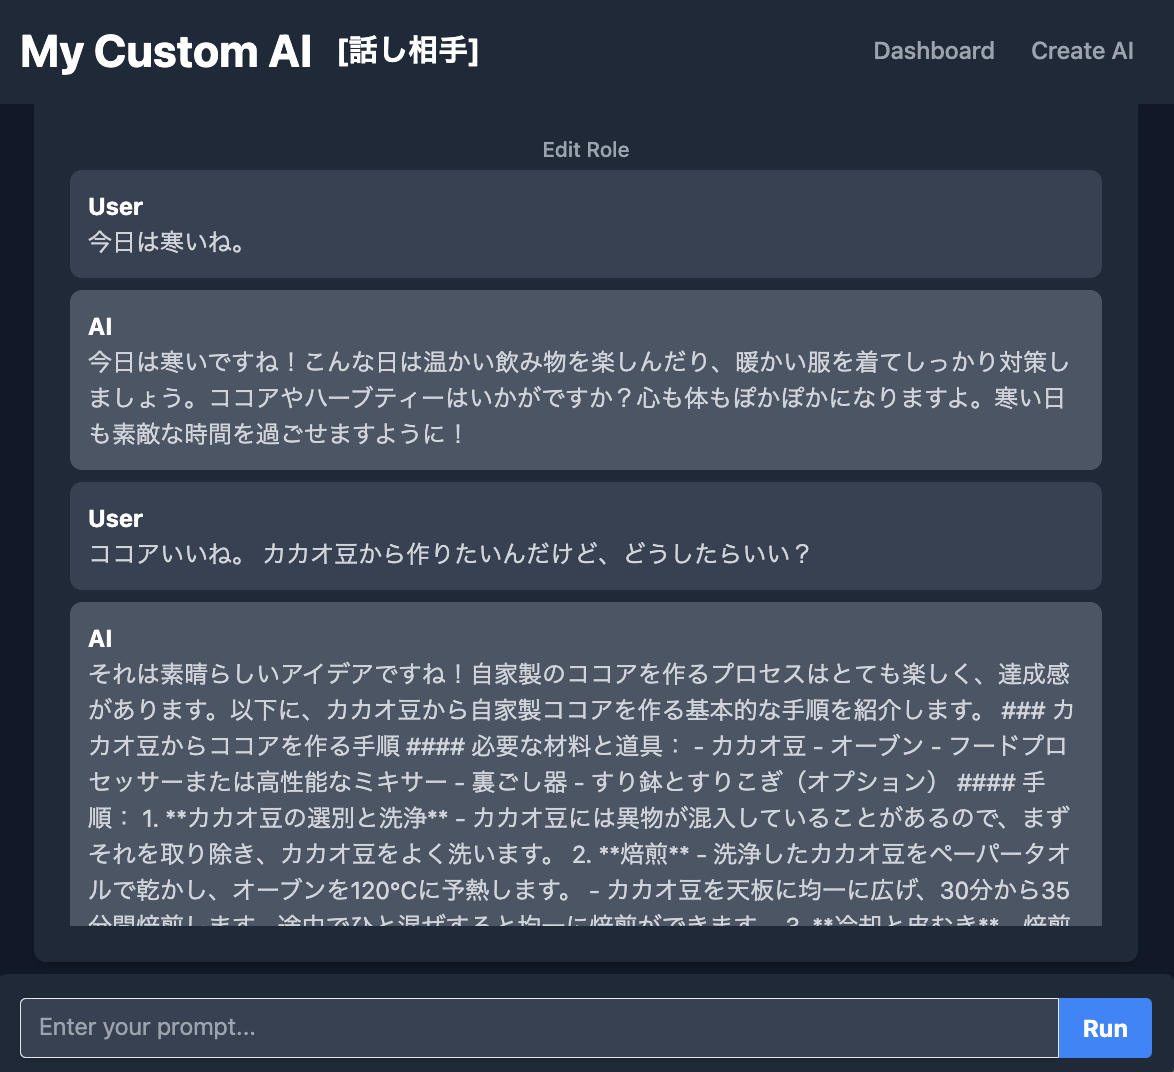
きちんとやりとり出来ているようですね!
まとめ
Go言語、Gin、Tailwind CSSを使って、自分だけのAIチャットボットWebアプリを作成しました。
自分用であればDBを使わずJSONでも十分ですが、複数名で利用する場合はDBの利用をお願いします。
ぜひ皆さんも、自分だけのオリジナルAIを作ってみてください!
一緒にがんばりましょう😀