はじめに
Excelでwebブラウザの操作を自動化する最小機能のみ実装したフレームワークの「TinySeleniumVBA」があります。
これは今のところActiveXを使用しているため、Windows専用になっています。ActiveXの部分を取り除き代替部分をVBA-toolsライブラリー群を使えば、Mac上のExcelで動作するかもと取り組みました。
これまで、その準備を着々と進めてきました。
ようやく自分の環境ではありますが、Macで「TinySeleniumVBA」を動かすことができました。
環境
Mac Book Pro(2.3 GHz 8コアIntel Core i9) Monterey 12.2.1
Microsoft Office Home and Student 2019
Excel for Microsoft 365では確認していませんので、テストのご協力をお願いします。
導入方法
下記サイトから「TinySeleniumVBA」をダウンロードします。
MacではActiveXが使用できません。
手順の「ツール>参照設定からMicrosoft Scripting Runtimeに参照を通してください」は不要になります。
今回、Excelには下記2つが追加になります。
- Dictionary.cls
- MacWebHelper.bas
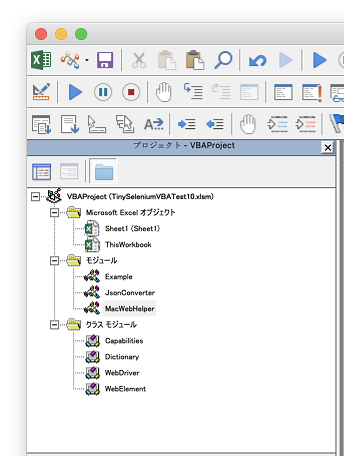
VBA-Dictionary
Microsoft Scripting Runtimeの代替として、VBA-DictionaryのDictionaryクラスを使用します。
これを使用すると、WindowsでもMacでもDictionaryオブジェクトを同様に使うことができるようになります。
下記サイトからダウンロードし、解凍後にVBAプロジェクトに「Dictionary.cls」をインポートします。
MacWebHelper
TinySeleniumVBAをMacで動作させるために独自に作成したモジュールになります。
Shell(WebDriverの起動)とHTTP通信(Curlによる通信)を担っています。
curlの接続時のタイムアウト時間(デフォルト300秒:web_ConnectTimeout)
curlの処理全体にかかる時間のタイムアウト(デフォルトなし:web_MaxTimeout)
Private Const web_ConnectTimeout As Long = 30
Private Const web_MaxTimeout As Long = 60
下記サイトからダウンロードしてください。
AppleScript
Mac版ExcelでShellを使用するにはAppleScriptを使用する必要があります。
Office 2016 for Mac 以降では、MacScript関数の代わりに AppleScriptTask関数を使用するのですが、セキュリティーの関係でスクリプトファイルを特別なフォルダに配置する必要があります。
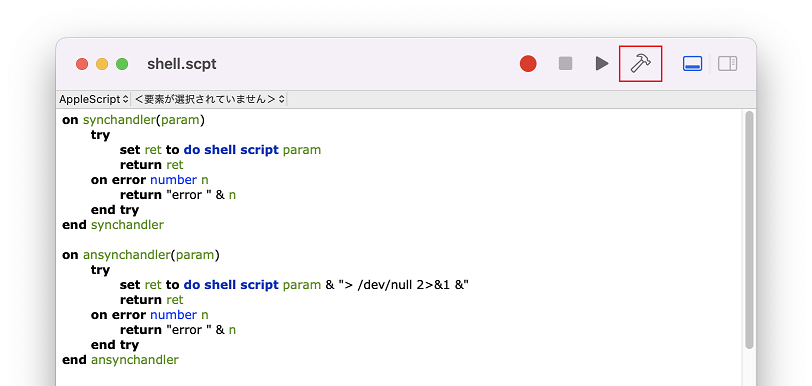
スクリプトを作成するにはMacに標準に搭載されている「スクリプトエディタ」が必要です。
Spotlight(虫眼鏡アイコン)に「エディタ」と入力すると「スクリプトエディタ」が検索結果に現れるので、そちらにコードを記入していきます。

on synchandler(param)
    try
        set ret to do shell script param
        return ret
    on error number n
        return "error " & n
    end try
end synchandler

on ansynchandler(param)
    try
        set ret to do shell script param & "> /dev/null 2>&1 &"
        return ret
    on error number n
        return "error " & n
    end try
end ansynchandler
入力後にトンカチボタン(コンパイルボタン)をクリックします。
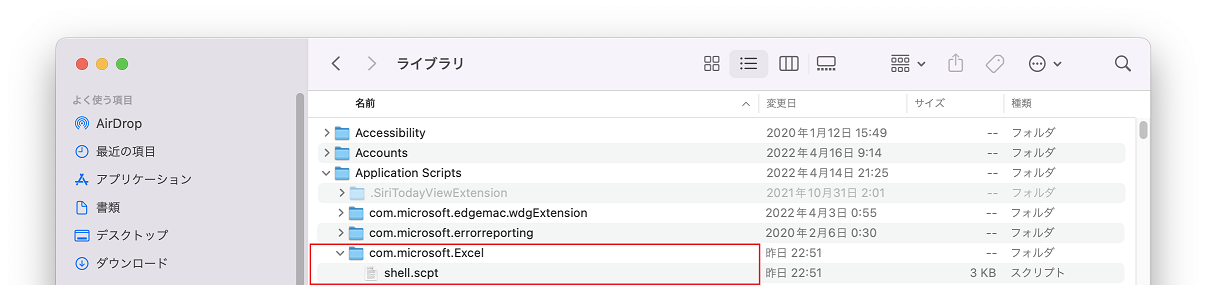
上記コードを入力した「shell.scpt」ファイルを最終的に「~/Library/Application Scripts/com.microsoft.Excel/」に配置してください。
プログラムの変更
一応、MacとWindowsが共存できるように"#If Mac"条件付きで処理を分けています。
Start関数とSendRequest関数の2箇所を修正します。
' Start WebDriver
Public Sub Start(ByVal driverPath As String, ByVal driverUrl As String, Optional ByVal driverName As String = vbNullString)
    ' Start WebDriver executable
    #If Mac Then
        Dim result As shellResult
        result = MacWebHelper.ExecuteInShell(driverPath)
        If result.ExitCode <> 0 Then
            MsgBox result.Output
            End
        End If
    #Else
        If Shell(driverPath, vbMinimizedNoFocus) = 0 Then
            MsgBox "Failed in starting WebDriver"
            End
        End If
    #End If

    ' Set WebDriver url
    UrlBase = driverUrl

    ' Initialize driver commands
    InitCommands

    ' Set browser name
    BrowserName = driverName
End Sub

' Send HTTP request
Private Function SendRequest(method As String, url As String, Optional Data As Dictionary = Nothing) As Dictionary
    Dim client As Object
    Dim JsonString As String

    #If Mac Then
        Dim response As WebResponse
        If method = "POST" Or method = "PUT" Then
            response = MacWebHelper.PostJson(url, Data)
        Else
            response = MacWebHelper.GetJson(url)
        End If

        JsonString = response.Content
        If response.StatusCode = InternalServerError And InStr(JsonString, "version") > 0 Then
            ' version mismatch error
            MsgBox JsonString
        End If
    #Else
        Set client = CreateObject("MSXML2.ServerXMLHTTP")

        client.Open method, url

        If method = "POST" Or method = "PUT" Then
            client.setRequestHeader "Content-Type", "application/json"
            client.send JsonConverter.ConvertToJson(Data)
        Else
            client.send
        End If

        Do While client.readyState < 4
            DoEvents
        Loop

        JsonString = client.responseText
    #End If

    Dim Json As Object
    Set Json = JsonConverter.ParseJson(JsonString)
    Set SendRequest = Json
End Function
For Eachの部分
TinySeleniumVBAのissuesにも書いたので、新しいバージョンになれば修正される可能性があります。
修正箇所は2箇所になります。「For Each」で検索してください。
For Eachのコレクション側に.Keysを追加します。
Public Function Execute(driverCommand, Optional parameters As Dictionary = Nothing, Optional asRawResponse As Boolean = False)
    For Each paramKey In parameters.Keys

Private Function ScriptDictToConvertedDict(Dict As Variant, Optional ByVal sessionId As String = vbNullString) As Object
    For Each key In dict.Keys
注意点
これまでWindows版で作成したサンプルや質問の回答したコードをMac版で試した中で見つけた修正点がありました。
WebDriverの配置
自分はWebDriverを/usr/local/bin/に配置しました。
実行時に「開発元を検証できないため開けません」が表示されたら、下記サイトを参考にしてください。
Driver.Chrome "/usr/local/bin/chromedriver"
 Or
Driver.Edge "/usr/local/bin/msedgedriver"
囲み記号
文字列の中の囲み記号はダブルクォーテーションにしないと正しい結果が得られませんでした。
※Content-Lengthの長さが一致しなくなるため、タイムアウトエラーになる。
csvanchors = Driver.FindElements(By.XPath, "//a[@data-file_type='CSV']")
↓
csvanchors = Driver.FindElements(By.XPath, "//a[@data-file_type=""CSV""]")
contents = Driver.ExecuteScript("return document.getElementsByClassName('datatable')[0].outerHTML;")
↓
contents = Driver.ExecuteScript("return document.getElementsByClassName(""datatable"")[0].outerHTML;")
パス区切り
末尾の& "\\"が不要でした。これがあると例として"DownLoad\"というフォルダが作成されてしまいます。
Windowsはパス区切りが複数回続けて書いても問題ないですがMacは駄目です。
cap.AddPref "download.default_directory", ThisWorkbook.path & "\"
↓
cap.AddPref "download.default_directory", ThisWorkbook.path
Sleep
MacのVBAで待機する(秒単位)
' 1秒待機
Application.Wait (Now() + TimeValue("0:00:01"))
TinySeleniumVBAの修正(WebDriver Ver.128以降)
WebDriver Ver.128以降からデフォルトポート 9515をやめてランダムに変更されました。
これにより、ポート指定をしていなかったTinySeleniumVBAでエラーが発生するようになりました。
下記の部分を修正してください。
' Launch Edge Driver
Public Sub Edge(ByVal driverPath As String, Optional ByVal driverUrl As String = "http://localhost:9515")
    start driverPath & " --port=9515", driverUrl, "MicrosoftEdge"
End Sub

' Launch Chrome Driver
Public Sub Chrome(ByVal driverPath As String, Optional ByVal driverUrl As String = "http://localhost:9515")
    start driverPath & " --port=9515", driverUrl, "chrome"
End Sub
JsonConverterでコンパイルエラー
【2025/03/09追記】
久しぶりにTinySeleniumVBAで作成したExcelファイルを開いて実行すると、コンパイルエラーが発生。
なんとバックスラッシュが勝手に消えてしまっていました。Excel 2019 for Macの不具合かな
' " -> 34 -> \"
json_Char = "\"""
             ↓
json_Char = """
562行目〜730行目に影響が出ました。
最後に
MacでExcelを使用してWebスクレイピングをするという需要はかなり少ないです。
2020年にMacとMicrosoft Office Home and Student 2019を購入しました。parallels desktop 17 for MacでWindows 11環境もありますが、Windows版のExcelはありません。Microsoft 365をサブスクリプションで購入するのももったいないのよね。大分前に1か月間無料は試しちゃったし。
TinySeleniumVBAを自宅で動かすにはMacに対応するしなかったのです。幸いMacで動作させることができました。
TinySeleniumVBAのバージョンアップでMac対応が組み込まれるように、作者であるuezoさんと協力していきます。