はじめに
前回は右クリックメニュー(ContextMenu)の表示制御と選択処理を行なった。
登録処理を作る前に、設定ファイルからランチャー用ボタン表示をしてアプリケーションを起動するところまでやっていく。
設定ファイル
一般的にXMLファイルで設定ファイルを作成するところなのだが、今回はiniファイルで設定ファイルを作成することにする。但し、 .NET Framework は、iniファイルをネイティブにサポートしていない。iniファイルを扱うとなるとWindowsAPI関数を使ったりSHIFT-JISなどの制限が出てくる。
よって、自分が以前作成したUTF-8対応Iniファイルを採用する。
設定内容は今度追加されていくが、今回の記事としては下記に留めておく。
; ランチャー
[APP1]
Name = サクラエディタ
Path = C:\Program Files (x86)\sakura\sakura.exe
Parameter =
Icon = C:\Program Files (x86)\sakura\my_appicon.ico
Index = 1
Group = 1

[APP2]
Name = WinSCP
Path = C:\Program Files (x86)\WinSCP\WinSCP.exe
Parameter =
Icon =
Index = 2
Group = 1
| 項目 | 内容 |
|---|---|
| APP{n} | 各ボタンのセクション |
| Name | 表示名 |
| Path | 起動パス名 |
| Parameter | コマンドライン引数 |
| Icon | アプリ付属以外アイコン(未指定はアプリ付属アイコンを使用) |
| Index | ボタンの位置(左上から1始め) |
| Group | タブグループ番号(1始め) |
設定ファイルの読み込み
今回は、APPセクションが複数あるのでDataSet型で読み込むことにする。
DataTable _dtApp = null;
int _tabGroup = 1;

public MainWindow()
{
    InitializeComponent();

    gridMain.GridRowCount = 2;
    gridMain.GridColumnCount = 4;
    gridMain.ShowGridLines = true;

    // iniファイルの読み込み
    IniManager iniManager = new IniManager();

    // 文字コードをUTF-8とする。
    iniManager.Encording = Encoding.UTF8;
    // Iniファイルの読み込み。FalseはDictionary型のみ、TrueならDataSet型にも変換する。
    iniManager.ReadIni("Setting.ini", true);

    // DataSet型による取得
    DataSet ds = iniManager.SectionDataSet;
    _dtApp = ds.Tables["APP"];
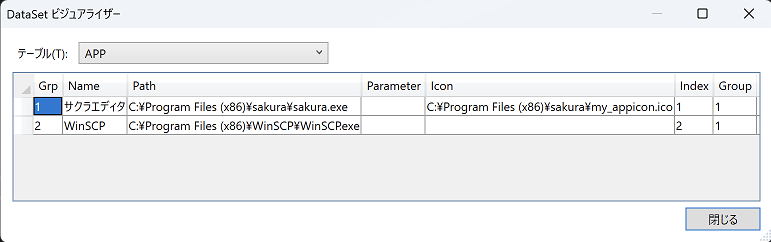
dtAppの中身の表示
ボタンの情報表示とアプリ起動
設定ファイルを内容をもとにランチャー用ボタンに設定内容を表示させる。
まだタブ操作は作成していないので、グループ(_tabGroup)は1固定としている。
左上から1始めでIndexを指定しているので、該当する位置にIndex値があれば設定ファイルの内容をセットしていく。
int index = 1;
for (int i = 0; i < 2; i++)
{
    for (int j = 0; j < 4; j++)
    {
        ImageButton appButton = new ImageButton();
        appButton.Name = "Button" + index.ToString();
        appButton.Tag = index;
        appButton.ImageHeight = 48;
        appButton.ImageWidth = 48;
        string expression = string.Format("Group={0} and Index={1}", _tabGroup, index);
        DataRow[] foundRows = _dtApp.Select(expression);
        if (foundRows.Length > 0)
            SetLuncherApp(appButton, foundRows[0]);
        appButton.Click += new RoutedEventHandler(Button_Click);
        appButton.ContextMenuOpening += ContextMenu_Click;
        appButton.ContextMenu = (ContextMenu)FindResource("PopupMenu");
        Grid.SetColumn(appButton, j);
        Grid.SetRow(appButton, i);

        gridMain.Children.Add(appButton);

        index++;
    }
}
アイコンの場所が指定されている場合はその場所からアイコンを取得して表示、未指定の場合は実行ファイルのアイコンを取得して表示する。
private void SetLuncherApp(ImageButton target, DataRow dr)
{
    target.Content = dr["Name"];
    if (dr["Icon"].ToString() != "")
    {
        string path = dr["Icon"].ToString();
        if (File.Exists(path))
        {
            target.ImageSource = new BitmapImage(new Uri(path));
        }
    }
    else
    {
        string path = dr["Path"].ToString();
        if (File.Exists(path))
        {
            try
            {
                LuncherInfo info = new LuncherInfo(dr["Path"].ToString());
                target.ImageSource = info.Icon;
            }
            catch (Exception ex)
            {
                //MessageBox.Show(ex.Message);
            }
        }
    }
}
ランチャー情報クラス
実行ファイルからパス名とアプリケーション名(拡張子除く)とアイコンイメージを取得する。
最初アイコン取得する際に、System.Drawing.Icon.ExtractAssociatedIconを使用していたが、UNCパスを使用すると例外エラーになるとの情報があったため、shell32.dllのExtractAssociatedIconに切り替えた。
- [WPF] C# 指定したファイルのアイコンを表示する
- How to get the associated icon from a network share file - Stack Overflow
WinSCPのアイコンを表示した際に透過情報が消えてしまっていたので、下記サイトの情報からSaveオプションをImageFormat.BmpからImageFormat.Pngに修正した。
using System;
using System.IO;
using System.Runtime.InteropServices;
using System.Text;
using System.Windows.Media;
using System.Windows.Media.Imaging;

public class LuncherInfo
{
    public string Name { get; set; }
    public string FilePath { get; set; }
    public ImageSource Icon { get; set; }

    [DllImport("shell32.dll", CharSet = CharSet.Unicode)]
    static extern IntPtr ExtractAssociatedIcon(IntPtr hInst, StringBuilder lpIconPath, out ushort lpiIcon);

    public LuncherInfo(string path)
    {
        FileInfo fileInfo = new FileInfo(path);
        FilePath = fileInfo.FullName;
        Name = Path.GetFileNameWithoutExtension(path);

        ushort uicon;
        StringBuilder strB = new StringBuilder(260);
        strB.Append(FilePath);
        IntPtr handle = ExtractAssociatedIcon(IntPtr.Zero, strB, out uicon);
        System.Drawing.Icon ico = System.Drawing.Icon.FromHandle(handle);
        Icon = BitmapToImageSource(ico.ToBitmap());
    }

    private BitmapImage BitmapToImageSource(System.Drawing.Bitmap bitmap)
    {
        using (MemoryStream memory = new MemoryStream())
        {
            bitmap.Save(memory, System.Drawing.Imaging.ImageFormat.Png);
            memory.Position = 0;
            BitmapImage bitmapimage = new BitmapImage();
            bitmapimage.BeginInit();
            bitmapimage.StreamSource = memory;
            bitmapimage.CacheOption = BitmapCacheOption.OnLoad;
            bitmapimage.EndInit();

            return bitmapimage;
        }
    }
}
Wine上の注意
Mac上のWineskinServerで動かしてみたところ、Icon.FromHandle(handle)で例外エラーになってしまいます。
例外エラー「Win32 handle that was passed to Icon is not valid or is the wrong type」
WineskinServerで動かす場合、アイコンを指定して頂くしかないですね。
例外はキャッチできるので、その場合にダミーのアイコン画像に差し替えるようにしておこうと思います。
アプリケーション起動
ボタン位置のアプリケーションをパラメーター(コマンドライン引数)を指定して起動します。
サクラエディタの場合はパタメーターにファイルパスを指定しておくと、指定したファイルを開いた状態で起動させることになります。
private void Button_Click(object sender, RoutedEventArgs e)
{
    Button b = (Button)sender;
    int index = (int)b.Tag;
    string expression = string.Format("Group={0} and Index={1}", _tabGroup, index);
    DataRow[] foundRows = _dtApp.Select(expression);
    if (foundRows.Length > 0)
    {
        DataRow dr = foundRows[0];
        Process.Start(dr["Path"].ToString(), dr["Parameter"].ToString());
    }
}
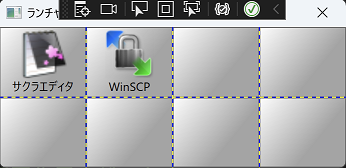
ボタンを押して、サクラエディタを起動させてみました。

最後に
WineskinServerで動作するランチャー作成しているので、Windows上で動いてもMac上のWine環境で動かないと意味がない。
Mac上のWine環境でもアイコンを指定すれば、ボタンのアイコン表示と起動することまでは確認できました。