
TL;DR(まとめ)
- M5StickC, Raspberry Pi Zero W, Google Home Mini を用いて歯磨き応援ツールを開発しました。
- M5StickCは加速度センサー、内蔵バッテリー、Wi-Fi、モニタ、スピーカーHAT(後付け)ありでPoCに最適なデバイスでした。
- PoCによって作り手がこだわった機能と、ユーザーに刺さる機能は必ずしも一致しないことを学びました。
きっかけ
- M5StickC × 加速度センサーで何か面白いものを作る、というお題が出た。
- 最近子供が歯磨きを面倒くさがっている。
システム構成
- 歯ブラシを 1 往復したら( M5StickC の加速度センサーで Y 軸方向に一定以上の差分が出たら) 1 回カウントする。
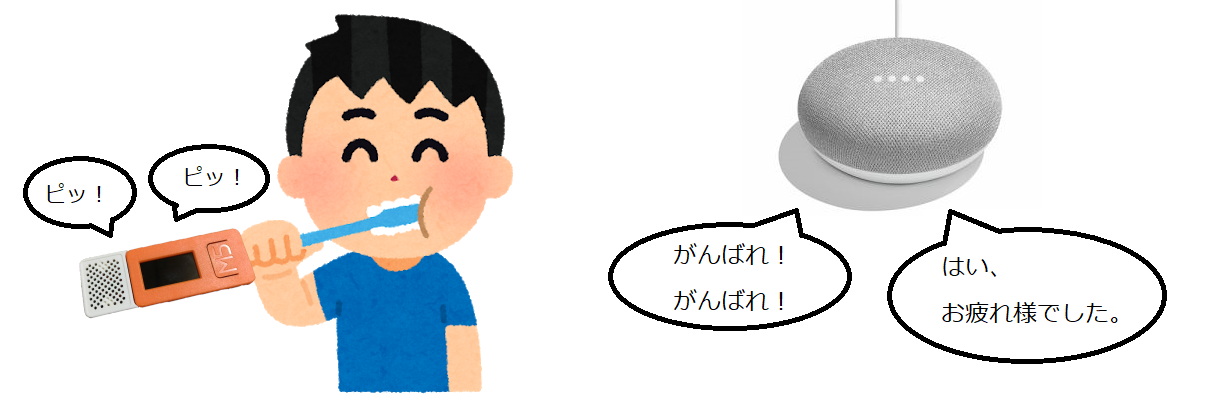
- カウントごとに SPK HAT から音を鳴らす。(プッ!プッ!)
- 10 回ごとに少し高めの音を鳴らす。(ピッ!)
- 一定回数ごとに LCD モニターに "Over XX times!" と表示させる。
- 規定回数を超えたら Google Home に激励(あるいはお疲れ様)のメッセージを喋ってもらう。
構築手順(ブラッシュアップのアドバイス大募集中です!)
M5StickC スケッチ
(2019/12/12追記)HTTP / POST した後に http.end(); する1行を追加
cheer_brushing.ino
# include <M5StickC.h>
# include <WiFiClientSecure.h>
# include <ArduinoJson.h>
# include "config.h"
# include <HTTPClient.h>

// Speaker用
const int servo_pin = 26;
int freq = 50;
int ledChannel = 0;
int resolution = 10;

// getAccelData用
float accX = 0;
float accY = 0;
float accZ = 0;
float previous_accY = 0;
float current_accY = 0;

// ブラッシングカウント用
int brushing_count = 0;
// カウントフラグ
int count_flag = 0;
// Google Homeが喋るセリフ
char *nodered_json = "";
// HTTP Response
int status_code = 0;

WiFiClientSecure wifiClient;
HTTPClient http;

void setup_wifi() {
  if (WiFi.status() != WL_CONNECTED) {
    Serial.print("connecting to ");
    Serial.print(ssid);
    Serial.println("...");
    WiFi.begin(ssid, password);

    if (WiFi.waitForConnectResult() != WL_CONNECTED) {
      // Wi-Fiアクスポイントへの接続に失敗したら5秒間待ってリトライ
      Serial.println("failed to connect");
      delay(5000);
      return;
    } else {
      Serial.print("WiFi connected: ");
      Serial.println(WiFi.localIP());
      //M5.Lcd.setTextSize(1);
      //M5.Lcd.println(WiFi.localIP());
    }

    //wifiClient.setCACert(test_ca_cert);
    randomSeed(micros());
  }
}

// 初期設定
void setup() {
  M5.begin();
  M5.Axp.ScreenBreath(8);     // 画面の輝度(MIN:7~MAX:15)
  M5.Lcd.setRotation(3);      // 左を上にする
  M5.Lcd.setTextSize(2);      // 文字サイズを2にする
  M5.Lcd.fillScreen(BLACK);   // 背景を黒にする

  //シリアル接続速度指定
  Serial.begin(9600);

  //Wi-Fi接続
  setup_wifi();

  // 6軸センサー
  M5.MPU6886.Init();

  // Speaker用
  ledcSetup(ledChannel, freq, resolution);
  ledcAttachPin(servo_pin, ledChannel);
}

// Node-REDにWebhooks
void nodered_post(int counts) {
  Serial.println(counts);
  //const char *nodered_json = "{\"message\":\"" + msg + "\"}";
  if ( counts == 50) {
    nodered_json = "{\"message\":\"まだまだがんばれ\"}";
  } else if ( counts == 100) {
    nodered_json = "{\"message\":\"もう少しだよ\"}";
  } else if ( counts == 150) {
    nodered_json = "{\"message\":\"はい、お疲れ様でした\"}";
  }
  Serial.println(nodered_json);
  http.begin( nodered_server, 1880, "/hamigakimsg");
  http.addHeader("Content-Type", "application/json" );
  status_code = http.POST((uint8_t*)nodered_json, strlen(nodered_json));
  Serial.println(status_code);
  http.end();
}

// ループ処理
void loop() {

  // 加速度取得(変化前)
  M5.MPU6886.getAccelData(&accX,&accY,&accZ);
  previous_accY = accY * 1000;

  // 加速度表示
  M5.Lcd.setCursor(0, 0);
  M5.Lcd.println(previous_accY);

  // 100ミリ秒待つ
  delay(100);

  // 加速度取得(変化後)
  M5.MPU6886.getAccelData(&accX,&accY,&accZ);
  current_accY = accY * 1000;

  // Y軸加速度の差分が400以上の場合
  if ( current_accY - previous_accY > 400) {
    // Beep音発行(10階ごとにちょい高めの音鳴らす)
    if ( brushing_count % 10 == 0) {
      ledcWriteTone(ledChannel, 1500);
    } else {
      ledcWriteTone(ledChannel, 1000);
    }
    delay(10);
    ledcWriteTone(ledChannel, 0);

    // ブラッシング回数インクリメント
    brushing_count++;
  }

  // ブラッシング回数表示
  M5.Lcd.setCursor(0, 16);
  M5.Lcd.println(brushing_count);

  // ToDo 一定回数超えたらWebhooksしてGoogle Homeしゃべらす。
  if ( brushing_count % 50 == 0 && brushing_count !=0 && count_flag == 0) {
    // 一定回数超えたことを表示する。
    M5.Lcd.fillScreen(BLACK);
    M5.Lcd.setCursor(0, 32);
    M5.Lcd.println("over " + String(brushing_count) + " times!!");

    // Google Home しゃべらす。
    nodered_post(brushing_count);

    // ループ抑止フラグを立てる
    count_flag = 1;
  }

  // 51,101,151回目の時にフラグを初期化する。
  if ( brushing_count % 50 == 1) {
    count_flag = 0;
  }

  // ボタン全体の状態更新
  M5.update();
  // ボタンA(M5)が押されたらカウンタリセット&画面リセット
  if ( M5.BtnA.wasPressed() ) {
    brushing_count = 0;
    M5.Lcd.fillScreen(BLACK);
  }
}
config.h
// Wi-Fiアクセスポイント
const char *ssid = "XXX";
const char *password = "XXX";

// Raspberry pi Node-RED
const char *nodered_server = "192.168.XXX.XXX";
Google Home周り(技術要素:Node-RED, google-home-notifier)
Raspberry Pi Zero W にNode-RED, google-home-notifier をインストールし、
Node-REDを以下の通り設定します。
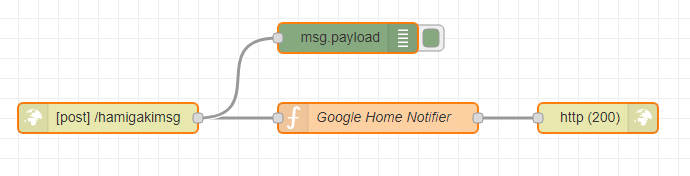
- M5StickCからのHTTPリクエストを受け付ける http in ノードを作成する。
- Function ノードにて、 google-home-notifier を呼びだす。
- http request ノードで状態コード 200 を返す。
function ノードで google-home-notifier を呼べるよう、メインの settings.js 内で、 functionGlobalContext を定義します。
~/.node-red/settings.js
functionGlobalContext: {
    googlehomenotifier:require('[google-home-notifierパス]/google-home-notifier'),
},
function ノードは以下の記述だけで msg.payload.message に渡されたメッセージを Google Home が喋ってくれます。
functionノード
const googlehome = context.global.googlehomenotifier;
const language = 'ja';

googlehome.device("GoogleHome", language);
googlehome.ip("XXX.XXX.XXX.XXX");
googlehome.notify(msg.payload.message, function(res) {
  console.log(res);
});

return msg;
所感
- 子どもに使ってもらったところ、想像以上に楽しそうに歯磨きしてくれてます。
- 作った本人としては、歯磨きの回数に応じて Google Home が喋るところがポイントでした。
- 使う側としては、音が出たり、歯磨き回数が表示される方が気に入ったようです。