ARアプリでの3Dモデルの移動というと、デバイスの画面越しに壁や床などをなぞるやり方(PanGesture)が一般的です。
今回はそれとは逆に、LiDARで認識した空間上を3Dモデルが勝手に動き回るサンプルを紹介します。
完成するもの
環境
- Swift5.3.2
- XCode12.4
- iPadPro 11inch(2020)
3Dモデルの準備
今回動かす3Dモデルは、Appleの3Dモデル作成アプリRealityComposerを使って用意します。
XCodeから新しいAugmented Reality Appプロジェクトを作成する場合、デフォルトでExperience.rcprojectというファイルがあるので、そちらを使うのが一番手っ取り早いです。
RealityComposerを起動したら、右上の追加からアクティビティ>チェスまでスクロールするとチェス駒の3Dモデルがあります。
今回は白のナイト駒を選びます。その際、すでにシーンに存在する3Dモデルは削除しておきます。
ナイトはそもそも直進しませんが、直感的に向きの確認しやすい駒だという理由で採用しています。ごめんルーク。

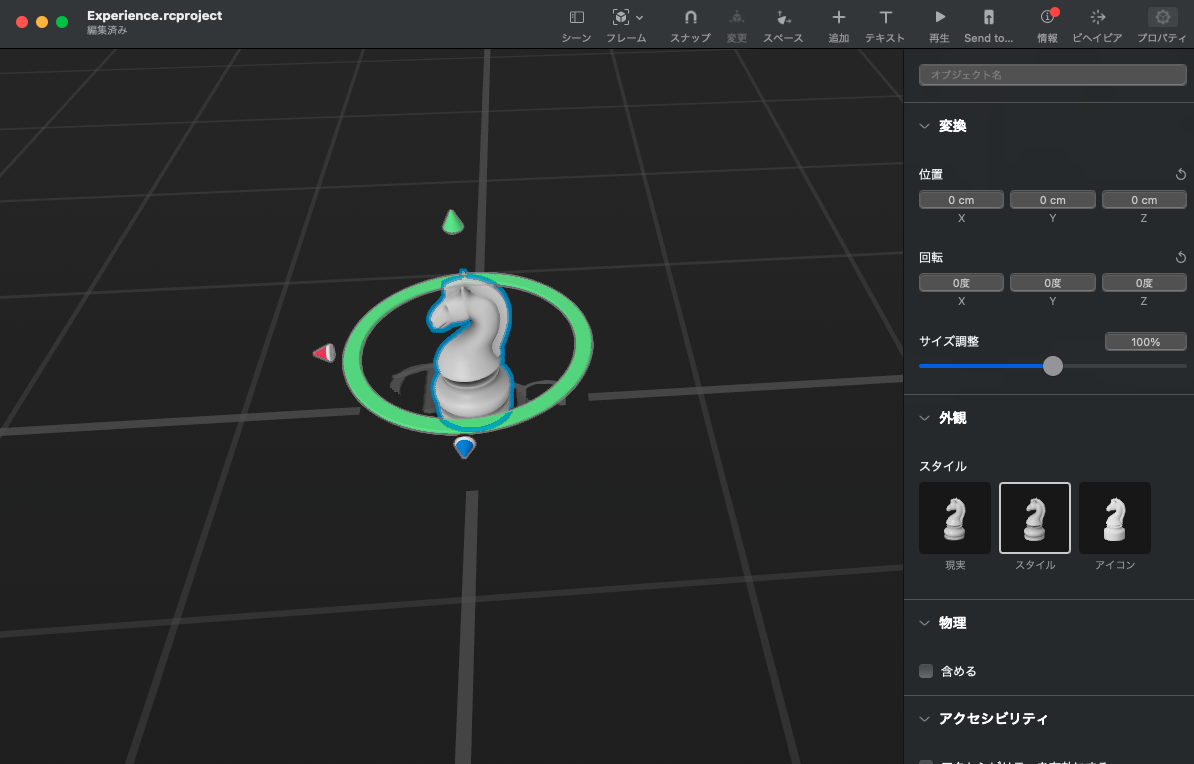
こちらがナイトをシーンに追加したところです。
赤がx軸、緑がy軸、青がz軸に対応しています。

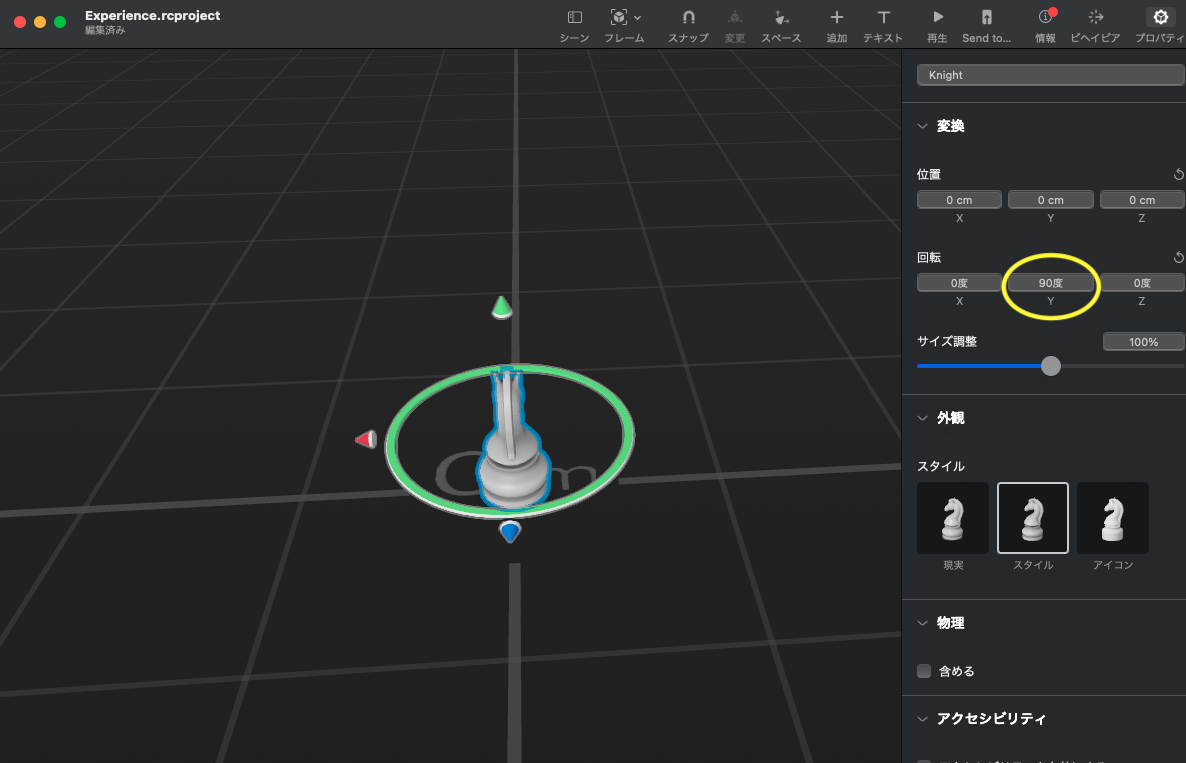
追加されたナイトは左を向いていますが、分かりやすく奥に直進させるためにy軸に対して90度回転させておきます。

前後の移動はz軸、左右の移動はx軸の値を入力して操作します。
各軸と値の対応は以下の通りです。
| 軸 | 値 | 進行方向 |
|---|---|---|
| x | プラス | 右 |
| x | マイナス | 左 |
| z | プラス | 前 |
| z | マイナス | 後 |
コード
ソースコードの全文は以下の通りです。説明はコメントアウト形式で記載しています。
import UIKit
import RealityKit
import ARKit

//進行方向の管理用enum 上下左右のUIButtonと連動している
enum Direction: String {
    case none = "none"
    case up = "up"
    case left = "left"
    case right = "right"
    case down = "down"
}

class ViewController: UIViewController, ARSessionDelegate {

    @IBOutlet var arView: ARView!
    @IBOutlet weak var directionLabel: UILabel!
    //駒の格納用AnchorEntity
    var knightAnchorEntity: AnchorEntity!
    //進行方向の指示用変数 デフォルトでは動かないように.noneで設定
    var direction:Direction = .none

    override func viewDidLoad() {
        super.viewDidLoad()

        arView.session.delegate = self

        //.collisionを設定することで後述するraycastによる移動が有効となる
        //.occlusionの設定を外しても問題ない よりリアルに駒の動きをみたい場合には入れておく
        arView.environment.sceneUnderstanding.options.insert([.occlusion, .collision])
        //メッシュ表示用設定
        arView.debugOptions.insert(.showSceneUnderstanding)

        //Experience.rcprojectからナイトの駒を読み込む
        //移動させるためにAnchorEntityを作成し、そちらに格納する
        //この時点でarViewに追加してもいいが、AR空間の読み込みが遅いと駒が表示されない場合があるので、今回は追加ボタンで操作する
        let knight = try! Experience.loadKinght()
        knightAnchorEntity = AnchorEntity()
        knightAnchorEntity.addChild(knight)
    }

    override func viewWillAppear(_ animated: Bool) {
        super.viewWillAppear(animated)

        //AR空間の詳細設定 上述の.showSceneUnderstandingとこちらの.meshでメッシュが表示されるようになる
        let configuration = ARWorldTrackingConfiguration()
        configuration.sceneReconstruction = .mesh
        arView.session.run(configuration)
    }

    //読み込んだ駒の設置用メソッド
    @IBAction func add(_ sender: Any) {
        guard let knight = knightAnchorEntity else { return }

        if let raycast = arView.raycast(from: arView.center, allowing: .estimatedPlane, alignment: .any).first {
            let transform = Transform(matrix: raycast.worldTransform)
            knight.transform = transform
        }
        arView.scene.anchors.append(knight)
    }

    //進行方向の操作用メソッド
    @IBAction func walk(_ sender: UIButton) {
        if let identifier = sender.restorationIdentifier {
            directionLabel.text = identifier
            direction = Direction(rawValue: identifier)!
        }
    }

    //ARSessionのデリゲートメソッド
    //フレームが更新されるたびに呼ばれるため、他のメソッドよりも駒をリアルタイムに動かしやすい
    func session(_ session: ARSession, didUpdate frame: ARFrame) {
        if direction == .none { return }
        guard let knight = knightAnchorEntity else { return }

        //初期値の設定 下のswitch分で中身を変更する
        var directionPoint: SIMD3<Float> = SIMD3<Float>(x: 0, y: 0, z: 0)
        //raycastの照射位置と照射方向を決めるための値の設定 0.005は0.5cmと同じ
        let value:Float = 0.005

        //進行方向を決定するためのswitch構文
        switch direction {
        case .up:
            directionPoint = SIMD3<Float>(x: 0, y: -value, z: -value)
        case .left:
            directionPoint = SIMD3<Float>(x: -value, y: -value, z: 0)
        case .right:
            directionPoint = SIMD3<Float>(x: value, y: -value, z: 0)
        case .down:
            directionPoint = SIMD3<Float>(x: 0, y: -value, z: value)
        default:
            break
        }

        //上で作成した照射位置と照射方向は、あくまでも駒の持つ座標を基準にしている
        //raycastする場合にはこれをworldの座標に変換する必要がある
        let from = knight.convert(position: SIMD3<Float>(x: 0, y: value, z: 0), to: nil)
        let direction = knight.convert(direction: directionPoint, to: nil)

        //raycastの実行と結果の判定 viewDidLoad()で.collisionを設定していると、HasSceneUnderstandingの部分で判定が行われる
        //raycastの第2引数がdirectionの場合、raycastがヒットしても突き抜けていくので、一番最初にヒットしたものだけ抽出する
        //第2引数はベクトルのため値を正規化する
        let collisionResults = arView.scene.raycast(origin: from, direction: normalize(direction))
        if let result = collisionResults.compactMap({ $0.entity as? HasSceneUnderstanding != nil ? $0 : nil}).first {
            let transform = Transform(matrix: float4x4(result.position, normal: result.normal))
            knight.move(to: transform, relativeTo: nil, duration: 0.05)
        }
    }
}

//Extensions(AppleのCreating a Game with SceneUnderstandingより)
extension float4x4 {
    public init(_ position: SIMD3<Float>, normal: SIMD3<Float>) {
        // build a transform from the position and normal (up vector, perpendicular to surface)
        let absX = abs(normal.x)
        let absY = abs(normal.y)
        let abzZ = abs(normal.z)
        let yAxis = normalize(normal)
        // find a vector sufficiently different from yAxis
        var notYAxis = yAxis
        if absX <= absY, absX <= abzZ {
            // y of yAxis is smallest component
            notYAxis.x = 1
        } else if absY <= absX, absY <= abzZ {
            // y of yAxis is smallest component
            notYAxis.y = 1
        } else if abzZ <= absX, abzZ <= absY {
            // z of yAxis is smallest component
            notYAxis.z = 1
        } else {
            fatalError("couldn't find perpendicular axis")
        }
        let xAxis = normalize(cross(notYAxis, yAxis))
        let zAxis = cross(xAxis, yAxis)

        self = float4x4(SIMD4<Float>(xAxis, w: 0.0),
                        SIMD4<Float>(yAxis, w: 0.0),
                        SIMD4<Float>(zAxis, w: 0.0),
                        SIMD4<Float>(position, w: 1.0))
    }
}

extension SIMD4 where Scalar == Float {
    init(_ xyz: SIMD3<Float>, w: Float) {
        self.init(xyz.x, xyz.y, xyz.z, w)
    }

    var xyz: SIMD3<Float> {
        get { return SIMD3<Float>(x: x, y: y, z: z) }
        set {
            x = newValue.x
            y = newValue.y
            z = newValue.z
        }
    }
}
コードを実行することで、最初の動画のようにAR空間を移動し続けるナイトを確認することができます。
raycast(origin:direction:)についての補足
今回のコードのうち最も重要な部分は、駒の移動場所を決定するarView.scene.raycast(origin: from, direction: normalize(direction))の部分です。
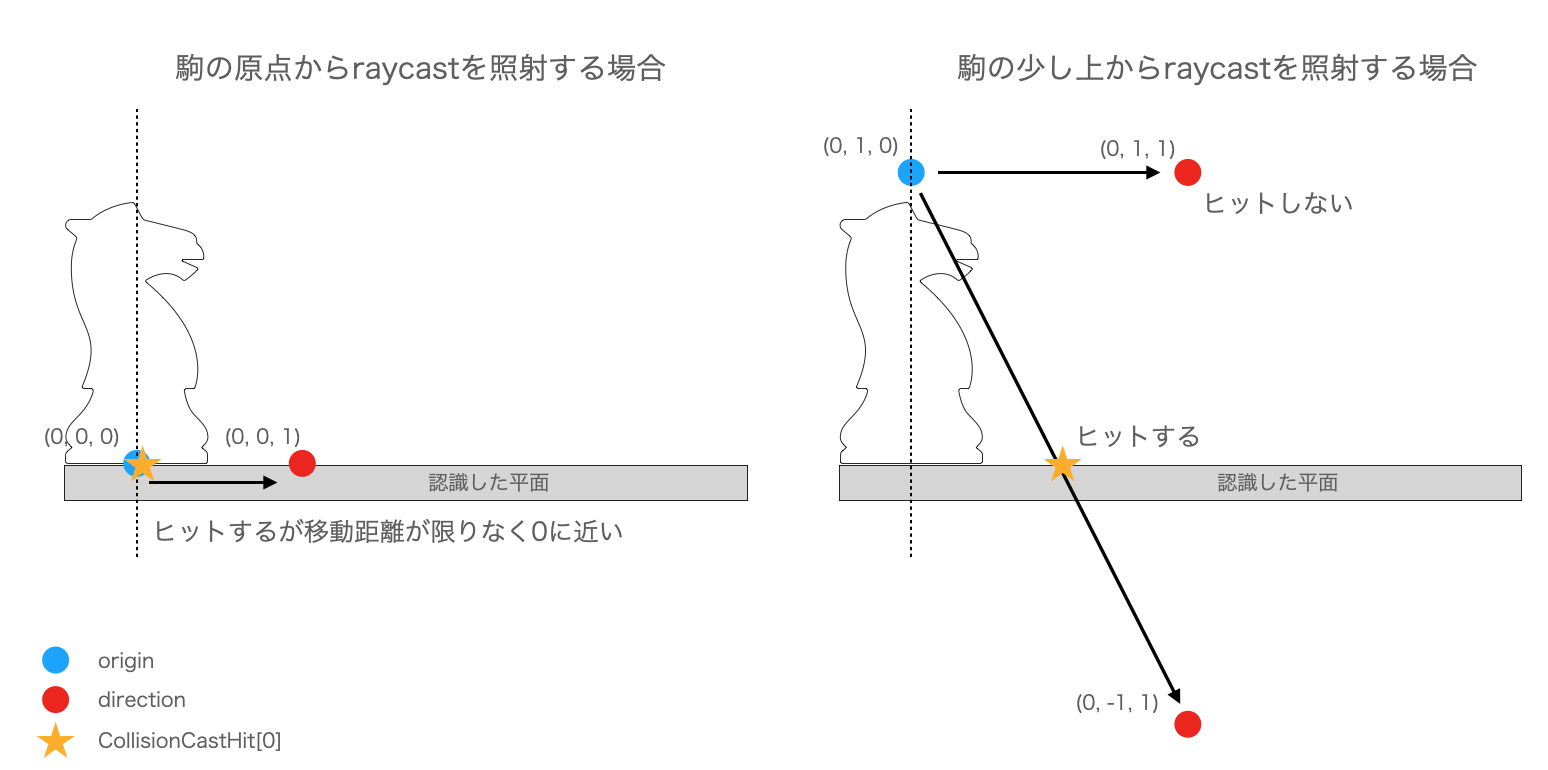
fromとdirectionをみていただくと、originのy値とdirectionのy値は正負が逆になっています。
これはoriginの座標から目の前の平面に必ずraycastを照射するように調整するためです。
originと同じ高さから照射すると、ヒットせずにどこまでも直進するか、限りなく0に近い距離にヒットします。

課題
- 谷折り部分への対応
目の前にraycastを照射するという特性上、壁のような山折りの部分であればそのまま垂直に移動することができます。
しかし崖のような谷折りの部分となると、目の前に照射すべきものがないため、その場で止まってしまいます。
その場合はraycastを進行方向とは逆に照射し、ヒットした結果の何番目かを利用する、という形が考えられます。
- ジャンプや落下などの実装
今回このサンプルを実装した理由が、ARでマリオみたいなゲームをやってみたいという要望に応えるためだったのですが、肝心のジャンプや落下といったアクションは実装できませんでした。
これは
とはいえAppleのサンプルでは元気に飛んだり跳ねたりしているBugたちが確認できるので、ソースコードの解読を続けたいと思います。
参考
今回の記事のメインとなる部分は、Appleが公開しているLiDARを使ったゲームサンプルのコードを参考にさせていただきました。
特にfloat4x4及びSIMD4<Float>のExtensionはそのまま使っています。
さらに詳しく調べてみたいという方は、公式のソースコードをお勧めいたします。
Apple - Creating a Game with SceneUnderstanding
また、Swiftでネイティブに実装するのではなく、UnityやUnrealEngineを使うという方法もあります。
追記
GitHubにリポジトリを作成しました。こちらは3Dモデルの設定もすでに行っているものですので、クローンしてそのまま利用することができるかと思います。