自主練習のメモ。
今回つかったのは、React製の静的サイトジェネレータDocusaurus v2 (2.0.0-alpha.70 > 2.0.0-beta.18)です。
GitHub Pagesにデプロイする手順を整理してみました。
サンプル
今回作ったやつは、以下で公開しています。
また、Hexabaseの開発ドキュメントもDocusaurusuで運用しています。
- 開発ガイド:https://devdoc.hexabase.com/
- APIガイド:https://apidoc.hexabase.com/
※ Hexabaseは、業務システム向けにバックエンド機能を提供するクラウドサービスです。
参考になったページ
-
docusaurusのインストール
https://v2.docusaurus.io/docs/installation -
deploying-to-github-pages - Deployment | Docusaurus
https://v2.docusaurus.io/docs/deployment/#deploying-to-github-pages -
GitHub Page を使う - GitHub Docs
https://docs.github.com/ja/github/working-with-github-pages -
Showcase | Docusaurus
https://v2.docusaurus.io/showcase
必要なもの
- node => 10.15.1 later
- yarn => 1.5 later
ただWindows10 では奨励条件で動作しなかったため、最新版にアップデートした。
ローカルにインストールして動かす
まず、Docusaurus をインストールする。
$ mkdir docusaurus
$ cd docusaurus
$ npx @docusaurus/init@latest init my-website classic
ディレクトリを変えて、パッケージをインストール。
$ cd my-website
$ yarn
$ npx docusaurus --version
これで、サンプルサイトが動作する。
$ yarn start
以下からアクセスできる。
localhost:3000
リポジトリの準備
リポジトリを作って、my-website のファイルをコピーする。
Github のリポジトリディレクトリに移動して、もう一度、動作テスト。
ビルドとテスト
ビルドと動作テスト。
$ yarn run build
$ yarn run serve
build/ に静的ファイルができるけど、Git は無視してくれるみたい。
docusaurus.config.js を設定
次の 4 つを書き換える
- organizationName : GitHub ユーザー名か、organization name にする
- projectName : GitHub のリポジトリ名にする
- url : GitHub Pages の URL にする
- baseUrl : Github のプロジェクト。
リポジトリが「https://github.com/facebook/docusaurus 」だとしたら、baseUrlは「/docusaurus/」
詳しくは、以下のページを参照ください。
https://v2.docusaurus.io/docs/deployment/#deploying-to-github-pages
このファイルの修正後、動作確認で「yarn start」は動くが、baseUrlが合わず「yarn run serve」が動かなくなる。
そのため動作確認は、毎回「docusaurus.config.js」を切り替える必要があるので、yarn startだけで済ませている。
デプロイ
Bash の場合、次のコマンドを実行する
GIT_USER=<GITHUB_USERNAME> yarn deploy
PowerShell だと、こう。
cmd /C 'set "GIT_USER=<GITHUB_USERNAME>" && yarn deploy'
パスワード付きだと、こう。2要素認証をONにしている場合は、パスワードの代わりにトークンを使う。
cmd /C 'set "GIT_USER=*****" && set "GIT_PASS=*****" && yarn deploy'
デプロイすると、gh-pages ブランチが作成されて、ビルドしたファイルだけがgh-pagesブランチに展開される。
ただし、ページ間のリンク先が存在していないと、エラーになってデプロイできないので注意する。
詳しくは、以下のページを参照ください。
https://v2.docusaurus.io/docs/deployment/#deploying-to-github-pages
GitHub Pages を設定する
GitHub のリポジトリページで、Settings を選択して、Github pages を有効にする
- Branch: gh-pages
- File: /(root)
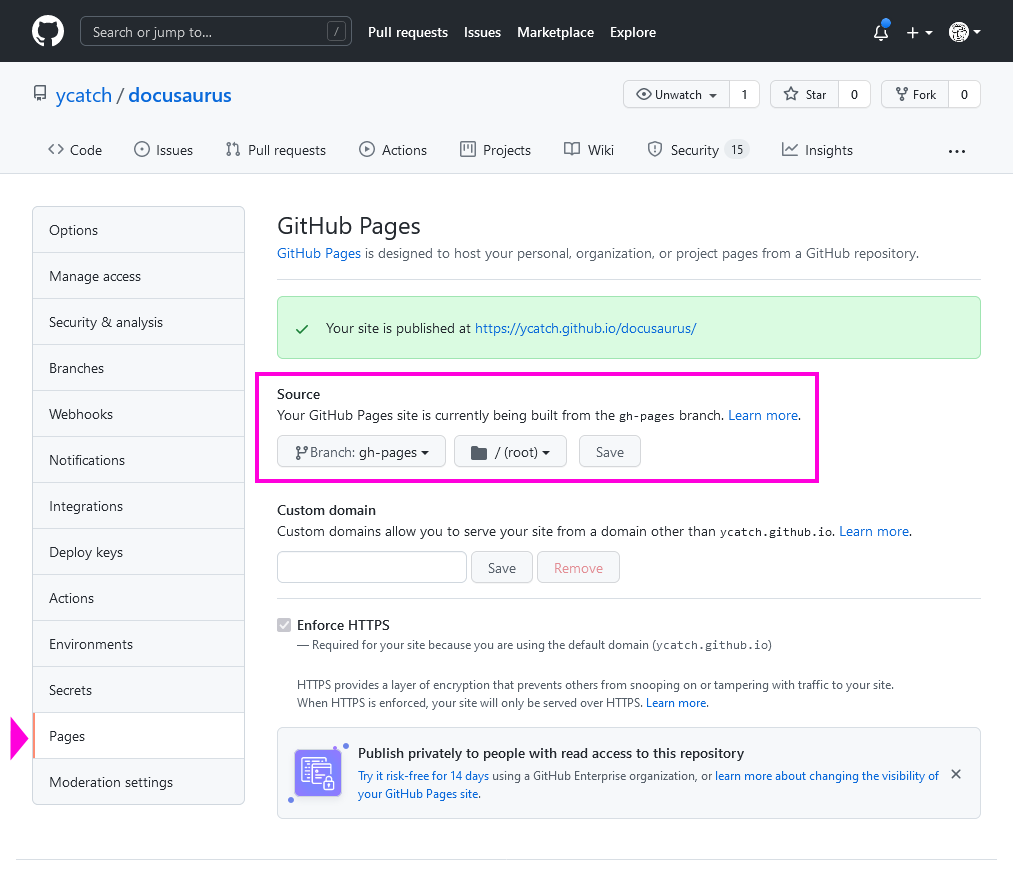
公開
https://(username).github.io/docusaurus/
今回作ったやつは、以下で公開しています。
デプロイ済みのページを更新するには
- ローカルで動作確認
- ページを更新する
- コマンドでデプロイする
メモ:Jekyllは無効になる
GitHubPages は、デフォルトで公開されたファイルを Jekyll を介して実行する。
Jekyll は、_で始まるファイルをすべて破棄する。
そのため、Docusaursでは、GitHub PagesのJekyllを無効にするため、
static ディレクトリに.nojekyll という名前の空のファイルを追加してある。
コンテンツの変更ポイント
Docusaurus を自分好みに変えていくときに、変更する箇所を調べた。
Classic テーマが対象。
docusaurus.config.js
-
サイト全体の設定
-
ナビゲーションバー -> themeConfig > navbar
- GitHub リンク
- Docs
- Blog
-
フッター -> footer
- 関連リンク
- 著作権表示
-
各ページにある Edit のリンク先 -> presets
Sidebars.js
- サイドバー
src/pages/index.js
- トップページ
- Get Started のキャプションとリンク
トップページのメインタイトルとサブタイトルは、docusaurus.config.js の title と subtitle で設定する。
src/css/custom.css
色の組み合わせは、このファイルで設定できる。showcaseを参考にすると早いかも。
Docs にページを追加する
- Docs/に、markdown ファイルを追加する
- 追加した markdown ファイルに、メタデータを記述する
- Sidebars.jsに、追加ページのidを記述する
---
id: doc2
title: Document Number 2
---
- 通常は、サイドバーに各ページの title を表示する
- sidebar_label で、サイドバーに表示する別名を指定できる
Docs のページを階層構造にする
Docs にディレクトリを作ってmarkdown ファイルを配置することで、Docs のページを階層構造にできる。
- Docs 以下にディレクトリを追加する
- 追加ディレクトリに markdown ファイルを追加する
- 追加した markdown ファイルに、メタデータを記述する
- Sidebars.js に、追加ページの id を、ディレクトリパスといっしょに記述する
module.exports = {
  someSidebar: {
    Docusaurus: ['doc1', 'doc2', 'doc3', 'doc4'],
    Another: ['dirPath/doc5', 'dirPath/doc6', 'dirPath/doc7'],
    Features: ['mdx'],
  },
};
機能拡張
使っているうちに、いろいろ欲しくなって入れてみた。
検索バー:その1
Algolia DocSearchが無料で使える。24時間に一度クロールしてくれるらしい。
docusaurus.config.jsのthemeConfigを追加する。
module.exports = {
  // ...
  themeConfig: {
    // ここから ----------------------------------------
    algolia: {
      apiKey: 'YOUR_API_KEY',
      indexName: 'YOUR_INDEX_NAME',
      // Optional: see doc section bellow
      contextualSearch: true,
      // Optional: Algolia search parameters
      searchParameters: {},
      //... other Algolia params
    },
    // ここまで ----------------------------------------
  },
};
Algolia DocSearch にAPI KEYを申請するだけ。
ただし、API キーがもらえるまで、24 時間くらいかかるみたい。
- Docusaurus v2 のページに Algolia DocSearch を導入する - Qiita
https://qiita.com/tetunori_lego/items/b050cac1a2b7fc5a1b18 - ドキュメント作成ツールの決定版!Markdown + React の体験を Docusaurus で
https://zenn.dev/ningensei848/articles/docusaurus_intro
検索バー:その2
Algolia DocSearchが使えない場合、Pluginでローカル/オフラインサーチできる。
docusaurus-search-local
これが動きそう。
- cmfcmf / docusaurus-search-local
https://github.com/cmfcmf/docusaurus-search-local - demo
https://christianflach.de/OpenWeatherMap-PHP-API/
インストール
yarn add @cmfcmf/docusaurus-search-local
設定
plugins: [
    require.resolve('@cmfcmf/docusaurus-search-local')
  ],
設定オプション
  plugins: [
    [require.resolve('@cmfcmf/docusaurus-search-local'), {
        // whether to index docs pages
        indexDocs: true,
        // must start with "/" and correspond to the routeBasePath configured for the docs plugin
        // use "/" if you use docs-only-mode
        // (see https://v2.docusaurus.io/docs/2.0.0-alpha.70/docs-introduction#docs-only-mode)
        docsRouteBasePath: '/docs',

        // Whether to also index the titles of the parent categories in the sidebar of a doc page.
        // 0 disables this feature.
        // 1 indexes the direct parent category in the sidebar of a doc page
        // 2 indexes up to two nested parent categories of a doc page
        // 3...
        //
        // Do _not_ use Infinity, the value must be a JSON-serializable integer.
        indexDocSidebarParentCategories: 0,

        // whether to index blog pages
        indexBlog: true,
        // must start with "/" and correspond to the routeBasePath configured for the blog plugin
        // use "/" if you use blog-only-mode
        // (see https://v2.docusaurus.io/docs/2.0.0-alpha.70/blog#blog-only-mode)
        blogRouteBasePath: '/blog',

        // whether to index static pages
        // /404.html is never indexed
        indexPages: false,

        // language of your documentation, see next section
        language: ["en", "ja"],

        // lunr.js-specific settings
        lunr: {
            // When indexing your documents, their content is split into "tokens".
            // Text entered into the search box is also tokenized.
            // This setting configures the separator used to determine where to split the text into tokens.
            // By default, it splits the text at whitespace and dashes.
            //
            // Note: Does not work for "ja" and "th" languages, since these use a different tokenizer.
            tokenizerSeparator: /[\s\-]+/
        }
    }]
  ],
日本語を検索
ただし、これだけでは日本語検索できない。
tokenizerSeparator: /[\s-]+/ となっている。空白文字とハイフンだけで区切っているので、日本語のワードが対象にならない。
なら、「全角ひらがな」「全角記号」で区切れたら、漢字だけ・英数字だけが取り出せるはず。
こんな感じ。
...
  tokenizerSeparator: /[\s\-\u{3000}-\u{301C}\u{3041}-\u{3093}\u{309B}-\u{309E}]+/gu
...
デモサイトで「ネコ」「neko」「wagahai」「記憶」とかやると、該当ページを検索できる。
正規表現の参考ページ
- JavaScriptでひらがな・カタカタ・漢字をチェックする方法まとめ | PisukeCode - Web開発まとめ
https://pisuke-code.com/js-check-hira-kana-kanzi/
google analytics の設定
- 📦 plugin-google-analytics | Docusaurus
https://v2.docusaurus.io/docs/api/plugins/@docusaurus/plugin-google-analytics - @docusaurus/preset-classicがインストールしてある場合は、plugin-google-analyticsのインストールは不要
yarn add @docusaurus/plugin-google-analytics
module.exports = {
  plugins: ['@docusaurus/plugin-google-analytics'],
  themeConfig: {
    googleAnalytics: {
      trackingID: 'UA-141789564-1',
      // Champs facultatifs.
      anonymizeIP: true, // Les IP doivent-elles être anonymisées ?
    },
  },
};
Color modeの切り替えをオフにする
Dark modeも良いんだけど、画像の調整がめんどい。
Theme configuration | Docusaurus
https://v2.docusaurus.io/docs/api/themes/configuration#color-mode---dark-mode
colorMode: {
    // "light" | "dark"
    defaultMode: 'light',

    // Hides the switch in the navbar
    // Useful if you want to support a single color mode
    disableSwitch: false,

    // Should we use the prefers-color-scheme media-query,
    // using user system preferences, instead of the hardcoded defaultMode
    respectPrefersColorScheme: false,

    // Dark/light switch icon options
    switchConfig: {
    // Icon for the switch while in dark mode
    darkIcon: '🌙',

    // CSS to apply to dark icon,
    // React inline style object
    // see https://reactjs.org/docs/dom-elements.html#style
    darkIconStyle: {
        marginLeft: '2px',
    },

    // Unicode icons such as '\u2600' will work
    // Unicode with 5 chars require brackets: '\u{1F602}'
    lightIcon: '\u{1F602}',

    lightIconStyle: {
        marginLeft: '1px',
    },
  },
},
Githubへのリンクをアイコンにする
/* Octocat for GitHub link  */
.header-github-link:hover {
    opacity: 0.6;
}

.header-github-link:before {
    content: '';
    width: 24px;
    height: 24px;
    display: flex;
    background: url("data:image/svg+xml,%3Csvg viewBox='0 0 24 24' xmlns='http://www.w3.org/2000/svg'%3E%3Cpath d='M12 .297c-6.63 0-12 5.373-12 12 0 5.303 3.438 9.8 8.205 11.385.6.113.82-.258.82-.577 0-.285-.01-1.04-.015-2.04-3.338.724-4.042-1.61-4.042-1.61C4.422 18.07 3.633 17.7 3.633 17.7c-1.087-.744.084-.729.084-.729 1.205.084 1.838 1.236 1.838 1.236 1.07 1.835 2.809 1.305 3.495.998.108-.776.417-1.305.76-1.605-2.665-.3-5.466-1.332-5.466-5.93 0-1.31.465-2.38 1.235-3.22-.135-.303-.54-1.523.105-3.176 0 0 1.005-.322 3.3 1.23.96-.267 1.98-.399 3-.405 1.02.006 2.04.138 3 .405 2.28-1.552 3.285-1.23 3.285-1.23.645 1.653.24 2.873.12 3.176.765.84 1.23 1.91 1.23 3.22 0 4.61-2.805 5.625-5.475 5.92.42.36.81 1.096.81 2.22 0 1.606-.015 2.896-.015 3.286 0 .315.21.69.825.57C20.565 22.092 24 17.592 24 12.297c0-6.627-5.373-12-12-12'/%3E%3C/svg%3E")
   no-repeat;
}
themeConfig: {
...
  {
    href: 'https://github.com/ycatch/docusaurus',
    className: 'header-github-link',
    'aria-label': 'GitHub repository',
     position: 'right',
  },
...
},