Azure FaceAPIの利用
AzureのFaceAPIを利用するには、まずAzureにアカウントを作成しなければなりません。
アカウント作成は無料で行えます。
https://azure.microsoft.com/ja-jp/
登録後、ポータルへ入り、リソースの作成を行ます。

AI + Machine LearningからFace APIを選択し、
適当に項目を埋めて、作成します。
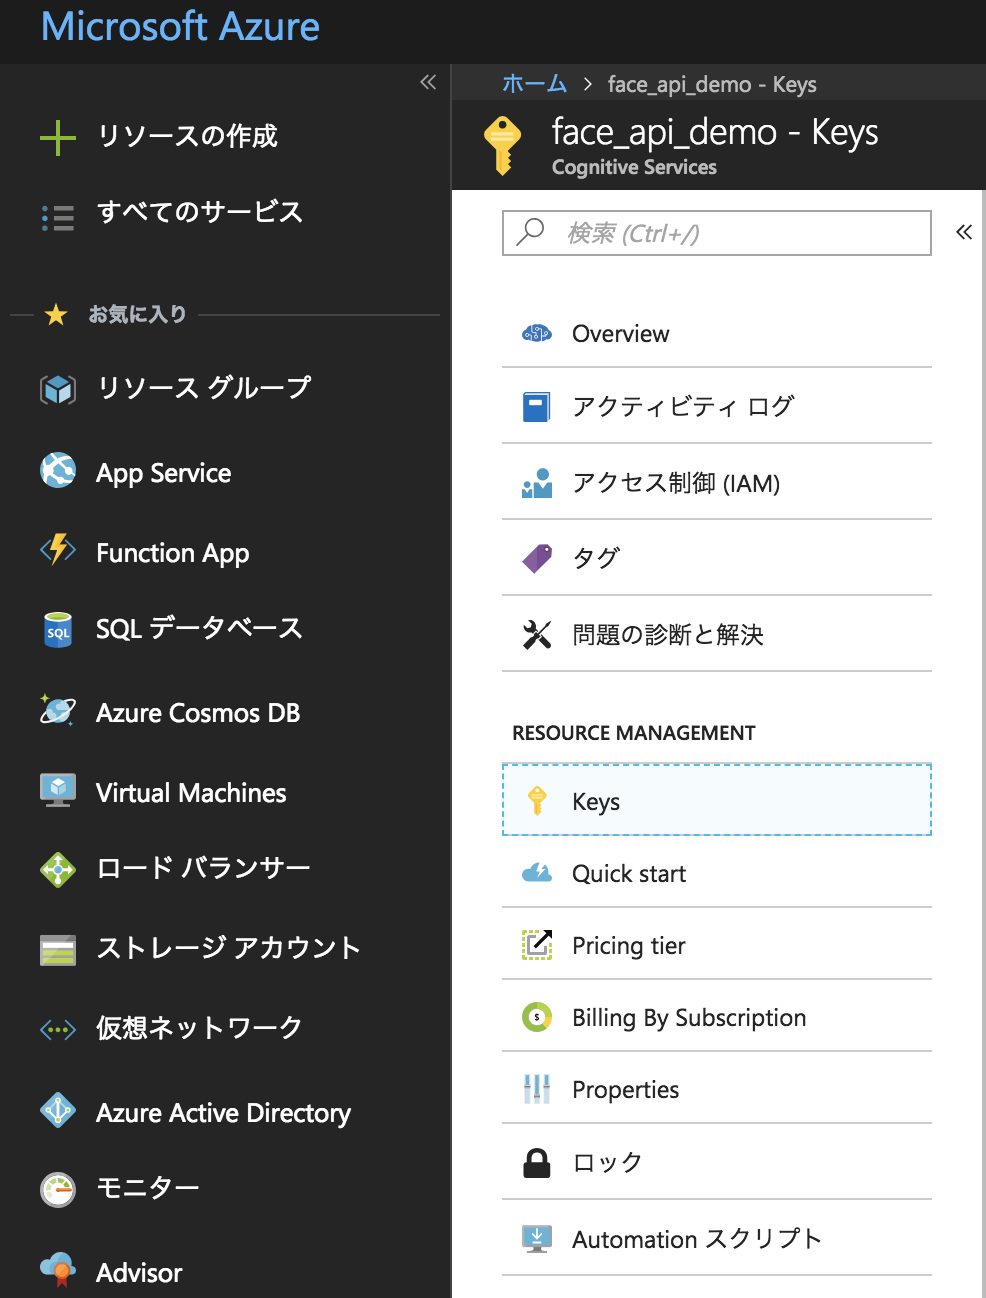
すこし時間を待っていると、作成したリソースがデプロイされますので、そこでようやくダッシュボードでリソースを選択することができるようになります。
リソースを選択し、Keysの項目をクリックすると、KEY1とKEY2が出てきます。
これらはあとでsubscription keyとして利用するので、どこかに控えておいても良いかもしれません(利用するのはKEY1で良いです)。
faceAPIの仕組み
faceAPIにおいて人物の顔を登録し、それを学習させる過程としては、まず、人物の集合であるグループを定義する必要があります。
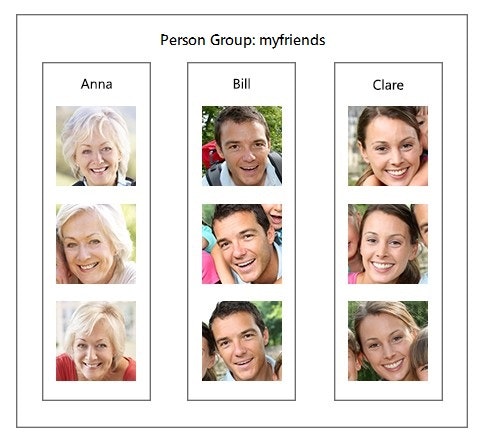
Person Groupの作成
PersonGroupにはこれから登録する顔が所属するグループを作成します。 たとえば、自分の好きなアイドルグループとか。ここではpythonのHTTPライブラリであるrequestsを利用してPersonGroupを作成します。
import requests

def createPersonGroup():
    result = requests.put(
        'https://japaneast.api.cognitive.microsoft.com/face/v1.0/persongroups/欅坂46',
        headers = {
            'Ocp-Apim-Subscription-Key': (subscription key for Azure FaceAPI)
        },
        json = {
            'name' = '欅坂46'
        }
    )
このようにfaceAPIのPersonGroup作成用のURLにputリクエストを出してあげると、resultにその結果が入ります。
その後print(result.text)をしてみると、作成に成功した場合、レスポンスのボディは空になって返ってきます。
エラーが起きた場合には、エラーの種類と原因が返ってきますので、それを参考に問題を解決すれば良いです。
PersonGroupを作成した後、今度はそのグループに属するPersonを登録していきます。
Document
How to create PersonGroup
Personの登録
それでは作成したPersonGroupにPersonを登録していきます。 「欅坂46」グループに「長濱ねる」を作成する場合、 Person登録用のURLは https://[location].api.cognitive.microsoft.com/face/v1.0/persongroups/{personGroupId}/persons なので、import requests
import json
def createPerson(personName):
result = requests.post{
'https://japaneast.api.cognitive.microsoft.com/face/v1.0/persongroups/欅坂46/persons',
headers = {
'Ocp-Apim-Subscription-Key': (subscription key for Azure FaceAPI)
},
json = {
'name': personName
}
}
personId = json.loads(result.text)['personId'] # personのidを抽出できる
return personId
createPerson('長濱ねる')
この次の工程では登録したpersonにその顔画像を、personその人として登録していくので、返ってくるpersonIdが必要になってきます。
Document
How to create Person
Add Faceの工程
登録したpersonの顔写真を登録していきます。 おそらく、以下のような実装になるかと思います。import requests
def addFace(personId, imageUrl):
requests.post(
'https://japaneast.api.cognitive.microsoft.com/face/v1.0/persongroups/欅坂46/persons/' + personId + '/persistedFaces',
headers = {
'Ocp-Apim-Subscription-Key': (subscription key for Azure FaceAPI)
},
json = {
'url': imageUrl
}
)
personId # createPerson()で得られたpersonId
imageUrl # personの画像url personその人しか写っていないものでないと、エラーになる
pictures = [imageUrl, imageUrl, imageUrl......]
for i in pictures:
addFace(personId, i)
事前に取得しておいたpersonIdに、顔写真一枚一枚をそれぞれを登録していきます。
Document
How to add face to a person
さて、ここまでの処理で学習させるための素材の準備が完了しました。
PersonGroupを作成し、そこに所属する人間と、その人間の写真を登録しましたので、これらを学習させてみましょう。
そうすることで、こちら側で用意した画像のurlを読み込ませて、そこに写る顔から、該当する人間の情報を返させるようにします。
Trainの実施
さきほどのaddFaceが終わった後、以下のメソッドを実行します。import requests
def trainGroup():
requests.post(
'https://japaneast.api.cognitive.microsoft.com/face/v1.0/persongroups/欅坂46/train',
headers = {
'Ocp-Apim-Subscription-Key': (subscription key for Azure FaceAPI)
},
json = {
'personGroupId': '欅坂46'
}
)
これで学習が終了しました。
あっけなくて逆に物足りなさを感じるかもしれません。
Document
How to train PersonGroup
それでは、今度はFaceAPIに、無作為で選んだ画像urlを渡し、それが「長濱ねる」かどうかを判定させましょう。
現状では「長濱ねる」だけを学習させていますので、他のメンバーも学習させて、その中から「長濱ねる」を当てられるようにしておきます。
import requests

# 鈴本美愉の登録
personId = createPerson('鈴本美愉')
pictures = [imageUrl, imageUrl, imageUrl......]
for i in pictures:
    addFace(personId, i)

# 渡邉理佐の登録
personId = createPerson('渡邉理佐')
pictures = [imageUrl, imageUrl, imageUrl......]
for i in pictures:
    addFace(personId, i)

# グループの学習
trainGroup()
画像から顔を判別してPersonGroupの中から同一の顔の持ち主を探す
判別させたい画像のurlを用意します。import requests
import json
imageUrl = 'http://cdn.keyakizaka46.com/images/14/752/02396f50b62224f8b6b686b1cffcb/400_320_102400.jpg'
def detectFace(imageUrl):
result = requests.post(
'https://japaneast.api.cognitive.microsoft.com/face/v1.0/detect',
headers = {
'Ocp-Apim-Subscription-Key': (subscription key for Azure FaceAPI)
},
json = {
'url': imageUrl
}
)
detectedFaceId = json.loads(result.text)[0]['faceId']
return detectedFaceId # 画像から取得された顔のid
def identifyPerson(detectedFaceId):
result = requests.post(
'https://japaneast.api.cognitive.microsoft.com/face/v1.0/identify',
headers = {
'Ocp-Apim-Subscription-Key': (subscription key for Azure FaceAPI)
},
json = {
'faceIds': [detectedFaceId],
'personGroupId': '欅坂46'
}
)
identifiedPerson = json.loads(result.text)[0]['candidates']
return identifiedPerson # detectedFaceIdをから抽出されたcandidatesを格納
detectedFaceId = detectFace(imageUrl)
identifiedPerson = identifyPerson(detectedFaceId)
print(identifiedPerson)
# [{'personId': '*********************************', 'confidence': 0.68672}] というような形で画像の顔と一致した人物のデータを返す
まず、detectFace()に画像のurlを渡し、その画像から読み取られた顔のidを手に入れます。
次にそのidをidentifyPerson()に渡し、PersonGroup内に登録した人物の顔とdetect時に読み込ませた画像の顔を比較します。
最後に、その結果得られた候補者(candidates)のidを抽出します。
この後、このcandidateのidはそのpersonの名前を抽出するために利用します。
Document
How to detect the registered person's face
How to identify the person
特定されたpersonIdからpersonの情報を取得する
最後の工程です。
identifyPerson()から取得したpersonIdを利用して、そのidの持ち主の名前を抽出します。
import requests
import json

def getPersonNameByPersonId(personId):
    result = requests.get(
        'https://japaneast.api.cognitive.microsoft.com/face/v1.0/persongroups/欅坂46/persons',
        headers = {
	    "Ocp-Apim-Subscription-Key": (subscription key for Azure FaceAPI)
        },
        json = {
            'personGroupId': '欅坂46'
        }
    )
    # personsには登録された全てのpersonが入っている
    persons = json.loads(result.text)
    for person in persons:
        # 渡されたpersonIdと合致するidを持つpersonを抽出して、その名前を返す
        if person['personId'] == personId:
            return person['name']

identifiedPersonName = getPersonNameByPersonId(personId)
print(identifiedPersonName) # => 渡邉理佐
getPersonNameByPersonId()でPersonGroupに登録した人物の情報を全て抜き出してから、
あらかじめ渡しておいたpersonIdと同じidを持つ人物だけを抜き出します。
returnしたperson['name']の結果が正しい結果かどうかを確認しましょう。
FaceAPIも完璧ではないでしょうから、時には間違った答えを返すこともあると思いますが、基本的には正しい答えを返してくれると思います。
実装が間違っていなければ、基本的には。。。
ここで行ったこと
だいたいの流れをまとめます。
とにかくこの流れさえわかっておけば、間違えることはないと思うので。
##### 学習工程#####
・PersonGroupの作成
・Personの登録
・PersonにFaceを登録
・PersonGroupを学習
##### 判別工程#####
・特定の画像からFaceをdetect
・detectした人物の画像から、それに該当する人物のidを抽出
・idを基にその人物の名前を抽出
あと、一貫したソースコードも載せておきます。
# -*-coding:utf8-*-
import json
import logging
import requests
import time

BASE_URL = 'https://japaneast.api.cognitive.microsoft.com/face/v1.0/'
SUBSCRIPTION_KEY = 'your subscription key'
GROUP_NAME = '欅坂46'

def createPersonGroup():
    end_point = BASE_URL + 'persongroups/' + GROUP_NAME
    requests.put(
        end_point,
        headers = {
            'Ocp-Apim-Subscription-Key': SUBSCRIPTION_KEY
        },
        json = {
            'name': GROUP_NAME
        }
    )

def createPerson(personName):
    end_point = BASE_URL + 'persongroups/' + GROUP_NAME + '/persons'
    result = requests.post(
        end_point,
        headers = {
            'Ocp-Apim-Subscription-Key': SUBSCRIPTION_KEY
        },
        json = {
            'name': personName
        }
    )
    personId = json.loads(result.text)['personId']
    return personId

def addFace(personId, imageUrl):
    end_point = BASE_URL + 'persongroups/' + GROUP_NAME + '/persons/' + personId  + '/persistedFaces'
    requests.post(
        end_point,
        headers = {
            'Ocp-Apim-Subscription-Key': SUBSCRIPTION_KEY
        },
        json = {
            'url': imageUrl
        }
    )

def trainGroup():
    end_point = BASE_URL + 'persongroups/' + GROUP_NAME + '/train'
    requests.post(
        end_point,
        headers = {
            'Ocp-Apim-Subscription-Key': SUBSCRIPTION_KEY
        },
        json = {
            'personGroupId': GROUP_NAME
        }
    )

def detectFace(imageUrl):
    end_point = BASE_URL + "detect"
    result = requests.post(
        end_point,
        headers = {
            'Ocp-Apim-Subscription-Key': SUBSCRIPTION_KEY
        },
        json = {
            'url': imageUrl
        }
    )
    detectedFaceId = json.loads(result.text)[0]['faceId']
    return detectedFaceId

def identifyPerson(faceId):
    end_point = BASE_URL + 'identify'
    faceIds = [faceId]
    result = requests.post(
        end_point,
        headers = {
            'Ocp-Apim-Subscription-Key': SUBSCRIPTION_KEY
        },
        json = {
            'faceIds': faceIds,
            'personGroupId': GROUP_NAME
        }
    )
    candidates = json.loads(result.text)[0]['candidates']
    return candidates

def getPersonNameByPersonId(personId):
    end_point = BASE_URL + 'persongroups/' + GROUP_NAME + '/persons'
    result = requests.get(
        end_point,
        headers = {
	    "Ocp-Apim-Subscription-Key": SUBSCRIPTION_KEY
        },
        json = {
            'personGroupId': GROUP_NAME
        }
    )
    persons = json.loads(result.text)
    for person in persons:
        if person['personId'] == personId:
            return person['name']

if __name__ == '__main__':
    # learning face
    createPersonGroup()
    # neru.txtに書き込まれた画像urlを配列にしてsourcesに格納
    sources = open('neru.txt').read().split('\n')
    personId = createPerson('長濱ねる')
    for i in sources:
        addFace(personId, i)
    # addFace()処理を待ってからtrainGroup()をしたいので、応急処置的にsleepしてます。。。
    # promise的なの使って改善すべき?? ちょっとこの辺まだよくわかってないです m(__)m
    time.sleep(10)
    trainGroup()

    # identify person
    imageUrl = 'https://scontent-nrt1-1.cdninstagram.com/vp/e714b56e8acc9001bd6e9c938cd738b5/5BDED0D0/t51.2885-15/e35/26180878_1782452602056444_9161322227717636096_n.jpg'
    detectedFaceId = detectFace(imageUrl)
    identifiedPerson = identifyPerson(detectedFaceId)
    if identifiedPerson[0]['personId']:
        personId = identifiedPerson[0]['personId']
        personName = getPersonNameByPersonId(personId)
        print(personName)
neru.txtには画像urlを1行ずつ書き込んでおく
http://48pedia.org/images/e/ee/2018%E5%B9%B4%E6%AC%85%E5%9D%8246%E3%83%97%E3%83%AD%E3%83%95%E3%82%A3%E3%83%BC%E3%83%AB_%E9%95%B7%E6%BF%B1%E3%81%AD%E3%82%8B_2.jpg
https://i0.wp.com/free-style-info.com/wp-content/uploads/2017/12/neru008-20171216-174300.jpg?resize=400%2C600&ssl=1
https://dreaming-baby.com/wp-content/uploads/2017/12/ac2eea4df1b0b02ac7bcdbf1a9f0479b.jpg
http://livedoor.blogimg.jp/fumichen2/imgs/1/1/1192251d.jpg
https://rr.img.naver.jp/mig?src=http%3A%2F%2Fimgcc.naver.jp%2Fkaze%2Fmission%2FUSER%2F20160918%2F79%2F7753109%2F205%2F853x1280xd8fa341ed662577f5d29ba9.jpg%2F300%2F600&twidth=300&theight=600&qlt=80&res_format=jpg&op=r
参考にしたもの
1. Getting Started with Face API in Python Tutorial 2. Azure face APIで遊んでみよう その2~顔の認識 3. AIで似ているAV女優を紹介しているスケベAI「スケベ博士」を作りました。特にdaiさんのnoteは参考になりました。
qiitaに書いておきたいなと思い始めたのも、daiさんのnoteを読んで、自分で画像認識を実装してからでした。
正直なところ、daiさんのだけではわからなかったり、抜けていると感じたところがあったので、そういった点も含めてFaceAPIの使い方を残しておこうと思いました。
参考になれば嬉しいです。
間違った点や改善すべき点などがあればご指摘ください。