Reduxを使わずに、useReducerなどの機能だけを用いてReactでグローバルに値を管理します。
コーディングはTypeScriptでやります。
reactのプロジェクト作成
TypeScriptでReactのプロジェクトを作るなら、
create-react-app my-app --typescript
こいつを一発ぶちかましてやればいいです。
create-react-appをグローバルでインストールしてない場合は、
npx create-react-app my-app --typescript
でプロジェクトを作ります。
必要なものは全部入っていますが、私はUIにmaterial-uiを使うので、
$ yarn add @material-ui/core @material-ui/icons @material-ui/styles @types/material-ui
をしてあります、一応。
windowsでやりました。
グローバルに値を管理する
ここではグローバル値をグローバルステイトと呼んでみます。
まず、srcディレクトリ内に、reducer.tsを作成します。
export const initialState = { // グローバルステイトの初期値
  currentUser: {
    age: 99,
    name: "DefaultName",
    occupation: "DefaultOccupation",
    spouse: false
  }
}

export type State = typeof initialState // グローバルステイトの型定義

export interface IAction { // グローバルステイトの更新を行わせる指示の型定義
  type: 'setUser',
  payload: {
    name: string,
    age: number,
    occupation: string,
    spouse: boolean
  }
}

export const reducer = (state: State, action: IAction) => {
  switch (action.type) {
    case 'setUser': return { // グローバルステイトの更新を行わせる指示のtypeが'setUser'の時の処理
      ...state,
      currentUser: action.payload
    }
    default: return state
  }
}
ここには指示のtypeがsetUserしかありませんが、一応switch文で書いておきます。
TSなのでreducerの引数にも型を設定してあげてください。
import * as React from 'react'

import { IAction, initialState, reducer, State } from './reducer'

const { createContext, useContext, useReducer } = React

// グローバルステイトの初期値を引数として取り、state用のcontextを生成
const stateContext = createContext(initialState)
// IAction型の引数を取る空の関数を初期値とし、dispatch用のcontextを生成
const dispatchContext = createContext((() => true) as React.Dispatch<IAction>)

export const Provider:React.FunctionComponent = props => {
  const [state, dispatch] = useReducer(reducer, initialState)
  return (
    <dispatchContext.Provider value={dispatch}> {/* dispatch用contextにdispatchを設置 */}
      <stateContext.Provider value={state}> {/* state用contextにstateを設置 */}
        {props.children}
      </stateContext.Provider>
    </dispatchContext.Provider>
  )
}

// dispatch関数を利用できるようにする
export const useDispatch = () => {
  return useContext(dispatchContext)
}

// グローバルステイトを利用できるようにする
export const useGlobalState = <K extends keyof State>(property: K) => {
  const state = useContext(stateContext)
  return state[property]
}
流れとしては、
- Contextの生成
- Contextをコンポーネントとしてまとめ、Providerとしてexportする
- useDispatch関数からdispatch関数を使えるようにし、useGlobalState関数からグローバルステイトを使えるようにする
最後から4行目の<K extends keyof State>では、
keyofでState(reducer.tsで定義したtype State)の要素のプロパティをunion型(共用体型)に変換し、
それをKが継承することになります(ここで書いたコードにはそもそもプロパティがcurrentUserしかないですが)。
useGlobalState関数はこのKの型の引数propertyを取ります。
union型では何個プロパティがあってもそのうちのいずれかに該当する引数を取ればいいので、propertyは上記のコードではcurrentUserでなければなりません。
したがって、その下ではuseContextで取ってきたグローバルステイトであるstateのcurrentUser(state[property]の部分)を取得しているわけです。
*この辺は自分で書いてて(参考ページを写経してて)、何やってんだこれ?となったので備忘録としても書いておきました。
React Hooks Tutorial on pure useReducer + useContext for global state like Redux and comparison with react-hooks-global-state
はい、ここまでくれば、あとはProvider.tsxをimportして、App.tsxに組み込みます。
// 上部省略
import { Provider } from './Provider'
import User from './User' // グローバルステイトとやり取りするコンポーネントをUser.tsxとして作りました
import logo from './logo.svg'

const App = () => {
  return (
    <Provider>
      <div className="App">
        <header className="App-header">
          <img src={logo} className="App-logo" alt="logo" />
          <h1 className="App-title">Welcome to React</h1>
        </header>
        <User/>
      </div>
    </Provider>
  )
}
ProviderはすべてのDOMを包み込むように設置します。
以下のファイルでは、グローバルステイトとやり取りを行っています。
// 上部省略
// material-uiのコンポーネントのimport省略
// material-uiのスタイル設定省略
import { useDispatch, useGlobalState } from './Provider';

interface IUser {
  name: string, // ユーザー名
  age: number, // 年齢
  occupation: string, // 職業
  spouse: boolean // 配偶者
}

const User = () => {
  // style設定を定数classesとして扱う(上では省略しましたが、ここでスタイル設定を扱う関数を実行しています)
  const classes = useStyles()

  // グローバルステイトのプロパティとしてcurrentUserを指定してglobalState定数に入れる
  const globalState = useGlobalState('currentUser');

  // userStateの定義とその初期値の設定、およびステイトの更新関数の定義
  const [ userState, setUserState ] = React.useState<IUser>({
    age: 0,
    name: "",
    occupation: "",
    spouse: false
  })

  // input変更検知
  function changeName(e: any) {
    setUserState({
      ...userState,
      name: e.target.value
    })
  }
  function changeAge(e: any) {
    setUserState({
      ...userState,
      age: e.target.value
    })
  }
  function changeOccupation(e: any) {
    setUserState({
      ...userState,
      occupation: e.target.value
    })
  }
  // 配偶者項目のみボタンでのswitch選択とする
  function HasSpouse() {
    setUserState({
      ...userState,
      spouse: true
    })
  }
  function HasNoSpouse() {
    setUserState({
      ...userState,
      spouse: false
    })
  }

  // ボタンを押されたときにreducerへdispatchしてグローバルステイトを更新
  const dispatch = useDispatch();
  function updateValue() {
    // グローバルステイトの更新を行わせる指示をdispatchの引数とする
    dispatch({
      payload: {
        age: userState.age,
        name: userState.name,
        occupation: userState.occupation,
        spouse: userState.spouse
      },
      type: 'setUser'
    })
  }

  return (
    <div>
      <Card className={classes.formCard}>
        <h3>RegisterUserAsGlobalState</h3>
        <TextField label="Name" type="text" value={userState.name} onChange={changeName}/>
        <TextField label="Age" type="text" value={userState.age} onChange={changeAge}/>
        <TextField label="Occupation" type="text" value={userState.occupation} onChange={changeOccupation}/>
        <div>
          <p>Spouse: {userState.spouse ? "Yes, I have" : "No, I do not"}</p>
          <Button className={classes.button} onClick={HasSpouse} variant="contained" color="secondary">
            I have a spouse
          </Button>
          <Button className={classes.button} onClick={HasNoSpouse} variant="contained" color="secondary">
            I do not have a spouse
          </Button>
        </div>
        <Button className={classes.button} type="button" onClick={updateValue} variant="contained" color="primary">
          Update
        </Button>
      </Card>
      <Card className={classes.detailCard}>
        <h3>UserDetail</h3>
        <p>UserName: {globalState.name}</p>
        <p>UserAge: {globalState.age}</p>
        <p>UserOccupation: {globalState.occupation}</p>
        <p>UserSpouse: {globalState.spouse ? "Yes, I have" : "No, I do not"}</p>
      </Card>
    </div>
  );
};

export default User;
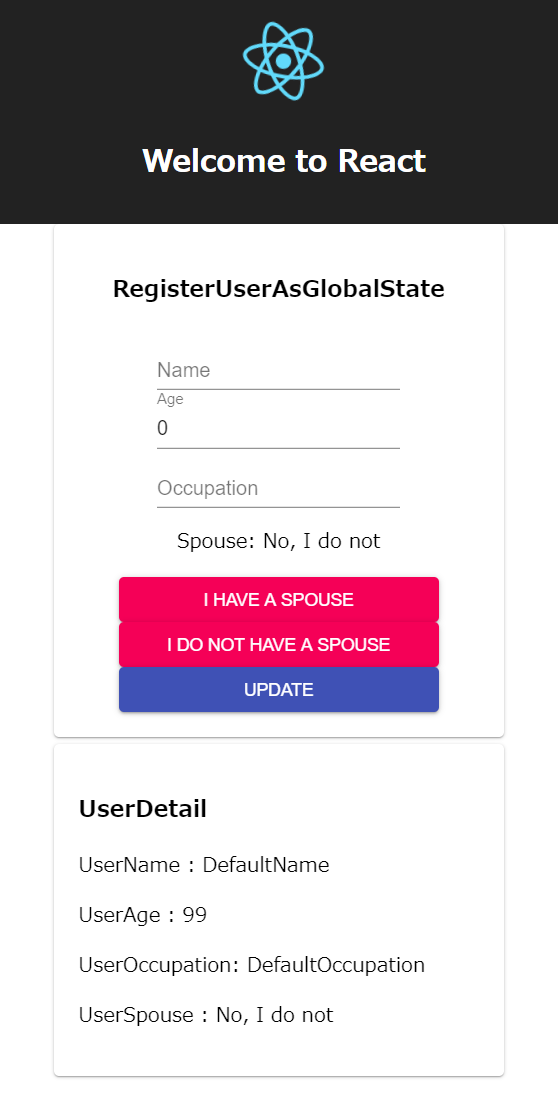
ここでyarn startすると、
私の環境では、以下のように表示されました。
NameとAgeとOccupationを入力して、I have a spouseボタンを押し、最後にUPDATEボタンを押しますと、
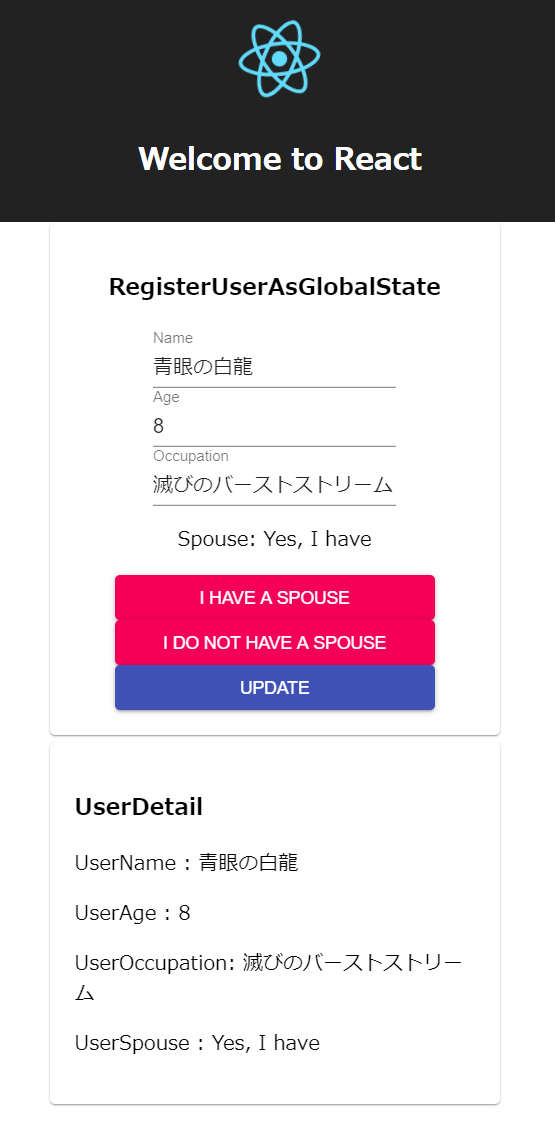
無事、光属性星8のドラゴン族、ブルーアイズホワイトドラゴンが登録されましたね。
次はサイバーエンドドラゴンとかも登録してみてください。
余談のmaterial-ui
私のmaterial-uiの設定はこんな感じになっていました。
// import系
import blueGrey from '@material-ui/core/colors/blueGrey'
import Button from '@material-ui/core/Button'
import Card from '@material-ui/core/Card'
import TextField from '@material-ui/core/TextField'
import { makeStyles } from '@material-ui/styles'

// 具体的な設定系
const useStyles = makeStyles((theme: any) => ({
  formCard: {
    width: "320px",
    padding: "20px",
    backgroundColor: blueGrey[900],
    left: "41%",
    position: "absolute"
  },
  detailCard: {
    width: "320px",
    padding: "20px",
    backgroundColor: blueGrey[900],
    top: "60%",
    left: "41%",
    position: "absolute",
    textAlign: "left"
  },
  button: {
    width: "80%"
  }
}))
これをconst classes = useStyles()で使っていく感じです。
material-uiの余談でした。