 神
神
Getting Started With Serverless and TypeScript
用意するもの
- Node.js
- あんまり古くないやつ
Hello World まで
repo を作る
$ mkdir oreno-sls-ts
$ cd oreno-sls-ts
$ git init
依存物をインストール
$ npm init
$ npm install --save-dev serverless serverless-webpack ts-loader tslint typescript webpack
今回はあえて serverless をグローバルに入れないパティーンでやってみる。 package.json で serverless のバージョンを管理できるメリットがある(serverless.yml の中にバージョン固定する設定もできるけど)。
雛形を作り、いらないものを一旦捨てる
$ node_modules/.bin/serverless create --template aws-nodejs
$ node_modules/.bin/tslint --init
$ rm handler.js serverless.yml # このあと手動でつくる
いろいろ作る
node_modules
.serverless
.built
service: oreno-sls-ts
provider:
  name: aws
  runtime: nodejs4.3
plugins:
- serverless-webpack
functions:
  hello:
    handler: index.hello
    events:
    - http:
        path: hello
        method: get
{
  "compilerOptions": {
    "target": "es5",
    "module": "commonjs"
  },
  "exclude": [
    "node_modules"
  ]
}
var path = require('path');

module.exports = {
  entry:  './index.ts',
  target: 'node',

  module: {
    loaders: [
      {
        test:   /\.ts(x?)$/,
        loader: 'ts-loader',
      },
    ],
  },

  resolve: {
    extensions: [
      '.ts',
      '.js',
      '.tsx',
      '.jsx',
      '',
    ],
  },

  output: {
    libraryTarget: 'commonjs',
    path:          path.join(__dirname, '.built'),
    filename:      'index.js',
  },
};
export * from './functions/hello';
export function hello(event, context, callback): void {
  const response = {
    statusCode: 200,

    headers: {
    },

    body: JSON.stringify({
      "message": "Hello TypeScript!!!!"
    })
  };

  callback(null, response);
};
ローカルで動作確認
$ node_modules/.bin/serverless webpack serve
うまく動いていれば http://localhost:8000/hello で動作確認できるはず。
デプロヰ
$ node_modules/.bin/serverless deploy
$ curl https://********.execute-api.us-east-1.amazonaws.com/dev/hello | jq
うまくいけば {"message": "Hello TypeScript!!!!"} が表示されるはず。
せっかくの TypeScript なので
型定義を使ってみる
Lambda Function に渡される context オブジェクトを型定義してみます。 event はめちゃくちゃ長くてアレだったので、ちゃんと書くときには定義します…
追記: context の型定義は自分でしなくても @types/aws-lambda パッケージを使えます。
export interface LambdaExecutionContext {
  callbackWaitsForEmptyEventLoop: boolean
  logGroupName:                   string
  logStreamName:                  string
  functionName:                   string
  memoryLimitInMB:                string
  functionVersion:                string
  invokeid:                       string
  awsRequestId:                   string
  invokedFunctionArn:             string
}
さっきの hello function を少し変更してこれを使ってみます。
import {LambdaExecutionContext} from '../types';

export function hello(event, context: LambdaExecutionContext, callback): void {
  const response = {
    statusCode: 200,

    headers: {
    },

    body: JSON.stringify({
      "message": `Hello!!!! I am a function named "${context.functionName}"`
    })
  };

  callback(null, response);
};
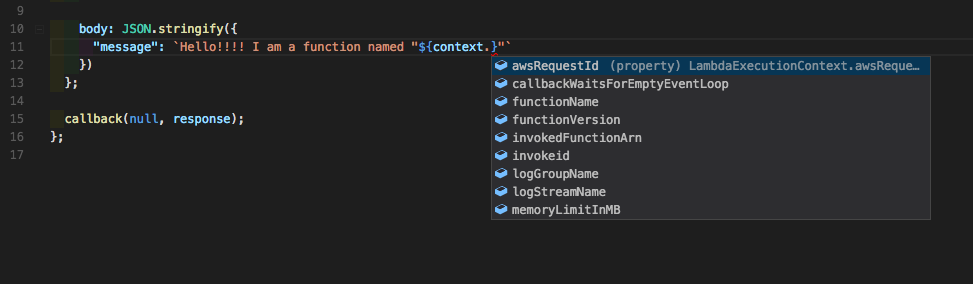
さてさて型定義されているということは。 Visual Studio Code なら補完が効きますし、
ありえないプロパティを指定するとちゃんとエラーを指摘してくれます。
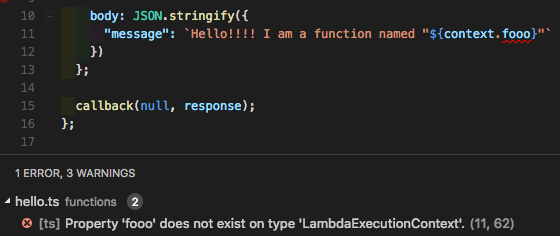
すてき!!!!!
AWS SDK で async/await してみる
パッケージを追加する。
$ npm install --save-dev aws-sdk @types/aws-sdk json-loader
@types/aws-sdk は DefinitelyTyped にある AWS SDK 用の型定義。 TypeScript の型定義管理はちょうざっくり変遷を辿ると
-
tsdっていう型定義管理ツールがあるぞ -
tsdはオワコン。typingsの時代だぜ - 型定義インストール専用のツールなんてもういらん。
npmで@types/fooって入れればおk
…という流れらしく、従って npm で入れる。
json-loader は AWS SDK の中で require('foo.json') してるの(たぶん)を Webpack で処理するのに必要。
ちょっと昔は AWS SDK と Webpack の組み合わせに問題があり、みんな困ってたけど直った模様。マジ感謝。
export * from "./functions/hello";
export * from "./functions/listfunctions";
import * as AWS from "aws-sdk";
import {LambdaExecutionContext} from "../types";

const lambda = new AWS.Lambda();

export async function listfunctions(event, context: LambdaExecutionContext, callback): Promise<void> {
  const functions  = [];
  let   nextMarker = null;

  do {
    const response: AWS.Lambda.ListFunctionsResponse = await lambda.listFunctions({Marker: nextMarker}).promise();

    functions.push(...response.Functions);
    nextMarker = response.NextMarker;
  } while (nextMarker);

  callback(null, {
    statusCode: 200,
    headers:    {},
    body:       JSON.stringify({functions}),
  });
};
を追加します。 AWS の API によくある NextMarker での判断を含んだ非同期 N 回ループがこんなに簡単に書けちゃいます。最高。
他のファイルも微変更が必要なのですが、後述の repo に全部あげておくのでそちらを参照してください。
再度デプロイして…
$ node_modules/.bin/serverless deploy
実行してみます。
$ curl https://********.execute-api.us-east-1.amazonaws.com/dev/listfunctions | jq
うまくいけばデプロイされたこれ自体を含む Lambda Function の一覧が取れるはずですね!
ここまでやったのがこちら
どうぞご笑覧ください。その後、諸々を見直してこの記事の内容とだいぶ違いがあったりします、ご注意を。