はじめに
今回は Microsoft Azure Tech Advent Calendar 2019 への投稿ということで、2019年10月に公開されたフレームワーク Dapr の AKS (Azure Kubernetes Service) 上での利用について投稿したいと思います。
概要
2019年10月にマイクロサービスアプリケーションの開発を容易にするためのフレームワークとして **Dapr(Distributed Application Runtime)**が公開されました。 現在 α 版ではありますが、Daprは、プログラミング言語に依存せずマイクロサービス間の呼び出し機能やステート管理、サービス間のメッセージ機能、リソースのバインディング、分散サービス間のトレーシングなどの機能を提供することを目指して開発が進んでいます。

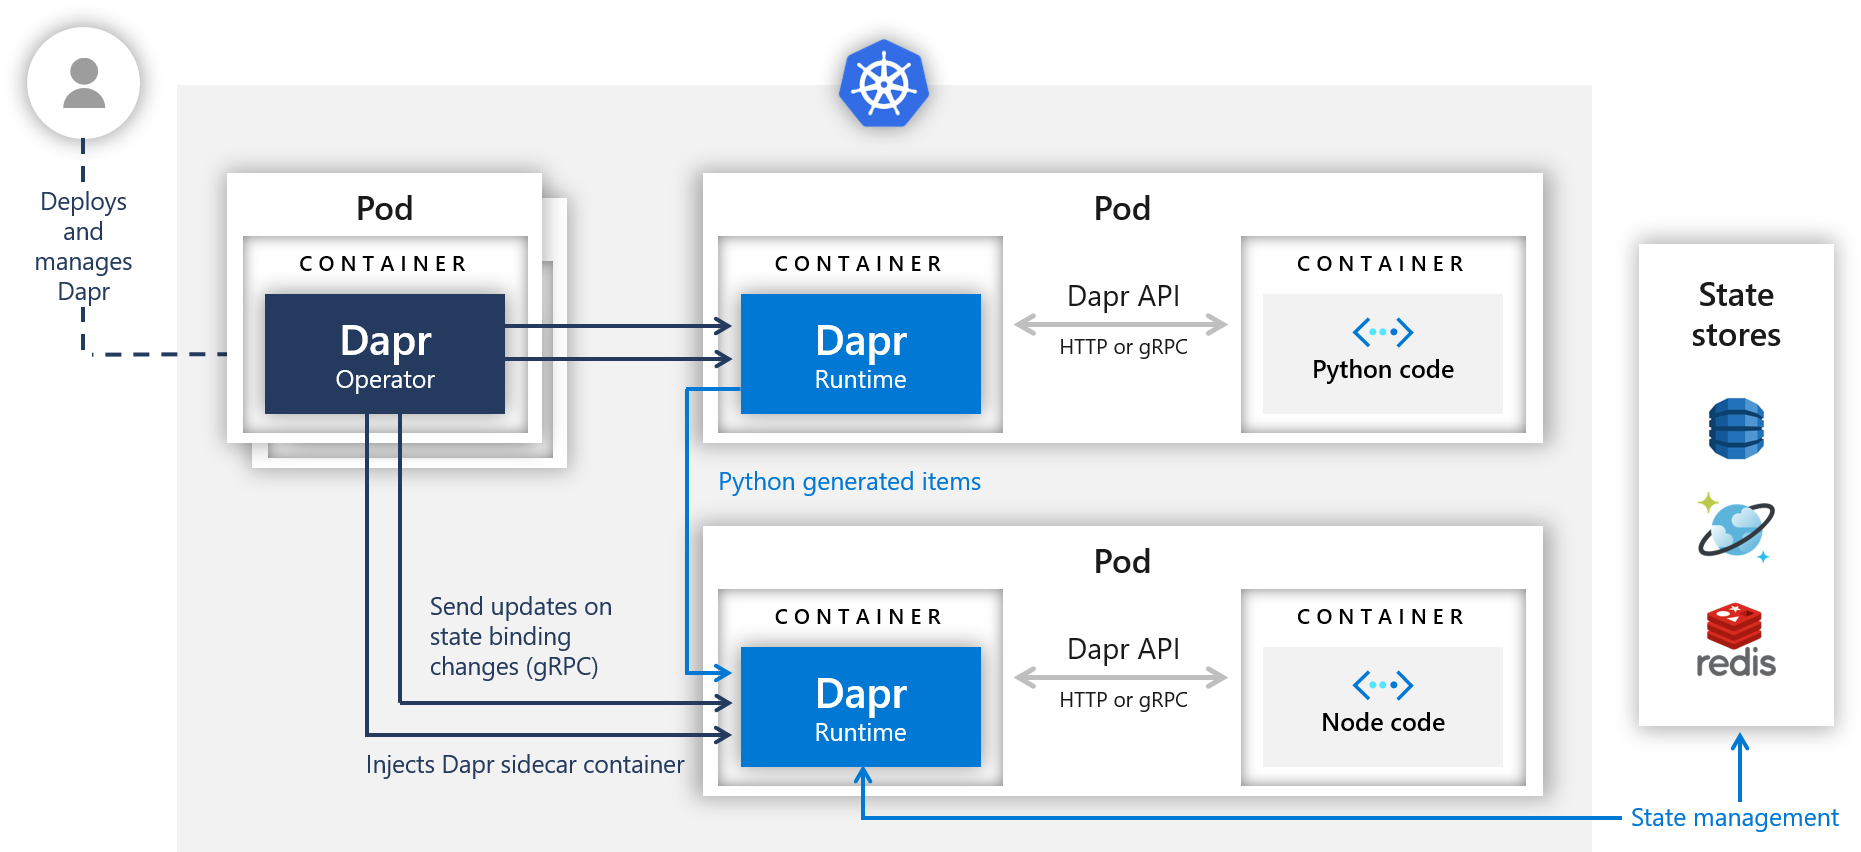
Dapr は、いわゆるサイドカーアーキテクチャとして動作し、アプリケーションからの HTTP/gRPC API 経由の呼び出しによって利用されます。(Kubernetes 上ではアプリケーションと同一の POD 内のサイドカーコンテナとして動作します)そのため、アプリケーション側では、 Dapr 利用のために特別なランタイムを組み込む必要がなく、アプリケーションロジックが分離された状態で機能を利用できます。

今回はKubernetes での Dapr の動作確認ですが、Azure Tech Advent Calendar ですので、 Microsoft Azure の Managed k8 Service である AKS 上で実行していきたいと思います。
AKS で動作するコンテナアプリケーションにて Dapr フレームワークを用いて アプリケーションの状態(State) を管理する方法について、次の流れでコマンド例、コード解説を交えて整理します。
- Azure Kubernetes Service (AKS) Cluster の作成
- Dapr CLI のインストール
- AKS Cluster に dapr をインストール
- Dapr の State Store (Redis) の構築
- Node.js アプリ with dapr をデプロイ
- python アプリ with dapr とデプロイ
- Node と Python アプリ間での dapr とのやりとり動作確認
最終的には、AKS 上で次の構成が実現されます。State Store は redis を使用します。
STEP 1. Azure Kubernetes Service(AKS) Cluster の作成
はじめに dapr と サンプルアプリケーションを動作させる kuberenetes クラスタを作成します。この後の操作には前提条件として、次のツールが必要のため、作業用の端末にセットアップしておきます。
・Azure CLI
・kubectl
dapr 検証環境用の AKS Cluster を Azure CLI で作成します。kubectl も前提として必要になるので、「クイック スタート:Azure CLI を使用して Azure Kubernetes Service クラスターをデプロイする」を確認いただくと良いかと思います。インストール後に次のコマンドを実行します。
# Azure への接続
az login

# サブスクリプションの選択
az account set -s <YourSubscriptionId>

# リソースグループの作成
az group create --name myAKSdapr --location japaneast

# AKS クラスタの作成
az aks create --resource-group myAKSdapr \
    --name myAKSDaprCluster \
    --node-count 2 \
    --enable-addons http_application_routing
    --enable-rbac \
    --generate-ssh-keys

# クラスタの資格情報を取得する
az aks get-credentials --resource-group myAKSdapr --name myAKSDaprCluster
念のため、クラスタ作成後に kubectl get node で作成が無事完了していることを確認しておきます。
$ kubectl get node
NAME                                STATUS   ROLES   AGE     VERSION
aks-nodepool1-37284717-vmss000000   Ready    agent   5m39s   v1.13.12
aks-nodepool1-37284717-vmss000001   Ready    agent   5m51s   v1.13.12
STEP 2. Dapr CLI のインストール
今回は Visual Studio Code の Remote Deployment で接続した Azure VM(Ubuntu)から作業しているため、この Ubuntu 環境に Dapr CLI をインストールします。Mac/Windowsでの手順は「Installing Dapr CLI」で確認できます。
wget -q https://raw.githubusercontent.com/dapr/cli/master/install/install.sh -O - | /bin/bash
Your system is linux_amd64
Installing Dapr CLI...

Downloading https://github.com/dapr/cli/releases/download/v0.2.0/dapr_linux_amd64.tar.gz ...
dapr installed into /usr/local/bin successfully.
cli version: 0.2.0
runtime version: n/a
To get started with Dapr, please visit https://github.com/dapr/docs/tree/master/getting-started
STEP 3. AKS Cluster に dapr をインストールする
次のコマンドで、AKS クラスタに dapr をインストールします。
$ dapr init --kubernetes
⌛  Making the jump to hyperspace...
ℹ️  Note: this installation is recommended for testing purposes. For production environments, please use Helm

✅  Deploying the Dapr Operator to your cluster...
✅  Success! Dapr has been installed. To verify, run 'kubectl get pods -w' in your terminal
上記の通りインストールが正常に完了した後に、kubectl get pods で pod を確認すると、dapr 関連の pod ( dapr-operator, dapr-placement, dapr-sidecar-injector) が表示されます。
$ kubectl get pods -w
NAME                                     READY   STATUS    RESTARTS   AGE
dapr-operator-68f7dcb454-nv25m           1/1     Running   0          70s
dapr-placement-6d77d54dc6-5bsp4          1/1     Running   0          70s
dapr-sidecar-injector-86d6ccf956-5j56p   1/1     Running   0          70s
STEP 4. State Store (Redis)の構築
Dapr は、Redis, CosmosDB, DynamoDB, Cassandra など多様なデータサービスを state 情報のストアとして使用できますが、今回は Redis を使用したいと思います。
Redisは helm で作成しようと思います。 11月に Helm 3.0.0 がリリースされたので、まずは Helm3 のセットアップから始めます。以下は Linux が作業端末であることを前提としているので、その他の環境の場合はHelm 公式を参照してください。Helm 3は、Tillerless になっていたりコマンド体系が少し違います。実際実行したコマンドは次の記載の通りです。
$curl https://raw.githubusercontent.com/helm/helm/master/scripts/get-helm-3 | bash
  % Total    % Received % Xferd  Average Speed   Time    Time     Time  Current
                                 Dload  Upload   Total   Spent    Left  Speed
100  6617  100  6617    0     0  21483      0 --:--:-- --:--:-- --:--:-- 21414
Downloading https://get.helm.sh/helm-v3.0.0-linux-amd64.tar.gz
Preparing to install helm into /usr/local/bin
helm installed into /usr/local/bin/helm
helm のコマンドがインストールできたら chart repository を登録しておきます。
$helm repo add stable https://kubernetes-charts.storage.googleapis.com/
"stable" has been added to your repositories
repository が参照できることを確認します。
$helm search repo stable
NAME                                    CHART VERSION   APP VERSION                     DESCRIPTION
stable/acs-engine-autoscaler            2.2.2           2.1.1                           DEPRECATED Scales worker nodes within agent pools
stable/aerospike                        0.3.1           v4.5.0.5                        A Helm chart for Aerospike in Kubernetes
stable/airflow                          5.1.0           1.10.4                          Airflow is a platform to programmatically autho...
# more
redis は defaultの namespace に作成しようと思います。次のコマンドで redis をインストールします。
$ helm install redis stable/redis
redis がデプロイされていることが確認できます。
$ helm list
NAME    NAMESPACE       REVISION        UPDATED                                 STATUS          CHART           APP VERSION
redis   default         1               2019-11-28 17:49:09.405349951 +0000 UTC deployed        redis-10.0.2    5.0.7

$ kubectl get pods -n redis
NAME             READY   STATUS              RESTARTS   AGE
redis-master-0   1/1     Running             0          6m2s
redis-slave-0    1/1     Running             0          6m2s
redis-slave-1    1/1     Running             0          5m21s
redis が作成できたら、次の deploy/redis.yaml を使用して redis の設定をおこないます。
210_aks_dapr_redis/deploy/
https://github.com/y10e/azure-sample-cli/tree/master/210_aks_dapr_redis/deploy
YOUR_REDIS_HOST_HERE, YOUR_REDIS_KEY_HERE の箇所を編集します。
apiVersion: dapr.io/v1alpha1
kind: Component
metadata:
  name: statestore
spec:
  type: state.redis
  metadata:
  - name: redisHost
    value: redis-master:6379
  - name: redisPassword
    value: <YOUR_REDIS_KEY_HERE>
YOUR_REDIS_KEY_HERE は、次のコマンドで確認した値を指定します。
$ kubectl get secret redis -o jsonpath="{.data.redis-password}" | base64 --decode
ファイルを修正したら構成を apply します。これで一旦、redis の作業は完了です。
$ kubectl apply -f ./deploy/redis.yaml
component.dapr.io/statestore created
ちなみに redis の key は、kubernetes の Secrets にも保存できます。サンプルは こちら で紹介されていました。
STEP 5. Node.js App with dapr をデプロイ
ここからは、dapr を使用したアプリ側のデプロイを進めます。
おなじく sample の deploy/node.yaml を使用します。 node.yaml を見ると Deployment の annotations で dapr サイドカーの設定が有効化されていることがわかります。また同時にサイドカーの dapr に対して、アプリの id や port などの情報を指定しています。
annotations:
        dapr.io/enabled: "true"
        dapr.io/id: "nodeapp"
        dapr.io/port: "3000"
デプロイします。
$ kubectl apply -f ./deploy/node.yaml
service/nodeapp created
deployment.apps/nodeapp created
デプロイ後、kubectl get pod で nodeapp からはじまる pod が確認できます。
$ kubectl get pods --selector=app=node
NAME                       READY   STATUS    RESTARTS   AGE
nodeapp-5956c68964-wfnsh   2/2     Running   0          41h
$ kubectl exec -it nodeapp-5956c68964-wfnsh /bin/ash
サンプルは、alpine ベースのコンテナなので、ash で接続して、node.js のコードを確認することも可能です。
$ kubectl exec -it nodeapp-5956c68964-wfnsh /bin/ash
Defaulting container name to node.
Use 'kubectl describe pod/nodeapp-5956c68964-wfnsh -n default' to see all of the containers in this pod.
/app # ls
app.js             node_modules       package-lock.json  package.json
/app # cat app.js
// ------------------------------------------------------------
// Copyright (c) Microsoft Corporation.
// Licensed under the MIT License.
// ------------------------------------------------------------

const express = require('express');
const bodyParser = require('body-parser');
require('isomorphic-fetch');

const app = express();
app.use(bodyParser.json());

const daprPort = process.env.DAPR_HTTP_PORT || 3500;
const stateUrl = `http://localhost:${daprPort}/v1.0/state`;
const port = 3000;

app.get('/order', (_req, res) => {
    fetch(`${stateUrl}/order`)
        .then((response) => {
            if (!response.ok) {
                throw "Could not get state.";
            }

            return response.text();
        }).then((orders) => {
            res.send(orders);
        }).catch((error) => {
            console.log(error);
            res.status(500).send({message: error});
        });
});

app.post('/neworder', (req, res) => {
    const data = req.body.data;
    const orderId = data.orderId;
    console.log("Got a new order! Order ID: " + orderId);

    const state = [{
        key: "order",
        value: data
    }];

    fetch(stateUrl, {
        method: "POST",
        body: JSON.stringify(state),
        headers: {
            "Content-Type": "application/json"
        }
    }).then((response) => {
        if (!response.ok) {
            throw "Failed to persist state.";
        }

        console.log("Successfully persisted state.");
        res.status(200).send();
    }).catch((error) => {
        console.log(error);
        res.status(500).send({message: error});
    });
});
このアプリは、こちらと同じものになります。
GET /order と POST /neworder の 2つのメソッドがあり、neworder では、dapr の State management の API を利用して、リクエストで受け取った order 情報( keyがorder )を記録します。order では、この order の状態を取得しています。
以降の作業のために、node.yaml で同じくデプロイされている service の IP を確認して環境変数にセットしておきます。
$ kubectl get svc nodeapp
NAME      TYPE           CLUSTER-IP    EXTERNAL-IP      PORT(S)        AGE
nodeapp   LoadBalancer   10.0.42.100   xx.xxx.xxx.xxx   80:32133/TCP   9m55s
$ export NODE_APP=$(kubectl get svc nodeapp --output 'jsonpath={.status.loadBalancer.ingress[0].ip}')
STEP 6. python App with dapr をデプロイ
今度は sample の deploy/python.yaml を使用します。
$ kubectl apply -f ./deploy/python.yaml
deployment.apps/pythonapp created
デプロイ後、kubectl get pod で pythonapp からはじまる pod が確認できます。
$ kubectl get pods --selector=app=python
NAME                         READY   STATUS    RESTARTS   AGE
pythonapp-5d9649fccd-pv8x6   2/2     Running   0          42h
python の sample も、alpine ベースのコンテナなので、 ash で接続してアプリのコードを見てみます。
kubectl exec -it pythonapp-5d9649fccd-pv8x6 /bin/ash
/app # cat app.py
# ------------------------------------------------------------
# Copyright (c) Microsoft Corporation.
# Licensed under the MIT License.
# ------------------------------------------------------------

import time
import requests
import os

dapr_port = os.getenv("DAPR_HTTP_PORT", 3500)
dapr_url = "http://localhost:{}/v1.0/invoke/nodeapp/method/neworder".format(dapr_port)

n = 0
while True:
    n += 1
    message = {"data": {"orderId": n}}

    try:
        response = requests.post(dapr_url, json=message)
    except Exception as e:
        print(e)

    time.sleep(1)
このアプリは非常にシンプルです。1 秒毎にサイドカーの dapr のエンドポイント対して、次の HTTP REQUEST を POST しています。
この時、Node.js の アプリケーションの ID と neworder のメソッドを指定することで、dapr 経由で Node.js のサービスを call しています。
POST http://localhost:<daprPort>/v1.0/invoke/<appId>/method/<method-name>
STEP 7. Node と Python アプリ間での dapr とのやりとり動作確認
Node.js のログを次のコマンドで確認してみます。
kubectl logs --selector=app=node -c node
そうすると、 pythonアプリから call されている 1 秒毎の Order 情報更新のメッセージログが確認できます。
Got a new order! Order ID: 1
Successfully persisted state.
Got a new order! Order ID: 2
Successfully persisted state.
Got a new order! Order ID: 3
Successfully persisted state.
Got a new order! Order ID: 4
Successfully persisted state.
Got a new order! Order ID: 5
Successfully persisted state.
また、Node.js の GET エンドポイントに接続すると最新の order の状態(orderId)が確認できます。
$ curl $NODE_APP/order
{"orderId":72}
補足
上記の動作確認で正常な値が取れない場合、dapr の設定等がおかしい可能性があります。その際は、nodeapp の POD 内の daprd のログなどを見るとどのようなエラーが発生しているかわかると思います。
kubectl logs nodeapp-5956c68964-wfnsh -c daprd
最後に
今回は、Azure Kubernetes Service 上で dapr を使用して、言語の異なる各アプリケーション(POD)間で状態の情報をマネジメントするアプリケーションのサンプルを紹介しました。
Daprは、本投稿(2019年12月1日)時点で、v 0.2.0がリリースされていますが、日本語の情報はほぼ皆無のため、1.0.0のリリースに向けて引き続き注目し紹介していきたいと思います。
参考ドキュメント
Dapr 公式
https://dapr.io/#
Dapr github
https://github.com/dapr/docs
Roadmap
https://github.com/dapr/dapr/wiki/Roadmap
投稿に使用したサンプルなど
https://github.com/y10e/azure-sample-cli/tree/master/210_aks_dapr_redis/deploy