この記事はFujitsu Advent Calendar 2020 25日目の記事です。
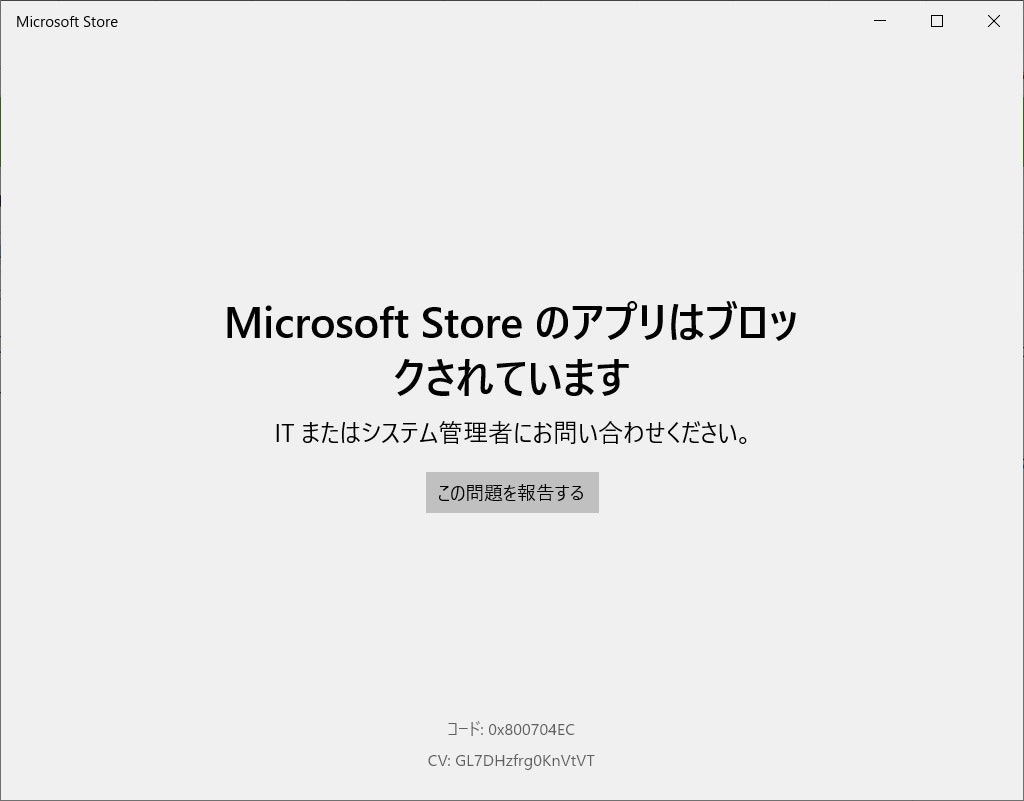
業務でDockerが使える様にHypervisorが利用可能な開発VMを貰ったので、有効活用出来る様にWSL2(Windows Subsystem for Linux2)をインストールしてDockerが利用できるようにしたいと思います。但し、Microsoft Storeが使えない環境なので少々手間が掛かります。。。![]()
Microsoft Storeが使えない??
Microsoft Storeが使えない環境とはMicrosoft Storeを起動すると以下のウィンドウが表示される環境です。
環境情報
- OS: Windows10 Enterprise 1909
- CPU: Intel Xeon Gold 6230 2.1GHz (2CPU)
- DRAM: 16GB
WSL2の有効化
WSLの有効化
まずはWSLの有効化を行います。Power Shellを管理者権限で起動して以下のコマンドを実行します。実行後、再起動します。
dism.exe /online /enable-feature /featurename:Microsoft-Windows-Subsystem-Linux /all /norestart
実行結果
Windows PowerShell
Copyright (C) Microsoft Corporation. All rights reserved.

新しいクロスプラットフォームの PowerShell をお試しください https://aka.ms/pscore6

PS C:\WINDOWS\system32> dism.exe /online /enable-feature /featurename:Microsoft-Windows-Subsystem-Linux /all /norestart

展開イメージのサービスと管理ツール
バージョン: 10.0.18362.1139

イメージのバージョン: 10.0.18363.1198

機能を有効にしています
[==========================100.0%==========================]
操作は正常に完了しました。
仮想マシン機能の有効化
仮想マシン機能を有効化します。管理者権限でPower Shellを起動し、以下のコマンドを実行します。実行後は再度再起動します。
必要な環境要件
- x64 システムの場合:バージョン 1903 以降、ビルド 18362 以上
- ARM64 システムの場合:バージョン 2004 以降、ビルド 19041 以上
- 18362 より前のビルドは WSL 2 をサポートしていません
dism.exe /online /enable-feature /featurename:VirtualMachinePlatform /all /norestart
実行結果
Windows PowerShell
Copyright (C) Microsoft Corporation. All rights reserved.

新しいクロスプラットフォームの PowerShell をお試しください https://aka.ms/pscore6

PS C:\WINDOWS\system32> dism.exe /online /enable-feature /featurename:VirtualMachinePlatform /all /norestart

展開イメージのサービスと管理ツール
バージョン: 10.0.18362.1139

イメージのバージョン: 10.0.18363.1256

機能を有効にしています
[==========================100.0%==========================]
操作は正常に完了しました。
Linux カーネル更新プログラム パッケージをダウンロード
Linuxカーネル更新プログラムパッケージをダウンロードし、インストールします。以下からダウンロードできます。wsl_update_x64.msiがダウンロードされます。
![]() WSL2のディストリビューションの再セットアップ実施時にインストールエラーが発生する場合が有ります。その場合カーネルを更新すると解決する場合が有ります。本来は
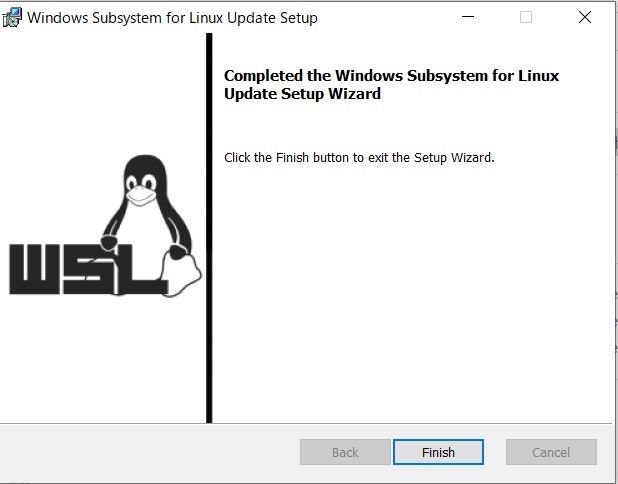
WSL2のディストリビューションの再セットアップ実施時にインストールエラーが発生する場合が有ります。その場合カーネルを更新すると解決する場合が有ります。本来はwsl --updateで更新できますが、環境により出来ない場合が有ります。その時は、コントロールパネル/プログラムと機能を起動し、Windows Subsystem for Linux Updateをアンインストールし、再インストールを実施します。
以下のようなウィンドウが表示されれば完了です。
WSL2を規定のバージョンとする
WSL2を規定のバージョンにします。管理者権限でPower Shellを起動し、以下のコマンドを実行します。
wsl --set-default-version 2
実行結果
Windows PowerShell
Copyright (C) Microsoft Corporation. All rights reserved.

新しいクロスプラットフォームの PowerShell をお試しください https://aka.ms/pscore6

PS C:\WINDOWS\system32> wsl --set-default-version 2
WSL 2 との主な違いについては、https://aka.ms/wsl2 を参照してください
2022/10/4更新: wslコマンドを用いたインストール
この記事を執筆した当時は上記の実行ファイルをダウンロードしてインストールを実施すう方法以外にMicrosoft Storeを用いずにインストールする方法が有りませんでした。しかし、記事執筆から数年が経過し、WSL2も進化しています。よってwslコマンドをPowserShell上から実行してインストール実施する方法を紹介します。
インストール可能なディストリビューションの確認
wsl --list --onlineまたはwsl -l -oコマンドでインストール可能なディストリビューションを買う人します。
> wsl --list --online
インストールできる有効なディストリビューションの一覧を次に示します。
'wsl --install -d <Distro>' を使用してインストールします。

NAME            FRIENDLY NAME
Ubuntu          Ubuntu
Debian          Debian GNU/Linux
kali-linux      Kali Linux Rolling
openSUSE-42     openSUSE Leap 42
SLES-12         SUSE Linux Enterprise Server v12
Ubuntu-16.04    Ubuntu 16.04 LTS
Ubuntu-18.04    Ubuntu 18.04 LTS
Ubuntu-20.04    Ubuntu 20.04 LTS
今回はUbuntu-20.04 LTSをインストールします。以下のコマンドを実行します。
> wsl --install -d Ubuntu-20.04
ダウンロード中: Ubuntu 20.04 LTS
インストール中: Ubuntu 20.04 LTS
Ubuntu 20.04 LTS はインストールされました。
Ubuntu 20.04 LTS を起動しています...
インストールが完了すると別ウィンドウでUbuntu 20.04 LTS @ WSL2が起動します。
従来の方法
ディストリビューションのセットアップ
以降の行程は @ihgs さんが以前共有して下さった情報(参考)の手順を参考に進めます。
ディストリビューションの実行ファイルを格納するディレクトリの作成
C:¥Programfiles直下にディストリビューションの実行ファイルを格納するディレクトリ(ここではWSL2)を作成します。
cd ../../
mkdir Programfiles/WSL2
ディストリビューションの実行ファイルのダウンロード
ダウンロードページからディストリビューションの実行ファイルをダウンロードします。今回はUbuntu 18.04をダウンロードします。ダウンロードしたディストリビューションの実行ファイルは先ほど作成したWSL2ディレクトリに移動させます。
![]() Ubuntu_1804.2019.522.0_x64.appx がダウンロードされます。
Ubuntu_1804.2019.522.0_x64.appx がダウンロードされます。
ディストリビューションの実行ファイルの展開
管理者権限でPower Shellを起動し、先ほど作成したWSL2ディレクトリに移動します。今後の行程はこのディレクトリ上で実施します。まずは実行ファイルをリネームし、展開します。以下のコマンドを実行します。
Rename-Item .\Ubuntu_1804.2019.522.0_x64.appx .\Ubuntu1804.zip
Expand-Archive .\Ubuntu1804.zip .\Ubuntu1804
実行結果
Windows PowerShell
Copyright (C) Microsoft Corporation. All rights reserved.

新しいクロスプラットフォームの PowerShell をお試しください https://aka.ms/pscore6

PS C:\WINDOWS\system32> cd ../../
PS C:\> mkdir '.\Program Files\WSL2'
                                                                                                                                                                                                                                                                                                    ディレクトリ: C:\Program Files                                                                                                                                                                                                                                                                                                                                                                                                              Mode                LastWriteTime         Length Name
----                -------------         ------ ----
d-----       2020/12/24      8:15                WSL2


PS C:\> cd '.\Program Files\WSL2'
PS C:\Program Files\WSL2> cp ..\..\Users\clouduser\Downloads\Ubuntu_1804.2019.522.0_x64.appx ./
PS C:\Program Files\WSL2> ls


    ディレクトリ: C:\Program Files\WSL2


Mode                LastWriteTime         Length Name
----                -------------         ------ ----
-a----       2020/12/18     17:23      231829509 Ubuntu_1804.2019.522.0_x64.appx


PS C:\Program Files\WSL2> Rename-Item .\Ubuntu_1804.2019.522.0_x64.appx .\Ubuntu1804.zip
PS C:\Program Files\WSL2> ls


    ディレクトリ: C:\Program Files\WSL2


Mode                LastWriteTime         Length Name
----                -------------         ------ ----
-a----       2020/12/18     17:23      231829509 Ubuntu1804.zip


PS C:\Program Files\WSL2> Expand-Archive .\Ubuntu1804.zip .\Ubuntu1804
PS C:\Program Files\WSL2> ls


    ディレクトリ: C:\Program Files\WSL2


Mode                LastWriteTime         Length Name
----                -------------         ------ ----
d-----       2020/12/24      8:16                Ubuntu1804
-a----       2020/12/18     17:23      231829509 Ubuntu1804.zip
ディストリビューションのインストール(実行ファイルの実行)
展開後に出来たUbuntu1804ディレクトリに移動し、ubuntu1804.exeを実行します。ディストリビューションのインストールが開始します。最後にUserName@HostName $とプロンプトが表示されれば完成です。
 cd .\Ubuntu1804\
.\ubuntu1804.exe
実行結果
PS C:\Program Files\WSL2> cd .\Ubuntu1804\
PS C:\Program Files\WSL2\Ubuntu1804> ls


    ディレクトリ: C:\Program Files\WSL2\Ubuntu1804


Mode                LastWriteTime         Length Name
----                -------------         ------ ----
d-----       2020/12/24      8:16                AppxMetadata
d-----       2020/12/24      8:16                Assets
-a----       2019/05/22      8:15         219038 AppxBlockMap.xml
-a----       2019/05/22      8:15           3851 AppxManifest.xml
-a----       2019/05/22      8:15          11209 AppxSignature.p7x
-a----       2019/05/22      8:15      231179584 install.tar.gz
-a----       2019/05/22      8:15           5400 resources.pri
-a----       2019/05/22      8:15         211968 ubuntu1804.exe
-a----       2019/05/22      8:15            744 [Content_Types].xml


PS C:\Program Files\WSL2\Ubuntu1804> .\ubuntu1804.exe
Installing, this may take a few minutes...
Please create a default UNIX user account. The username does not need to match your Windows username.
For more information visit: https://aka.ms/wslusers
Enter new UNIX username: user
Enter new UNIX password:
Retype new UNIX password:
passwd: password updated successfully
Installation successful!
To run a command as administrator (user "root"), use "sudo <command>".
See "man sudo_root" for details.

yuhkiyano@Vectorfield-PC:~$
ファイアウォールとProxyの設定
WSL1はネットワークアダプタがホストマシンと共有でしたが、WSL2から独立の仮想ネットワークアダプタを用いて通信をする仕様となりました。このネットワークアダプタが曲者で起動毎にIPアドレスやMACアドレスが変わります。そのためセキュリティソフトのファイアウォールで通信を遮断されるため、設定を追加する必要が有ります。また必要に応じてProxyの設定も実施します。(aptをはじめとする外と通信するアプリケーションが使えず出鼻を挫かれます。。。)
参考情報
- VPN環境下でWSL2を利用する場合に利用
OSのアップグレード
aptでアップグレードを実行します。
sudo apt update && sudo apt upgrade -y
Dockerのインストール
ここからはDocker Desktop for Windowsのインストールを実施します。WSL2側の設定はWindowsへのインストール時に自動的に実行されます。
2023/1/5 更新: Docker Desktopインストールせずに利用
この記事を執筆当時は無料で利用できていたDocker Desktopも定められた条件に該当する組織内での利用は有料となってしまいました。そこでDocker Desktopを利用せずにDockerをインストールする方法を用いることとします。
Docker本体のインストール前に必要なアプリケーションをインストールします。
sudo apt install -y apt-transport-https ca-certificates curl gnupg-agent software-properties-common
リポジトリキーを追加します。
sudo mkdir -p /etc/apt/keyrings
curl -fsSL https://download.docker.com/linux/ubuntu/gpg | sudo gpg --dearmor -o /etc/apt/keyrings/docker.gpg
echo \
  "deb [arch=$(dpkg --print-architecture) signed-by=/etc/apt/keyrings/docker.gpg] https://download.docker.com/linux/ubuntu \
  $(lsb_release -cs) stable" | sudo tee /etc/apt/sources.list.d/docker.list > /dev/null
本体のインストールを実行します。
sudo apt update && sudo apt install -y docker-ce docker-ce-cli containerd.io docker-compose-plugin
現在ログイン中のユーザーをdockerグループに追加します。
sudo gpasswd -a $USER docker
一旦ログアウトし、再ログインすることで有効になります。
exit
/var/run/docker.sockに書き込み権限を追加します。
sudo chgrp docker /var/run/docker.sock
iptablesの設定をlegacy設定に変更します。
sudo update-alternatives --set iptables /usr/sbin/iptables-legacy
sudo update-alternatives --set ip6tables /usr/sbin/ip6tables-legacy
docker daemonを自動起動するための設定を行います。
sudo visudo
ユーザー名 ALL=NOPASSWD: /usr/sbin/service docker start
ユーザー名 ALL=NOPASSWD: /usr/sbin/service docker stop
ユーザー名 ALL=NOPASSWD: /usr/sbin/service docker restart
.bashrcに以下を追記します。
service docker status > /dev/null 2>&1
if [ $? = 1 ]; then
    sudo service docker start
fi
一旦ログアウトし、再ログイン後にdockerが実行出来るか確認します。
exit
$ docker container run --rm hello-world
Unable to find image 'hello-world:latest' locally
latest: Pulling from library/hello-world
2db29710123e: Pull complete
Digest: sha256:94ebc7edf3401f299cd3376a1669bc0a49aef92d6d2669005f9bc5ef028dc333
Status: Downloaded newer image for hello-world:latest

Hello from Docker!
This message shows that your installation appears to be working correctly.

To generate this message, Docker took the following steps:
 1. The Docker client contacted the Docker daemon.
 2. The Docker daemon pulled the "hello-world" image from the Docker Hub.
    (amd64)
 3. The Docker daemon created a new container from that image which runs the
    executable that produces the output you are currently reading.
 4. The Docker daemon streamed that output to the Docker client, which sent it
    to your terminal.

To try something more ambitious, you can run an Ubuntu container with:
 $ docker run -it ubuntu bash

Share images, automate workflows, and more with a free Docker ID:
 https://hub.docker.com/

For more examples and ideas, visit:
 https://docs.docker.com/get-started/
- 参考
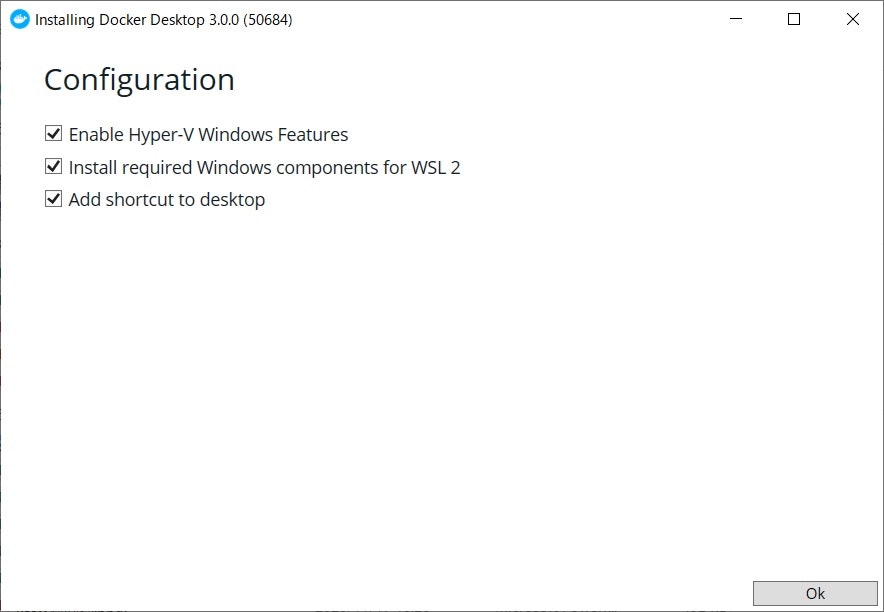
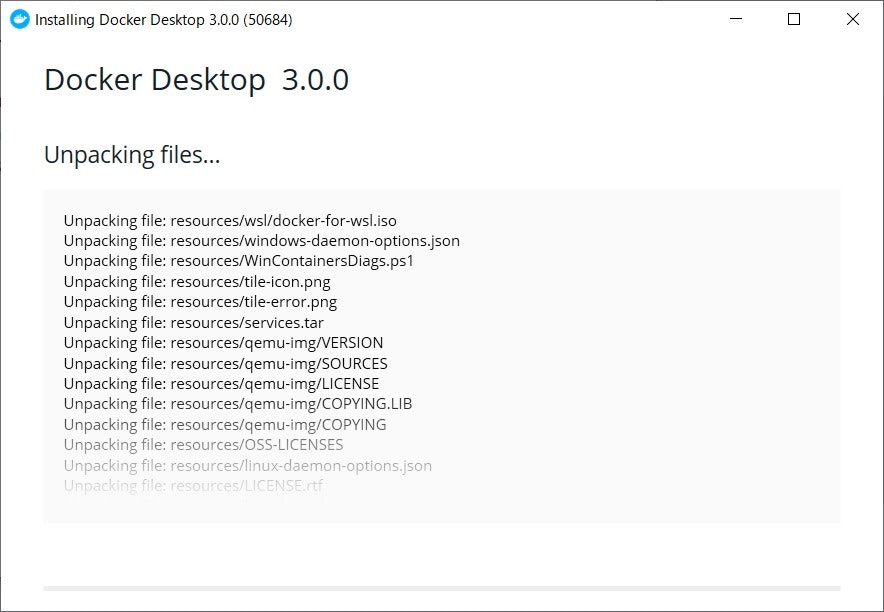
Docker Desktopのインストール
インストーラーのダウンロード
Docker DesktopよりWindows版のDockerのインストーラーをダウンロードします。Docker Desktop Installer.exeがダウンロードされます。完了後ダブルクリックします。以下のウィンドウが表示されたらそのままOKをクリックします。
インストールが完了表示されたらClose and Restartをクリックして再起動します。
![]() 再起動後
再起動後Docker Desktop is starting1のままなかなか起動せず、最終的に起動エラーが表示されました。ただ、Reset to Factory Default and Restart!?2をクリックすると何食わぬ顔でDockerが起動しました。ネットを検索した所、同様のIssueが挙がっていたのでどうやらバグの様です。。。
Proxyの設定とDocker Hubにログイン
DockerのProxy設定を行います。Settings>Resources>Proxiesから設定できます。設定が完了したら以下のコマンドを実行します。すると以下の警告が。。。
$ docker container run --rm hello-world
Unable to find image 'hello-world:latest' locally
docker: Error response from daemon: toomanyrequests: You have reached your pull rate limit. You may increase the limit by authenticating and upgrading: https://www.docker.com/increase-rate-limit.
See 'docker run --help'.
どうやらDocker Hubのアカウントでログインする必要が有る様なのでログインを試みるも。。。
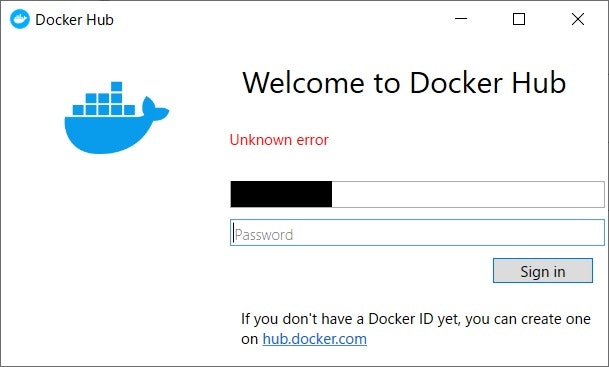
コマンドラインでログインをして、再度hello-worldコンテナを実行してみます。
$ docker login
Login with your Docker ID to push and pull images from Docker Hub. If you don't have a Docker ID, head over to https://hub.docker.com to create one.
Username: ****
Password:
Login Succeeded
yuhkiyano:~ $ docker container run --rm hello-world
Unable to find image 'hello-world:latest' locally
latest: Pulling from library/hello-world
0e03bdcc26d7: Pull complete
Digest: sha256:1a523af650137b8accdaed439c17d684df61ee4d74feac151b5b337bd29e7eec
Status: Downloaded newer image for hello-world:latest

Hello from Docker!
This message shows that your installation appears to be working correctly.

To generate this message, Docker took the following steps:
 1. The Docker client contacted the Docker daemon.
 2. The Docker daemon pulled the "hello-world" image from the Docker Hub.
    (amd64)
 3. The Docker daemon created a new container from that image which runs the
    executable that produces the output you are currently reading.
 4. The Docker daemon streamed that output to the Docker client, which sent it
    to your terminal.

To try something more ambitious, you can run an Ubuntu container with:
 $ docker run -it ubuntu bash

Share images, automate workflows, and more with a free Docker ID:
 https://hub.docker.com/

For more examples and ideas, visit:
 https://docs.docker.com/get-started/
無事成功しました!!![]() これでWSL2からDockerを実行出来る環境の構築が完了しました!!
これでWSL2からDockerを実行出来る環境の構築が完了しました!!![]()
まとめ
今回開発環境としてHyper-Vが有効になったWindows 10のVMを貰ったのでDockerの環境構築を行いました。本筋では無いため、詳細には言及しませんでしたが、WSL2の特性上ファイアウォールに通信遮断されてしまう所に苦戦しました。また、Docker Desktopもバグが多い印象です。今後アップデートされて解消することを願うばかりです。ともあれDocker on Ubuntu 18.04 @ WSL2が完成したので活用していこうと思います。
その他Tips
再インストールする場合
ディストリビューションを再インストールする場合は以下のコマンドを実行してwslの登録リストから削除してからディストリビューションのディレクトリを削除します。
 wsl --list
Linux 用 Windows サブシステム ディストリビューション:
Ubuntu-16.04 (既定)
Ubuntu-18.04
 wsl --unregister Ubuntu-18.04
Windows側のCドライブにアクセスしたい
/mnt/cがWindows側のCドライブなのでアクセスできます。
$ sudo ls /mnt/c
'$Recycle.Bin'             PerfLogs               Recovery                     WSL            settingバックアップ        wsl_settings
 DTK                      'Program Files'         Squid                        Windows        swapfile.sys
'Documents and Settings'  'Program Files (x86)'  'System Volume Information'   pagefile.sys   vscode_extension_install
 MSOCache                  ProgramData            Users                        public         wsl_important_data
From VSCode
VSCode Remote Extension PackをインストールしておくとVSCodeからもアクセス出来ます。
WSLコマンドのオプション一覧
オプション一覧
 wsl --help
Copyright (c) Microsoft Corporation. All rights reserved.

使用法: wsl.exe [引数] [オプション...] [コマンド ライン]

Linux バイナリを実行するための引数:

    コマンド ラインを指定しないと、wsl.exe は既定のシェルを起動します。

    --exec, -e <コマンド ライン>
        指定したコマンドを、既定の Linux シェルを使用しないで実行します。

    --
        残りのコマンド ラインをそのまま渡します。

オプション:
    --distribution, -d <ディストリビューション>
        指定したディストリビューションを実行します。

    --user, -u <ユーザー名>
        指定したユーザーとして実行します。

Linux 用 Windows サブシステムを管理するための引数:

    --export <ディストリビューション> <ファイル名>
        ディストリビューションを tar ファイルにエクスポートします。
        標準出力の場合は、ファイル名を - とすることができます。

    --import <ディストリビューション> <インストール場所> <ファイル名> [オプション]
        指定した tar ファイルを新しいディストリビューションとしてインポートします。
        標準入力の場合は、ファイル名を - とすることができます。

        オプション:
            --version <バージョン>
                新しいディストリビューションに使用するバージョンを指定します。

    --list, -l [オプション]
        ディストリビューションの一覧を表示します。

        オプション:
            --all
                現在インストール中またはアンインストール中のものを含めて
                すべてのディストリビューションを一覧表示します。

            --running
                現在実行中のディストリビューションのみを一覧表示します。

            --quiet, -q
                ディストリビューション名のみを表示します。

            --verbose, -v
                すべてのディストリビューションについての詳細情報を表示します。

    --set-default, -s <ディストリビューション>
        ディストリビューションを既定として設定します。

    --set-default-version <バージョン>
        新しいディストリビューションの既定のインストール バージョンを変更します。

    --set-version <ディストリビューション> <バージョン>
        指定したディストリビューションのバージョンを変更します。

    --shutdown
        実行中のすべてのディストリビューションと WSL 2 ライトウェイト ユーティリティ仮想マシンを直ちに終了します。

    --terminate, -t <ディストリビューション>
        指定したディストリビューションを終了します。

    --unregister <ディストリビューション>
        ディストリビューションの登録を解除します。

    --help
        使用法を表示します。
Reference
- Windows 10 用 Windows Subsystem for Linux のインストール ガイド
- Windows Server インストール ガイド
- WSL コマンドと起動構成
- WSL2におけるVcXsrvの設定←GUIの設定