はじめに
最近ではChatGPTが世間で大きな話題を集めていますね。ChatGPTとはOpenAIが開発した人工知能技術の一つでありその高度な自然言語処理技術を活かし、幅広い用途で使用されています。例えば、機械翻訳、テキスト生成、チャットボット、文章の自動要約などなど。
今回は、そんな時代の波に乗り、LaravelとOpenAIのAPIを使って、エラー解決アプリケーションを作成する方法を紹介します。
環境
| 開発環境 | バージョン |
|---|---|
| Laravel | 9.52.4 |
| PHP | 8.1 |
前提条件
本記事では、Laravelの開発環境が既に構築されていることを前提としています。さらに、本記事では、ビューのデザインを以下のように設定しています。
- ベースとなるスタイルとして、Tailwind CSSを使用する。
- ビューのレイアウトには、Bladeテンプレートエンジンを使用する。
本記事とレイアウトを揃えたい場合は、Tailwind CSSをプロジェクトにインストールする必要があります。
また、Tailwiind CSSをインストールしていなくとも、アプリケーションの動作には支障は出ませんので、各自の判断にお任せします。
概要
このアプリケーションは、エラーが発生した際に該当箇所とエラー内容を入力することで、自動的に解決方法を提供してくれるものです。

環境構築
OpenAIのAPIを使用するためのライブラリをインストールします。
composer require openai-php/client
続いて、OpenAIのAPIキーを取得します。サイトにアクセスし、アカウントを作成してAPIキーを取得します。
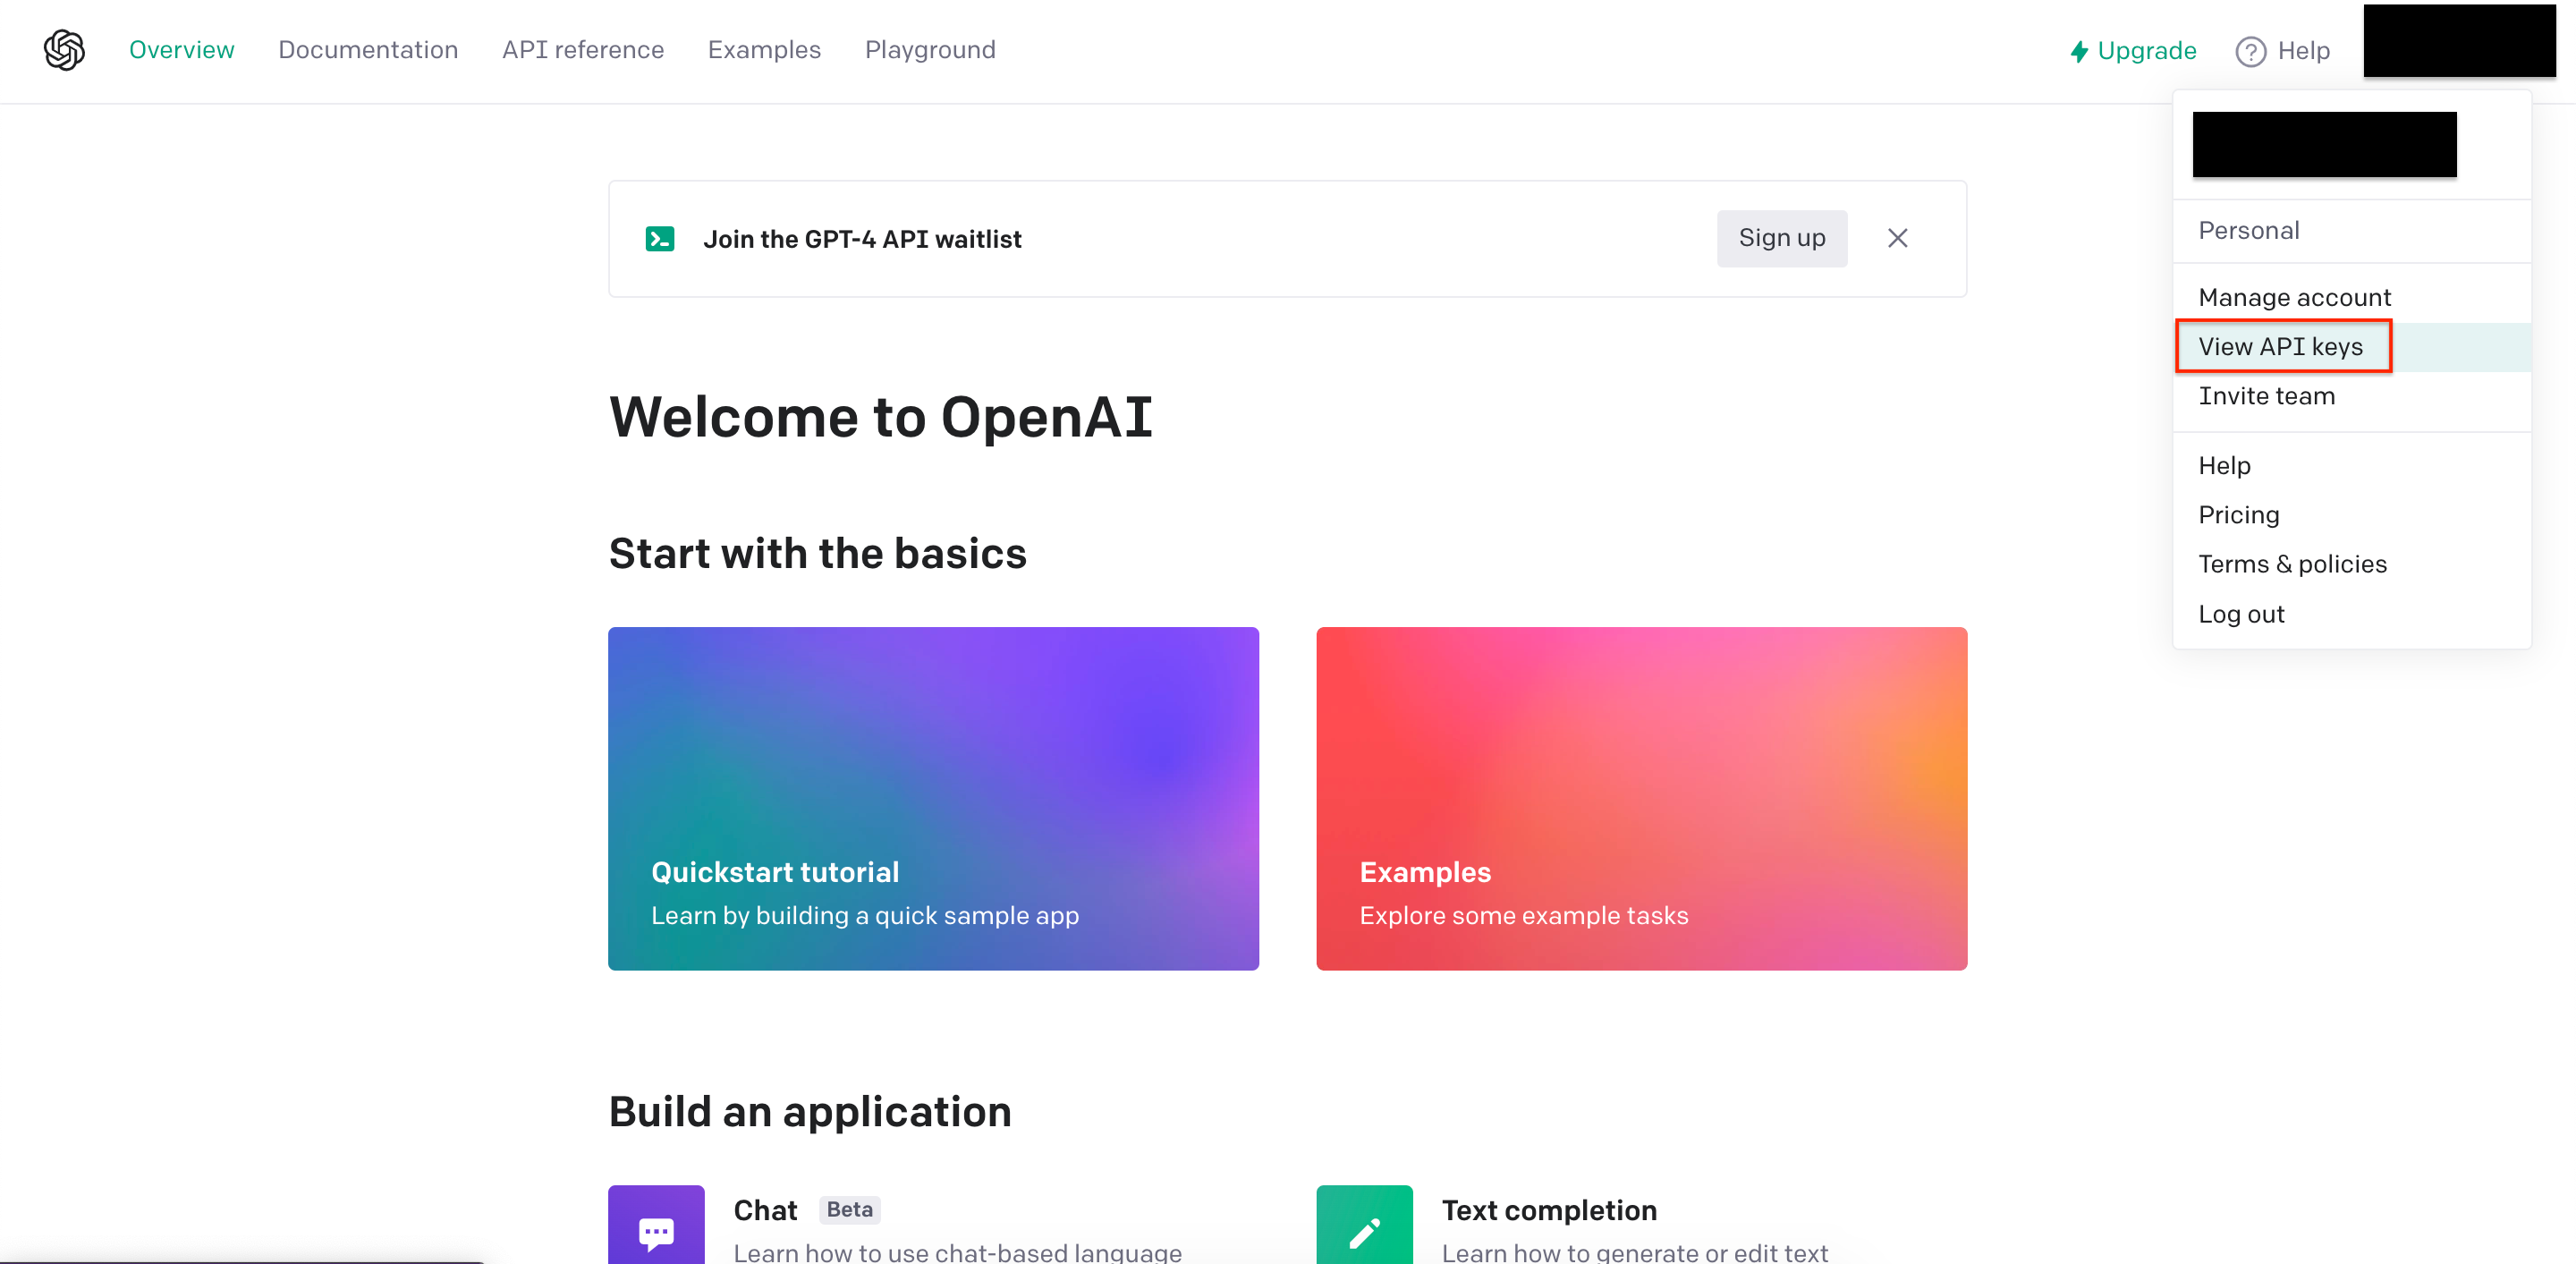
画面右上のプロフィールをクリックしてください。
その後、プルダウンリストが開くので「View API Keys」をクリックしてください。
赤枠の「Create new secret key」をクリックし、OpenAIのAPIキーを取得します。
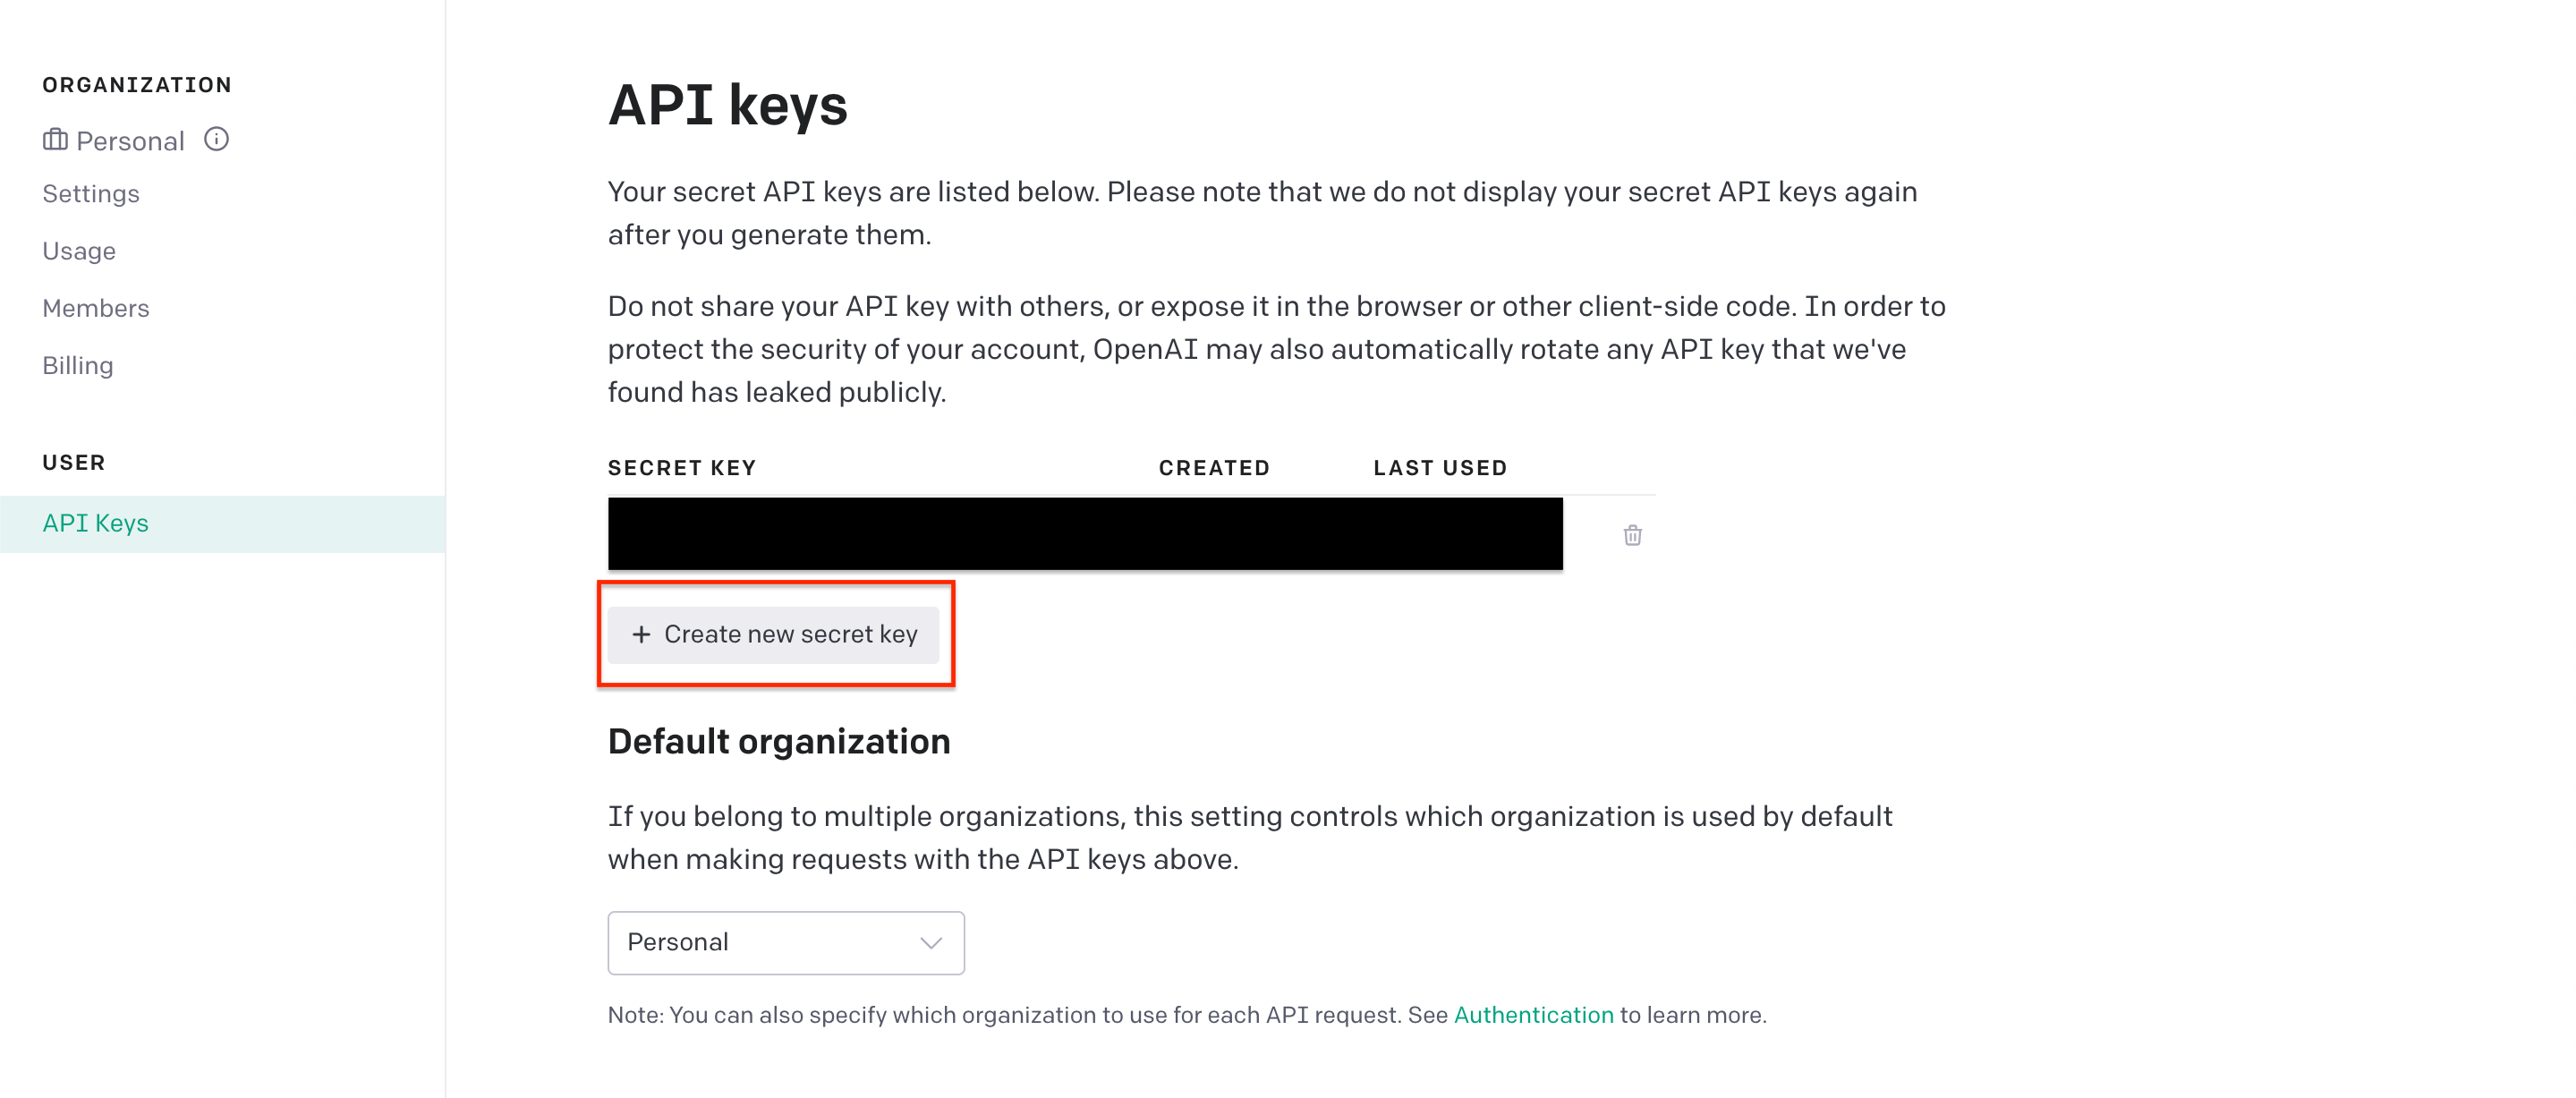
発行したAPIキーをコピーし、.envファイルに以下のように設定します。
OPENAI_API_KEY="発行したAPIキー"
次に、config/services.php ファイルを開き、以下のようにOpenAI APIキーを設定してください。
'openai' => [
    'api_key' => env('OPEN_API_KEY'),
  ],
入力フォームの作成
1. コントローラーを作成
まずは、コントローラーを作成します。
以下のコマンドを実行して、app/Http/Controllers/ResolveController.phpファイルを作成してください。
php artisan make:controller ResolveController
2. メソッドを作成
app/Http/Controllers/ResolveController.phpを開き、エラー内容を入力するフォームを表示するメソッドを以下のように定義します。
<?php

namespace App\Http\Controllers;

use Illuminate\Contracts\View\View;

class ResolveController extends Controller
{
  /**
   * 入力画面表示
   *
   * @return View
   */
  public function index(): View
  {
    return view('resolve.index');
  }
}
3. ルーティングの設定
routes/web.phpを開き、以下のように作成したコントローラーを設定します。
<?php

use App\Http\Controllers\ResolveController;
use Illuminate\Support\Facades\Route;

Route::get('/', [ResolveController::class, 'index'])->name('index');
4. viewを作成
resources/views/にresolveディレクトリを作成し、その中にindex.blade.phpファイルを作成してください。
index.blade.phpを開き、以下のようなフォームを作成します。
<!DOCTYPE html>
<html lang="en">

<head>
  <meta charset="UTF-8">
  <meta http-equiv="X-UA-Compatible" content="IE=edge">
  <meta name="viewport" content="width=device-width, initial-scale=1.0">
  <link href="{{ asset('css/app.css') }}" rel="stylesheet">
  <title>入力画面 | {{ config('app.name') }}</title>
</head>

<body class="bg-gray-100">
  <div class="flex flex-col justify-center items-center h-screen">
    <div class="max-w-md w-full px-6 py-8 bg-white shadow-md overflow-hidden sm:rounded-lg">
      <h1 class="text-3xl font-extrabold text-gray-900 text-center mb-8">{{ config('app.name') }}</h1>
      <form method="POST" action="" class="space-y-6">
        @csrf
        <div>
          <label class="block text-gray-700 font-bold mb-2" for="error_location">
            エラー箇所
          </label>
          <textarea class="form-textarea border-2 rounded-lg py-2 px-3 w-full focus:outline-none focus:ring-2 focus:ring-blue-400" id="error_location" name="error_location" rows="5" required></textarea>
        </div>
        <div>
          <label class="block text-gray-700 font-bold mb-2" for="error_code">
            エラーコード
          </label>
          <textarea class="form-textarea border-2 rounded-lg py-2 px-3 w-full focus:outline-none focus:ring-2 focus:ring-blue-400" id="error_code" name="error_code" rows="5" required></textarea>
        </div>
        <div class="flex justify-center">
          <button class="w-full text-center py-2 px-4 border border-transparent rounded-md shadow-sm text-white font-medium bg-blue-500 hover:bg-blue-700 focus:outline-none focus:ring-2 focus:ring-offset-2 focus:ring-blue-400" type="submit">
            解決する
          </button>
        </div>
      </form>
    </div>
  </div>
</body>

</html>
ここまでで、エラー内容を入力するためのフォームが完成しました。ここから、実際にエラーを解決するための実装に入ります。
エラー解決処理機能の作成
1. メソッドを追加
エラー内容を受け取り、解決方法を提示する処理を行うメソッドを作成します。作成箇所は、app/Http/Controllers/ResolveController.phpになります。
ResolveControllerを開き、resolveメソッドを追加します。
/**
   * OpenAIのAPIにエラー内容を問い合わせ、解決方法を提示
   *
   * @param Request $request
   * @return View
   */
  public function resolve(Request $request): View
  {
    $client = OpenAI::client(config('openai.openapi_key'));
    $errorLocation = "発生したファイルの場所:\n" . $request->input('error_location');
    $errorCode = "エラーを解決するための方法を教えてください:\n" . $request->input('error_code');

    $result = $client->completions()->create([
      'model' => 'text-davinci-003',
      'prompt' => $errorLocation . "\n" . $errorCode,
      'max_tokens' => 200,
      'temperature' => 0.5,
      'n' => 1,
    ]);

    $resolve = $result->choices[0]->text;

    return view('resolve.resolve', compact('resolve'));
  }
簡単な処理の解説をおこないます。
最初の行では、OpenAIのAPIを使用するためのクライアントオブジェクトを作成し、生成したAPIキーを使用してAPIに接続します。APIキーは.envに設定した値をconfig/services.php経由で取得しています。
次に、入力されたエラーの場所とエラーコードを変数$errorLocationと$errorCodeに代入しています。
その後、OpenAIのAPIを呼び出すために、completions()メソッドを使用します。create()メソッドでAPIに送信する配列を定義しています。
配列には、以下のパラメータを設定しています。
-
model:使用するOpenAIのAPIモデルの種類を指定する文字列です。このコードでは、
text-davinci-003モデルを使用しており、使用するモデルによってレスポンス内容や料金等が変動します。 - prompt:APIに渡す文字列を指定します。今回のアプリケーションで言えば、エラーの場所とエラーコードを含む文字列を指定します。
- max_tokens:生成されるテキストの最大トークン数を指定する整数値です。今回は、200トークンに設定しています。
- temperature:出力されるテキストの多様性を制御するために指定します。0から2の間の値を取り、値が小さいほど、生成されたテキストは安定的で一貫性があるものになります。一方、値が大きいほど、生成されたテキストは多様で、より創造的なものになります。今回は、創造的なレスポンスを期待していないので、0に近い数値を指定しています。
- n:生成される回答数を指定する整数値です。今回は1つで良いので、1に設定しています。
最後に、$result->choices[0]->text;でAPIから返された結果(生成された解決策)を取得しています。
詳細な設定については下記参照
2. ルーティングの設定
routes/web.phpに上記メソッドを実行するルーティングを設定します。
<?php

use App\Http\Controllers\ResolveController;
use Illuminate\Support\Facades\Route;

Route::get('/', [ResolveController::class, 'index'])->name('index');
// 以下を追加
Route::post('/resolve', [ResolveController::class, 'resolve'])->name('resolve');
3. 入力フォームを修正
resources/views/resolve/index.blade.phpを修正します。formタグのaction属性を下記のように修正します。
// 修正前
<form method="POST" action="" class="space-y-6">
// 修正後
<form method="POST" action="{{ route('resolve') }}" class="space-y-6">
4. エラー解決を表示する画面を作成
resources/views/resolve/にresolve.blade.phpを作成します。
<!DOCTYPE html>
<html>

<head>
  <link href="{{ asset('css/app.css') }}" rel="stylesheet">
  <title>解決画面 | {{ config('app.name') }}</title>
</head>

<body class="bg-gray-100 font-sans leading-normal tracking-normal">
  <div class="hero min-h-screen bg-gray-100">
    <div class="flex flex-col justify-center items-center pt-6">
      <h1 class="text-3xl font-bold text-gray-800">{{ config('app.name') }}</h1>
    </div>
    <div class="container px-4 md:px-0 max-w-full mx-auto pt-8 md:pt-16">
      <div class="flex flex-wrap -mx-4 justify-center">
        <div class="w-11/12 px-4 mb-8">
          <div class="bg-white p-6 rounded-lg shadow-lg">
            <h2 class="text-2xl font-bold text-gray-800 mb-4">解決方法</h2>
            <p class="text-lg font-medium text-gray-600">{{ $resolve }}</p>
            <div class="mt-4 flex justify-center">
              <a href="{{ route('index') }}" class="bg-blue-500 hover:bg-blue-700 text-white font-bold py-2 px-4 rounded-lg">戻る</a>
            </div>
          </div>
        </div>
      </div>
    </div>
  </div>
</body>

</html>
これで、エラー解決を行うアプリケーションの作成は完了です。
まとめ
以上でOpenAIのAPIを使用したエラー解決アプリケーションの作成が完了しました。Laravelを使用したOpenAIのAPIを使用する記事が少なかったため、誰かのお役に立てれば幸いです。
また、本アプリケーションは様々な方向性での拡張可能だと思っているので(プログラミング言語の指定など)、是非自分なりのアプリケーションを作ってみてください。