はじめに
こちらの記事ではReact Hook FormとZodの基本的な使い方をまとめました。
今回はもう少し応用的なフォームを作成してみます。
完成イメージと仕様、環境は以下の通りです。
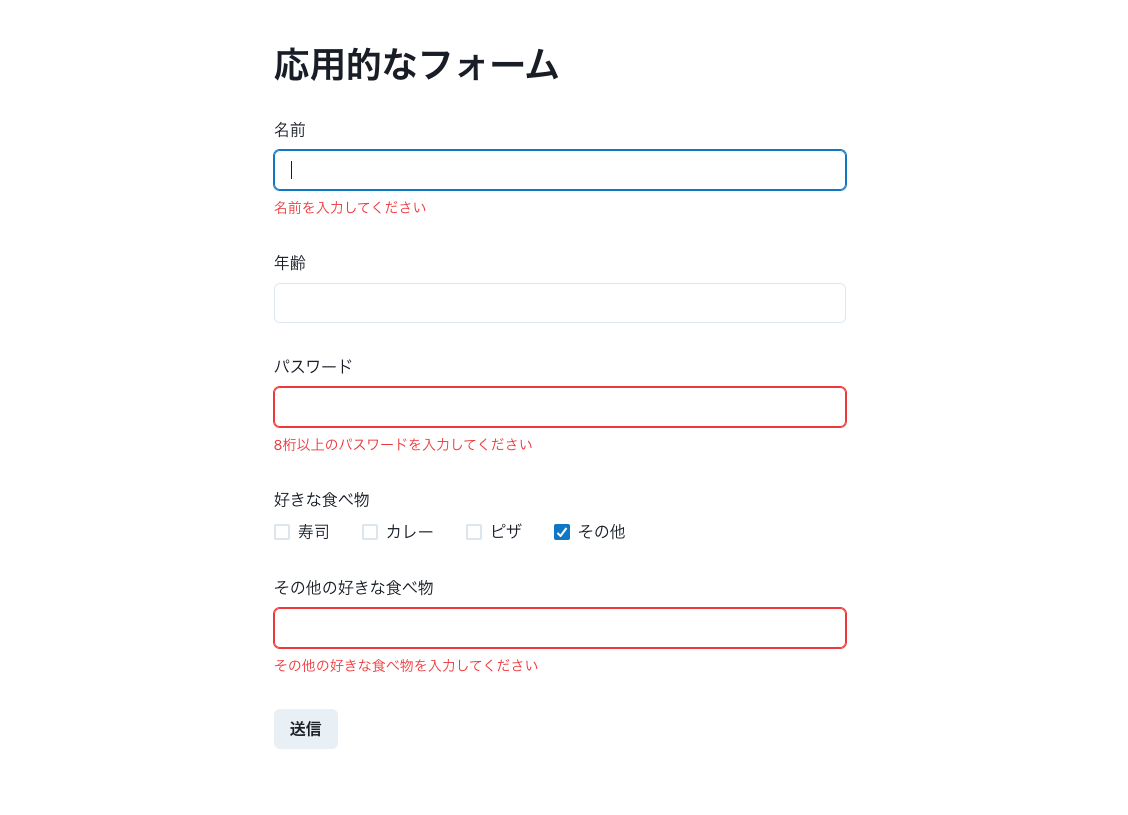
- 仕様
- 「名前」は1文字以上、必須
- 「年齢」は任意
- 「パスワード」は英大文字or英小文字or数字を使って8文字以上、必須、onBlur時にバリデーションチェック
- 「好きな食べ物」はチェックボックス、任意
- 「その他の好きな食べ物」は「その他」がチェックされているときのみ必須
- バリデーションが成功したら入力値を取得できる
- 環境
- Next.js 13.3.4
- react-hook-form 7.43.9
- zod 3.21.4
- chakra-ui 2.6.0
コード例
use-applied-form-top.tsx
import { useForm } from "react-hook-form";
import {
  appliedFormSchema,
  AppliedFormSchemaType,
} from "@/features/applied-form/schema";
import { zodResolver } from "@hookform/resolvers/zod";

export const useAppliedFormTop = () => {
  const {
    register,
    handleSubmit,
    formState: { errors },
    trigger,
    control,
  } = useForm<AppliedFormSchemaType>({
    resolver: zodResolver(appliedFormSchema),
  });

  const onSubmit = (data: AppliedFormSchemaType) => {
    console.log(data);
  };

  return {
    register,
    onSubmit: handleSubmit(onSubmit),
    errors,
    trigger,
    control,
  };
};
-
triggerはバリデーションのタイミングを手動で設定するために使います -
controlは後述するControllerコンポーネントを定義する際に必要です
applied-form-top.tsx
import {
  Container,
  Heading,
  FormControl,
  FormLabel,
  FormErrorMessage,
  Input,
  Button,
  CheckboxGroup,
  Checkbox,
} from "@chakra-ui/react";
import { useAppliedFormTop } from "@/features/applied-form/hooks";
import { Controller } from "react-hook-form";

const foods = [
  {
    id: "sushi",
    label: "寿司",
  },
  {
    id: "curry",
    label: "カレー",
  },
  {
    id: "pizza",
    label: "ピザ",
  },
  {
    id: "other",
    label: "その他",
  },
];

export const AppliedFormTop = () => {
  const { register, onSubmit, errors, trigger, control } = useAppliedFormTop();
  return (
    <Container mt={12}>
      <Heading as={"h2"} mb={8}>
        応用的なフォーム
      </Heading>
      <form onSubmit={onSubmit}>
        <FormControl isInvalid={!!errors.name}>
          <FormLabel htmlFor={"name"}>名前</FormLabel>
          <Input type={"text"} id={"name"} {...register("name")} />
          <FormErrorMessage>
            {errors.name && errors.name.message}
          </FormErrorMessage>
        </FormControl>

        <FormControl mt={8}>
          <FormLabel htmlFor={"age"}>年齢</FormLabel>
          <Input type={"text"} id={"age"} {...register("age")} />
        </FormControl>

        <FormControl isInvalid={!!errors.password} mt={8}>
          <FormLabel htmlFor={"password"}>パスワード</FormLabel>
          <Input
            type={"password"}
            id={"password"}
            {...register("password")}
            onBlur={() => trigger("password")}
          />
          <FormErrorMessage>
            {errors.password && errors.password.message}
          </FormErrorMessage>
        </FormControl>

        <FormControl mt={8}>
          <FormLabel>好きな食べ物</FormLabel>
          <Controller
            name="foods"
            control={control}
            render={({ field }) => {
              return (
                <CheckboxGroup {...field} defaultValue={[]}>
                  {foods.map((food) => {
                    return (
                      <Checkbox key={food.id} value={food.id} mr={8}>
                        {food.label}
                      </Checkbox>
                    );
                  })}
                </CheckboxGroup>
              );
            }}
          />
        </FormControl>

        <FormControl isInvalid={!!errors.other} mt={8}>
          <FormLabel htmlFor={"other"}>その他の好きな食べ物</FormLabel>
          <Input type={"text"} id={"other"} {...register("other")} />
          <FormErrorMessage>
            {errors.other && errors.other.message}
          </FormErrorMessage>
        </FormControl>

        <Button type="submit" mt={8}>
          送信
        </Button>
      </form>
    </Container>
  );
};
-
trigger(名前)とすることで、その入力のバリデーションをチェックできます- 今回はパスワードのinputのonBlur時に実行するようにしています
-
Controllerコンポーネントについて- 外部のライブラリやUIコンポーネントを使用して、フォームを作成、制御する際に使用します
-
nameにはフィールドの名前、controlにはuseFormから受け取ったcontrolオブジェクト、renderにはフォームフィールドを描画するためのコンポーネントを渡します - また、引数の
fieldにはフォームフィールドに関する情報が含まれています
index.ts
import { z } from "zod";

export const appliedFormSchema = z
  .object({
    name: z.string().min(1, { message: "名前を入力してください" }),
    age: z.string().nullable(),
    password: z
      .string()
      .min(8, { message: "8桁以上のパスワードを入力してください" })
      .regex(/^[a-zA-Z0-9]+$/, {
        message: "英大文字、英小文字、数字で入力してください",
      }),
    foods: z.array(z.string()),
    other: z.string().nullable(),
  })
  .refine((data) => !data.foods.includes("other") || !!data.other, {
    message: "その他の好きな食べ物を入力してください",
    path: ["other"],
  });

export type AppliedFormSchemaType = z.infer<typeof appliedFormSchema>;
-
refine()について-
refine()を使うことで独自のバリデーションロジックを設定できます - 第1引数にバリデーション関数を設定し、期待する条件を書きます
- 第2引数にいくつかのオプションを設定します(一部抜粋)
-
message:エラーメッセージ -
path:エラー扱いにするフィールド
-
-
参考記事
採用のお知らせ
株式会社Relicでは、エンジニア・デザイナーを積極的に採用中です。
またRelicでは、地方拠点がありますので、U・Iターンも大歓迎です!🙌
少しでもご興味がある方は、Relic採用サイトからエントリーください!