■ はじめに
今回は、決定木・ランダムフォレスト・勾配ブースティングについてまとめていきます。
【対象とする読者の方】
・3つのモデリングにおける基礎を学びたい、復習したい方
・理論は詳しく分からないが、実装を見てイメージをつけたい方 など
【全体構成】
・モジュールの用意
・データの準備
- 決定木
- ランダムフォレスト
- 勾配ブースティング
■ モジュールの用意
最初に、必要なモジュールをインポートしておきます。
import numpy as np
import pandas as pd
import matplotlib.pyplot as plt
import graphviz
import mglearn

from sklearn.datasets import make_moons
from sklearn.model_selection import train_test_split
from sklearn.tree import DecisionTreeClassifier
from sklearn.ensemble import RandomForestClassifier
from sklearn.ensemble import GradientBoostingClassifier
from sklearn.tree import plot_tree
from sklearn.tree import export_graphviz
## ■ データの準備 make_moon データセットを使用します。
X, y = make_moons(n_samples=100, noise=0.25, random_state=123)

print(X.shape)
print(y.shape)

# (100, 2)
# (100,)
X_train, X_test, y_train, y_test = train_test_split(X, y, test_size = 0.3, random_state = 123)

print(X_train.shape)
print(y_train.shape)
print(X_test.shape)
print(y_train.shape)

# (70, 2)
# (70,)
# (30, 2)
# (70,)
決定木では個々の特徴量は独立に処理され、データの分割はスケールに依存しないため
正規化や標準化は不要となります。
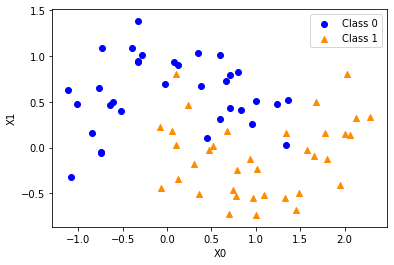
次に、データをプロットして見ておきます。
fig, ax = plt.subplots()

ax.scatter(X_train[y_train == 0, 0], X_train[y_train == 0, 1],
           marker = 'o', c = 'blue', label = 'Class 0')

ax.scatter(X_train[y_train == 1, 0], X_train[y_train == 1, 1],
           marker = '^', c = 'darkorange', label = 'Class 1')

ax.set_xlabel('X0')
ax.set_ylabel('X1')
ax.legend(loc = 'best')

plt.show()
1. 決定木
モデルの作成をします。
tree = DecisionTreeClassifier(max_depth = 3, random_state=0)
tree.fit(X_train, y_train)

'''
DecisionTreeClassifier(ccp_alpha=0.0, class_weight=None, criterion='gini',
                       max_depth=3, max_features=None, max_leaf_nodes=None,
                       min_impurity_decrease=0.0, min_impurity_split=None,
                       min_samples_leaf=1, min_samples_split=2,
                       min_weight_fraction_leaf=0.0, presort='deprecated',
                       random_state=0, splitter='best')

'''
max_depth:木の最大の深さ
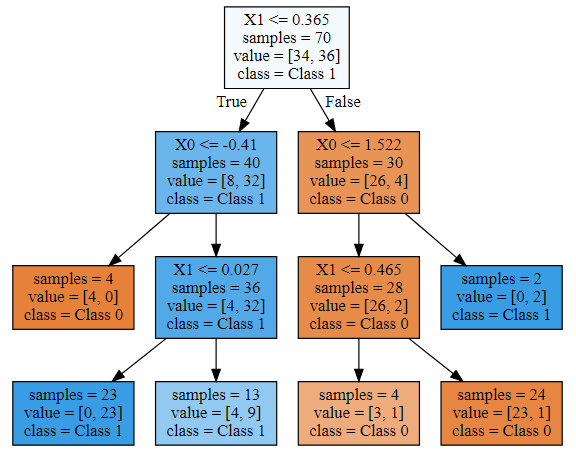
次に、プロットをします。
export_graphviz(tree, out_file="tree.dot", class_names=["Class 0", "Class 1"],
                feature_names=['X0', 'X1'], impurity=False, filled=True)

with open('tree.dot') as f:
    dot_graph = f.read()

graphviz.Source(dot_graph)
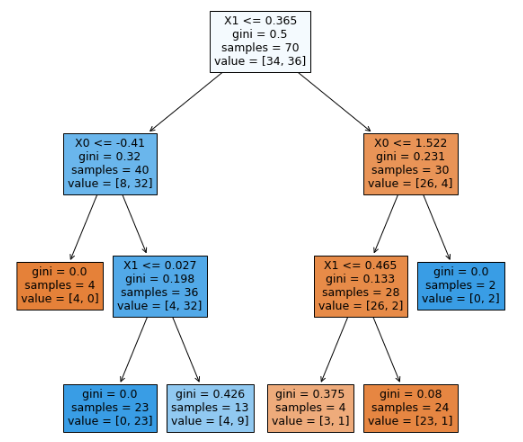
graphvizは、インストールとパスを通す必要があるため
別のプロット方法も、下記に記載しておきます。
fig, ax = plt.subplots(figsize=(10, 10))
plot_tree(tree, feature_names=['X0', 'X1'], filled=True)
plt.show()
モデルの正解率を求めます。
print('Training set score: {:.3f}'.format(tree.score(X_train, y_train)))
print('Test set score: {:.3f}'.format(tree.score(X_test, y_test)))

# Training set score: 0.914
# Test set score: 0.867
Trainingデータの方が高いため、過剰適合している可能性があります。
未知のデータ(Testデータ)に対する正解率(汎化性能)も向上させることが必要です。
2. ランダムフォレスト
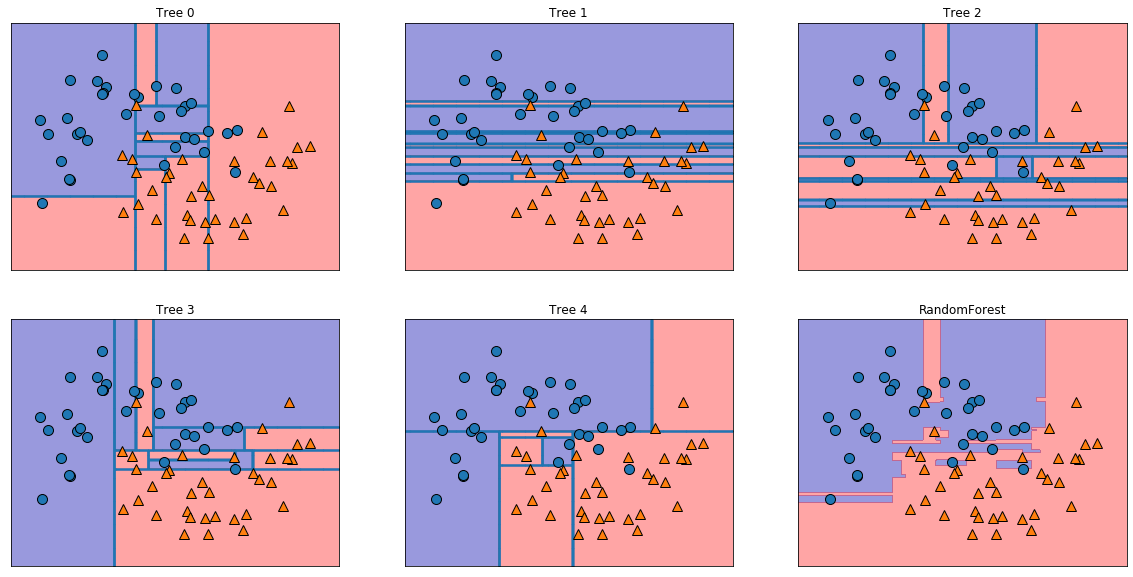
ランダムフォレストは、複数の決定木を用いて分類を行います。
具体的には、それぞれの決定木で異なるデータを用意したり
1個のノードごとに使用する特徴量を変更したりして、複数の異なる決定木を作ります。
最後に、それらの決定木における予測値の平均を取って、最も高かったものを出力します。
forest = RandomForestClassifier(n_estimators=5, random_state=0)
forest.fit(X_train, y_train)

'''
RandomForestClassifier(bootstrap=True, ccp_alpha=0.0, class_weight=None,
                       criterion='gini', max_depth=None, max_features='auto',
                       max_leaf_nodes=None, max_samples=None,
                       min_impurity_decrease=0.0, min_impurity_split=None,
                       min_samples_leaf=1, min_samples_split=2,
                       min_weight_fraction_leaf=0.0, n_estimators=5,
                       n_jobs=None, oob_score=False, random_state=0, verbose=0,
                       warm_start=False)

'''
n_estimators:決定木の個数
モデルをプロットします。
fig, axes = plt.subplots(2, 3, figsize=(20, 10))

for i, (ax, tree) in enumerate(zip(axes.ravel(), forest.estimators_)):
    ax.set_title('Tree {}'.format(i))
    mglearn.plots.plot_tree_partition(X_train, y_train, tree, ax=ax)

mglearn.plots.plot_2d_separator(forest, X_train, fill=True, ax=axes[-1, -1], alpha=.4)
axes[-1, -1].set_title('RandomForest')
mglearn.discrete_scatter(X_train[:, 0], X_train[:, 1], y_train)

5つの異なる決定木と、それらの決定境界を平均したランダムフォレストが確認できます。
print('Training set score: {:.3f}'.format(forest.score(X_train, y_train)))
print('Test set score: {:.3f}'.format(forest.score(X_test, y_test)))

# Training set score: 0.971
# Test set score: 0.900
先ほどの決定木よりも、Testデータに対する正解率(汎化性能)が向上していることが分かります。
3. 勾配ブースティング
ランダムフォレストが複数の決定木における予測値の平均を取って出力するのに対して
勾配ブースティングは、1つ前の決定木の誤りを次の決定木が修正するように、順番に決定木を作ります。
gbrt = GradientBoostingClassifier(random_state=0, max_depth=3, learning_rate=0.01)
gbrt.fit(X_train, y_train)
learning_rate:学習率(個々の決定木が、それまでの決定木の過ちをどれくらい強く補正するかのパラメータ)
print('Training set score: {:.3f}'.format(gbrt.score(X_train, y_train)))
print('Test set score: {:.3f}'.format(gbrt.score(X_test, y_test)))


# Training set score: 0.943
# Test set score: 0.933
決定木単体やランダムフォレストよりも、Testデータに対する正解率(汎化性能)が高くなっています。
結論として、勾配ブースティングはパラメータの影響を受けやすいですが
正しく設定さえできれば、最も性能が良い傾向にあります。
■ 最後に
今回は、決定木・ランダムフォレスト・勾配ブースティングについて比較を行いました。
少しでも多くの方のお役に立ちましたら幸いです。


