はじめに
業務の中でESLintカスタムルールを作る機会があり、備忘録的に記事を作成しました。
この記事は作成したルールを同一リポジトリ内でのみ利用することを想定し、
ルールのプラグイン化・公開は対象外とします。
利用するツール、ライブラリ
- VSCode
- TypeScript
- Jest
各々の設定方法は省略します。
作成の流れ
TypeScriptで記述したカスタムルールは、JavaScriptにトランスパイル後に.eslintrcで読み込む必要があります。
デバッグのたびに「トランスパイル→ESLintサーバーの再起動」はかなり手間ですよね。
そこで、@typescript-eslint/rule-testerを利用してTypeScriptのまま修正⇔テストを行うことで効率よく開発を進めます。
ディレクトリ構成
カスタムルール専用のディレクトリで開発を行います。
rules/srcでルールごとに実装ファイル(index.ts)とテストファイル(index.test.ts)を作成します。
src/index.tsは各ルールファイルを importでひとまとめにし、トランスパイル時の入り口とします。
└── rules
   └── src
       ├── index.ts
       ├── <ルールA>
       │   ├── index.test.ts
       │   └── index.ts
       └── <ルールB>
           ├── index.test.ts
           └── index.ts
カスタムルールを書く
当記事では特定の文字列を含む変数に対して警告を行うルールを作成します。
よく見る2番目の配列で警告する文字を指定できるようにしていきます。
{
  "rules": {
    "local-rules/rule-hogehoge":  ["warn", {"keyword": ["warnText"]}]
  }
}
パッケージインストール
npm i -D @typescript-eslint/rule-tester @typescript-eslint/utils
テストコード
import { RuleTester } from '@typescript-eslint/rule-tester'
import { WarnVariableNames, ruleName } from '.'

const ruleTester = new RuleTester()

const options = [{ keywords: ['trim', 'temp'] }] // 警告対象の文字

ruleTester.run(ruleName, WarnVariableNames, {
  // 正常パターン
  valid: [
    {
      code: `let filteredValue = something.filter(e => e !== 3);
      let filteredValue2 = something.filter(e => e !== 3)
      `,
      options,
    },
    {
      code: `const filteredValue = something.filter(e => e !== 3)`,
      options,
    },
  ],
  // エラーパターン
  invalid: [
    {
      code: `let trimmedValue = something.filter(e => e !== 3)`,
      options,
      errors: [
        {
          messageId: ruleName,
        },
      ],
    },
    {
      code: `const trimmedValue = something.filter(e => e !== 3)`,
      options,
      errors: [
        {
          messageId: ruleName,
        },
      ],
    },
    {
      code: `const tempValue = 300`,
      options,
      errors: [
        {
          messageId: ruleName,
        },
      ],
    },
  ],
})
ルール実装前にテストコードに正常・異常パターンを定義します。
errorsには発生するエラーのmessageIdを指定します。
(後続の実装ファイルからimportする仕組みにしているので、エラーが発生しても一旦無視してください)
本来エラーとする文字列は.eslintrcで定義しますが、テストデータではoptionsをモックデータとして渡しています。
全体的にテスト対象のスタブ(code)と期待結果(errors)が近く、かなり分かりやすいですね!
JSX(React)のカスタムルールテストコードの書き方はこちら
{
  code: `export const Button = () => {
   return this is button;
  };`,
  // このオプションを追加
  parserOptions: {
    ecmaFeatures: {
     jsx: true,
   },
  },
}
ルールの実装
import { ESLintUtils } from '@typescript-eslint/utils'

const createRule = ESLintUtils.RuleCreator(name => name)
export const ruleName = 'unnecessary-variable-names'
export const WarnVariableNames = createRule({
  meta: {
    /**
     * problem・・・エラーのルール
     * suggestion・・・警告のルール
     * layout・・・セミコロン、カンマ、括弧などのルール
     */
    type: 'suggestion',
    // ルール説明文
    docs: {
      description: 'Warn particular keyword included variables',
    },
    // 警告・エラー時に表示するメッセージ
    messages: {
      [ruleName]: 'Please change variable name',
    },
    // .eslintrc定義時に受け取る引数の型を定義
    schema: [
      {
        type: 'object',
        properties: {
          keywords: { type: 'array', items: { type: 'string' } },
        },
        additionalProperties: false,
      },
    ],
  },
  name: ruleName,
  defaultOptions: [{ keywords: [] as string[] }],
  create(context) {
    const keywords = context.options[0].keywords

    return {
      VariableDeclaration(node) {
        let variableName = ''

        if (
          node.declarations.length > 0 &&
          node.declarations[0].id.type === 'Identifier' &&
          node.declarations[0].id.name
        ) {
          variableName = node.declarations[0].id.name
        }
        // `keywords`が変数名に含まれている場合に警告
        if (keywords.some(keyword => variableName.includes(keyword))) {
          context.report({
            node,
            messageId: ruleName,
          })
        }
      },
    }
  },
})
Linterはコードを一度AST(抽象構文木: Abstract Syntax Tree)に変換して、必要な情報を取得取り出しています。
ここではVariableDeclaration(node){}で変数宣言を行っているNodeを取得し、keywordsで指定した文字と一致するか検証しています。
Nodeを取得する関数は、あまりドキュメントが見つからず@typescript-eslint/utilsの型定義とTypeScript AST Viewerからトライ&エラーしながら調べます。
テストの実行
次にテストコードを実行して、意図した動作になっているか確認します。
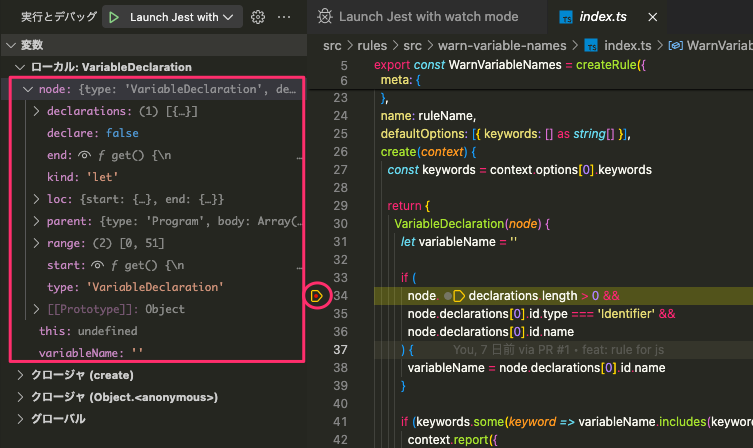
nodeを追いやすいようVSCodeのデバッグ機能を活用していきます。
package.jsonの修正
次回以降もテストがしやすいようpackage.jsonのscriptsにテスト実行スクリプトを追加します。
{
  "scripts": {
    "test:watch": "jest --watch"  // 追加
  }
}
VSCodeのデバッガー利用
VSCodeデバッガーとアタッチしブレークポイントを打てるようにします。
まずは.vscode/launch.jsonを作成し、GUIからデバッグを実行できるようにします。
{
  "version": "0.3.0",
  "configurations": [
    {
      "command": "npm run test:watch",
      "name": "Test with watch mode",
      "request": "launch",
      "type": "node-terminal"
    }
  ]
}
すると、サイドバーの「実行とデバッグ」からテストを起動できます。
テストが通らないときはブレークポイントを活用します。
node周りのエラーはVSCodeでブレークポイントを打ち、デバッガーからプロパティを追ってみてください。

コード全体にルールを適用する
実装したルールをコード全体に適用してみましょう。
パッケージのインストール
npm i -D eslint-plugin-local-rules
ビルド
.eslintrcで呼び出せるようにJavaScriptコードにトランスパイルします。
src/index.tsファイルを追加。
import { WarnVariableNames } from './warn-variable-names'

export default {
  'warn-variable-names': WarnVariableNames,
}
ビルドスクリプトを追加して、npm run build:ruleを実行します。
{
  "scripts": {
    "build:rule": "rm -r -f ./local-rules && tsc rules/src/index.ts --module nodenext --moduleResolution nodenext --outDir local-rules" // 追加
  }
}
.eslintrcで読み込む
{
  "plugins": ['react-refresh', '@typescript-eslint', 'local-rules'],  // 'local-rules'を追加
  {
    "rules": {
      "local-rules/warn-variable-names":  ['warn', {"keyword": ["temp"]}], // 追加 keywordは任意の文字列配列を入力
    }
  }
}
最後にVSCodeのESLintサーバーを再起動(⌘P)
カスタムルールがコード全体に適用され、マウスオーバーで設定したエラーが表示されるようになりました!

カスタムルール作成サンプルリポジトリ

