はじめに
よくある構成として API Gateway × Lambda がありますが,
RDS を使いたいがコネクション問題を解決しにくい場合などで Lambda の採用を見送るケースがあります.
そこで今回, AWS Copilot を使用して API Gateway × Fargate の構成で API サーバを構築します.
なお, ドメインを example.com としている箇所がありますが, お使いのドメインに置き換えてください.
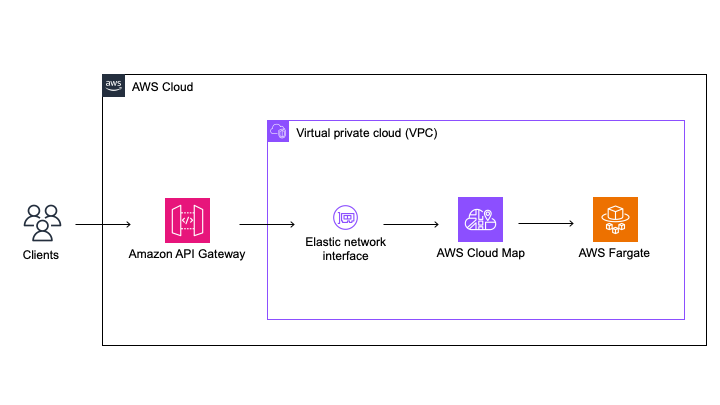
構成図
サンプルコード
全体像
.
├── copilot
│   ├── environments
│   │   └── test
│   │       └── manifest.yml
│   └── services-example-api
│       ├── addons
│       │   ├── addons.parameters.yml
│       │   └── api-gateway.yml
│       └── manifest.yml
└── services
    └── example-api
        ├── src
        │   └── index.ts
        ├── Dockerfile
        ├── package.json
        └── tsconfig.json
copilot
copilot/environments/test/manifest.yml
name: test
type: Environment

observability:
  container_insights: false
copilot/services-example-api/addons/addons.parameters.yml
Parameters:
  DiscoveryServiceArn: !GetAtt DiscoveryService.Arn
copilot/services-example-api/addons/api-gateway.yml
Parameters:
  App:
    Type: String
  Env:
    Type: String
  Name:
    Type: String
  DiscoveryServiceArn:
    Type: String
  HostedZoneId:
    Type: AWS::Route53::HostedZone::Id
    Default: # ホストゾーン ID を指定してください

Mappings:
  test:
    ApiGateway:
      DomainName: example-api-test.example.com
    LogGroup:
      RetentionInDays: 1

Resources:
  VpcLink:
    Type: AWS::ApiGatewayV2::VpcLink
    Properties:
      Name: !Sub ${App}-${Env}-${Name}-VpcLink
      SubnetIds:
        !Split [",", Fn::ImportValue: !Sub "${App}-${Env}-PublicSubnets" ]
      SecurityGroupIds:
        - Fn::ImportValue: !Sub ${App}-${Env}-EnvironmentSecurityGroup

  HttpApi:
    Type: AWS::ApiGatewayV2::Api
    Properties:
      Name: !Sub ${App}-${Env}-${Name}
      ProtocolType: HTTP
      DisableExecuteApiEndpoint: true

  Stage:
    Type: AWS::ApiGatewayV2::Stage
    Properties:
      ApiId: !Ref HttpApi
      StageName: $default
      AutoDeploy: true
      AccessLogSettings:
        DestinationArn: !GetAtt AccessLogGroup.Arn
        Format: '{
                   "request-id": "$context.requestId",
                   "extended-request-id": "$context.extendedRequestId",
                   "ip": "$context.identity.sourceIp",
                   "request-time": "$context.requestTime",
                   "http-method": "$context.httpMethod",
                   "resource-path": "$context.resourcePath",
                   "status": "$context.status",
                   "protocol": "$context.protocol",
                   "response-length": "$context.responseLength"
                 }'

  Integration:
    Type: AWS::ApiGatewayV2::Integration
    Properties:
      ApiId: !Ref HttpApi
      ConnectionId: !Ref VpcLink
      ConnectionType: VPC_LINK
      IntegrationMethod: ANY
      IntegrationType: HTTP_PROXY
      IntegrationUri: !Sub ${DiscoveryServiceArn}
      PayloadFormatVersion: "1.0"

  PreflightRoute:
    Type: AWS::ApiGatewayV2::Route
    Properties:
      ApiId: !Ref HttpApi
      RouteKey: OPTIONS /
      Target: !Join
        - /
        - - integrations
          - !Ref Integration

  PostRoute:
    Type: AWS::ApiGatewayV2::Route
    Properties:
      ApiId: !Ref HttpApi
      RouteKey: POST /
#      API Gateway のオーソライザーに Cognito を使用する場合は下記を参考にしてください
#      AuthorizationType: JWT
#      AuthorizerId: !Ref Authorizer
      Target: !Join
        - /
        - - integrations
          - !Ref Integration

#  API Gateway のオーソライザーに Cognito を使用する場合は下記を参考にしてください
#  Authorizer:
#    Type: AWS::ApiGatewayV2::Authorizer
#    Properties:
#      ApiId: !Ref HttpApi
#      AuthorizerType: JWT
#      IdentitySource:
#        - $request.header.Authorization
#      JwtConfiguration:
#        Audience:
#          - # Cognito ユーザプールのクライアント ID を指定してください
#        Issuer: !Sub
#          - "https://cognito-idp.ap-northeast-1.amazonaws.com/${UserPoolId}"
#          - UserPoolId: # Cognito ユーザプール ID を指定してください
#      Name: !Sub ${App}-${Env}-${Name}-authorizer

  Certificate:
    Type: AWS::CertificateManager::Certificate
    Properties:
      DomainName: !FindInMap [ !Ref Env, ApiGateway, DomainName ]
      DomainValidationOptions:
        - DomainName: !FindInMap [ !Ref Env, ApiGateway, DomainName ]
          HostedZoneId: !Ref HostedZoneId
      ValidationMethod: DNS

  CustomDomainName:
    Type: AWS::ApiGatewayV2::DomainName
    Properties:
      DomainName: !FindInMap [ !Ref Env, ApiGateway, DomainName ]
      DomainNameConfigurations:
        - CertificateArn: !Ref Certificate
          EndpointType: REGIONAL

  ApiMapping:
    Type: AWS::ApiGatewayV2::ApiMapping
    DependsOn: CustomDomainName
    Properties:
      DomainName: !FindInMap [ !Ref Env, ApiGateway, DomainName ]
      ApiId: !Ref HttpApi
      Stage: !Ref Stage

  CustomDomainRecord:
    Type: AWS::Route53::RecordSet
    Properties:
      Name: !Ref CustomDomainName
      Type: A
      HostedZoneId: !Ref HostedZoneId
      AliasTarget:
        DNSName: !GetAtt CustomDomainName.RegionalDomainName
        HostedZoneId: !GetAtt CustomDomainName.RegionalHostedZoneId

  AccessLogGroup:
    Type: AWS::Logs::LogGroup
    Properties:
      LogGroupName: !Sub "/aws/apigateway/${App}-${Env}-${Name}"
      RetentionInDays: !FindInMap [ !Ref Env, LogGroup, RetentionInDays ]
copilot/services-example-api/manifest.yml
name: services-example-api
type: Backend Service

image:
  build: ./services/example-api/Dockerfile
  port: 3000

cpu: 256
memory: 512
count: 1

environments:
  test:
    logging:
      retention: 1
services/example-api
今回は GraphQL で API サーバを実装します.
services/example-api/src/index.ts
import { ApolloServer } from "@apollo/server";
import { startStandaloneServer } from "@apollo/server/standalone";

const typeDefs = `#graphql
type User {
    id: Int
    name: String
}

type Query {
    users: [User]
}
`;

const users = [
    {
        id: 1,
        name: "Alice",
    },
    {
        id: 2,
        name: "Bob",
    },
];

const resolvers = {
    Query: {
        users: () => users,
    }
};

const bootstrap = async() => {
    const server = new ApolloServer({
        typeDefs,
        resolvers,
    });

    const { url } = await startStandaloneServer(server, {
        listen: { port: 3000 },
    });

    console.log(`🚀  Server ready at: ${url}`);
};

bootstrap().catch(console.error);
services/example-api/Dockerfile
FROM node:18-slim AS deps

WORKDIR /app

COPY package.json package-lock.json ./
RUN npm ci


FROM node:18-slim AS builder

WORKDIR /app

COPY . .
COPY --from=deps /app/node_modules ./node_modules

RUN npm run build


FROM node:18-slim AS runner

WORKDIR /app

COPY --from=builder /app/dist/index.js .

EXPOSE 3000

CMD ["index.js"]
services/example-api/package.json
{
  "name": "example-api",
  "version": "1.0.0",
  "description": "",
  "main": "dist/index.js",
  "scripts": {
    "build": "tsc --noEmit && esbuild --platform=node --format=cjs --bundle --minify --outdir=dist src/index.ts",
    "start": "npm run build && node ./dist/index.js"
  },
  "dependencies": {
    "@apollo/server": "^4.7.1",
    "graphql": "^16.6.0"
  },
  "devDependencies": {
    "@types/node": "^20.2.5",
    "esbuild": "^0.17.19",
    "typescript": "^5.0.4"
  }
}
services/example-api/tsconfig.json
{
  "compilerOptions": {
    "rootDirs": ["src"],
    "outDir": "dist",
    "lib": ["es2022"],
    "target": "es2022",
    "module": "commonjs",
    "moduleResolution": "node",
    "esModuleInterop": true,
    "types": ["node"]
  }
}
動作確認
localhost
$ cd services/example-api
$ npm i
$ npm start
$ curl --request POST \
    --header 'content-type: application/json' \
    --url http://localhost:3000/ \
    --data '{"query":"query Users {\n  users {\n    id\n    name\n  }\n}"}'
{"data":{"users":[{"id":1,"name":"Alice"},{"id":2,"name":"Bob"}]}}
example-api-test.example.com
$ copilot init
# 割愛
$ curl --request POST \
    --header 'content-type: application/json' \
    --url 'https://example-api-test.example.com/' \
    --data '{"query":"query Users {\n  users {\n    id\n    name\n  }\n}"}'
{"data":{"users":[{"id":1,"name":"Alice"},{"id":2,"name":"Bob"}]}}
問題なくデプロイできていますね.
最後に
AWS Copilot を使用して API Gateway × Fargate の構成で API サーバを構築しました.
API Gateway のバックエンドとして Lambda の採用が難しい場合の選択肢の一つになれば.
※ 試した後は $ copilot app delete を行ってリソースを削除してください
備考
動作確認環境
$ copilot -v
copilot version: v1.28.0
$ node -v
v18.16.0