terraformを使えばクラウド上のリソースを定義ファイルの状態になるように構築してくれます。
正直terraformでの構築・運用に慣れるとコンソール上でポチポチやっているのが面倒になります。
今回はterraformを使いAWSの環境の構築・運用自動化に入門してみます。
本記事では、以下を掲載します。
1,CentOS7にterraform実行環境インストール
2,コマンド等の説明
3,実際にAWSのVPCをterraformで作成
前提
AWSアカウント作成済み
IAMユーザ、ユーザのアクセスキー・シークレットキー発行済み
1,CentOS7にterraform実行環境インストール
※rootユーザでの作業とします。
実行環境導入
# terraformダウンロード
wget https://releases.hashicorp.com/terraform/0.11.13/terraform_0.11.13_linux_amd64.zip

# terraform配置
unzip ./terraform_0.11.13_linux_amd64.zip -d /usr/local/bin/

# 確認
terraform -v

# terraform用ディレクトリ作成
mkdir terraform
cd terraform
初期設定
クレデンシャル情報を設定するファイルを作成します。
vi terraform.tfvars
※以下記載

aws_access_key = "アクセスキー"
aws_secret_key = "シークレットキー"
アクセスキー・シークレットキーの値の渡し方について
値の渡し方は以下の方法があります。
・Terraformコマンドで値を渡す
$ terraform apply \
-var 'aws_access_key=アクセスキー' \
-var 'aws_secret_key=シークレットキー'
・環境変数で値を渡す
$ export TF_VAR_aws_access_key="アクセスキー"
$ export TF_VAR_aws_secret_key="シークレットキー"
・ファイルで値を渡す
vi terraform.tfvars
※以下記載
aws_access_key = "アクセスキー"
aws_secret_key = "シークレットキー"
Terraformの公式ドキュメントでは、terraform.tfvarsを使う方法が推奨となっています。
2,コマンド等の説明
実際にリソースを作成する前に、簡単にコマンド等の説明をします。
基本コマンド
# 初期化
terraform init

# ドライ・ラン
terraform plan

# 適用
terraform apply

# 削除確認
terraform plan -destroy

# リソース一括削除
terraform destroy
Workspace
Workspaceという概念で、本番/検証/開発など環境を分けたりすることができます。
何も指定しなくてもdefaultというWorkspaceで作業はできます。
# workspace の一覧表示
terraform workspace list

# workspace を選択
terraform workspace select ワークスペース名

# workspace を作成
terraform workspace new ワークスペース名

# workspace を削除
terraform workspace delete ワークスペース名

# workspace を表示
terraform workspace show
3,実際にAWSのVPCをterraformで作成
今回VPC01という名前でVPCを作成し、パブリックサブネットととプライベートサブネットをひとつずつ用意する構成にします。
下記、リソース定義をしますが、リソース設定について簡単に説明します。
リソースはresourceブロックで設定します。resource "<リースの種類>" "<リソース名>" {}という構文です。
リソースの種類は、プロバイダーがAWSの場合はaws_*という名前でTerraformで予め定義されています。
VPCであればaws_vpc、EC2であればaws_instanceです。リソース名は任意の名前を設定可能です
ではmain.tfというファイルを作成します。
vi main.tf
※以下記載

# クレデンシャル変数設定
variable "aws_access_key" {}
variable "aws_secret_key" {}

provider "aws" {
    access_key = "${var.aws_access_key}"
    secret_key = "${var.aws_secret_key}"
    region = "ap-northeast-1"
}

# 以下VPCリソース定義
resource "aws_vpc" "VPC01" {
    cidr_block = "10.0.0.0/16"
    instance_tenancy = "default"
    enable_dns_support = "true"
    enable_dns_hostnames = "false"
    tags {
      Name = "VPC01"
    }
}

resource "aws_internet_gateway" "myGW" {
    vpc_id = "${aws_vpc.VPC01.id}"
}

resource "aws_subnet" "public-a" {
    vpc_id = "${aws_vpc.VPC01.id}"
    cidr_block = "10.0.0.0/24"
    availability_zone = "ap-northeast-1a"
}

resource "aws_subnet" "private-a" {
    vpc_id = "${aws_vpc.VPC01.id}"
    cidr_block = "10.0.1.0/24"
    availability_zone = "ap-northeast-1a"
}

resource "aws_route_table" "public-route" {
    vpc_id = "${aws_vpc.VPC01.id}"
    route {
        cidr_block = "0.0.0.0/0"
        gateway_id = "${aws_internet_gateway.myGW.id}"
    }
}

resource "aws_route_table_association" "pubclic-a" {
    subnet_id = "${aws_subnet.public-a.id}"
    route_table_id = "${aws_route_table.public-route.id}"
}

resource "aws_security_group" "SG01" {
    name = "admin"
    description = "Allow SSH inbound"
    vpc_id = "${aws_vpc.VPC01.id}"
    ingress {
        from_port = 22
        to_port = 22
        protocol = "tcp"
        cidr_blocks = ["X.X.X.X/XX"] # SSHをアクセスしたいネットワークを指定。
    }
    egress {
        from_port = 0
        to_port = 0
        protocol = "-1"
        cidr_blocks = ["0.0.0.0/0"]
    }
}
リソースブロックの中の設定項目は、VPCであればcidr_blockやinstance_tenancy等を記述しています。
AWSリソースで設定する項目についてはProvider: AWS - Terraform by HashiCorp
より参照できます。
では定義したリソースを適用していきます。
初期化
# terraform init
※ Terraform has been successfully initialized! と表示される。
ドライラン
# terraform plan
※以下表示される。

Refreshing Terraform state in-memory prior to plan...
The refreshed state will be used to calculate this plan, but will not be
persisted to local or remote state storage.


------------------------------------------------------------------------

An execution plan has been generated and is shown below.
Resource actions are indicated with the following symbols:
  + create

Terraform will perform the following actions:

  + aws_internet_gateway.myGW
      id:                                          <computed>
      owner_id:                                    <computed>
      vpc_id:                                      "${aws_vpc.VPC01.id}"

…以下省略

Plan: 7 to add, 0 to change, 0 to destroy.
「+」マークが付いているのが新規に作成されるリソースです。また最終行に作成、変更、削除されるリソース数が表示されます
terraform planを実行すると、リソースの状態を表すterraform.tfstateという名前のJSONファイルが生成されます。
リソース作成
# terraform apply
※以下表示される。

An execution plan has been generated and is shown below.
Resource actions are indicated with the following symbols:
  + create

Terraform will perform the following actions:

Do you want to perform these actions?
  Terraform will perform the actions described above.
  Only 'yes' will be accepted to approve.

 Enter a value: 確認されるので"yes"と入力する

…以下省略

 Apply complete! Resources: 7 added, 0 changed, 0 destroyed.
リソースを変更したい場合はmain.tfの内容を修正し、再度terraform applyをするだけです。
リソースを削除したい場合は、terraform plan -destroyで削除のドライラン、terraform destroyでリソース一括削除ができます。
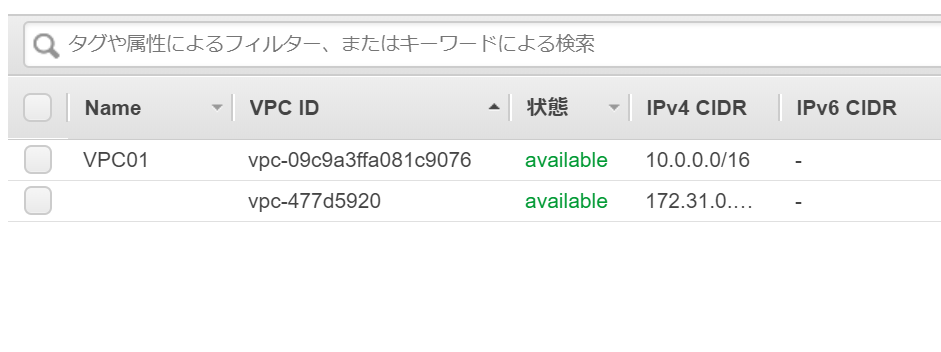
実際にコンソール上で確認してみるとVPCが作成されています。

tfファイルの分割について
これまで1つのテンプレートファイル(main.tf)にまとめてリソース定義しましたが、
Terraformは拡張子が*.tfのファイルを自動的にテンプレートとして認識してくれるので、
テンプレートファイルを複数に分割することも可能です。
クレデンシャルはvariables.tf、VPCはvpc.tf、S3はs3.tfなど分けて管理してもよいと思います。
Gitにサンプルを用意してあります。
https://github.com/y-araki-git/terraform-aws-sample
Terraformを実行する際に気をつけるべきこと
例えばTerraformを使いリソース管理をする場合、Terraformで構築した後に、他の誰かがコンソール上から手作業でリソース作成したとします。
それに気づかずTerraformでまた構築実行した場合、手作業で作成したリソースを上書きして消してしまう可能性もあります。
チームでTerraformを利用する場合は、方針をしっかり決めて運用すべだと思います。